
 Member
Hello everyone! Instead of making multiple threads with updates to the car I figured I'd put them all in here and make a running journal of sorts. Before I get to the nitty gritty, I'd like to share a little bit about my story with this car:
In early 2009 I discovered that it was possible to bring in Japanese cars to Canada as long as they were 15 years old or older. Low and behold, it just so turned out that 1994 M3s were now eligible to be imported as of 2009!
After some research, It was clear to me that these cars were a gamble. They came with little (if any) history and there was the possibility that the odometer will have been rolled back (this is legal in Japan). Not to mention, you could not view the car until it was already on our shores and so had no idea how it really looked or drove.
I lamented for 1 year.
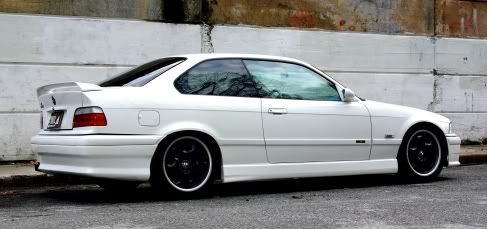
Enter December 2009, when I found a clean M3 being imported by a local company with 188K kms and no accidents (a sign that it had never had its odometer rolled back) and, in AVUS BLUE, my favourite colour.
Finaly, I was ready, I gathered some (surprisingly unreluctant) friends and made the 300km trip to view the car.
Upon arrival at the dealer, this is what my friends and I found:
The paint was relatively flawless for a 15 year old car, the only marks being a couple clear coat blemishes similar to this one:
In the trunk there was a DVD player and a separate DVD player for Navigation CD's (these were sold):
The Pilot Sport 2's were on their last legs:
The interior was a whole new set of problems.
The door cards were either improperly reupholstered or had come apart in the last 15 years:
The glove compartment clips were obviously tron:
Rear window seals were coming apart:
Passenger rear door card held in by wood-screws:
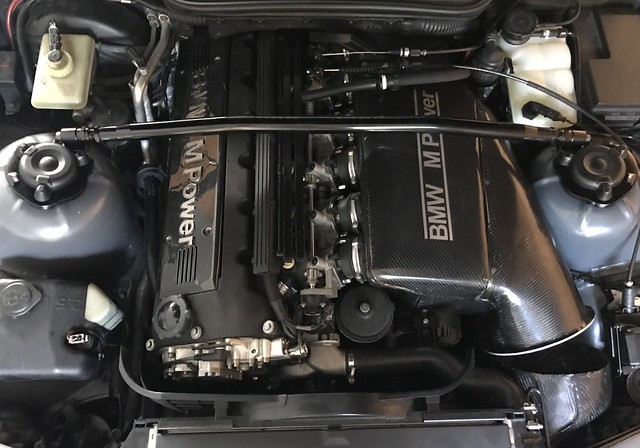
The engine looked clean given its age and origin:
The only issue being the coil pack which, for some reason was bolted on top of the vavle cover using the factory valve cover bolt holes.
A carbon fiber induction system complete with heat sheild. Not sure if I'm completely sold on it:
Chassis comes complete with Bilstien Sport Shocks and THICK antiroll bars front and rear (later measured to be 29mm front and 24mm rear).
So, needless to say, I was feeling a little defeated. But then they offered to let us test drive it
Upon driving the car the only niggle we found was the tie rods were finished and the brakes were on their way out. In the end, I put a deposit on the car and agreed to pick it up after Christmas despite all the things that were wrong with it. My will power was just no match for an M3's charm
When I finally went to bring the car home, I was apprehensive. The car had to go through a BC inspection before I could pick it up and many issues that I had seen with the car had been remedied (if only temporarily). The following had been done to the car during the inspection:
-rear brade disks
-New rear tires
-New D/S tie rod
as well as some extras that needed doing for the car to conform with BC regulations (ie. daytime running lights and a third brake light.
I was apprehensive because the car would have to travel 300 km before it was safely in my driveway, and I had no idea how the car would respond to such a long drive. :?
So how did it do?
It was scary.
The car would swerve under hard acceleration and over bumps. It was a little better thanks to the new tie rods but obviously something esle was wrong with the suspension because the problem was still very much present. The root of the issue was eventually found out and will be discussed later on.
Fast forward all of 3 days and this was the view from my driveway:
I immediately starting ripping through the interior, cleaning and removing anything I didn't like.
The underside of the rear bench revealed crums from Japanese coffee cakes:
Removing the center console found me 11 Yen richer!! (At least, thats what I think these coins are)
Original DS1 spare tire looked like it had been used once before. It was cleaned and re-stored in the trunk:
The Canadian government saw it fit to install a third brake light that consisted of a string of LEDs. These are now gone.
I had a technician at work go over the car thouroughly (he is an E36 fanatic so no coaxing was needed). Here's what he found:
- a bent control rod
- trashed rear control arm bushings
- an exhaust leak at the headers
Overall, the technician was impressed with the car and with the balls it took to follow through with buying a car I knew nothing about. I then carried out the work I had come to do:
Engine oil - 7 L of 10w40
Diff oil - premium BMW product
Transmission oil - BMW ATF
Coolant flush - BMW "blue" coolant
and a new washer pump
Later that night a few friends/coworkers and I went for a drive:
And a few more:

Member
Update: January 25th, 2010
After sending the car to a reputed local shop with the intention to get the following fixed:
- new rear control arm
- new rear trailing arm bushings
- vavle adjustment
- exhaust header leak
- new clutch
- new spark plugs
- new fuel filter
- new E46 M3 transmission mounts
not 4 hours after I dropped the car off, I received a phone call from the owner of the shop saying they had found some rather disappointing issues with the chassis. Here are the foreboding images:
What you're looking at is essentially a subframe that has torn itself from its mount.
Apprently a common problem on these cars at this point in their life, the front subframe gets rotten in its old age and, if continuously driven hard, will rip from the engine mounts. The solution? A subframe reinforcement kit from Turner Motorsport.
The shop was kind enough to provide pictures of the work in progress:
Subframe off of the car:
Reinforcement kit welded in and coated in corrosion protectant:
Unfortunately no pictures were taken of the exhaust header fix, but here are some of the crack:
You can see the carbon "spray" all over the heat insulation and transmission.
Upon doing the valve adjustment, the shop found a few striped valve cover bolts similar to this one:
And one of the associated holes:
Needless to say, the bolts were fixed and their holes re-threaded.
Now for the big one.
My clutch was beyond gone. Up hills and under hard acceleration the car was slipping quite noticeably and the soonest my dealer could ship me in a new one was 2 weeks! I just couldn't wait this long so I called the shop I eventually took the car to and to my utter joy they had a new one in stock! When I asked the manager how much they were selling the clutch for he replied that it was part of a clutch kit complete with a lightweight flywheel.
The flywheel in question was 11 lbs, 15 lbs lighter than stock. Knowing full well the pros and cons of fitting a lightweight flywheel, I told him this was acceptable and promptly booked the car in for what was sure to be a very expensive service.
Without disclosing the resulting invoice amount, I can say that the hole in my bank account was worth it!
And the acceleration? Suffice it to say that a mad dash to the redline in second gave my friend some nasty whiplash in the morningThe new flywheel does rattle a little as I thought it would, but it's not nearly as bad as some horror stories make it out to be (and it goes away once the clutch is depressed and is not even noticeable under normal driving conditions). The shop told me however, that the exhaust header section that they welded in also rattles, so I can pass one off as the other if I so choose.
That night some friends and I took the car for a small photoshoot in Vancouver. Here are the fruits of our labour:

Member
Update: March 9th, 2010
I finally got around to installing my factory headlights that were brought in from the UK. I don't have pictures of the install, but suffice to say the engine bay has been severely cleaned up. The previous Hella headlights had wires running everywhere around the front of the engine bay: the HID ballasts were mounted on the engine struts and looked unsightly, there was a dealer installed daytime-running-light module stuck in there, and wires running everywhere from the fuse box to get the angle eyes working.
With the factory headlights, all of this is gone (including, sadly, the HIDs, which were integrated into the Hella headlight assembly).
Anyway, after the install was over, I made a point of taking some pictures in my local parking garage:
On another note, I picked up some parts from my work on the weekend (basically, I got paid to buy myself car parts
One of the items I picked up was a brand new Euro M3 Owners Manual:
The other items consisted of:
E46 M3 rear top mounts
Z3 top mount reinforcement plates
And a new radiator (my current one suffers from the dreaded upper rad hose mount crack).
I also installed a center console arm rest from a 1997 M3.
Helpful.
BMW CCA Member
Member
Update: March 23rd, 2010
At this point I've gone overboard. Not a week had gone by that I hadn't had some part on order, or a pending date at the local shop, or a planned "driveway-shop meet."
Most recently, I've had a fan delete done. This wasn't necesarily done for any sort of performance gain. In fact, truth be told, I haven't noticed a huge gain in performance but rather an increased urgency throughout the rev range. but even that was only just noticeable.
Instead I chose to do this common engine mod to free up some space at the front of the engine bay. This way, I might be able to get my hands in there to change the belts without taking out the rad and fan shroud, saving me money in the long run.
Well, I guess the shop that performed the mod didn't tighten my upper rad hose well enough, because not too soon after I had gotten out into open roads had it popped off the rad again, spewing coolant everywhere and sending the engine temp needle on a nice little journey towards the red. I soon pulled over and parked it while i frantically searched for a nearby hose, waterfountain or gas station. None were present.
Luckily, a nearby conveniant store had 1L bottles of watter.
I'd like to say the look on the cashier's face when I brought 5L of water to the counter was worth my money, but it wasn't.
But what I got in the mail certainly was! A slightly used glovebox out of a '97 M3, fresh from Ontario. Looking back at the pictures of the car when I first picked it up, you can see how rough the original glovebox was.
As soon as my new stereo was in place, I drilled a little hole in the back of the blovebox for the iPod cable to slip through and I was golden! It was the first time I had heard actual music in my car since I had bought it. Some pictures of the result (excuse the finger-gunk on the headunit):
Some pictures of the iPod cable in the glovebox:
Also got some bad shots of the new armrest:
I also got around to doing a quick spray of the muffler on the weekend. No need to take it off, just mask around where you don't want paint to go:
As you can see, it was looking its age.
But after a lick of black hi-temp paint, all was looking new:
And an ode to spring:
In some totally unrelated news, my friend bought his first BMW, a 1988 325iS, black on cardinal red leather. On the way home from picking it up with him, a buddy got a great pic of the M3 in a tunnel:

Member
Looks like a great bit of work man, but it looks awesome! Congrats
OEM Member
I'm excited to see where this goes.. Also, why didn't you put the ipod wire through the cubby hole?
98 5MT Hellrot 328i SOLD
05 5AT Jet Black 330ci ZHP CURRENT
Member
Update: April 13th, 2010
Finally managed to repalce the rear top mounts with my E46 M3 items. These were getting very bad, to the point were I was avoiding particularily fun stretches of road for fear of them popping through the rear shock towers. They would continually knock about during cornering and every once in a while an audible "SNAP" could be heard if the windows were down.
I also got a chance to finally fix the coil pack issue. Some pictures during:
As I was putting each coil pack into its respective spot, I couldn't help but wonder why anyone would want this sort of setup...
While I had the coil pack cover off, a friend thought it would be funny to throw it on his 325iS:
While I had the strut brace off I thought I'd paint it satin black (in high-temp paint nonetheless).
In the end, this is what I got:
Looking much tidier now to satisfy the OCD in me
Now the only problem is, I've scuffed up the valve cover so much that it needs a respray now more than ever")
Member
Thanks for the comments so far guys. I'm just stepping through and updating this until the present day. It's amazing how much this car has changed since I initially picked it up!
I didn't want any wires visible from the cabin, nor did I want to have to unplug my iPod every time I leave the car. I figured inside the glovebox would be just fine, although the convenience of having it right beside me would have been nice.Originally Posted by lilcdkey

Member
Udpate: May 10th, 2010
I finally replace my old radiator, which by this point had caused me to overheat on the corner of Vancouver's worst intersection as well as during many a spirited drive.
At the same time, I got around to changing the oil with 7L of Royal Purple 15W40, a fantastic oil if I say so myself.
With the rad out, it was also a lot easier to get the belts changed as well.
I also managed to fit an Mtech II steering wheel. An easy job with great results! Anyone with the "bus driver" 4 spoke wheel should really consider this as it brings the M3's interior to the level it should have been from the factory:
I'll also throw in these for fun:
And a couple others from a while back:
Some of the pictures only go to show me how badly I need to treat the paintwork to a good detail
Member
Update: July 5th, 2010
And so began my long and arduous wheel refurb. I picked up a set of ACS Type I 3 piece wheels locally with the intention of building them up. Unfortunately, what they really needed was a refurb. I performed and documented the refurb in stages. The first step was to get the wheels in pieces (I figured I could do the refurb with the lips and barrels in one piece, which turned out to be a bad idea because 3 of the 4 wheels leaked air in the end).
The first couple of days was prepping and polishing the lips, and prepping the centers.
Supplies used were:
-100, 220, 400, 1000, and 2000 grit sandpaper
-aerospace stripper
-Meguiars metal polish
-Mother's polishing ball on a drill
An odd way to start the process maybe, but the first thing I did after taking the wheels apart was drop the nuts into a can of vinager.
Now I've never done this sort of thing before, so for me it was a massive leap of faith when I decided to take apart my wheels and refurbish them myself. Here's a few detailed ones of the lips before I even touched them:
All washed up:
I found a place fairly local that I can take my centers to and have a go at sandblasting them myself (which I'd also never done before). Here are the results:
I was amazed at how enjoyable it was to literally peal back the time beneath the thick layers of paint and primer. Blasting revealed some dents that had been filled previously, but I simply refilled them again and smoothed it over.
Next I set about lathering the lips in aerospace striper to take off all the clearcoat:
I was surprised to see hardly any clearcoat come off the wheels! Which I guess explains how they became so oxidized and tarnished over the years.
Now with the lips ready to be sanded I took a moment to pause and really think about what I was doing. Even after the countless DIY's I had read and going over it in my mind, I still couldn't really fathom how this would turn out, so I took the grubbiest, most oxidized wheel I had and started with that one.
I started out with this:
After a couple rounds of 100, 120, and 400 grit:
I then finished the lip off with 1000 and 2000 grit before polishing, at which point I seriously doubted any of my efforts would pull through.
For polishing I used a meathod I had read about on a Chevy forum. The first step was to lather the lip in polish (I used Meguiars Metal Polish):
The next step (and yes I am serious), was to dust the lip in white flour:
Now I began polishing with my Mother's mag and wheel polishing ball, going in circles around the lip. Result? I was in shock:
A quick wash to take off any residue and I actually burst out laughing:
I brought an untouched wheel next to it for comparrison:
I was sold! I immediately set about sanding down the remaining lips and following the same procedure as before. The rest of the wheels had some BAD road rash, bad enough that I had considered getting new lips. Here's an example:
So, armed with my newfound courage, I took a dremmel to it:
I repeated with the dremmel on each wheel until my ear's bled and my neighbors closed their windows
The next step was to sand the rough patches down to smooth out the dremmel work:
To this:
And this:
To this:
So with the wost behind me I decided to take a moment to appreciate what I had done before I began polishing again. Here is one of the rears going through the same process as before:
Polish applied:
Flour applied:
After polishing, I was feeling high and mighty again! Remember those baddly curbed and dremmeled parts?
Stage 1 done:

Member
Update: July 23rd, 2010
Wheel Refinishing stage 2: Paint
I began by using quick, light passes on the back of one of the centers:
I liked what I saw, so I began spraying the other 3 centers, front and back:
Before
After
Any imperfections were left to dry before being sanded over and then resprayed:
And a final few coats:
In total, I think I put on approximately 5 to 7 coats of paint. This is curently being followed by approximately 7 to 10 coats of clearcoat (or until the surface of the center is smooth).
In between each coat of clear, I wait for the surface to dry before I wetsand with 1000 and 2000 grit sandpaper. This effectively removes any major surface imperfections and allows the clearcoat to do a better job of filling in the microscopic gaps on the surface of the wheel.
I chose not to clearcoat the polished lips. The pros are that I won't have to polish the wheels every once in a while. The cons are that it will most likely deminish the super mirror-like finish I currently have on them.
The whole time I had been soaking the wheel nuts in a small jar of vinager, which after about a week, looked like primordial ooze:
The idea here was to clean off any rust and loctite that had been sitting in the threads. Well, after removing the nuts and giving them a rinse, it looked like my idea had worked... for a split second. As soon as I rinsed the nuts off, they began to rust.
Next to replacing all 160 nuts, my best solution was to clean off all of the flaking rust and coat the nuts in a rust-proof paint to conceal the rust:
Now, enough about the wheels. I've been up to a few smaller jobs on the car recently, mostly things that I wanted fixed when I first bought the car. One such job, was to remove the tint. Please forgive me for not taking too many pictures of the process, as once I got into it I got very stuck in and couldn't stop.
It's a simple process really, and I'll write out what I did for those who wish to do the same:
1. Remove the rear quarter windows
2. Remove the c pilars
3. Remove the parcel shelf
4. Cover the exteror of each tinted window with water or windex (note, use household glass cleaner and not automotive glass cleaner, as the latter doesn't contain ammonia, which is the active ingredient in removing the tint).
5. Wrap the wetted surface in a black garbage bag and let sit for 20 min
6. Choose a corner to start picking at until you can begin to peel off the tint in one peice. If it's hot enough outside, the tint should come off pretty easily.
7. Remove any stubborn layers of tint by soaking it in windex and scrubbing with a blade or abbrassive material.
8. Use goof-off or some sort of adhesive remover to get the remaining glue off of the windows
9. Wipe down with windex to clean
10. Admire your new look
All in all, I probably spent about 2 to 3 hours on this job before moving on to my next job of replacing all the rubber trim around the windows, including the rear quarters, rear windscreen, and front windows. I didn't do the front windscreen because I reckon it had been replaced previously and was still in fairly decent condition. Here are the pictures of the process:
The grubby old seals, some fo the worst I've ever seen:
Dad's M3 int eh background (now gone):
Parcel shelf out. This is going to be re-dyed before it is put back in:
Underneath the old seals lies a dirty filth:
Cleaned up:
Front seals replaced:
Old vs. New (new on left):
New rear quater rubbers put in:
While all the seals were off, I decided to respray the long piece of trim above the windows as a temporary measure. The results were pretty good, so I'm pretty content with leaving them on:
Sanding:
Painted:
I also replaced the upper door handle trim, as every time I went to open the door I cringed at the state of the rubber gasket. I used a DIY guide that can be found here. Here are the pictures of my process with the door trim:
Old:
The tool I used was a tool shelf hook that I bent into a sharper angle at the end:
Old trim off:
The rubber seal was so degraded that it crumbled to bits as soon as the trim was off!
Now I knew the lower handle would appear faded next to the new upper trim, so I tested a few revitalization methods on the old upper trims and chose the one I thought matched up best with the new OEM finish:
The top trim is obviously the new one, on the middle I used black spray paint on half and mother's back to black on the other half, and on the bottom trim I used Trim Black (a sort of self-etching black paint).
A closer look:

The picutres make it hard to tell, but I'd rank them as follows (with 1 being the best and closest to OEM finish and 3 being the worst):
1. Mothers back to black (although this is more of a temporary solution)
2. Trim black
3. Spray paint
I had run out of trim black so it settled for the temporary fix of the back to black. After 3 car washes it still lookes factory fresh:
Quite impressed with the results!
carles.buzz
Wow! Awesome car... I noticed you didn't mention how pumped you were that the car came with acs type 3's... what they aren't good enough for you
Keep up the good work.
Member
Wow you have definitely put A LOT of money into this. looks great though. Was it worth it?
Member
Impressive work on the ACS wheels, cant wait to see how they come out!
PM/email me for some of the cleanest and safest redrills money can buy.
info@ewheelworks.com
I can also powder coat, polish, and plate for a very competitive price.
ewheelworks.com
Member
lol I was scrolling down the pics and saw the lips being refinished and I was like "if these are acs type 1's I'm going to kill myself!" sweet ride and excellent wheel choice
Member
Update: July 29th, 2010
With the cr's interior resting in various locations around the garage, it was time to get everything back together (especially with a little sorrage space needed for a new addition
Now unlike most people, I didn't want to use rattle cans on the shelf because I wanted to retain the texture of the fabric (I don't know why, as it's not like I'm constantly urged to touch it
I could have bought ready-made dye, but I didn't know what the consistency and concentration would be like so I went with powedered dye. The box read use one package per 500mL so what did I do? I mixed it in with 250mL instead for added darkness
I started with this:
And began lathering the dye on (be sure to wear latex gloves or you'll look like a leper!)
Here was my applicator:
Note the contrast in colour:
Job done:
Turns out 250mL was just enough!
Second on my list of things to do was fit some new goodies!
Picked up some boxes from work, fresh from Germany:
Plastic laminate still on them, mmm...
Old ones out and cleaned:
Half 'n half:
Repeaters:
The corners were a bit of a hassle, as the government saw it fit to install an additional set of bulbs in them:
These bulbs lit up when the light switch was turned to "corners only" and came on in conjunction with the city lights. After the bulbs were removed only the city lights come on when the switch is set to this position, which I don't mind at all.
Job done:
Unfortunately, the headlights that I picked up from the UK are missing a tab for the corners on the driver's side, and so whilst on the highway one day I lost one of my new clear corners. So the ambers were refitted. Coincidentally, I picked up my clear corners off the guy who bought my old car, so I have parts off my old car on my new car!
And fianlly, the aforementioned new addition to the garage:
For some reason all the wheels I buy are in need of some TLC but be in no doubt, they are genuine OZ Mitos. The specs are as follows:
Fronts: 17x8j ET36
Rears: 17x8j ET37
These will remain tucked away until they undergo their planned surgery.
Member
Very impressed! Can't wait to see more, this is inspiring me to start one of these for my car.
Member
Thanks for the kind words guys. Hopefully people can learn from my work/mistakes and at the very least appreciate the hard work
I was really amped about it. It was actually one of the many reasons I bought the car (just not a huge fan of DS1's, although I still like them).
Last edited by 3MPowered; 03-31-2011 at 06:30 PM.
Member
I have only put money into labour for the car if it's something I either don't have time to do myself or don't have the tools to do it myslef. As for parts, a discount on OEM parts helps, but it all adds up really fast
Is it worth it? Absolutey
Member
BMW CCA Member
I applaud you sir.
Member
really good work
Ambition before adhesion
cool car but why didn't you just buy one of the 1994 m3 that were already imported into canada?
Member
Update: August 12th, 2010
Finally finished my first ever 3-piece wheel refurb! Here's how I finished off:
Last update showed the wheels painted and cleared. Next to prep, I'd say clearcoat is the most important stage of painting. After having painted the centers they were very rough (a grazing of the hand would leave flecks of silver on your skin) and very, very silvery (almost too silvery). My general process for clearcoat went like this for both the front and rear of the centers:
1. Three coats of clear
2. Wetsand entire surface
3. Three coats of clear
4. Wetsand
5. Two coats of clear and a third light dusting of clear
Each step was at least 15 minutes apart, which was more than enough considering the hot weather at the time. It may be obvious, but make sure the wheel is completely dry between wetsanding and the next coat of clear, otherwise you botch the finnish!
Next came the most tedious part (yes, ever more than sanding down all the lips!). The bolts. Most of them weren't too bad, with only minimal corrosion or oxidation on them, but then there was also the old loctite to peal off too.
To do the bolts I first used a dremmel with a wire brush attachemnt to clean away the bolts (including the threads):
Before:
After:
Next came a hit of polish:
My polishing tools:
Shiny and protected
Repeat 160 times...
After the bolts were done, I looked and around and realized: there was nothing left to do!So it came time to put the wheels back together and hope for the best!
Front:
Back (notice the painted nuts
Before anyone says anything, no I have not touched the center caps so they are a slightly different hue of silver than the rest of the wheel. This is to be fixed at a later date, but for now I think it looks fine.
The Hiccup: I went to get the PS2's fitted to the wheels and was told the sealant that was previously put on the wheels is no longer any good (kind of defeated the purpose of keeping the lips and barrels in one piece during the build). So I didn't get the wheels fitted and with a roadtrip scheduled the following week it meant crunch time! I worked frantically to get some good beads of silicone on the wheels and realized something...
Yes, that's right, I'm missing 1 bloody bolt! I pass it off as being done on and hope it catches on as a trend
On a side note, I replaced the front wiper cover as the old one was not in tune with the rest of the fresh rubbers I had put on the car.
During:
Old and new:
(Forgot to take an after picture)
Member
I get asked this a lot and the answer always remains the same: Genuine Canadian Euro M3s fetch obscene amounts of money (usually between $20K and $30K). And that's if you can find one for sale locally.
I figured I could pay a fraction of that and spend the rest of my money on bringing it back to life, which evidently I needed to do anyway.
There really isn't a difference between Euro M3s and Canadian Euro M3s aside from the fact that the Canadian M3s got a numbered plaque (similar to the M3 GT) in the glovebox. That being said, the exclusivity would have been nice
 Posting Permissions


 Reply With Quote


Bookmarks