
 DIY monkey
Spurred on by recent DIY threads and the lure of increased performance for my OBDI M3, I decided to put together my own 3.5" intake. Just wanted to let you guys see the results so far by making a vanity post.
I'm not going to make a DIY out of this, but I'll list the parts and tools I used in case anyone is curious.
Parts
- 3.5" 540i HFM (same as Euro) - $140 from the forums
- Turner Motorsport 413+HFM chip - $100 from the forums
- 9" long S&B filter with inverted code and 3.5" neck - $35 from eBay
- 3.5" aluminum tube with 45* mandrel bend - $20 from eBay/forums
- 3.5"-to-3" silicone reducer with 90* bend - $20 from siliconeintakes.com
- 3.5" silicone coupler - $7 from atpturbo.com
- 3/4" heater hose - $3 from AutoZone
- hose clamps - $5 from various
- adhesive/sealant/glue - $5 from AutoZone
So that's about $335 and some of your time. Compare that with $880 from ECIS or $1000 from TMS/JC; neither include a smooth transition elbow, but they do come with a heat shields. I don't have a heat shield yet.
Tools
- X-acto or hobby knife for best results
- hack saw or circular saw
- sand paper or Dremel for smoothing/deburring
- latex or nitrile gloves
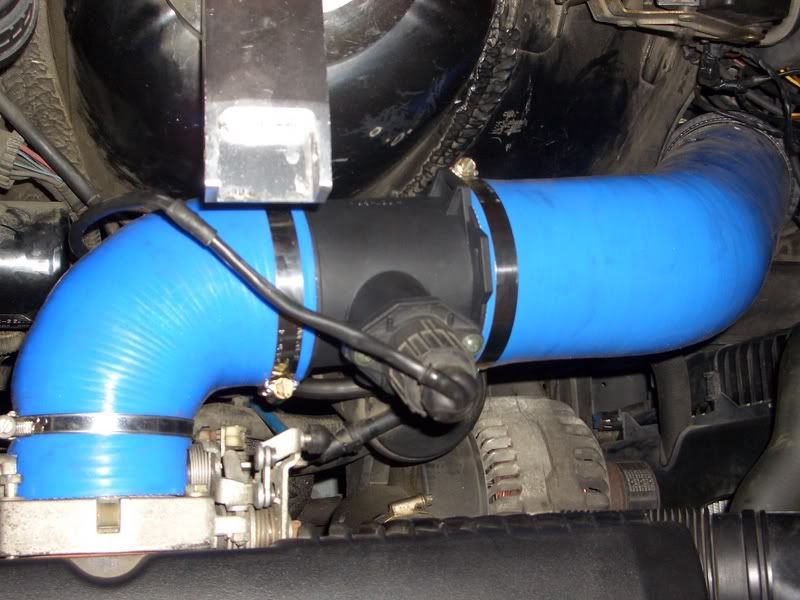
Smooth Intake Elbow
The elbow is a 3-layer 3.5"-to-3" silicone transition, with the 3" side trimmed a bit for clearance against the strut tower on the 3.5" side. The ports for the vacuum lines are 3/4" rubber heater hose, cut just long enough so that neither port has anything sticking into the cavity of elbow when the vacuum lines are attached. The silver markings on the hose were from a silver Sharpie marker I when cutting the elbow.
I used a layer of two-part epoxy between the elbow and the hoses, followed up with an outer skin of oil- and fuel-resistant sealant over the epoxy. After I put everything together, I realized that the epoxy I used is for a different kind of material; even after 24 hours of curing, it felt a smidge soft (but maybe I just didn't use the right mix of adhesive and hardener). The sealant dries rock hard, so, hopefully, it helps makes up for the epoxy choice. It's lasted more than a week so far!


Air Filter
I choose the biggest filter I could find. Why? Because I can! The price difference between this and a normal sized filter wasn't that big, so jumped in head first.
In all seriousness, it's likely a lot more filter than I'll ever need. It's 9" long with an inverted cone at the top. Once installed, there's a little bit of clearance around it, but not much. I don't personally know how big ZKW headlights are, but I'm guessing they won't play nice with this filter.
As far as I can tell, ECIS sells S&B filter cleaners, so I figured S&B filters should be decent. I plan to supplement the filter with a water repellent sock in the future for extra protection against all the dust, pollen, construction debris, and sudden heavy down-pours here in TX.
Plumbing
The elbow is mated to 3.5" aluminum plumbing. The tubing was mandrel bent, so there are no wrinkles/etc at all along the length of the tube. Between the final geometry of the elbow and the space requirements of the air filter, there's a length of straight tubing that may help with air metering.
The filter was put onto the tubing and everything mocked up and marked up before cutting with a hack saw. I would have used a circular saw to get a perfectly straight cut, but all I had at the time were hand tools; this isn't a big deal since it'll be covered anyway. All cuts were deburred with the Dremel first and finished with sandpaper. Watch out for the metal filings when you cut!
Here's the gist of the before and after. Somewhere between 2" and 4" had to be cut from either end.

Final Assembly
Fortunately, everything fit together without too much fuss. The only messy thing you'll need to do is zip tie the intake air thermostat since there's no longer anything for it to connect to; OBDII cars do not have to worry about this (I think).
For the clamps, be aware that the HFM housing is slightly larger than 3.5". A T-bolt clamp meant for 3.5" tubing plus silicone may or may not fit. My clamps didn't, so I had to use regular hose clamps.
Some people are concerned about the "ghettoness" of a DIY elbow, but I assure that you can't see any of the construction unless you specifically look for it.


Performance
Sorry, I've got no dyno charts to post, so anything I say is only an opinion. The car seems to be smoother, more responsive, and stronger with everything installed, but it's hard to tell how much each piece helped. All I know is that I pay for premium gasoline, so I might as well get the chip (and associated gadgetry) that will make use of it.
Future Plans
- The thing I don't like this set-up is that the filter is basically suspended by the HFM, which is in turn held in place by the intake elbow aft of it and the charcoal canister below it. I want to rig something up so that some of the movement of the filter when the car is in motion will be braced by the cruise control mounts.
- A sock/prefilter/precharger/etc would help keep larger debris out of the filter pleats.
- Of course, I need a heat shield. I've got some alumalite (two thin sheets of aluminum sandwiching a layer of corrugated polyethylene) that I may use if I'm feeling ambitious. Otherwise I'll just grab something aftermarket.
Reference Links
- http://forums.bimmerforums.com/forum...d.php?t=708734 ("Mpact-like" silicone boot for $20)
- http://forums.bimmerforums.com/forum...d.php?t=694819 (My Next Set of Mods...)
- http://forums.bimmerforums.com/forum...d.php?t=410836 (Air induction systems primer)
(Continues here)
Last edited by CRYPTiC; 08-07-2007 at 05:21 AM.
ex-1995 Cosmos M3 Coupé - deck spoiler / koni struts + shocks / x-brace / clears / unstaggered contours / yokohama avs es100 / alu thermostat housing / emp water pump / porterfield r4-s pads / gc rtab shims / bavauto ss brake lines / fdm / ie rsm plates / kicker sub + box + amp / sylvania silverstar lows / lamin-x / loc-tite'd opn / lots of refurbishing
Retired - mason strut brace / jl stealthboxes / tms chip + hfm / s&b filter + outerwears / ecis heatshield / alpine 9835 + aux
E36 ///M DIY & Tech - Door Handles / Underpanel / Coolant Hoses / Gear Ratios / 3.5" Intake / Lower Chain Tensioner / Threaded Starter / IAT Sensor / 24# Injectors
DIY monkey
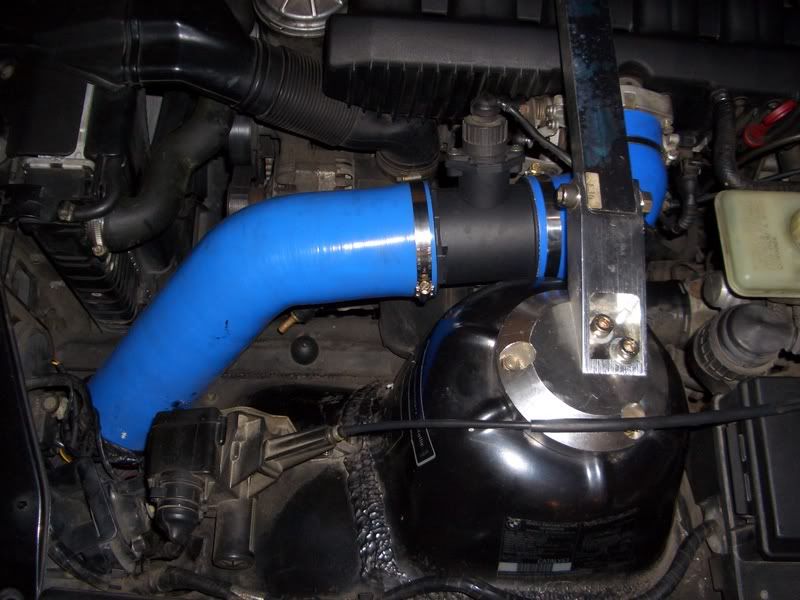
And this is how my intake looked while I was waiting for the 3.5" straight coupler.

Last edited by CRYPTiC; 06-08-2007 at 04:25 AM.
ex-1995 Cosmos M3 Coupé - deck spoiler / koni struts + shocks / x-brace / clears / unstaggered contours / yokohama avs es100 / alu thermostat housing / emp water pump / porterfield r4-s pads / gc rtab shims / bavauto ss brake lines / fdm / ie rsm plates / kicker sub + box + amp / sylvania silverstar lows / lamin-x / loc-tite'd opn / lots of refurbishing
Retired - mason strut brace / jl stealthboxes / tms chip + hfm / s&b filter + outerwears / ecis heatshield / alpine 9835 + aux
E36 ///M DIY & Tech - Door Handles / Underpanel / Coolant Hoses / Gear Ratios / 3.5" Intake / Lower Chain Tensioner / Threaded Starter / IAT Sensor / 24# Injectors
Member
nice work! subscribed for Silicone Tube DIY reference
Member
Dude, very nice write-up. I've been thinking about doing this for some time now, and your setup matches exactly what i had in mind. Cheers.
I think i know what your talking about. What you could try is fabricating a thin strip of metal that hooks around the hose clamp then to that (cruise control?) module as some pre-fabed intakes do. Such as this one from Cosmo Racing:Originally Posted by CRYPTiC

You could then use a hump coupler in place of the hose between the aluminum tube and HFM. This will provide the flex your looking for.
http://www.turbohoses.com/Hump.htm
DIY monkey
Thanks for the compliments, guys.
The nice thing about the T-bolt clamp is that it exposes some threads when it's clamped down. I'm going to see if I can get some kind of threaded hollow shaft to run the length between the plumbing and the cruise control bracket. That should take care of horizontal movement. Considering the distance and the lever arms involved, I'm not sure anything involving the CC bracket would do anything to help with vertical movement.
ex-1995 Cosmos M3 Coupé - deck spoiler / koni struts + shocks / x-brace / clears / unstaggered contours / yokohama avs es100 / alu thermostat housing / emp water pump / porterfield r4-s pads / gc rtab shims / bavauto ss brake lines / fdm / ie rsm plates / kicker sub + box + amp / sylvania silverstar lows / lamin-x / loc-tite'd opn / lots of refurbishing
Retired - mason strut brace / jl stealthboxes / tms chip + hfm / s&b filter + outerwears / ecis heatshield / alpine 9835 + aux
E36 ///M DIY & Tech - Door Handles / Underpanel / Coolant Hoses / Gear Ratios / 3.5" Intake / Lower Chain Tensioner / Threaded Starter / IAT Sensor / 24# Injectors
Member
Very nicely done! Why not just go deep down in the bumper like the cosmos intake? I personally like the sound of the cosmos better then a short ram intake with a heat shield like most companies put out.
If the representatives of the people betray their constituents, there is then no resource left but in the exertion of that original right of self-defense which is paramount to all positive forms of government, and which against the usurpations of the national rulers may be exerted with infinitely better prospect of success than against those of the rulers of an individual State. In a single State, if the persons intrusted with supreme power become usurpers, the different parcels, subdivisions, or districts of which it consists, having no distinct government in each, can take no regular measures for defense. The citizens must rush tumultuously to arms, without concert, without system, without resource; except in their courage and despair. Alexander Hamilton, Federalist No. 28
DIY monkey
Thanks.
Two words regarding the bumper: filter cleaning. When I had a filter down there, it got dirty very quickly because I was missing an underpanel. Between taking apart my bumper, removing my wheels and fender liner, and/or fighting with the small opening leading to the bumper, I eventually threw in the towel.
The other reasons I don't like the bumper area is that the bract duct, fog lights, and shape of the wheel well necessitated a really small filter. Since I was going for a 3.5" intake, I didn't think that made much sense .
But I agree: logically it's a better location since it's mostly isolated from the engine compartment. This is especially true if you have the block-off plate I've seen on some brands of intakes.
ex-1995 Cosmos M3 Coupé - deck spoiler / koni struts + shocks / x-brace / clears / unstaggered contours / yokohama avs es100 / alu thermostat housing / emp water pump / porterfield r4-s pads / gc rtab shims / bavauto ss brake lines / fdm / ie rsm plates / kicker sub + box + amp / sylvania silverstar lows / lamin-x / loc-tite'd opn / lots of refurbishing
Retired - mason strut brace / jl stealthboxes / tms chip + hfm / s&b filter + outerwears / ecis heatshield / alpine 9835 + aux
E36 ///M DIY & Tech - Door Handles / Underpanel / Coolant Hoses / Gear Ratios / 3.5" Intake / Lower Chain Tensioner / Threaded Starter / IAT Sensor / 24# Injectors
Boosted Member
By far one of the most sano-looking DIY intakes I've ever seen. Nice job.
That cheap boot is actually a better radius than the samco boot I paid 5 times as much for.
The only area I'd change would be the 45 degree tube connected to the filter - its got a really small radius. I'd have gone w/ a 30 degree bend or a longer radius 45, but thats minor.
Good work.
Garrett
AirborneDEN
That was a very nice write up, good job.
DIY monkey
Now that you mentioned it, I have to agree on the plumbing bend radius. It can be better.
Surprisingly, the cheapie Cosmo Racing (not Cosmos Racing) 3" intake that came with the car had a very large radius bend on it. Not bad for something that you find on eBay...
ex-1995 Cosmos M3 Coupé - deck spoiler / koni struts + shocks / x-brace / clears / unstaggered contours / yokohama avs es100 / alu thermostat housing / emp water pump / porterfield r4-s pads / gc rtab shims / bavauto ss brake lines / fdm / ie rsm plates / kicker sub + box + amp / sylvania silverstar lows / lamin-x / loc-tite'd opn / lots of refurbishing
Retired - mason strut brace / jl stealthboxes / tms chip + hfm / s&b filter + outerwears / ecis heatshield / alpine 9835 + aux
E36 ///M DIY & Tech - Door Handles / Underpanel / Coolant Hoses / Gear Ratios / 3.5" Intake / Lower Chain Tensioner / Threaded Starter / IAT Sensor / 24# Injectors
Member
Very Nice, but like you said, you need a box. My AA works so well at keeping out the heat, on frosty mornings otw to work (35M) when I park and the entire car frosts up except the hot hood....I get a 12" square of frost on the hood directly above the Box.
John
'95 Hellrot M3 w/Dove
AA Euro HFM Stage II (w/21# Injectors & Software) W/Gen III Exhaust - URI Crank Pully - FDM w/3 Row M Coupe Rad - 3.23 LSD - Vogtland Club Spec/Koni SA - UUC Red w/Enforcers - TMS Shims/Rear Camber Bars w/QA1 inners/Sways - VMC F/TMS R End Links - X-Brace - Perf Ultimate/SS Brake Lines - GC Tower Mounts/RTAB Shims - ZKW's w/5000K Hid - Fog Delete - Alpine 9847/Pioneer TS-C130R Kevlar Components/Pioneer PRS-X340/Stealth Box's/Wired Zune 120GB - OE LTW CF Sills/Glove Box Plate - Staggered Black M-Spoke II's w/235/40 (front), 255/40 (Rear) Nitto NT05's - Rolled Fenders!
***Got a '95 M3? (actually pretty common on all years! Even happened to Racer Seth Thomas!) Check Your LSD! http://forums.bimmerforums.com/forum...d.php?t=390209
Not a Detailer Anymore.
Great work there, Crypt.
I, like you, picked up a large inverted cone filter that won't fit in the bumper.
Been debating whether to cut down my cosmos a few inches or use a short coupling to HFM.
My K&N filter was torn at the metal pleats from being in proximity to the area where the horns are.
The nose was essentially jammed down in that hole.
Filter was filthy too despite not being inside the bumper cover.
Member
I made my TB boot last week the same way as cryptic. Much easier to use 3/4" heater hose instead of cutting the nipples off your stock boot. Anywho, I already had a Cosmos V2, and just installed 3.5 HFM, 24# Injectors, Chip, and this boot. Great upgrade. Here's a couple pics with the Cosmos:
License Revoked
looks great.
The "better feel and more power" you are experiencing is most likely the added sound messing with your senses. Chances are you have possibly lost a few HP.
But again..looks good.
Member
Not a chance in hell I lost HP. It's definitely not about looks, else I'd have the cleanest engine bay around. This is one of the best upgrades for an OBD1 M3. Proven results time after time by nearly every person who's done it. How's it I could've possibly lost HP?
And just did headers, new mid-pipe with x-pipe and resonators only, bolted with my TSE I already had. There's no way you can say a loss in HP will result with this mod, even without the exhaust work. The car pulls harder and smoother all the way though now.
Very interesting thought though, I'd like to know your reasoning.
Not a Detailer Anymore.
Does the V2 come in different colors?
First time I've seen one.
License Revoked
Reasoning? I've personally seen two E36 M3's dynoed with JUST a cone air intake. (Notice I refuse to succumb to the marketing hype and call it "Cold Air" intake. That's a joke). On BOTH, they actually lost a bit of torque and HP. This was after the owners had SWORN they had better "throttle response and much more power". Both M3's, however, picked up something like a solid 3hp each after a piece of cardboard was placed between the cone and the engines fan. The fan wash was disrupting airflow and causing underhood turbulence which killed a bit of power. Not much mind you. The cardboard was temporary, and I seem to recall both owners getting some form of protective box for the cone to rest in. The warmer underhood temps werent as big of an impact as the fan wash.
Another friend didnt notice any real gains until he got an aftermarket chip/flash to bring in a bit more fuel to go along with the added air.
But again..the only real way is to dyno a before/after measurement. But the added intake noise will sure make you feel like you have more power, even if in fact you have dropped a few HP/Torque...
Member
Yes, V2 comes in Black, Blue and Red
Member
So are you saying basically that it's a matter of needing to use a heatshield to isolate the airflow?
Boosted Member
A shield is a must. No doubt. Sucking underhood air is a no-no.
However, shielded intakes (which are true CAI) have consistently shown dyno gains of 8-12 whp. This is very very old news.
Garrett
Boosted Member
Does anybody even sell cone intakes without a shield or isolating the filter behind the bumper cover. They all isolate the filter from the engine bay. Its been this way for many years.
ECIS, Conforti, AA, Dinan, the Dinan replica's, etc. are all COLD AIR INTAKES as they receive air exclusively from outside of the engine bay.
What are you talking about?
Who sells an e36 intake consisting of JUST a cone and calls it a CAI?
Garrett
Member
I agree with Mad Dog for intakes that sit up high in the engine bay as cryptic's. But I relocated the horn and Cosmos is nested behind the bumper. I do plan on however modifying the brake duct inlet to allow more flow straight to the intake too.
Not a Detailer Anymore.
I guess I need a shield then.
My filter sits high enough to be touching the hood insulation.
Was in dire need of a new filter, so I just settled for what I could find at the time.
License Revoked
That's a must. And also be aware that the lower the cone is/hosing to the cone is, the more prone you are to a hydrolock situation in a deep puddle/flood. Obviously none of us would ever intentionally drive through deep water situation..but accidents do occur. And in that situation, you'd be more likely to hydrolock with a low, exposed cone than you would with the stock airbox
License Revoked
#1. Im assuming we simply disagree on our basic definition of "cold".
#2. Look around this board..if not this thread. Plenty of folks have exposed cones with no shield/no box. Just trying to let them know that if they are going to run a cone..which is fine if thats their choice..then if they arent at least shielding it, they are probably losing HP
 Posting Permissions


 Reply With Quote


Bookmarks