
 Member
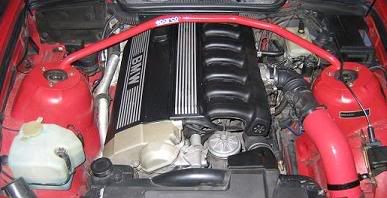
I looked around the forum and found no DIY for motor mounts with photos. All the ones I found gave the basic info to do the job, but I thought some pics and pointers would help others eliminate the trial and error that makes the job tougher and longer than it needs to be.
You will need to get two new motor mounts and the corresponding flange nuts. The nuts on motor mounts are one time use so get new ones. My dealer charged me $1 each, not so bad.
Tools needed:
1- 3/8” ratchet
2- 6” extensions
1- 10” extension
1- Swivel adapter
1– Six point 16mm socket
You really need the extensions and swivel to do the job. Here are the new motor mounts and flange nuts.
Last edited by hellrot325; 04-28-2007 at 08:13 PM.
[
Turner Perf Chip/Fan Delete/Sparco Strut Tower Brace/X-Brace/JTD Underpanel
Zimmerman X-D Rotors/Axxis Ultimate Pads/Solid Caliper Guide Bolt Bushings
UUC EVO3/DSSR SSK/3.15 LSD/Cosmos Racing CAI V2/ASC Delete
96+ M3 LCA/LCAB M3 RTAB and GC Shims
BMW OEM Alarm/Woodgrain Delete/Blizzaks baby!/16x7 BMW Style 30 Sport wheels
Member
This is the setup you will use to remove and re-install the flange nuts....the only change will be the number of extensions.
[
Turner Perf Chip/Fan Delete/Sparco Strut Tower Brace/X-Brace/JTD Underpanel
Zimmerman X-D Rotors/Axxis Ultimate Pads/Solid Caliper Guide Bolt Bushings
UUC EVO3/DSSR SSK/3.15 LSD/Cosmos Racing CAI V2/ASC Delete
96+ M3 LCA/LCAB M3 RTAB and GC Shims
BMW OEM Alarm/Woodgrain Delete/Blizzaks baby!/16x7 BMW Style 30 Sport wheels
Member
Step one: Jack up the front end of the car. You may want to take the wheels off to give yourself more room. I wish I did.
Step two: Take off the 16mm flange nuts that hold the motor mount in place. You will remove the nuts for the bottom mounts from underneath the car, and the top from the engine bay. Let’s start with the top. The PS is easy to find and do. Set up the ratchet with all the extensions so you get down there…you will need the swivel because the angle requires it. Hit all the nuts with PB Blaster to help loosen them up.
Last edited by hellrot325; 04-28-2007 at 07:55 PM.
[
Turner Perf Chip/Fan Delete/Sparco Strut Tower Brace/X-Brace/JTD Underpanel
Zimmerman X-D Rotors/Axxis Ultimate Pads/Solid Caliper Guide Bolt Bushings
UUC EVO3/DSSR SSK/3.15 LSD/Cosmos Racing CAI V2/ASC Delete
96+ M3 LCA/LCAB M3 RTAB and GC Shims
BMW OEM Alarm/Woodgrain Delete/Blizzaks baby!/16x7 BMW Style 30 Sport wheels
Member
Now remove the nut from the drivers side. The drivers side is a little harder to find. Remove everything back to the throttle body: air box (or CAI), MAF, and 90 deg boot. The DS top mount is right under the TB.
[
Turner Perf Chip/Fan Delete/Sparco Strut Tower Brace/X-Brace/JTD Underpanel
Zimmerman X-D Rotors/Axxis Ultimate Pads/Solid Caliper Guide Bolt Bushings
UUC EVO3/DSSR SSK/3.15 LSD/Cosmos Racing CAI V2/ASC Delete
96+ M3 LCA/LCAB M3 RTAB and GC Shims
BMW OEM Alarm/Woodgrain Delete/Blizzaks baby!/16x7 BMW Style 30 Sport wheels
Member
Step three: OK, the tops nuts are off, now crawl under the car. You will see the bottom mount. Here is the driver's side. Use a single 6" extension and swivel and go through the hole in the control arm to get to it. Do the passenger side also.
[
Turner Perf Chip/Fan Delete/Sparco Strut Tower Brace/X-Brace/JTD Underpanel
Zimmerman X-D Rotors/Axxis Ultimate Pads/Solid Caliper Guide Bolt Bushings
UUC EVO3/DSSR SSK/3.15 LSD/Cosmos Racing CAI V2/ASC Delete
96+ M3 LCA/LCAB M3 RTAB and GC Shims
BMW OEM Alarm/Woodgrain Delete/Blizzaks baby!/16x7 BMW Style 30 Sport wheels
Member
Step four: With the top and bottom flange nuts off, the mechanical connections are done. You just need to lift the motor high enough to free the motor mount....about 1-1/2 to 2". Use a piece of 2x4 to spread the load, and jack up the motor by the oil pan. Do this very slowly and make sure no hoses or other connections get strained. I had no issues here.
Note: If you have an x-brace it needs to come off...you can see mine under the car.
Last edited by hellrot325; 03-26-2008 at 02:42 PM.
[
Turner Perf Chip/Fan Delete/Sparco Strut Tower Brace/X-Brace/JTD Underpanel
Zimmerman X-D Rotors/Axxis Ultimate Pads/Solid Caliper Guide Bolt Bushings
UUC EVO3/DSSR SSK/3.15 LSD/Cosmos Racing CAI V2/ASC Delete
96+ M3 LCA/LCAB M3 RTAB and GC Shims
BMW OEM Alarm/Woodgrain Delete/Blizzaks baby!/16x7 BMW Style 30 Sport wheels
Member
Step five: Now just remove the old motor mounts. The driver's side is a little tricky to work out because of the steering linkage, go outboard of the control arm. The passenger is easy. If they won't come out you need to jack a little higher. Sorry no photos, I was doing this alone
Step six: Install the new motor mounts. Insert the top stud first, and then the lower. The motor mount has a specific orientation. The diagram shows you the orientation looking up from below the car. Once you have this orientation right you will hear and feel it fall in place. Visually check to make sure. Let the motor mount rest on the lower mount and loosely install the new flange nut.
[
Turner Perf Chip/Fan Delete/Sparco Strut Tower Brace/X-Brace/JTD Underpanel
Zimmerman X-D Rotors/Axxis Ultimate Pads/Solid Caliper Guide Bolt Bushings
UUC EVO3/DSSR SSK/3.15 LSD/Cosmos Racing CAI V2/ASC Delete
96+ M3 LCA/LCAB M3 RTAB and GC Shims
BMW OEM Alarm/Woodgrain Delete/Blizzaks baby!/16x7 BMW Style 30 Sport wheels
Member
The passenger side has a heat shield to protect the mount from the exhaust. The heat shield has a pin that orients it correctly toward the exhaust. It fits into one of two dimples (one is for PS and the other DS)..you'll see...figure the proper placement and install the mount.
Last edited by hellrot325; 04-28-2007 at 08:11 PM.
[
Turner Perf Chip/Fan Delete/Sparco Strut Tower Brace/X-Brace/JTD Underpanel
Zimmerman X-D Rotors/Axxis Ultimate Pads/Solid Caliper Guide Bolt Bushings
UUC EVO3/DSSR SSK/3.15 LSD/Cosmos Racing CAI V2/ASC Delete
96+ M3 LCA/LCAB M3 RTAB and GC Shims
BMW OEM Alarm/Woodgrain Delete/Blizzaks baby!/16x7 BMW Style 30 Sport wheels
Member
Step 7: Lower the motor slowly allowing the top stud to be inserted into the top mount. Mine went right in. Install the top flange nuts and torque all to 33 ft-lbs. You really can't get a torque wrench on properly so I went a little high to account for the extensions and the swivels.
You're done!
[
Turner Perf Chip/Fan Delete/Sparco Strut Tower Brace/X-Brace/JTD Underpanel
Zimmerman X-D Rotors/Axxis Ultimate Pads/Solid Caliper Guide Bolt Bushings
UUC EVO3/DSSR SSK/3.15 LSD/Cosmos Racing CAI V2/ASC Delete
96+ M3 LCA/LCAB M3 RTAB and GC Shims
BMW OEM Alarm/Woodgrain Delete/Blizzaks baby!/16x7 BMW Style 30 Sport wheels
Member
Here are my old mounts with 160,000 miles on them...not too bad
[
Turner Perf Chip/Fan Delete/Sparco Strut Tower Brace/X-Brace/JTD Underpanel
Zimmerman X-D Rotors/Axxis Ultimate Pads/Solid Caliper Guide Bolt Bushings
UUC EVO3/DSSR SSK/3.15 LSD/Cosmos Racing CAI V2/ASC Delete
96+ M3 LCA/LCAB M3 RTAB and GC Shims
BMW OEM Alarm/Woodgrain Delete/Blizzaks baby!/16x7 BMW Style 30 Sport wheels
Member
Thanks. I went with stock. Don't want NVH issues.Originally Posted by DJ Genius

[
Turner Perf Chip/Fan Delete/Sparco Strut Tower Brace/X-Brace/JTD Underpanel
Zimmerman X-D Rotors/Axxis Ultimate Pads/Solid Caliper Guide Bolt Bushings
UUC EVO3/DSSR SSK/3.15 LSD/Cosmos Racing CAI V2/ASC Delete
96+ M3 LCA/LCAB M3 RTAB and GC Shims
BMW OEM Alarm/Woodgrain Delete/Blizzaks baby!/16x7 BMW Style 30 Sport wheels
M3 Time
anotherand an exemplary DIY writeup by hellrot325
Is it really safe to rest the engine by the pan on a jack? This is only thing that scares me without a engine hoist.
Cosmos - Black l l Lux l HK l OEM clears all around l Depo HID's 55W 5000K l Strut bar
2nd is the 1st loser
Oh, this is so good and clear, I was thinking to by UUC mounts next mounth and do a swap.
Good job hellrot325, I won't have any problems doing a swap, cause we have a nice DIY
Sorry I interupted your DIY
2nd is the 1st loser
What's the NVH issue? Vibration?
Member
Every DIY says it's okay, and I had no problem. YRMV of course. I vouch for nothing.
[
Turner Perf Chip/Fan Delete/Sparco Strut Tower Brace/X-Brace/JTD Underpanel
Zimmerman X-D Rotors/Axxis Ultimate Pads/Solid Caliper Guide Bolt Bushings
UUC EVO3/DSSR SSK/3.15 LSD/Cosmos Racing CAI V2/ASC Delete
96+ M3 LCA/LCAB M3 RTAB and GC Shims
BMW OEM Alarm/Woodgrain Delete/Blizzaks baby!/16x7 BMW Style 30 Sport wheels
Member
Noise Vibration Harmonics. Stiff urethane bushings transmit more of it of course.
[
Turner Perf Chip/Fan Delete/Sparco Strut Tower Brace/X-Brace/JTD Underpanel
Zimmerman X-D Rotors/Axxis Ultimate Pads/Solid Caliper Guide Bolt Bushings
UUC EVO3/DSSR SSK/3.15 LSD/Cosmos Racing CAI V2/ASC Delete
96+ M3 LCA/LCAB M3 RTAB and GC Shims
BMW OEM Alarm/Woodgrain Delete/Blizzaks baby!/16x7 BMW Style 30 Sport wheels
Member
I've never used them so I can't say first hand, but a stiffer bushing will trainsmit more NVH. The amount, and whether it's tolerable, is best left to others to say.
The plus side is that it will also resist engine torque. This will better keep the engine and tranny lined up, reducing the (minimal) risk of misshifts. They should last longer too. But you can see mine after 160K miles, not so bad.
Last edited by hellrot325; 04-03-2009 at 04:38 PM.
[
Turner Perf Chip/Fan Delete/Sparco Strut Tower Brace/X-Brace/JTD Underpanel
Zimmerman X-D Rotors/Axxis Ultimate Pads/Solid Caliper Guide Bolt Bushings
UUC EVO3/DSSR SSK/3.15 LSD/Cosmos Racing CAI V2/ASC Delete
96+ M3 LCA/LCAB M3 RTAB and GC Shims
BMW OEM Alarm/Woodgrain Delete/Blizzaks baby!/16x7 BMW Style 30 Sport wheels
Member
Seems like shifting is smoother and less vibration overall. Not sure if it actually is or I just want it to be.
Last edited by hellrot325; 04-28-2007 at 09:52 PM.
[
Turner Perf Chip/Fan Delete/Sparco Strut Tower Brace/X-Brace/JTD Underpanel
Zimmerman X-D Rotors/Axxis Ultimate Pads/Solid Caliper Guide Bolt Bushings
UUC EVO3/DSSR SSK/3.15 LSD/Cosmos Racing CAI V2/ASC Delete
96+ M3 LCA/LCAB M3 RTAB and GC Shims
BMW OEM Alarm/Woodgrain Delete/Blizzaks baby!/16x7 BMW Style 30 Sport wheels
Member
Great writeup as allways Hellrot. Thanks. good to see yours were still in one piece. my driversside mount ripped in half by 140K. May be time to check them again...Have about 80K on the replacements.
Member
Thanks. I was surprisedI think replacing my tranny mounts at 89K helped. They work together. I am changing them out but my clutch is starting to go so I will wait until I do that...UUC TM+E. Oh, and Stage 2 LWF and M5 clutch
[
Turner Perf Chip/Fan Delete/Sparco Strut Tower Brace/X-Brace/JTD Underpanel
Zimmerman X-D Rotors/Axxis Ultimate Pads/Solid Caliper Guide Bolt Bushings
UUC EVO3/DSSR SSK/3.15 LSD/Cosmos Racing CAI V2/ASC Delete
96+ M3 LCA/LCAB M3 RTAB and GC Shims
BMW OEM Alarm/Woodgrain Delete/Blizzaks baby!/16x7 BMW Style 30 Sport wheels
Member
Make sure you use the 2x4 under the oil pan, never put the jack directly onto the oil pan, as you will cause a dent and possibly mess up the pickup and mechanicals inside in addition to possibly cracking a seal and draining all your oil.
Short answer, with a 2x4, you're good 100%.
Member
The oil pan is cast...it's not going to dent.
[
Turner Perf Chip/Fan Delete/Sparco Strut Tower Brace/X-Brace/JTD Underpanel
Zimmerman X-D Rotors/Axxis Ultimate Pads/Solid Caliper Guide Bolt Bushings
UUC EVO3/DSSR SSK/3.15 LSD/Cosmos Racing CAI V2/ASC Delete
96+ M3 LCA/LCAB M3 RTAB and GC Shims
BMW OEM Alarm/Woodgrain Delete/Blizzaks baby!/16x7 BMW Style 30 Sport wheels
E30 =/= E36
Thanks for the DIY. I just got done doing this. One word of advice:
Since the oil pan is slightly to the driver's side, jacking it up with both sides unbolted will pretty much only raise the driver's side enough to replace the mount. I did that one first and put the nuts back on that side pretty loose. Then when I jacked the motor up again, the passenger's side lifted up enough to replace the mount.
Peace be with you
Word, I 2 just got done, still covered in grease
1 Side at a time.
The driver's side was actually easier IMO since that's the side the motor wants to torque away from. Motor was very easy to lift when doing the driver side.
When I did the passenger side, the car came off the jacks completely, bout 4-5 inches off the driver side jack, 1 inch off the passenger side jack.
This is a piece of cake to do as long as you have the swivel and some PB.
-edit 8-7-07.
I finally got the rest of my car done (cooling system since the fan went FU to me)
Anyway, even though my car only has 85k on the odo, and the mounts didn't look THAT bad (just some very very slight surface cracking), it might just be a placebo affect, but I'm thinking the car is MUCH more connected/smooth when taking corners/getting on it.
I'll need to do some more 1-2-3 hammer shifts though to really put her thru her paces.
Last edited by Mike 01Hawk; 08-07-2007 at 10:57 AM.
2001 Pewter Formula Firehawk Hard-Top (1 of 3 for 2001)
Need to update the website!
1997 Byzanz M3/4/5 "Penny"
First pic @ her new home 04-22-07, more to come
May 2008 after 5% tint and Zaino Detail
Member
As always, thanks for putting this together. I'm glad I'm about 40k miles behind you, so that you can replace all these parts and post up your DIY's.
Some things I figured out along the way:
a) Not sure if it helps or is just psychological, but I was having some difficulty installing new mounts and noticed I still had my front stressbar in place. Removing that seemed to help. Duh.
And for the 'vert club:
a) Convertible motor mounts are different. They have metal tops and bottoms, and are more "cylinder-like" than the ones pictured here, which are "cone-like". Also, my vert had two metal caps for the top - similar to the Tranny Mount Enforcers (TME) from UUC. Here's a link to pelicanparts.com's website showing the part. They label the parts "Engine Mount, Left, Convertibles only, 323iC manual trans, 325iC/328iC".
b) It may be I have crappy tools, or since the 'vert mounts are different, I found that I had to use a 16mm deep socket to remove the tops. My standard length would bottom out on the "bolt" which prevented me from tightening the nuts down.
Again, thanks for the write up! Seeing how easy it was helped me to gather the courage to get this done. No more rattles at the drive-thru!
BigBilly
1987 M6 Cinnabar Red (I think) / 2014 M5 Alpine White / 1998 328iC - sold
Hey everybody - it's been a while. Glad to see BF.com is still thriving.
Any pointers on care and feeding of an E24 are appreciated.
 Posting Permissions


 Reply With Quote


Bookmarks