
 Member
The bottom part of my driver's side seat stopped warming a few years ago. A few months ago, I noticed the back part of the seat wasnt working too well. After searching and using info from many different threads & write-ups for other issues, I was able to get it done and make a write-up. I thought about getting aftermarket seat warming pads and wiring them to my OE switches, but in the end decided to go with OEM heating pads.
Tools That I Used:
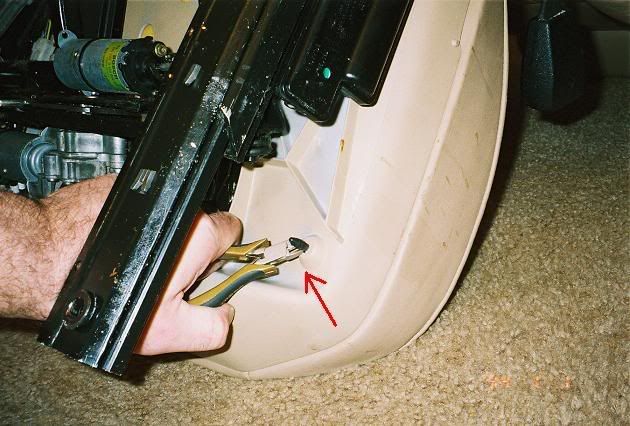
Flathead screwdriver - to pop off the caps that cover the 2 nuts in the front of the seat rails
16mm socket with a breaker bar - to loosen and remove seats (i am not very strong!)
Cutters - to break off the 4 plastic clips that hold the seat cushion on
T30 torx - to remove a small panel on the bottom of the seat
T20 torx - to remove the screws that help hold the cover on the back of the seat
Needle nose pliers - to remove the little metal hogrings
Small bent needle nose pliers - very helpful, but probably not necessary to assist resecuring the skins back down
Steps 1 and 2 are about removing the seat from the car.
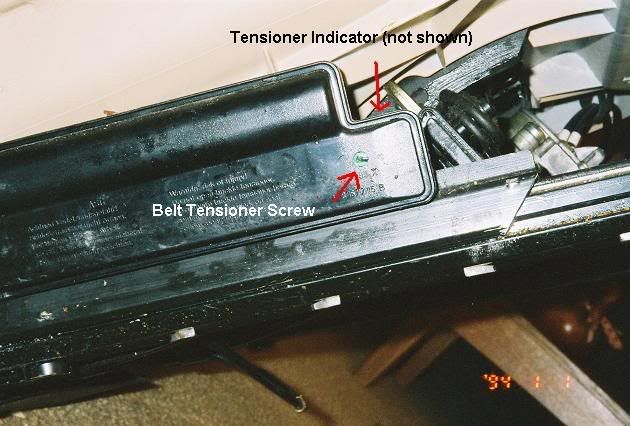
Step 3 is about the seat belt tensioner.
Steps 4, 5, 6, 7, 8 and 9 are about removing and taking apart the bottom cushion and putting it back together with the new heating element.
Step 10 details removing the back cushion of the seat.
Step 12 gives finishing info and torqueing info.
First off, I used this write-up for the first part of the install. http://www.bimmerdiy.com/diy/e36powerseats
At the end of that write-up, it lists the author as "hellrot325". Thanks, 'hellrot325', for your help!
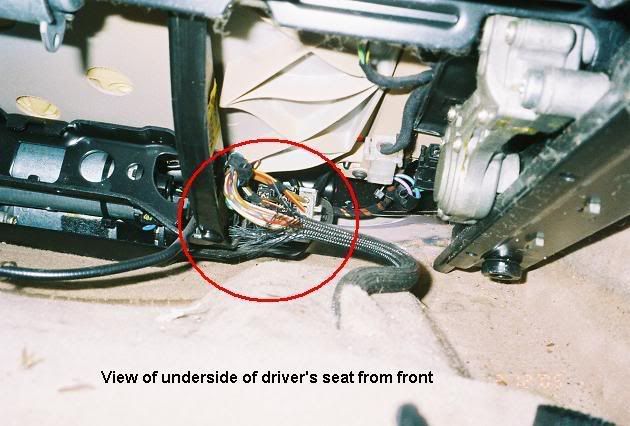
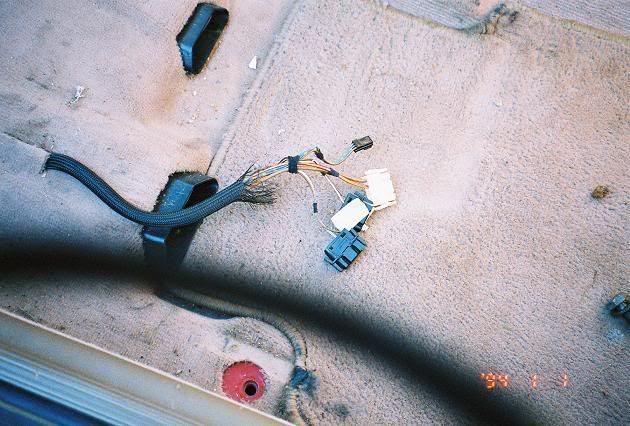
Step 5: Once youve got the bottom seat cushion loose, it should be hanging from the seat by your existing heated seat wires. You'll want to use the T30 torx tool to remove the small panel on the lower back of the seat to give access to the connectors. Then locate the connector for the heating element, and remove it. I gave the connector of the new element a quick look for reference to undo the latch that holds the connector in place. Now the seat cushion should be free.Originally Posted by http://www.bimmerdiy.com/diy/e36powerseats
Step 6: The edges of the leather skin are held in place by little plastic tabs. Compress the seat bolsters down to put some slack in the skin, then gently pull the skin over the tabs. Its easiest to do the flat edges before the corners.
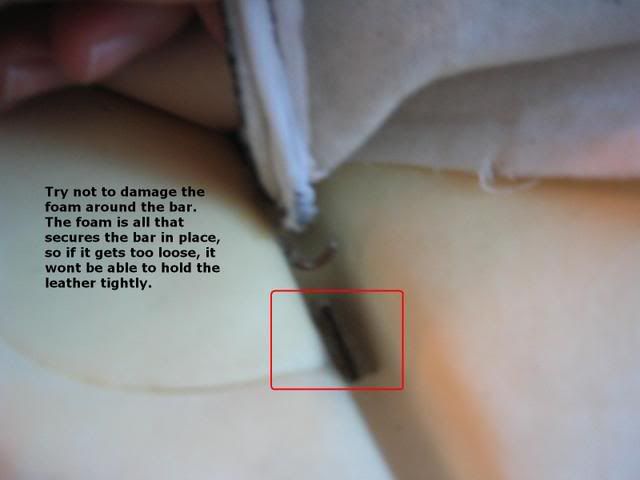
Step 7: The skin is held in place by 17 small metal rings called Hog Rings. There are 4 down the two sidecreases, and 3 across the three center creases. To remove each ring, first hold the skin out of the way. I put the tip of the needle nose pliers in the center of the ring and then opened the pliers to stretch the ring. With the ring stretched open, you can use the pliers to unhook each ring. The skin should now be free. Thread the heat element connector through the seat foam to free the heating pad.
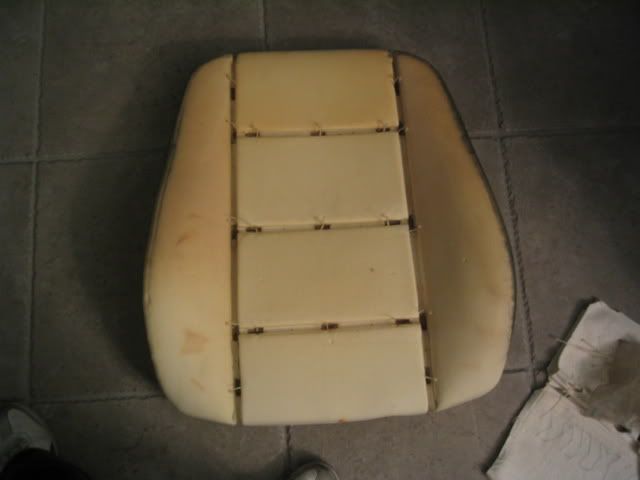
Step 8: I used small zipties in place of metal hogrings to re-secure the skin back to the foam. I found it best to get the zipties looped under the bars in the foam before setting the new heat pad down. The bent needle nose pliers make this a little easier. Think about how youll be re-securing the skin back. I made sure to loop all the zipties the same way so that once you loop the ziptie over the bar on the skin, Id be able to grab the pointy end to pull it tight. If this doesnt make sense now, you'll get it once you try to resecure the skin. I promise. After the zipties are ready to go, lay down the new heating pad & push it into the creases. Obviously, youll want the ziptie ends to be poking through the holes in the heat pad. I used the bent needle nose pliers to pull the pointy ends over the bar on the skin and to tighten the zipties. I kept in mind how tight the hogrings kept the skin, and tried to replicate the same tightness with the zipties. It is really important not to skip any of the 17 fastening points on the seat. If you skip one, the leather will not be pulled snugly.
Step 9: Be sure that youve tightened all the zipties, trim them if you want. I didnt because I didnt want to make any sharp edges that could eventually rub through the leather. Pull the skin over the side bolsters and reloop the skin over the plastic tabs, and youre all set to put this one back on the seat frame.
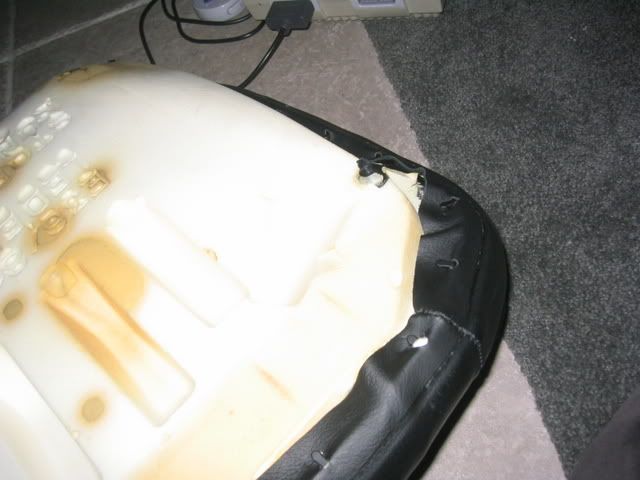
Step 10: To remove the back cushion from the seat, youll need to remove the 2 T20 torx screws from the bottom of the cover on the back of the seat, pull out the headrest, remove the lever that flips the seat forward and the lever's surround. To remove the lever, pull it straight out in the direction it is pointing. I wedged a flathead screwdriver in between the lever and the surround to get it started. The surround is held in by 2 clips, one at the top and one at the bottom. These clips are shaped like a symmetrically split arrow, with a little barb holding the surround in place. The barb (supposedly) can be nudged out of the way with a screwdriver, but I just pulled on it after wedging a flathead screwdriver between it and the seat. Luckily, I didnt break either clip. After this, the cover on the back of the seat should be free. After unlooping the leather skin from the metal tabs, you can gently lift the foam & skin from the metal frame. Be careful, because the metal skeleton frame of the seat extends out into the side bolsters. It isnt necessary to remove the foam from the frame to change the heating pad, but its so easy to do and makes the job much easier.
Step 11: Changing the heating pad on the back cushion is exactly the same as the bottom cushion, except there are 5 hogrings down the each of the 2 side creases. Go over steps 7 and 8 for a refresher. Be very careful when pulling the skin over the edges of this cushion. There is more surface area that needs to be cleared so there is more chance of ripping the skin, especially on the upper corners. Obviously, youll want to replace the foam & leather back onto the frame, reloop the skin onto the tabs, and clip in the new connector.
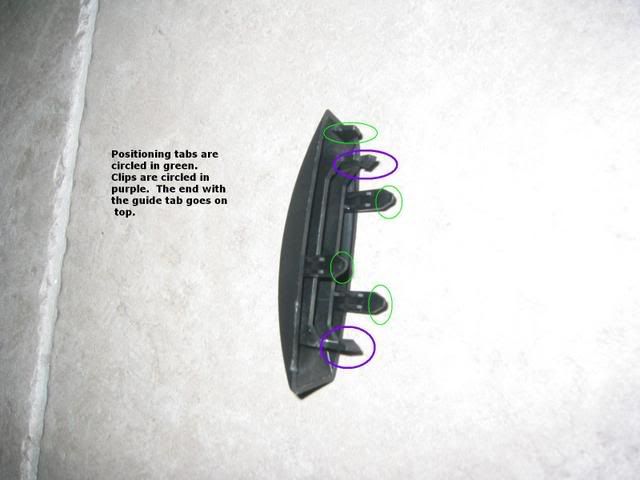
Step 12: Use 4 new plastic rivets to reattach the bottom cushion back onto the frame. Reattach the panel to the lower back of the seat, and put the seat back into the car. Dont forget to plug everything back in. Per Bentley Manual, torque to 41 ft-lbs, the 2 nuts and 2 bolts that hold the seat rails to the floor of the car.
Last edited by palomino; 01-15-2007 at 06:03 PM.
Member
Wonderful! I was just going to attempt this next weekend, thanks!
Member
Great writeup. Should help quite a few people out.
Question: how much were the OEM heating pads?
Member
I think normal retail was $70, but my dealer gave them to me for $48 a piece.
For non-sport, non-vader seats, the part numbers are 64-11-8-391-697 and 64-11-8-391-696. I forget which is the bottom cushion and which is for the back cushion.
All the other threads I read gave me the impression that was an easy afternoon thing. MAYBE if i had hustled through it, I could have gotten it done in 3-4 hours. Maneuvering the hogrings out of the seat and tightening the zipties made my hands sore though.
Also, I found an old thread where a guy swapped his driver and passenger cushions, to help even out the wear. The cushions are interchangeable side to side, but if you have heated seats, you'll need to swap out the heating elements because the connector is on a side of the cushion and isnt long enough to work on the other side of the car. I didnt find that thread until I had already reassembled the bottom cushion, but its a great idea. Maybe Ill do it over summer.
Member
Why would you need heated seats in CA?
Nice write up
1974 BMW 2002 Touring
1996 Alpina B3 3.2 Touring
1996 Alpina B8 4.6 Touring
2023 BMW M3
Member
Its like, 53 degrees here today! brrr!

Seriously, it gets cold here. Every once in a while, the cars tell us its cold outside.
Member
Great!!!
Good thing I didn't throw away my old heated seats. My new ones don't have it and it gets really cold early in the mornings.
Thank you!
Member
How difficult would it be to adapt the wiring for a swap between driver and passenger seat heaters? Screw my passengers, it's my car!
Off-Topic King
in for later
useful DIY is useful
thanks
PS: i like this pic
sorry for ridonk revival
-Rich-
Member
good work. where did you buy the plasctic rivote for the buttom cushion?
Member
They are called seat pins or clamps and you can get them at the dealer or any vendor selling BMW parts here.
52108130678 the part number
Off-Topic King
money, thanks!!!
they are $0.21 bucks each from here
http://www.trademotion.com/partlocat...&siteid=214672
you gotta enter the part number
i m sure it s one of those things it might be worth getting from the dealer
-Rich-
Member
Hi guys. Sorry to beat the horse some more.
Can anyone find part numbers for the passenger seat heating elements? My bum element is malfunctioning and I'd like to replace it sometime this year.
 Posting Permissions


 Reply With Quote


Bookmarks