
 >=]
>=]
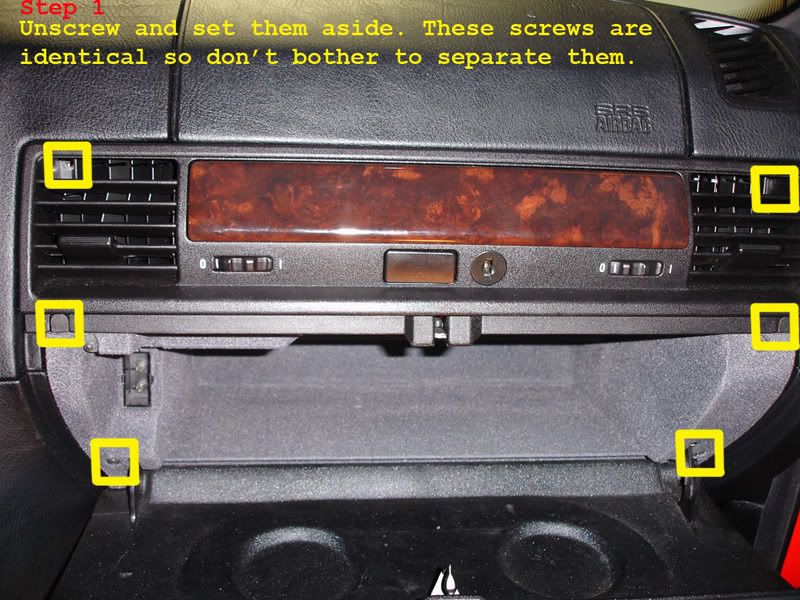
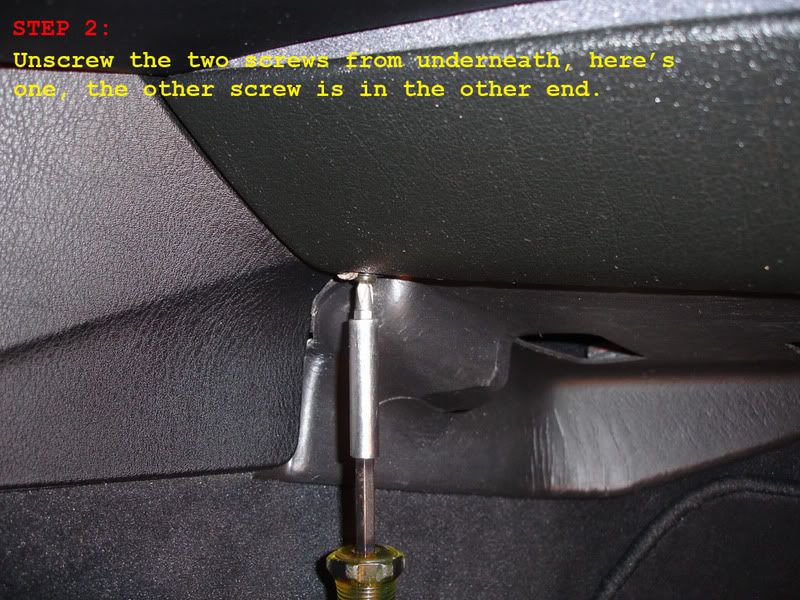
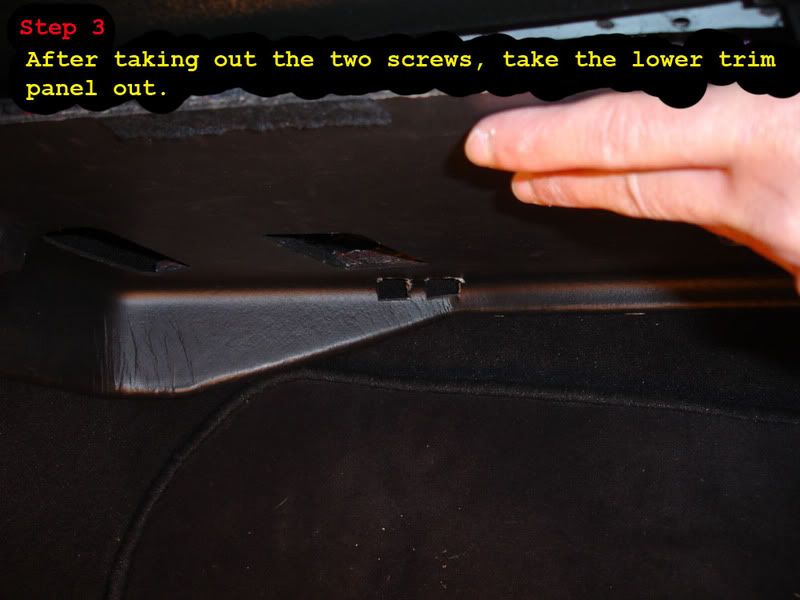
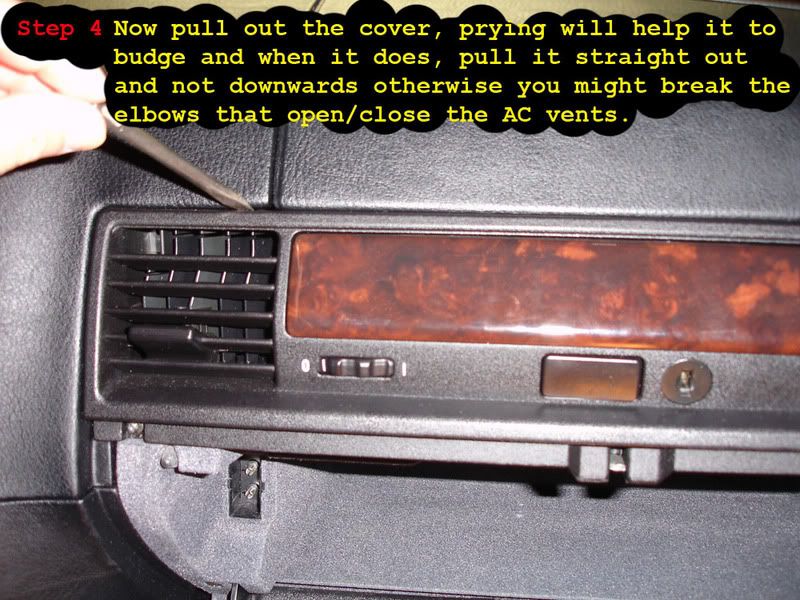
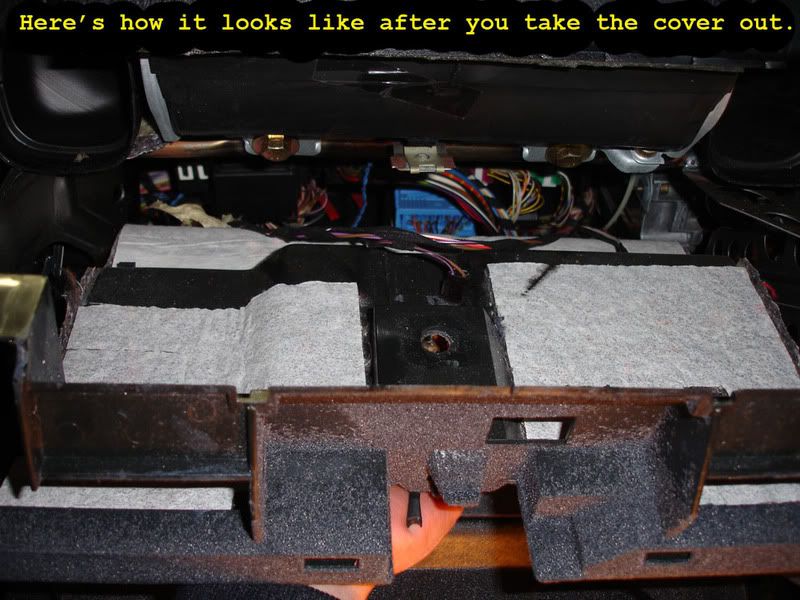
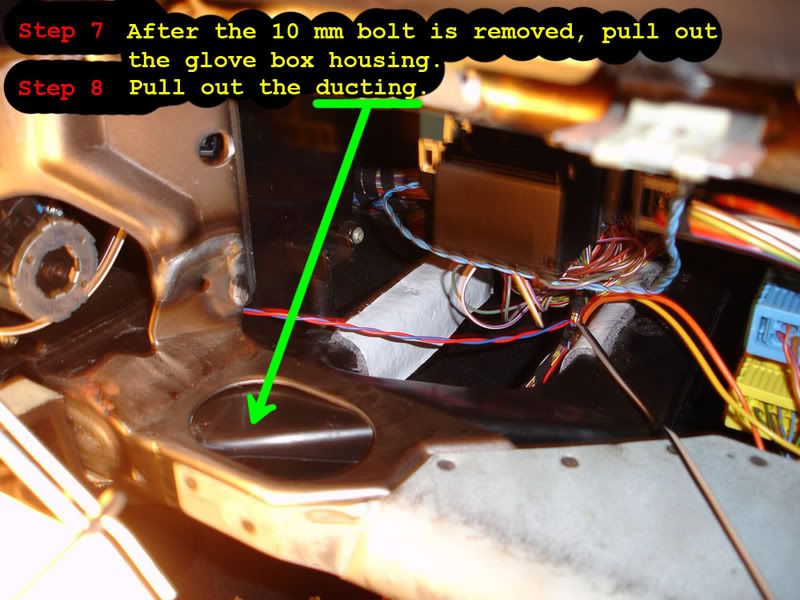
I couldn't find detailed procedures when I searched for the Cabin microfilter DIY so I decided to make one myself. I know that most people who have done this before will say you wouldn't have to disassemble the glovebox, etc, and they can probably describe the procedure in a sentence or so, I tried to do it without taking the glove box out but it being my first attempt, I couldn't help but take everything out. IMHO it is better to disassemble the glovebox so you wouldn't have to lay upside down trying to take out the stuff you need to...
If this is the first time you're doing this, this DIY will make it 10x easier, it points out every little detail step by step you'll probably finish the job within less than 30 minutes.
The cabin microfilter should be replaced every 12 months, if you're one of those who often have hard times remembering dates, then you might want to mark your new filter with the date you installed it, or with the date you need to replace it...
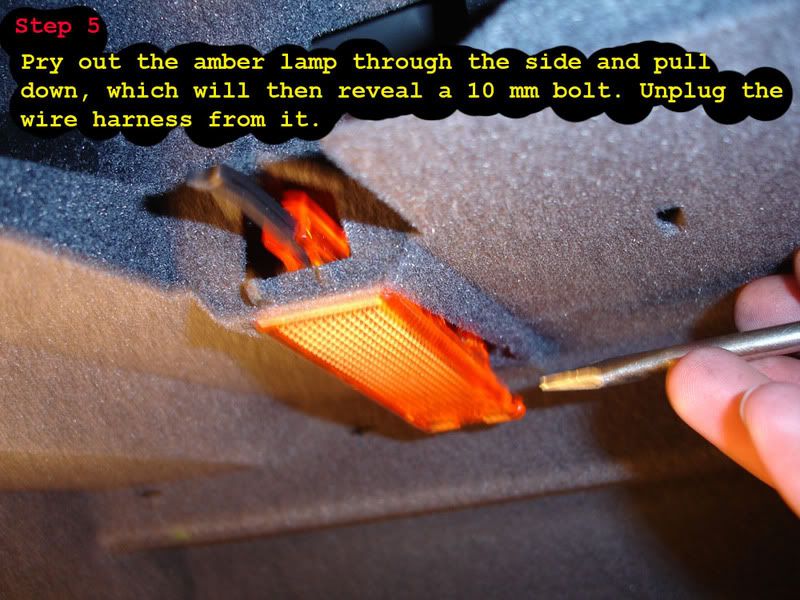
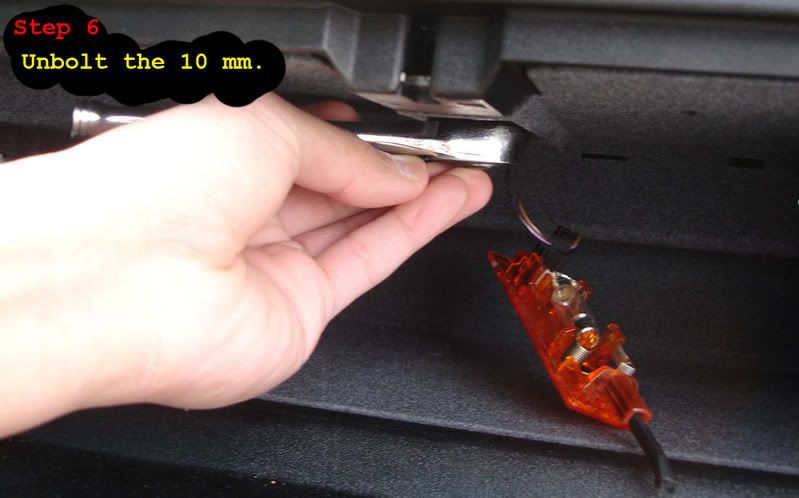
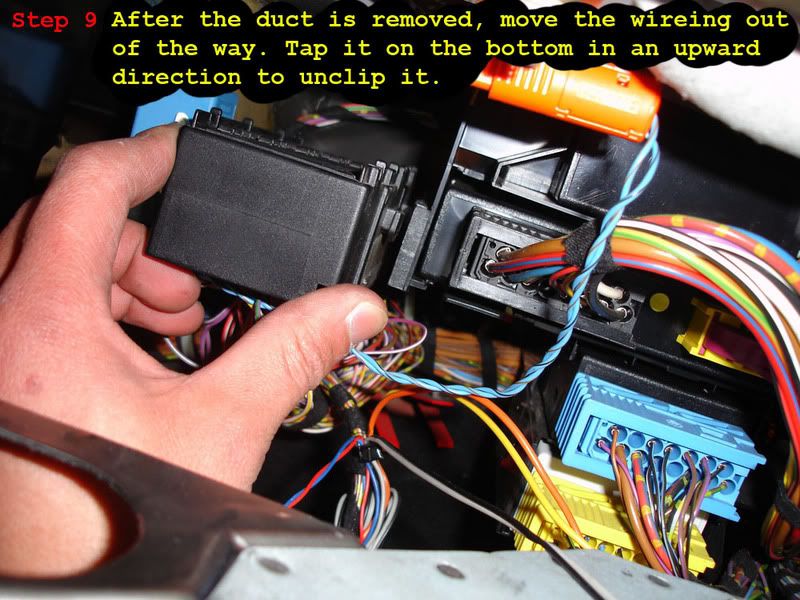
EDIT Step 9: you unclip the wiring by pressing on the tab towards the left (this tab is visible in the next picture[Step 10] above the bar code) before you push it up and move out of the way.
You may vacuum the housing if you feel like it.
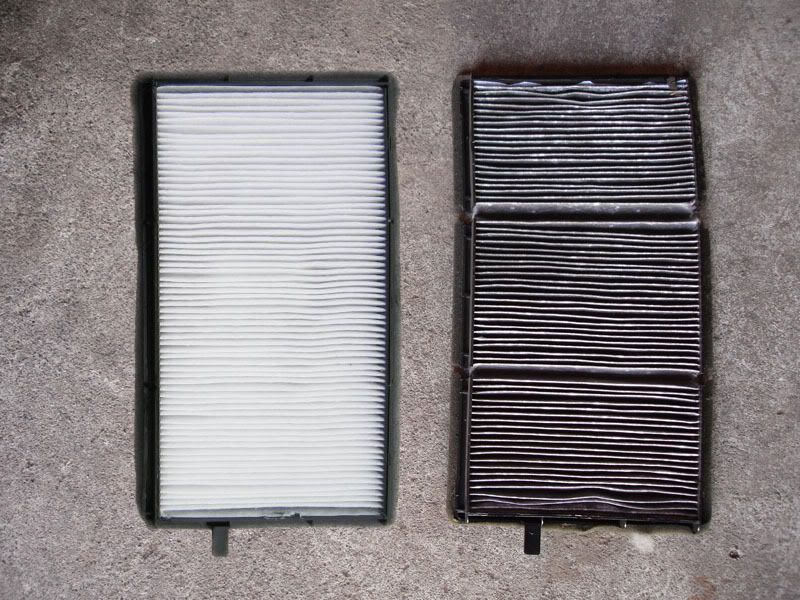
My cabin filter is bad but not as bad as with leaves falling off when I took it out of its housing;
Last edited by Blink21Me; 12-23-2011 at 05:01 PM. Reason: added notes on Setp 9
Member
nice write up , thanks alot for sharing
No more M3, driving a Camry TuRD
Member
thanks man, can never have enough good DIY archives.
>=]
no probs
Member
Great writeup. I just finished doing mine a few hours ago, using this writeup. The hardest part, I thought, was moving the connectors out of the way. Took me about 1 hr. Thanks!
Tola
Member
Thanks for the info, I've been meaning to do this for some time and had heard that it was difficult. I think I'll give it a go.....
Member
Thanks for the *great* DIY. I followed it step by step today. Despite great instructions, this job is a PITA because of the very tight working space and kludgy filter access.
FWIW - here's a couple of notes:
Step 8 - ducting is held in place on top left by plastic reusable "rivet" that can be pried off with screwdriver.
Step 9 - electronics are held in place on rt side by two clips, that unclip when you lift up on it (thought I broke it when it came free).
Hardest part for me was getting underpanel back in and aligned with vents, glovebox, kickpanel and console panels.
I'll be driving around the pollen in the air from now on :-)
>=]
I took a close look at that and confirmed it could be separated, then used some muscle and punched it upwards...Originally Posted by tseak

>=]
Yes it was kinda hard to reinstall the lower trim panel, that took me about 10 minutes with the back of my head on the floor...I apologize I forgot to mention about it, couldn't recall because mine didn't have that rivet when I took the ducting out, but I did notice the spot a screw or rivet is supposed to be in to hold the ducting in place...
Member
great writeup, thanks man!
Chariots:
1998 M3 Coupe
2003 SV650S Copper
2007 4-Banger Camry
Mods:
AA Intake, AA Track Pipe, AA Exhaust, AA Tuning, Reiger Front Bumper w/Carbon Fiber Splitter, AA Strut Bars, BMW X-Brace, 3.64 40% LSD, Carbon Fiber Foglight Brake Ducts, Turnermotorsports Brake Cooling Kit, H&R Coilovers, Eibach Sway Bars, Ground Control Rear Shock Mounts, AA Diff Support Bracket, JTDesigns Trans Mount, JTDesigns Undertray, Momo Millenium Steering Wheel, White Face Gauges, Euro Two-Piece Floating Rotors, Hawk Pads, 18" SSR GT3's...More to come!
Member
hell yeah, best diy write up yet. I've been stalling on doing this- I bought my new cabin filter 2 months ago. I finally decided to tackle this. Your write up was perfect. I don't know how my mechanic was going to charge me $125 (including parts) to do this. I did notice my filter was broken into three sections. I installed mine without having to break the new filter. Piece of cake.
Total time after backing the car out of the garage, breaking out the tool bag, install and cleanup (about a half cup of leaves and debris)= 1 hour.
I think I am going to send my old black filter to the lab to see if they can find some new forms of bacteria on there.
No more stinky a/c.
Yeah baby
>=]
^^^ LOL, Glad to hear
Excel Motorsports
Thanks for taking the time to do a great writeup.I will do my filter change tomorrow.
Member
That's fantastic. Better then any manuals I've read. I'm doing mine as soon as weather permits. Thanks!
Member
Thanks for this- very helpful!
This is a great writeup, just wish I had this 3 months ago- would have saved learning some of this the hard way
Member
filter is sitting in the shop waiting for me to tackle this project. hopefully i will be able to get to it tomorrow.
Member
Thanks for the great writeup. While i was in there i wanted to see if there was a reason for my recirc not working and sure enough the motor was just hangin there. Turns out the motor was 180 degrees off- so i reset it and works good now. Thanks again.
Member
I also thank you for the great write up. I just finished putting it all back together, it went well thanks to your write up. The old filter was very dirty, I was glad I changed it. I also fixed the glove box door sag while I had it apart anyway. Clean fresh cabin air now!
>=]
No probs guys....
Member
Did you just fasten it down tighter when you were piecing it back together? Or did you use new screws and screw it into position?
I have some glovebox sag and am I little worried if I take it all apart, it may be worse off once I put it back together.
Member
I just took almost everything apart but I have 2 problems:
1) The old filter isn't a box type like the one I got which is like the ones on the pics above, it's just the paper, it doesn't have any plastic, I'm not sure if the new filter is going to fit there.
2) I don't have the right tool to take the two 8mm bolts off, I have a 8mm socket but I can't use it there because the space is too tight, what can I do?
Also I turned the fan on to see if it can blow the dirty away and it's very weak now, the #1 position doesn't even workI hope I didn't break anything.
Thanks.
Member
Well, I did it, I could find the right tool to remove the 8mm bolts.
So the new filter is in, what a bitch... The new one fit right in but it seems whoever replaced it before only put the paper and not the plastic surround which is a lot easier to fit in
I was hoping that with the new filter I would get a lot more air but it didn't happen
Member
I bought the filter a while ago and still haven't been able to convince myself to do this. In fact, this job as well as the window motor I just replaced leave me seriously questioning the Germans concept of design for serviceability. At least this write-up should help. Thanks!
I drink your milkshake
Cool DIY. There is one that was posted in the E36 section that received a lot of discussion. It is linked in my sig.
To argue with a person who has renounced the use of reason is like administering medicine to the dead. ~ Thomas Paine
You can safely assume you've created God in your own image when it turns out that God hates all the same people you do. Anne Lamott
Custom watch straps for sale
FOR SALE: watch straps!!
E36 DIY: My articles are now located in the E36 DIY page
Member
which is why you can do the same job in the e46 in 2 minutes.
 Posting Permissions


 Reply With Quote

Bookmarks