
 ShutUpWomanGetOnMyHorse
Sticking with the theme of my other DIY.. IDIOT PROOF.. Hopefully, first timers will find this thread useful despite the topic being a repost.
BLABLABLA follow these instructions at your own risk. I am not responsible for any bodily injury you inflict to yourself.
TOOLS REQUIRED:
6MM AND 16MM OPEN WRENCH / 10MM AND 13MM SOCKET
EDIT: You'll also need Vise Grips
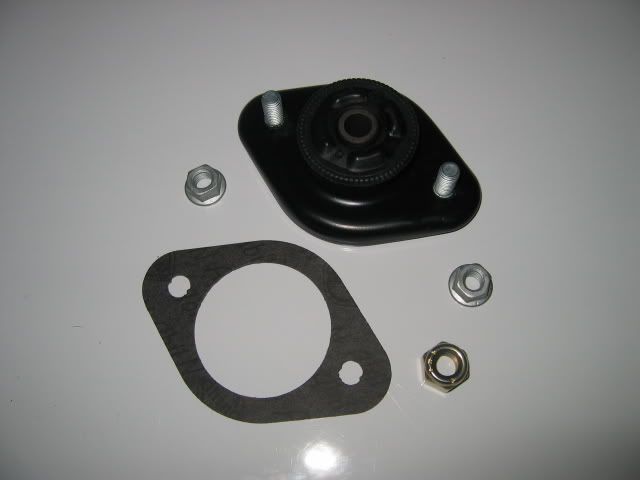
NEW RSMs OF YOUR PREFERENCE. HOWEVER, IF YOU DECIDE TO GO OEM, HERE ARE THE PART NUMBERS:
RSM (2): 33 52 6 754 096
Z3 PLATE (2): 51 71 8 413 359
WASHER GASKET (2): 33 52 1 128 734
SELF-LOCKING COLLAR NUT (4): 31 33 1 092 887
SELF-LOCKING HEX NUT (2): 33 52 1 137 360
THE PROCESS: ....(I'll take more pics later.. )
1) JACK UP THE CAR, YOU JUST NEED ENOUGH ROOM TO STICK YOUR HAND/ARM IN THE WHEEL WELL. IF YOU CAN TOUCH THE RSM, IT'S HIGH ENOUGH.
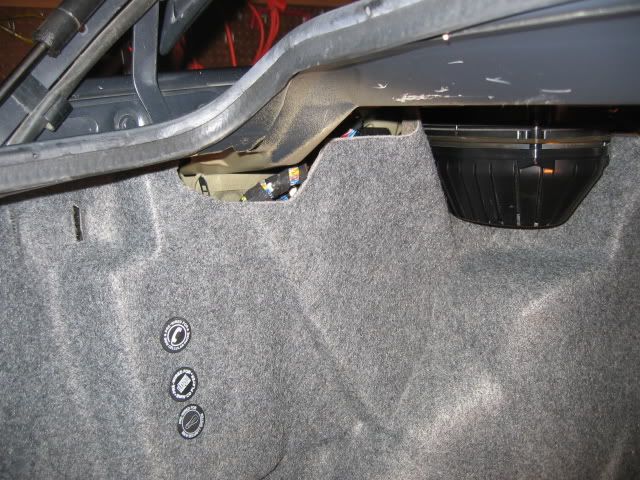
2) OPEN THE TRUNK AND TAKE OUT THE LINING THAT COVERS YOUR SPARE TIRE.
3) TAKE OFF YOUR TAILIGHT COVER.
4) USE YOUR 10MM SOCKET AND UNSCREW THE TWO SCREWS SECURING THE PANEL TO THE LEFT OF YOUR SPARE TIRE. REMOVE THE ENTIRE PANEL.
5) CARPET SHOULD PEEL WITHOUT ANY PROBLEMS:
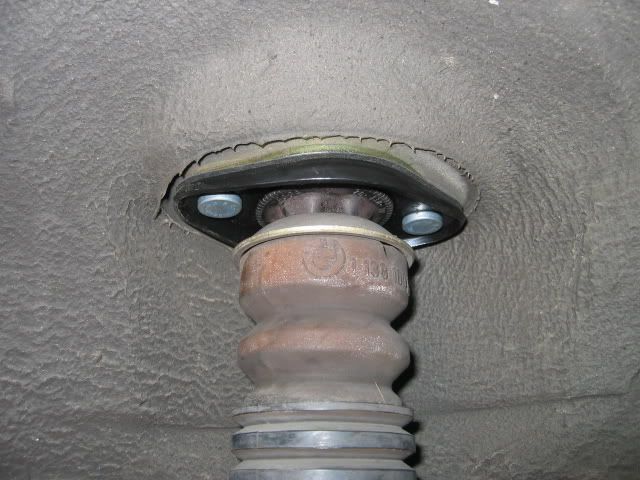
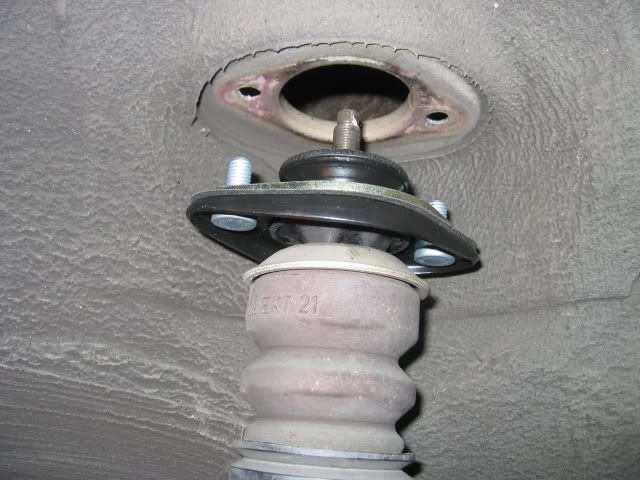
HERE'S THE SHOCK MOUNT!!
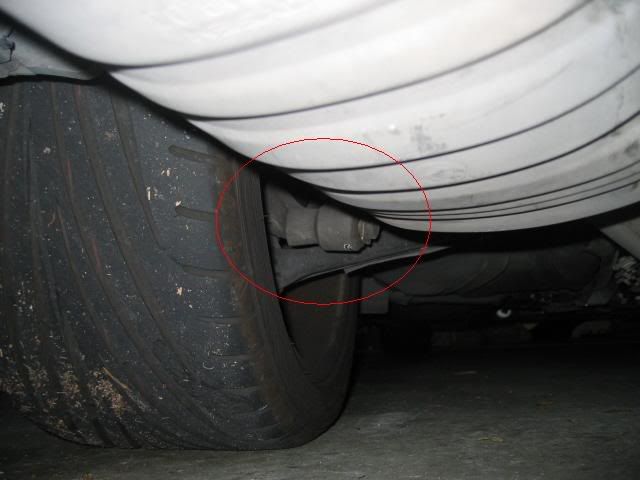
YOU CAN ALSO SEE IT FROM THE WHEEL WELL:
EDIT: These pics were taken after I mounted the RSM with the Z3 plate in the wrong order, which has now been fixed. It's a good reference, however, read the instructions instead of just following pictures.
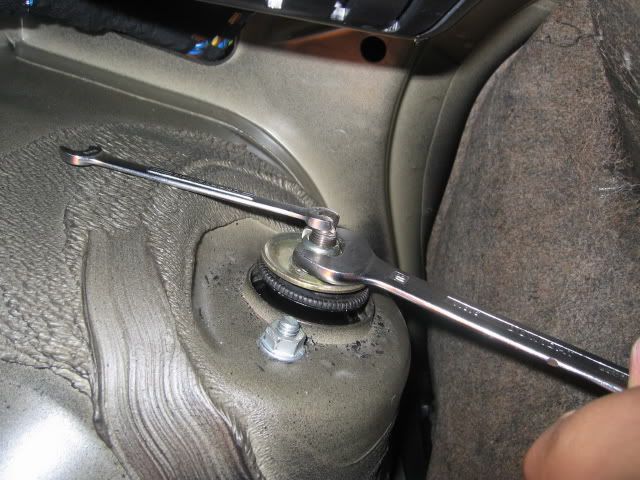
6) TAKE YOUR 6MM AND 16MM WRENCH AND UNSCREW THE HEX NUT, TAKE IT OFF:
EDIT: Sometimes the 6MM wrench is not enough, use your Vise Grip
7) USE YOUR 13MM SOCKET AND UNSCREW THE TWO COLLAR NUTS.
8) PUSH DOWN. REACH INSIDE THE WHEEL WELL AND PULL THE SHOCK MOUNT OUT:
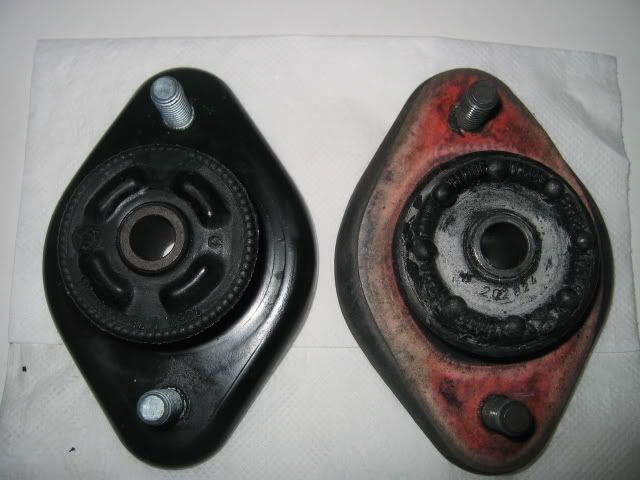
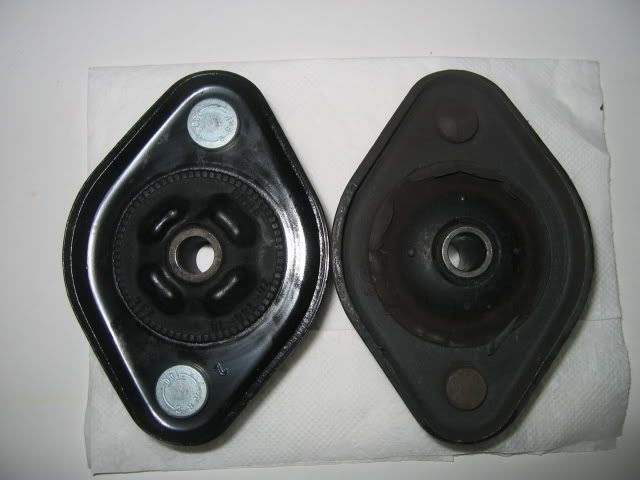
COMPARE THE NEW WITH THE OLD.... I ONLY HAD 30K ON MINE...
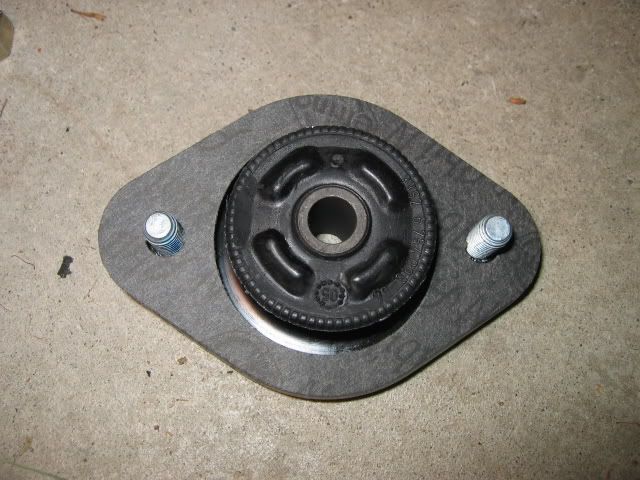
9) PUT THE GASKET ON TOP OF THE RSM BEFORE REINSTALL, Z3 PLATE WILL BE PLACED ON TOP OF THE RSM INSIDE OF THE TRUNK:
10) TAKE A FLOOR JACK TO ASSIST WITH GUIDING THE RSM BACK IN. BELOW IS A PIC OF WHERE YOU SHOULD JACK FROM.
YOU'LL NEED IT FOR SUPPORT WHILE YOU'RE SECURING EVERYTHING.
EDIT: I jacked the car too high the first time. If the car is not jacked up that high, you won't need to do this. The shock can be pulled up by hand.
USUALLY, IF REINSTALL IS A PITA, I'LL CONTINUE THE DIY. HOWEVER, REINSTALL WAS PAINLESS SO I'LL JUST SAY "REVERSE FOR REINSTALL."
HOPE THAT HELPED.
EDIT: PASSENGER SIDE:
1) Remove the "tray" over the battery.. (It's probably called a battery cover) No tools required. Just pull the clip back.
2) Remove the CD changer. There are a total of three nuts. 10MM socket will work for all three. Unplug the two wires behind the CD changer. You probably will be able able to navigate the carpet without doing this, however, it takes a minute to remove and I found the process a lot easier. It's up to you.
3) Before you pull out the carpet, you'll need to cut small hole in your carpet to guide the fuel cable out. Nothing major, plus you won't be able to see the cut since it's behind the CD changer. EDIT: You can pull the clip from the cable, there's a bump along the line. If you get lazy like I did, make a small hole.
4) Pull the carpet away... you'll see the sound insulation. There's another cover that you need to remove. Again, 10mm socket for two nuts.
5) With the cover out of the way, you'll be able to pull back the carpet AND the insulation to access the RSM..
6) Remove and install the rear shock mount per the driver's side instructions.
A Little more work, but still pretty simple. PM me if you have any specific questions.
Last edited by M13; 05-30-2006 at 12:02 AM.
ShutUpWomanGetOnMyHorse
This piece was underneath the carpet... I didn't put it back.. what is it? Do I NEED it?
Nevermind, I put it back.
Last edited by M13; 05-29-2006 at 12:44 PM.
License Revoked
Dude, unbolt the RSM from the body, THEN separate the shock from the RSM once it's out of the car. MUCH easier this way.
Not a Detailer Anymore.
Should have bought the RSM's that have the wedge centre bushing as well.Originally Posted by SQ Bimmer
They will last a lot longer than the BMW OEM type that always tears away from the rubber.
License Revoked
I'm using E46 m3 vert rsms with the z3 plates. Supposedly they will last a while.
Didn't replace any hardware though...
ShutUpWomanGetOnMyHorse
It's not very difficult, you can't get MUCH easier... it's like saying: "Face the toilet paper up instead of down.. it's MUCH easier to get to"
Buy whatever you want, just don't tell me what to buy.
Trying to help out the forum, and get all this random BS.
I'm about to just delete this thread.

Member
M13,
Please don't. You've actually inspired me to do mine. Until this point I thought it was more pain in the ass than anything else. Because of your post yesterday, I placed my order for the stuff and I'm doing this next week. Not everyone is criticizing(sp) your DIY. I found it very helpful.
On behalf of all the lurkers and noobies, thank you.
Is my helmet big enough?
Not a Detailer Anymore.
Toward the wall picks up dirt when it drapes. lol
Hey, just a suggestion.Buy whatever you want, just don't tell me what to buy.
Thanks for thinking of the members.
Trying to help out the forum, and get all this random BS.
No can do. Try it.
Member
Sound insulation.
ShutUpWomanGetOnMyHorse
Does it affect the cabin or .. trunk?
I drove around without it.. Didn't make much of a difference actually..
Member
This picture doesn't look right. It looks like you had the reinforcement plate mounted between the RSM and the shock tower. Its supposed to go on top of the shock tower (inside of the car).
The order should go (from bottom to top): rsm - paper gasket - shock tower - reinforcement plate.
I'm assuming that the pics you took of the removal of the RSM are actually the installation process, but just reversed. As Homer would say, D'oh.
Don't worry, the install process is much quicker the second time around. I've reinstalled my RSM way too many times (accidently mounted it upside down, forget to grease the bushings, forgot the paper gasket, didn't pre-load the bushing...). The last I did it I didn't even bother to take the wheels off. Damn those shortened shock pistons...
Member
Maybe the rear passengers might notice. <shrug>. If you didn't notice it, then you just saved yourself some weight.
ShutUpWomanGetOnMyHorse
I read that the Z3 plate goes on top. But when I was installing it, I was thinking... it's not doing anything down there..At least the plate will act as a barrier on the bottom.. O, well. No weird noises or reduced handling yet...
What does the plate do anyways?
Grease Bushings... preload the bushings? crap.. didn't read that.. Elaborate? ..
You don't need to take the wheel of to replace your RSM, I didn't..
This was my first time so.. thanks for the feedback.
ShutUpWomanGetOnMyHorse
My thoughts exactly... My car's a "two seater".. no one sits back there anyways..
I'm tempted to leave the spare tire out as well. Save 23lbs ..
Not a Detailer Anymore.
That spare affords rear crash protection. But I don't want you to construe this as telling you what to do, just advice...no, there I go again.
Just a reminder.
Member
You're going to be kicking yourself in the head when you get flat, and no spare tire to put on. 23lbs nothing compared to peace of mind.
And, those "fix-a-flats" dont always work, and i wouldn't recommend it for a low-profile tire.
Great write up M13. But you should elaborate that the carpet is a little harder to pull on the passenger side because of the cd-changer. (assuming people have the oem-changer) which most M's do. ^_^
Member
When your rear shocks are rebounding (extending in length), the RSM is being "pulled" down. The only thing that is preventing your RSM from being pulled away from your shock tower is two little nuts. Those nuts probably have a combined contact area of less than 0.5 square inches. So you are concentrating all that force onto 0.5 square inches. By placing the reinforcement plate on top, you are speading the force over a much larger area. This reduces the chance of damaging your sheet metal.
Don't worry about the greasing and pre-loading of the "bushings". I have the Ground Control RSM that has the urethane bushings. Since the shock piston isn't perpendicular to the RSM when the suspension is loaded, the urethane bushing can creak when going over bumps. By greasing and removing the preload on the bushing, you eliminate the noise. It's not a lot of noise, but it's an easy fix, so why not...
The Ground Control RSM also have the mounting bolts welded to the reinforcement plate, meaning that the nuts to remove the RSM are accessable in the wheel well, not the top of the shock tower. By doing this, I can remove my RSM without removing the carpet inside the trunk.
Member
This is a guess as to how the reinforcement plates work...
By putting them on top of the shock-tower (inside the trunk) would distrubute the load across a larger surface area (the plate vs just locking nuts) thus putting less shearing stress on the bushing...Also making the whole assembly more stable.
Think how a sandwich has a top and bottom bun to keep the slippery BLT in check inside of it...as you hold on to it going in for a bite.
Putting the reinfor. plate on the bottom wouldn't do anything positve.
Again, M13...i don't mean to be littering your thread, kudos to you for taking pics and making a great write up, as we all here are grateful of your contribution.
Edit: i must have been tired + hungry, please excuse my crappy analogy.
Member
ShutUpWomanGetOnMyHorse
Ok that makes sense... I'll fix the DIY and replace the reinforcement plate.
I'll probably put the spare back.. it was just a joke about leaving it off.. and I hate those run flat things.. it's not recommended for Z rated tired anyways..
Ok, I'm going to do the other side. I'll address the CD changer issue too.

ShutUpWomanGetOnMyHorse
All done. It was sort of a pain on the passenger side..
1) Remove the "tray" over the battery.. (It's probably called a battery cover) No tools required. Just pull the clip back.
2) Remove the CD changer. There are a total of three nuts. 10MM socket willwork for all three. Unplug the two wires behind the CD changer.
3) Before you pull out the carpet, you'll need to cut small hole in your carpet to guide the fuel cable out. Nothing major, plus you won't be able to see the cut since it's behind the CD changer.
4) Pull the carpet away... you'll see the sound insulation. There's another cover that you need to remove. Again, 10mm socket for two nuts.
5) With that out of the way, you'll be able to pull back the carpet AND the insulation to access the RSM..
A Little more work, but still pretty simple. PM me if you have any specific questions.
Member
good DIY, this is on my list to take care of this summer.
Permanently single
Don't take the spare tire out. It's supposedly part of the crush resistance of the rear end of your car and thus is a safety issue if you're ever rear-ended.
And there's no need to cut a hole in the carpet for the fuel door pull. Just disconnect the release. If you pull the carpet away from the side of the trunk a bit so you can get your hand around back, you'll feel a bump in the line. Dig with your fingernails a bit and you'll feel a groove. Just pry that groove with your fingernail and it comes apart easily (the bump splits apart along the axis of the line).
There's also no need to pull out the changer. Just tug the carpet downwards just a bit, so you can peel the top edge down to clear the bottom of the changer.
After installing coilovers, swapping to E46 RSMs w/ Z3 plates, adding strut brace, removing Z3 plates, to Ground Control w/ brace, to TCK w/ brace (and new coilovers), to TCK w/ Z3 plates (removed brace), I've done this a few times. And that doesn't include helping friends do theirs.
Oh, and if you have a rear strut brace, don't install the Z3 plates. The sandwich will then be too thick and you won't be able to screw the mounting nuts on properly.
-c///m
1997 Estorilblau M3 2-door
Performance: JC euro intake, AA Gen III exhaust, Evosport UDP, fan delete, Schrick cams, OBD-I intake manifold, 540 HFM, ASC delete, 24# fuel injectors, DiffsOnline 3.46 40% LSD, Boston BMWCCA sticker
Suspension: TC Kline SA (Suck-A**) coilovers, ///M front strut brace, X-brace, TCK RSM, Powerflex RTAB, Turner sways, Motorforce camber plates, RRT reinforced rear LCAs
Lighting: ZKW w/ HID, Euro clears, Lamin-X foglight film
Other: Z3 steering rack, SS brake and clutch lines, Stygar SSK, UUC TME, VDO Gauges, MB Quart Discus components, MB Quart Discus 6x9 triaxials, Audio Art NA 4070 280W amp
ShutUpWomanGetOnMyHorse
I agree, if you take the spare out, put it back.
Regarding the fuel door pull. I thought there was a way to pull it apart, but didn't want to read the forums to find the solution. Luckily, the hole is no biggie, and won't be visible.
Althought you can pull the carpet back without removing the CD change; it only took 60 seconds to remove, and it makes the process so much easier.
Either way is fine. Thanks for the input.
Member
Question:
will the washer gasket and z3 plate work for any RSM? for example...my repair shop rsm?
 Posting Permissions


 Reply With Quote
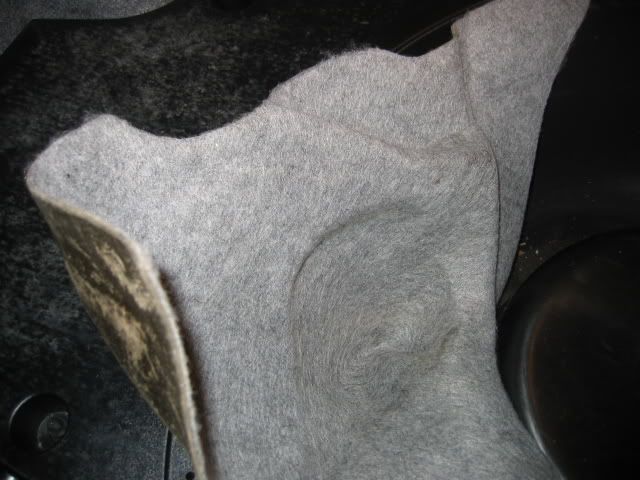


Bookmarks