
 Member
Just finished installing new poly steering rack bushings on my 83 320iS. I got mine from Bavauto for about $50. This was a really tough job made worse by how dirty and oily my car is and not knowing how to reinstall the rack. Total time was 5 hours but that includes lots of parts degreasing and stopping to take pictures. This would really be best accomplished by 2 people with the car on a lift if you have access to one, I didn't.
Tools needed:
Ramps and/or jack
17mm, 13mm, 10mm sockets and wrenches
2 large C clamps
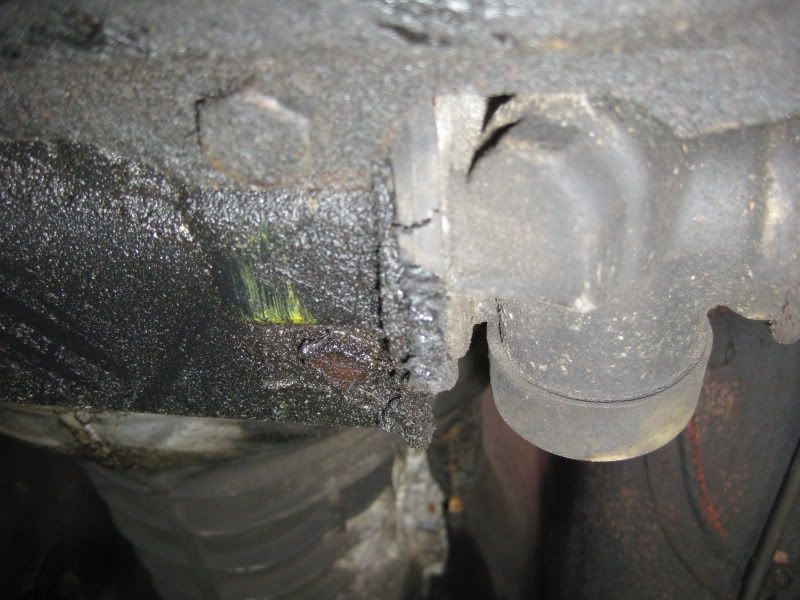
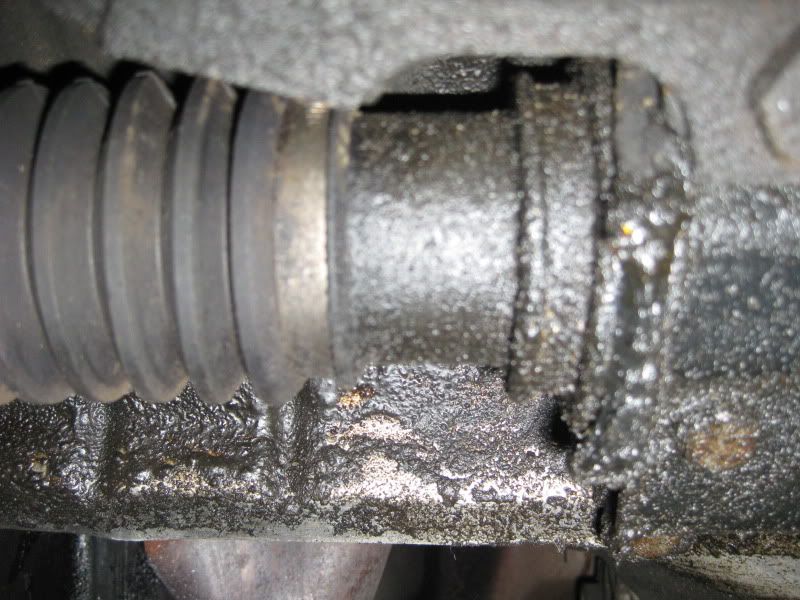
My original bushings were in terrible shape, cracked and deteriorated by oil. There was a bad shimmy in the front end when going over large potholes.
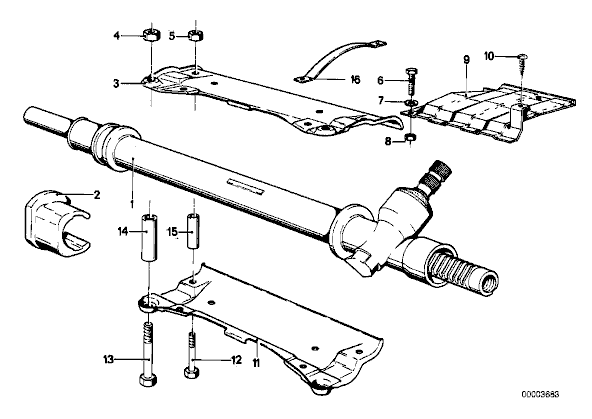
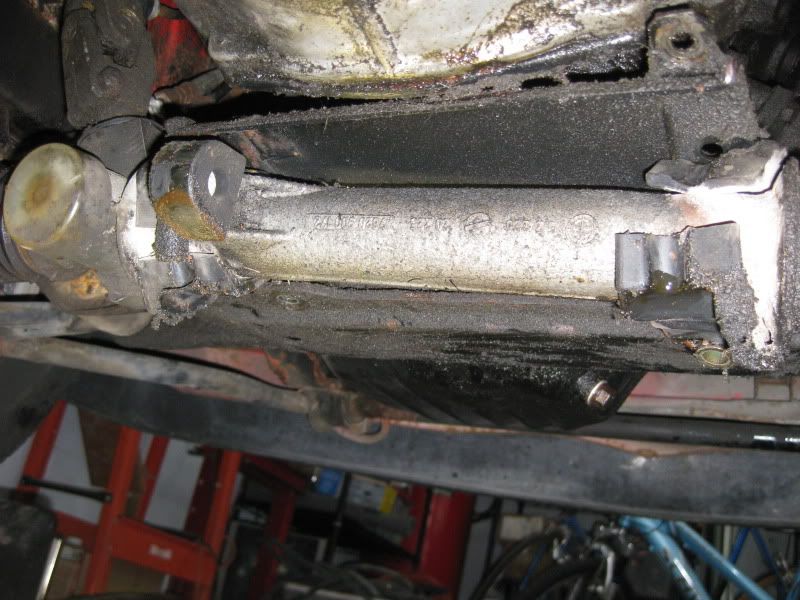
This image might help as you start to tear into the job
Step 1:
Jack up front end and chock rear wheels. You will want the front tires off the ground.
Step 2:
Remove heat shield by removing 3 attaching bolts. There are 2 13mm bolts one through the steering rack mount and one through the sub-frame. There is one 10mm screw into the right frame.
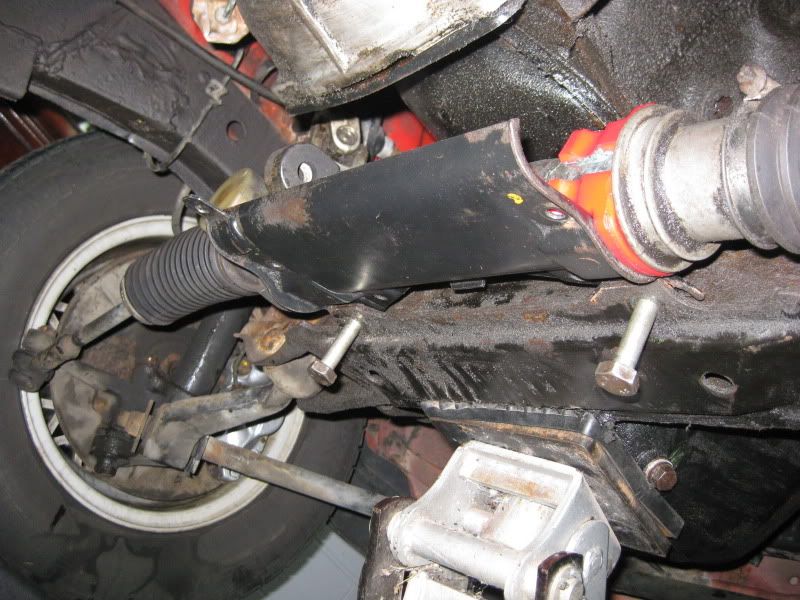
Step 3:
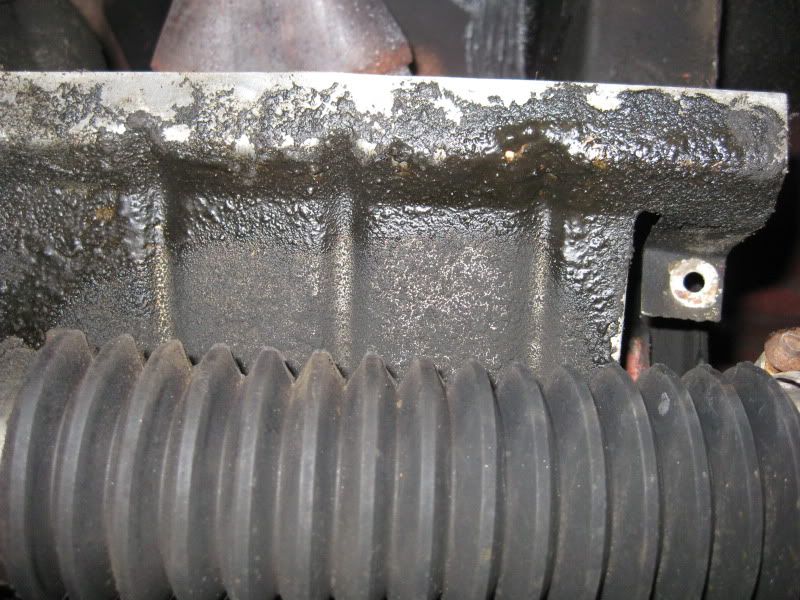
Remove the steering rack. Remove the 2 17mm bolts holding the rack to the subframe. They have nuts on the top and you will need to hold them with a 17mm wrench. Once the bolts are off you can pry the rack towards the back of the car and down. Remove the two smaller 13mm bolts and the steering rack mount will separate. There are metal bushes for each of the 4 bolts. Once out it should look something like this.
Step 4:
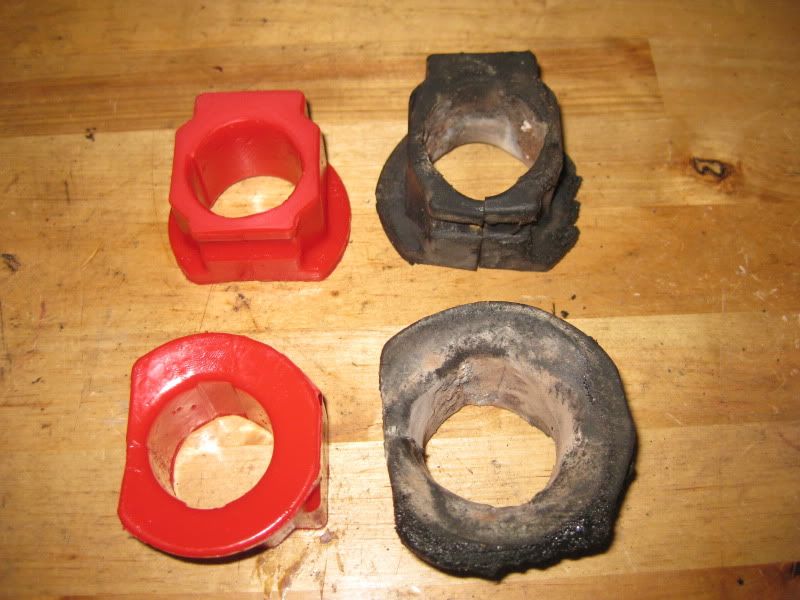
Remove the old bushings. The old bushings are split and will pull off. My steering rack had a lot of powdery residue from the aluminum housing corrosion. I cleaned it with a wire brush. Here are the old and new bushings:
Step 5:
Install new bushings. I always coat polyurethane with synthetic grease so i coated the inside surface and slid the new bushings over the rack. This is about when things starting going bad for me. I put the two shells of the steering mount back and tried to install back into the tabs on the subframe. The poly is much stiffer than the rubber so it won't compress enough to fit back in. On top of that you must install the two metal bushes prior to sliding the rack back in and they want to fall out, repeatedly.
Step 6:
Remove the transmission bellhousing inspection cover. This buys you just a bit more clearance which is needed to get the rack back in. Sorry, no pix but there are 2 10mm bolts and one 13mm bot to remove.
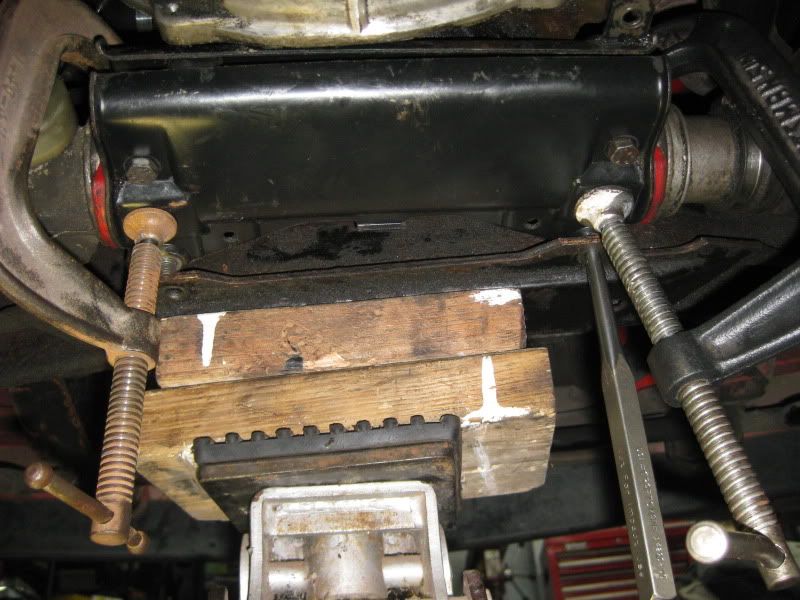
Step 7:
This was the magic trick for me. Reinstall the 2 smaller 13mm bolts and nuts including the metal bushings with the rack hanging down. Then put the C clamps on each end of the steering rack mount and tighten them down hard like this:
Step 8:
Reinstall the rack. Slide the rack back in between the upper and lower mounting tabs on the subframe. Reinstall the 17mm bolts through the rack mount and bushings and tighten.
Step 9:
Reinstall transmission inspection plate. I don't know what this is intended for because you sure can't inspect anything useful through here, like the clutch.
Step 10:
Reinstall heat shield. 2 bolts, one screw.
You're done! Lower the car, cleanup your mess and go for a test drive. This install made a big difference on my car. Steering is much more precise and the pothole shudder is gone.
Last edited by conv440; 02-26-2011 at 04:55 PM.
Member
Haha. I cussed for three hours, tried a c-clamp, but it was too big. I finally figured out, there are extra holes up next to the holes where the 17mm front bolt go through. I put the back bolts in, then put to extra 13mm bolts and nuts from the bottom up, tighted them down, put the front spacers in when it got close, tightened those bolts the rest of the way, the whole "sandwich" slit right in. Put the 17mm bolts through, done. Oh, I used a scissors jack to help position the assembly. I could probably do another one in under an hour now, piece of cake.
It's a cracker car
Great write up! Thanks. I want to do this too. How-to pics rock!
Member
Good stuff. Might want to add this to the faq?
Member
Thanks for the contribution!
Some of us old farts prefer to do it on the bench/deck
I'm not very old, just feel like it sometimes
Last edited by epmedia; 02-26-2011 at 06:21 PM.
Tbd
Member
agreed, much easier to remove the rack entirely and install them on the bench, but that's a great writeup.
BTW, I also sell urethane rack bushings
Last edited by Jester323; 06-16-2012 at 02:46 PM.
e21: 1981 2.5L sleeper
e21: 1982 323i Baur TC 1 # 4210
e21: 1980 323i project or parts car, can't decide
e21: track car project
e46: 325XiT

click here for the latest updates
Member
Thanks for the replies. If there's an easier way to do this please let me know, like rebuilding on the bench, I'm guessing that you need to pull the tie rods. I don't see a lot of info on the E21s especially for DIYs, but I know a lot of people have been doing amazing things with these cars for a long time. My background has been in American muscle (Mustang, Challenger) and then E34 and E46's. I got this car 3 months ago and am becoming a big fan of the E21s.
Last edited by conv440; 02-26-2011 at 10:48 PM.
Member
Yes, you would need to either remove the tie rods from the rack, ot the ball joints from the control arms, but it is worth it for how much easier that makes it.
There is a DIY/FAQ section stickied at the top of the e21 subforum here. Check it out, there is tons of good stuff there.
e21: 1981 2.5L sleeper
e21: 1982 323i Baur TC 1 # 4210
e21: 1980 323i project or parts car, can't decide
e21: track car project
e46: 325XiT
Member
For on the bench/deck, theres a couple extra steps, but not too bad...
Mark the outer rod threads and unscrew them.
Mark the flex coupling on the steering shaft, remove the upper 2 nuts?
And of course, adjust the toe after assembly.
It's kind of a pita either way, especially for old farts:
And yes - Jester makes some kick-a** bushings, get with him someday for your future bushing needs. I must say: "thank you" again Jester.
Tbd
addicted.
WOW thanks, I needed this because I just got mine recently and started to put them in, the new ones are so much stiffer, thanks for having perfect timing!
-Christo-
>1983 320i, K-Jet turbo, Eurometric poly, Ground control coil overs, Koni yellows, rear sway, full camber/toe adjustment, Ireland Engineering, LSD. 15x7 OZ Alpina reps, 205/50/r15 Kumho Ecsta XS
>1986 325es, RB20det, Poly rear everything, e46 front control arms, rear camber/toe adjustment, 17x9 STR, BC Coils, 250whp 2300lbs w/o driver
Member
great write up. just installed same bushings. i did not use c-clamps but instead initially put the rear bolts in the 2 extra holes up front in the clam shell to compress the leading edge. after the front top and bottom clam shell edges were seated in place i removed same bolts and returned them to their original mounting holes. remember to remove these bolts before pushing the clam shell fully into place! install larger front bolts and voila! about 3 hrs with cleaning. watch the bell housing lower plate cover as it cut my thumb deep!
oops! just read daniel's reply! i second the method!
Last edited by gsumzzz; 02-27-2011 at 06:58 AM. Reason: Automerged Doublepost
Member
Originally Posted by Jester323

PM sent
He who dies with the most unfinished projects wins
Member
Also PM'd you about these a couple of times a while back. Would like to know if you ship them to AUS and at what cost?
Thank You.
Member
Wow, I thought I had a tough time with this. I used Jester's bushings. I already had the tie rods off, but I managed to do it with help leaving the steering rack in place. I did this last summer, and I really can't remember how we got it done. But, no c-clamps were used...lots of cussing though.
Member
No C-clamps, jeebers making me feel practically wimpy
I use to have baller status, I should work out a tad
Oh wait - I'm just gonna turn up the radio and take a nap instead...
Last edited by epmedia; 02-28-2011 at 11:14 PM.
Tbd
Member
wooo thanks! had poly bushings sitting in my garage for over 5 years..... now i think its time to install.cheers
1972 2002
1981 323i
Member
It's not a fun job to install them, but once you have... SOOOO worth it!
e21: 1981 2.5L sleeper
e21: 1982 323i Baur TC 1 # 4210
e21: 1980 323i project or parts car, can't decide
e21: track car project
e46: 325XiT
Member
I did mine on the car exactly like the OP because I couldn't get the rack free from the steering shaft.
Amen to that. From 'F' to 'F1'
Eric P.
Member
Oh yea - some of you folks have rivets instead of bolts on the steering flex coupling/disc? I can see that being a major pita
Tbd
Member
This made such a difference on the car! So now I'm hooked and want to do more for my handling. My goal is a fun driver for autox. Despite my very poor power to weight ratio (125hp and 3440lbs!), at least I can make it perform in the turns. I've been searching for 23.5mm and 16mm poly sway bar to frame bushings and possibly fcab bushings but haven't found anything. I think someone on this forum was making them, Jester323? The manufacturer in Australia doesn't seen to have any US distributors.
Member
Member
I've been trying to source 27mm poly sway to frame bushings myself. my car came wiht one poly and one rubber(WTF?) and when i recently put in new contorl arms ther rubber bushing literaly disintegrated
please update us if you find a place to get them
hey thanks! arggggg they only sell up to 26 mm!
Last edited by madmangos; 03-02-2011 at 06:19 PM. Reason: Automerged Doublepost
1972 2002
1981 323i
Member
yes, I make them, I have a mold for the 23.5mm swaybar and can also make custom one-off bushings if needed. PM if interested. I'll need to know the exact diameter of your sway bar, so measure them carefully with calipers.
e21: 1981 2.5L sleeper
e21: 1982 323i Baur TC 1 # 4210
e21: 1980 323i project or parts car, can't decide
e21: track car project
e46: 325XiT
Member
I just did the bushings and i didnt use clamps. Instead i ziptied everything together!
I put ties around the whole thing on both ends. ties through the 17 and 13 mm bolts, next to the 17mm there are holes on the top and bottom pieces and i put ties through those. Then i also put one around the "tabs" on the back side. Ill post the pic up tomorrow. Made the process not bad (NO CURSING!) Only thing i had to do was cut the 17mm ones right before i slide the rack into place.
Member
e21fun, you must have hands like thor! great idea.
 Posting Permissions


 Reply With Quote


Bookmarks