
 I got ur force right here
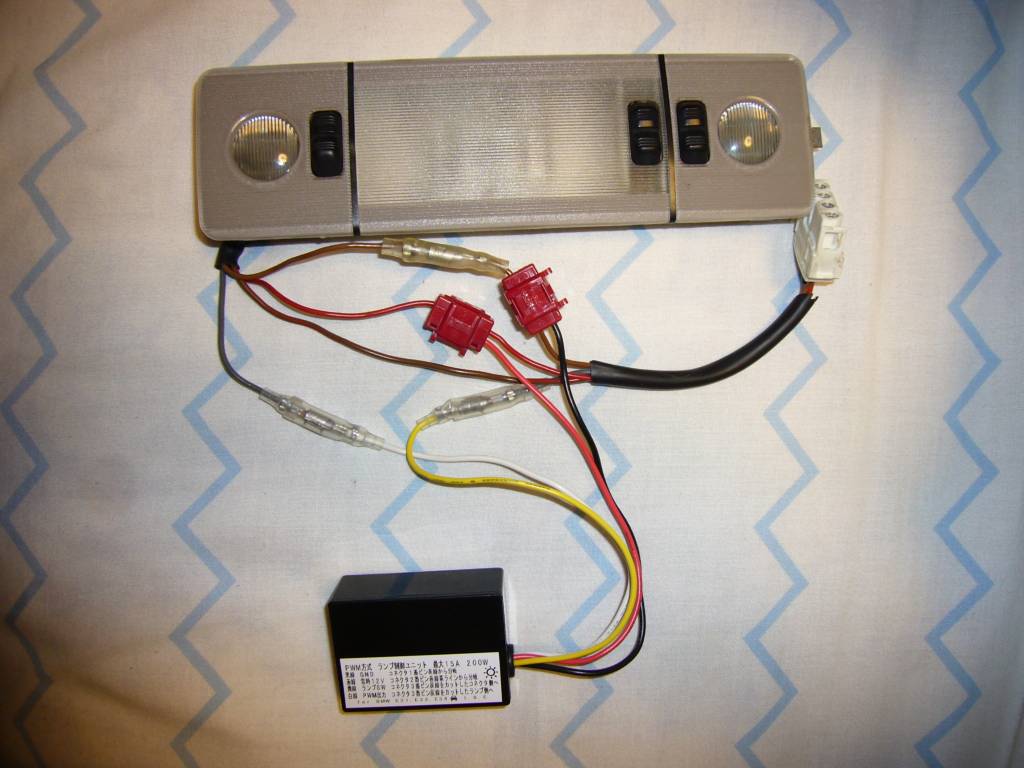
With all the rain at the Bear Mtn Meet, I didn't get to show too many people the dimmer kit I'd just installed.
I installed LED's to brighten/update the look. They are super bright and a bit harsh when they first come on so I ordered Shogun's kit. Exactly what I was looking for.
Front Main Interior Light
[ame]http://www.youtube.com/watch?v=81Bf6-jmxyk[/ame]
Rear Interior Lights
[ame]http://www.youtube.com/watch?v=0iJocrmO27s[/ame]
I believe I have the delays On & Off set to the fastest. I might change the On to the slower setting but I do like it as it is.
The install took 15 minutes and all the parts were in the envelope.
=Removing and Assembling=
- Remove the fuse for your interior lights
- Remove and unplug your front interior lamp unit. Be careful not to nick/cut the wires or yourself when removing the connector over the metal bar. You can do all the assembly in the car but its easier on a table.
- Carefully remove about 2" of the protective black wire protection.
- Clip the grey wire between the front lamp unit and it's white plug.
- Crimp on a male connector to the end closer to the lamp unit and female connector to the end closer to white plug. (Then you can reconnect them if you decide to remove the kit later)
- Crimp a female connector on to the white wire from the Shogun's circuit. Crimp a male connector on to the yellow wire. (You may notice that I used both female on the grey wire as I was more nervous of mixing up the connections than ever taking the kit out)
When connected
=Program the bulb type & delays=
Dip Switch 1 determines what type of lights you have
OFF = LED
ON = Incandescent
Dip Switch 2 sets the turn on delay dimmer
OFF = 0,5 sec.
ON = 2,0 sec.
Dip Switch 3 and 4 are used together to determine the switch off delay time
=3= | =4= | =Delay=
OFF | OFF | 2 sec.
OFF | ON | 4 sec.
ON | ON | 6 sec.
ON | ON | 8 sec.
=Installing it into the car=
- Carefully feed the cable over the metal bar but do not connect the white plug yet.
- Connect Shogun's red wire to the lamp unit's red wire with a wire tap connector.
- Connect Shogun's black wire to the lamp unit's brown (NOT the BROWN with RED Stripe!!!) with a wire tap connector.
- Connect the connectors on the grey wire with the white and yellow wires.
- Connect the white plug
- Don't hide the black box until you have tested everything and are happy with the programming
- Check your work again
- Connect the fuse
- Try it out (adjust the programming) and Smile.
Last edited by IT Jedi; 08-24-2010 at 11:28 PM.
BMW CCA #434501
[ 127k Miles | Dinan Engine & Trans chips | LSD | AFE Pro 5 R Air Filter | ANSA Exhaust | BavAuto Springs | Bilstein Sport shocks || Racing Dynamics front strut brace | BavAuto DTM Lip | Driver-side wiper arm upgrade | Euro LKM ECE-B | French Market E1 Spec Hella Lows (HID 4500K 55w DDM Raptor v2) and Highs (Osram Nightbreaker +90) | HID Projector Fogs - 3000K 35w DDM Raptor v2 | LED Interior lights with Shogun's Dimmer kit | 7 Series Rear Map lights | Euro clear parking, tail and signal lamps]
Member
Is the dimmer not standard on e34s? I have a 1989 535i and my lights dim when you close the door.
Member
Wow that's a cool feature! And thanks for the write-up!
shade tree mechanic
Moderator
@MikeHsu
on the normal GM there is only a fixed switch off delay (no dimming function) time, not adjustable for the time, no switch on dimmer, not switchable to LEDs from standard bulbs and so on.
Here the official info on the NEW GM:
This Service Information Bulletin supersedes S.I. 61 01 92 (3460) dated January 1992. It incorporates additional information on the new General Module software for E32/E34 vehicles. SUBJECT: New General Modules (GM)
MODELS: 7 Series (E32), 5 Series (E34) - Vehicles produced 9/91 and later
Situation: New general modules have been used in production since September 1991 in all E32 and E34 models. The software has been completely revised . Part numbers have been changed to reflect these revisions, as listed below, as of September 1991. Model Part Number E32 61 35 8 356 095, E34-up to 61 35 8 356 095 9/91 production
E34-9/91 and later production 61 35 8 355 812
Note:
E34 vehicles produced 9/91 and later have different central locking system components from earlier E34 vehicles; therefore, P/N 61 35 8 355 812 is used only in E34 vehicles produced 9/91 and later, P/N 61 35 8 356 095 can be used in E34 vehicles produced prior to 9/91, and in all E32 vehicles. When the general module is connected to the vehicles electrical system, it will recognize (and store in memory) the vehicle configuration, such as:
- with/without power windows
- With/without power sunroof
- with/without wiper contact pressure control
- with/without headlight washers
Important Information
All general modules must be plugged in only after disconnecting the vehicle's battery. If the vehicle's battery is connected when the GM is installed, undefined signal contacts can cause an incorrect vehicle configuration to be stored, resulting in the impairment of
one or more of the above-mentioned systems. If one or more of the GM functions are impaired in this matter, the GM can be "cleared" by disconnecting the vehicle's battery for at least ten seconds.
GM Function Changes E32/E34 (Beginning with 9/91 Production)
- Repeat and Time interlock for headlight washers:
· Time interlock: 3 minutes
· Headlight washing at fifth windshield washing after time interlock.
- Intensive washing pump operating time reduced from 3 to 2 seconds
- Minimum interval for intermittent wiping is programmable down to 2 seconds (previously 3 seconds)
- Increased wiper contact pressure during windshield washing cycle is now also provided during dry wiping portion of the cycle (previously only during washer pump operation).
- Previously, the GM would react to opposing signals (eg., an unlock signal while trying to lock, as with a defective microswitch) by carrying out the first command, then the opposing command (e.g., locking, followed immediately by unlocking).
Repeating the first command then results in carrying out that command (e.g., try to lock again, and locking is now carried out).
This function ("Asynchronous Position") is omitted in the new GM for all E32 models and E34 models prior to 9/91 (P/N 61 35 8 356 095), and remains in the new GM for E34 models after 9/91 (P/N 61 35 8 355 812) only for central locking commands "lock" and "double-lock".
- After unlocking is performed due to crash sensor activation, the locking command is now reactivated by double-locking with the key from either the driver's or passenger's door.
- The "one-touch" operation of windows has been expanded to include all four windows in the opening direction. The driver's window still has "one-touch" operation in both opening and closing directions. Interruption of the "one-touch" feature of the driver's window in the closing direction is still accomplished by depressing any window switch (in any direction), or by depressing the sunroof switch in the "tilt" direction (provided the sunroof is not already in the "tilt" position). Interruption of the "one-touch" feature of the sunroof in the closing direction is still accomplished by depressing the sunroof switch (in any direction).
- The switch-off delay of the interior lights which occurs after entering the vehicle and closing the driver's door has been reduced from 20 seconds to 15 seconds.
Shogun tricks and tips for the E32 series are HERE!
Member
how can I get the dimmer kit and where can I get the led lights for the interior of my car ('92 525i/5)? Thanks in advance?
'92 525i, lazurblau metallic, Bilstein Sports, Vogtland Springs...so far
Member
How much is the kit?
I got ur force right here
Originally Posted by scram1
 PM Shogun for pricing. I think it's after 1am there so it will take a few hours to get a response.
I picked up my leds from BavAuto and some from ebay. eBay is cheaper but I had to be careful to choose the right style/color/size.
I chose a mix of warm white for map lights and cool white for courtesy. It was probably said in the instructions but you want to have all incandescent or LED but not a mix. Warm white looks just like incandescent
BMW CCA #434501
[ 127k Miles | Dinan Engine & Trans chips | LSD | AFE Pro 5 R Air Filter | ANSA Exhaust | BavAuto Springs | Bilstein Sport shocks |
Member
which Led modules did you used?
i have an awfull experience with leds in the past. they were never brighter than bulbs
I got ur force right here
I can't believe how little time I've had for projects over the last 2 months. I did start the window module set up. I'm excited to finish but frequent snow storms and no garage are slowing me down.
I haven't had any problems with LED's being dull. They are all surprisingly bright.
I found most of them on eBay. The back two are larger square 9 led panels. Front center came from BavAuto and is their 2 x 12 LED kit... Is nice and I was able to match the color with the eBay back lights but BavAuto charges a lot for them.
The front reading lights are also from eBay and are 6 LED panels. They are warmer yellowish white (vs blueish white). All plenty bright.
My windows are tinted extremely dark (PO....). It looks great but seriously stresses cops if they pull me over. In daytime, I'll just lower all the windows but at night these LED's are bright enough to see every bit of the interior through the tinting. No tickets
BMW CCA #434501
[ 127k Miles | Dinan Engine & Trans chips | LSD | AFE Pro 5 R Air Filter | ANSA Exhaust | BavAuto Springs | Bilstein Sport shocks |
Member
I just received the dimmer unit by post sent from Japan in only a couple of days! Impressive. But I'm very impressed by the quality of this product which I can qualify as being highly professional and very well engineered (and I have very high expectations as an engineer
Thanks very much Shogun! You have the best product on the market (and I got many of them in my hands before claiming Shogun's product being the best)
Take care,
Stef
Member
Cool stuff.. Looks good man!
Member
I've attached a pdf file with a diagram with instructions I made from IT Jedi's translation for installation. It was a fun project and easy to install.
Can also be downloaded from :
http://www.quebecman.net/e34/InteriorDimmerModule.pdf
Enjoy !
Member
Erich, you'll never believe it. The F430 schematics where erratic. Finally, I don't need to modifiy your unit with a Reed relay as the delay ECU is also using the ground (and not a +12V signal). I have now installed it on my car and it works perfectly well. As promised, I'm publishing now my DIY guide which you can see on FerrariChat :
http://www.ferrarichat.com/forum/sho...d.php?t=319055
Cheers,
Stef
PS: you need to register on ferrarichat to see the pictures but I advise you to do so, so that members can get in contact with you.
shade tree mechanic
Moderator
thanks, looks great. And nice comments on the Ferrari Forum:
Itested many dimmers and studied several electronic schematics. None of them where satisfying enough to be implemented in a Ferrari and especially behind the M032 ECU. Dirtly electronic modules would seriously mess up this ECU! My specs were quite severe: I wanted it programmable and configurable, ground based control (I initialy thought that we would need a +12V based control), almost no power consumption in standby mode, limited heat at the heat sink and a PWM based control (Pulse Width Modulation).
On a good day, I discovered on a BMW forum a guy from Japan who is making what seemed to be the perfect dimmer. I got in contact with him and after many email exchanges and studying his schematics, I got convinced that we have here the right product. His module is entirely programmed using a PIC12F629, just perfect! The MOS FET used is a 2SK3140 using a 4V gate and is attached to a small heat sink.
Here a the characteristics of this dimmer module :
- Support of normal bulbs or additional LED’s
- Maximum control of 200W (15A)
- Standby current drain of 1mA
- A noise signal is applied to prevent line noise from generating false-starts or miss-functioning
- Uses a digital IC (PIC12F629) to realize control by PWM adjustment
The dimmer module has 4 wires
- white : OUT ground to the dome light and LEDs
- yellow : IN delayed ground from the M032 ECU
- red : +12V HOT (module power)
- black : ground (module power)
The dimmer module can be configured using DIL switches :
- SW1 OFF : LED + normal bulbs
- SW1 ON : normal bulbs
- SW2 OFF : Fade In time of 0.5 secs
- SW2 ON : Fade In time of 2 secs
- SW3 OFF – SW4 OFF : Fade out time of 2 secs
- SW3 ON – SW4 OFF : Fade out time of 4 secs
- SW3 OFF – SW4 ON : Fade out time of 6 secs
- SW3 ON – SW4 ON : Fade out time of 8 secs
You can also tell 'lilleprins' = Anders from Sweden that the dimmer unit for him is packed and will be out by airmail today from Tokyo to Goteborg.
Have just 3 dimmer units left at the moment on stock, will produce more next weekend to satisfy the Ferrari owners
Last edited by shogun; 04-04-2011 at 09:38 AM.
Shogun tricks and tips for the E32 series are HERE!
Member
This is a great little invention. Easy to install and works really well... Gives a great interior mood. Most amazing thing is that from Paypal to may mailbox was only 4 days from Japan to California.
Member
very nice
shade tree mechanic
Moderator
Just completed production of some more of the dimmer modules, available as long as stock lasts. http://forums.bimmerforums.com/forum....php?t=1377691
Price worldwide EURO 85.00 incl. shipping by airmail, non-registered, non-trackable. Comes in a small padded airmail envelope. In case shipping with tracking is requested, plus 10.00 EURO.
Last edited by shogun; 03-04-2018 at 09:16 PM.
Shogun tricks and tips for the E32 series are HERE!
Member
Hi Shogun, this product looks great, I'm trying to private message you but it seems like I can't. Would this work for a non bmw car with some modification? I have a project I want to use your product with.
shade tree mechanic
Moderator
some are also installed in Ferrari F430, read from post # 22 http://forums.bimmerforums.com/forum...hlight=ferrari
and here copied from Ferrari chat about installation in Ferrari:
I tested many dimmers and studied several electronic schematics. None of them where satisfying enough to be implemented in a Ferrari and especially behind the M032 ECU. Dirtly electronic modules would seriously mess up this ECU! My specs were quite severe: I wanted it programmable and configurable, ground based control (I initialy thought that we would need a +12V based control), almost no power consumption in standby mode, limited heat at the heat sink and a PWM based control (Pulse Width Modulation).
On a good day, I discovered on a BMW forum a guy from Japan who is making what seemed to be the perfect dimmer. I got in contact with him and after many email exchanges and studying his schematics, I got convinced that we have here the right product. His module is entirely programmed using a PIC12F629, just perfect! The MOS FET used is a 2SK3140 using a 4V gate and is attached to a small heat sink.
Here a the characteristics of this dimmer module :
- Support of normal bulbs or additional LED’s
- Maximum control of 200W (15A)
- Standby current drain of 1mA
- A noise signal is applied to prevent line noise from generating false-starts or miss-functioning
- Uses a digital IC (PIC12F629) to realize control by PWM adjustment
The dimmer module has 4 wires
- white : OUT ground to the dome light and LEDs
- yellow : IN delayed ground from the M032 ECU
- red : +12V HOT (module power)
- black : ground (module power)
The dimmer module can be configured using DIL switches :
- SW1 OFF : LED + normal bulbs
- SW1 ON : normal bulbs
- SW2 OFF : Fade In time of 0.5 secs
- SW2 ON : Fade In time of 2 secs
- SW3 OFF – SW4 OFF : Fade out time of 2 secs
- SW3 ON – SW4 OFF : Fade out time of 4 secs
- SW3 OFF – SW4 ON : Fade out time of 6 secs
- SW3 ON – SW4 ON : Fade out time of 8 secs
Installation instructions for our E34 and E32
InteriorDimmerModule.pdf
Last edited by shogun; 03-31-2016 at 07:37 PM. Reason: updated
Shogun tricks and tips for the E32 series are HERE!
shade tree mechanic
Moderator
Still some units on stock, works on E34, E32 and Ferrari F430 V8. Probably the last production.
Price worldwide EURO 85.00 incl. shipping by airmail, non-registered, non-trackable. In case shipping by registered airmail is requested, plus 10.00 EURO.
PM me with complete shipping address and I will let you know Paypal details.
Last edited by shogun; 03-04-2018 at 09:17 PM.
Shogun tricks and tips for the E32 series are HERE!
 Posting Permissions


 Reply With Quote

Bookmarks