
 20 Qs Exempt
My DIY is based off of this one posted up on bimmerdiy.com (http://www.bimmerdiy.com/diy/garageopener/). Mine is slightly modified with my own spin of it. First off, mine is a craftsman and only takes 3v, I didn't feel like splicing the line from my wiring harness, and I decided to mount it in a different spot.
If you look at it this way a new button battery is probably $5. I decided not to splice my line and hard wire it because I didn't want to risk future problems. You may say, "Well I don't want to open this damn thing up and replace a battery all the time." Well I thought of that too, average button battery is around 280 mAh, cheap AA is 1700mAh, and how often do you have to change that batter in the opener anyway. Extend that by 6x and that's how often you will replace this. Each AA is = 1.5v, add the two together and you have 3v.
Here's the parts list. I didn't have anything so I bought it all. On off Switch $2.69 (PN 275-0644), Battery Holder $1.99 (PN 270-408), Wire Stippers, Solder, and Soldering Iron ~$12 at HF. Not pictured, about 2 ft of basic wire, 2 AA batteries, Phillips screwdriver, drill, and Dremel tool.
\
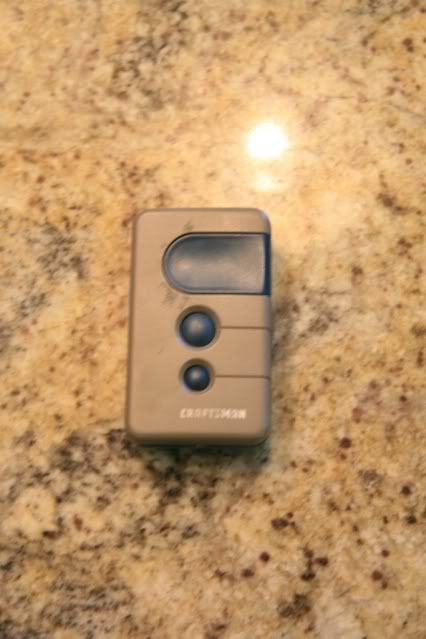
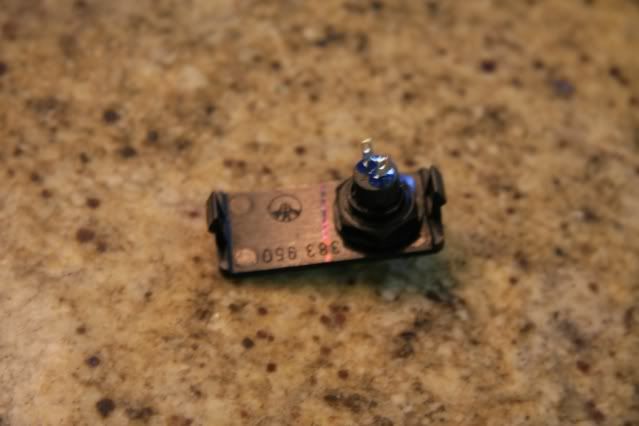
Standard Craftsman Garage Door opener
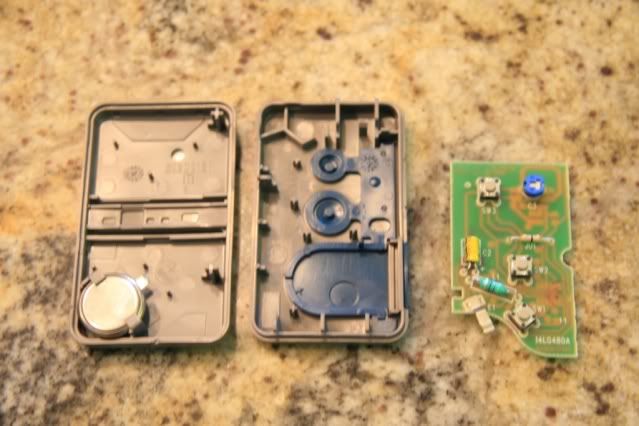
Pry open from the side that says pry here to replace battery. It comes apart like this. If your attemtingto go this far, this probably won't be that difficult.
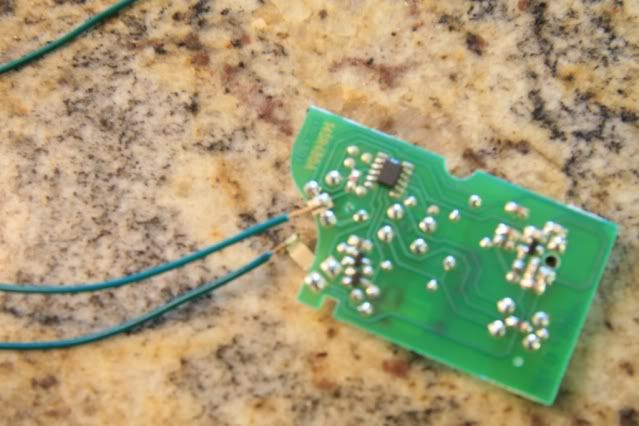
Not pictured is the battery pack. We extended the line about 6" to give us some room inside of the car to put the pack. The line on the bottom or the thing that sticks out is the ground, the one on top is the positive side. Solder each wire to the correct spot.
Next solder the leads on the button for the garage door opener to jump them. Make sure you have the correct connections. You can tell because the other 2 just hold the button to the board because it does not have any metallic lines running from the board (Pretty obvious in picture). You can also test by touching a wire across the leads, this should open the door. These wires are about 12-18" long. Enough to go from the top of the dash to the desired mounting location.
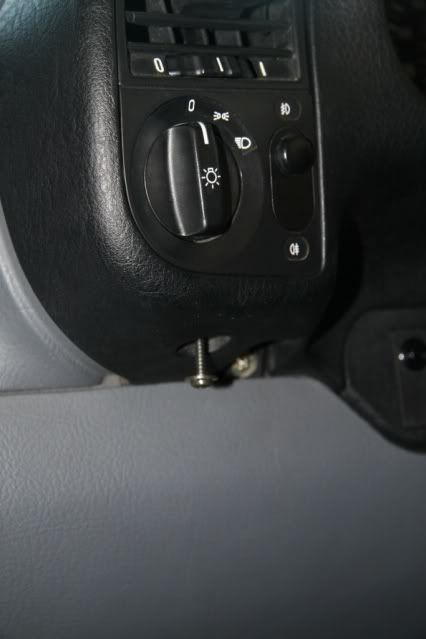
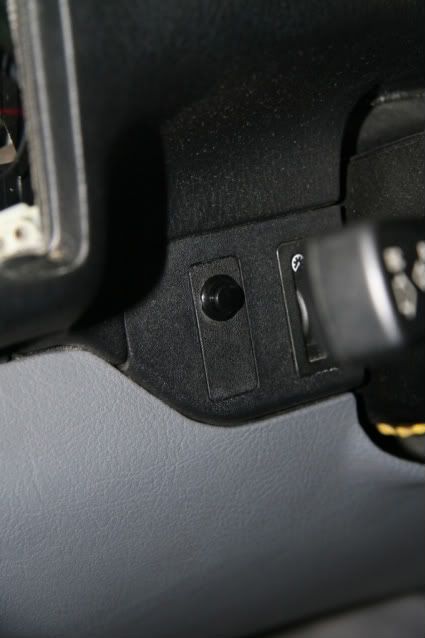
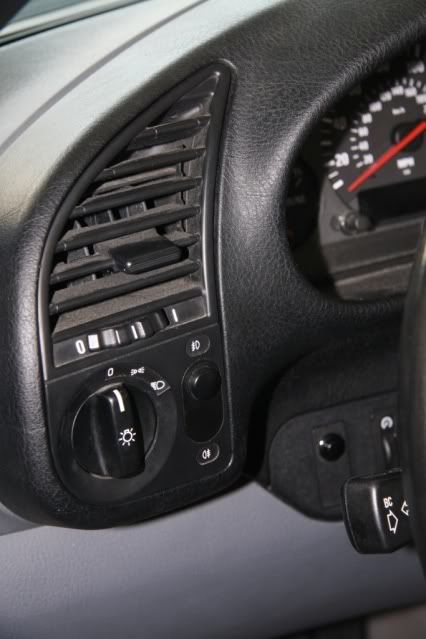
Locate the screw below the fog light button. Undo it and the whole assembly comes out. There is a screw twist off connection (like on fog light) and another prong connection. Take the twist off first because its shorter, then get the other one.
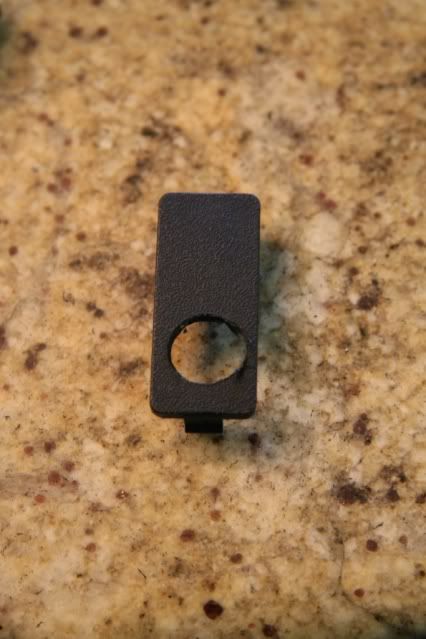
This picture already shows the button, but if you want to mount it there pop it out. Put your arm in there and push it out. Your arm will fit, I do not have small hands by any standards.
Drill a hole in the plate. I realized that my garage door opener will support 2 garage doors, so I will re-program everything and add a second button for the second garage door; so, I made sure I had enough room for a second button. I drilled a very small hole first, made it bigger with a bigger bit, then used the dremel tool with a sander at full speed to widen it to the perfect size.
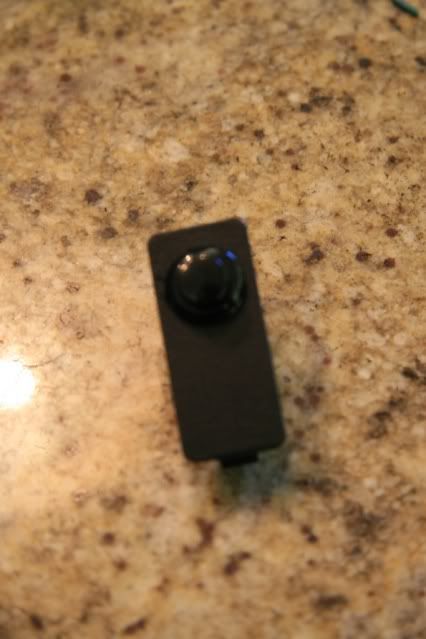
Switch mounted front.
Switch back. Now solder it to the switch. You may say, "Well now it wont fit though there." Well it will, so do it now so you don't have to try and solder in your car while holding everything up in the air.
At this point in time I got excited so I don't have very many pictures past this point. I also realized I have no pictures of the battery pack. Trust me it's there.
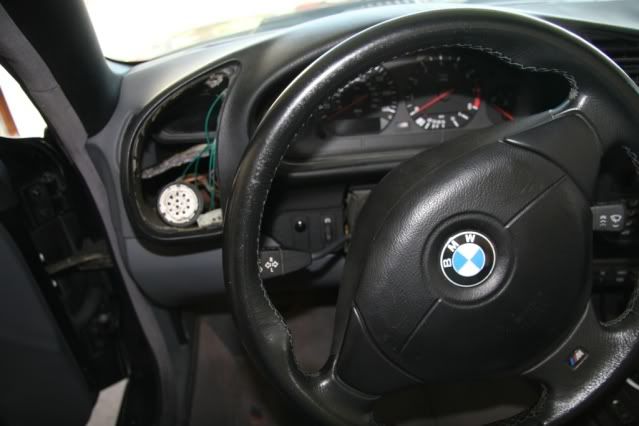
Now put everything in your car. I put the opener electronic board on the top closest to the dash, the battery pack thing over in some dead space to the right, and ran the switch down to the bottom. Run the switch first though, it will be easier that way.
Now put your light connections back in. I recommend the screw thing first then the clip thing. Make sure to push all the wires to the right side so the vent doesn't catch on them when you put it back in. Also there is some force required to get it back in, so don't worry about it. It makes a pop and goes right back into place. Make sure you have your screw thing on the bottom in the opening first or that will probably break off.
Here's the finished product and how it will look from the top.
My other project. I thought it was kinda cool, so whatever. My next project is cleaning out that damn garage lol. Hope you enjoyed everything and good luck with your new project. All in all it took about an hour after we had everything. Definitely worth it though.
Really, nothing??
Last edited by E36BMW3series; 06-20-2010 at 11:14 AM. Reason: Automerged Doublepost
Off-Topic King
doesn t the
circuitry receive 12v from the car's power source?
not worried about that being fried?
20 Qs Exempt
Originally Posted by das borgen

Well if you read the whole thing I addressed that problem. You are correct though, it does. I didn't feel like splicing the wire in my wiring harness, so I used 2 AA batteries instead. It has over 6x the life of the button battery I pulled out. This way if I decide to turn it to stock I have a piece that less than a buck to replace and just pull it straight out and not worry about any wires. The 2 AA batteries also delivers 3v at similar amperage. Most of the time it's the amps that fry the circuit rather than voltage from what I remember?
I should have taken pictures of that, but I got too excited.
Last edited by E36BMW3series; 06-20-2010 at 11:37 AM.
Member
BMW E36 M3 Expert
Many years ago I did something almost identical in my car, except that I put in a voltage dropping circuit so that the remote could be powered from the car's 12V. I didn't want to mess with eventual disassembly for battery replacement. However the problem I ran into was poor reception of the remote's signal, presumably because it was being blocked by the dash and the car's sheet metal. Now this issue could have been specific to my own setup, but either way it wasn't satisfactory.
So I came up with a very simple alternative (see pic) — kind of a pseudo built-in. This is the smaller version of the same Sears remote, and as you can see it fits exactly into the central storage tray (assuming you don't have cup holders there). I took the remote apart and spray painted its case black to blend with my interior, and mounted it with adhesive Velcro tape. This location gives a more unobstructed signal path, plus the remote can easily be removed for standalone use if needed.
This compact remote is small enough that it can be mounted almost anywhere if your centre storage cubby isn't available.
Neil
Last edited by NeilM; 06-22-2010 at 10:12 AM.
Member
I did this exact same install on my car. I park my car outside of the garage quite often, so the most comforting part is that the garage door opener only works when the car is on (if a potential theif could even find the button) and its so clean!!!
20 Qs Exempt
I don't have any signal problems. I just tucked it under the dash panel. I think my battery was about shot before I did this, but it works to the end of my driveway, so that's good enough for me. Before this I had my opener double-side taped to my door. I had it inside the little tray thing.
I decided not to splice the wire and used the battery pack, so mine always has power. Honestly I'm not worried about a thief opening my garage door that way. If they are going to locate that button then start pushing it I probably have bigger issues. At least this way with my vert no one is going to walk away with my opener.
Resist
BMW CCA Member
Nicely done. Could also just buy a homelink mirror, program, and be done.
Member
True. What's $300 when you're already spending $2. :-)
Resist
BMW CCA Member
$300? You're doing it wrong. Try like $65 bucks. And there's nothing wrong with the way OP did it.
Member
I meant the cost of the Homelink mirror. It was a joke. I did it like the OP did it.
Resist
BMW CCA Member
Homelink mirrior is not 300 bucks man. You can get one for about 65
20 Qs Exempt
I didn't think about that.
Although I was looking for the cheapest solution possible and my mirror is already huge. Any bigger and I won't be able to see anything on the right. I'm pretty tall so the mirror is right in my line of view.
I really like this way though. I added the second garage door and a second button, so I have my total up to about 8 now. All clean and out of the way. I'm a sucker for cool stuff that is cheap, cool, and unique.
Member
link to homelink mirror?
Resist
BMW CCA Member
www.google.com
or
http://motors.ebay.com
Hey man I'm not knocking your way. Well done. Looks nice. If you ever wanted to make it look super OEM you could get the switch that goes there for the euro cars that have rear fog lights. It looks basically like another fog light button. Switch can't be more than 10 bucks or so.
I just posted the homelink mirror for lazy people like myself. Plus its not any bigger than the regular mirror, and it has auto dimming. Which is nice.
Last edited by Volf; 06-24-2010 at 06:52 PM. Reason: Automerged Doublepost
20 Qs Exempt
I knew you weren't, I was just throwing my 2 cents in. I always wondered what what supposed to go there. I wish I knew it was rear fogs in euro cars, I would have ordered it lol.
Member
I did what the OP did, but with two buttons to control two doors. And, I have the power sourced from "ignition", so you need to have the keys in position #2 for added security.
20 Qs Exempt
I added the second door and button yesterday actually. . . . I didn't realize I could program 2 doors with one opener until the other day. . . .
Pretty cool idea for the whole ignition. I don't think I could figure that one out too easily. . . . Plus they are hidden enough to fool most people, so close enough.
Member
Nice DIY OP. Im a OEM whore (for the most part
Viper 2 way paging alarm
By angrywhopper at 2010-06-26
+
DEI garage door opener
By angrywhopper at 2010-06-26
I get very good range and all i have to do is press the aux button on my remote when needing the garage door opened/closed.
 Posting Permissions


 Reply With Quote


Bookmarks