
 Führer of the Dance
I tackled this job today because, with winter approaching, I did not want to live with the prospect of expensive noises the first time the temps drop into the small numbers. With 119k miles on my 525i, it was time. I opted for the cold-weather version of the CCV and all the associated hoses; these are simply the regular pieces covered in insulating foam sheathing.
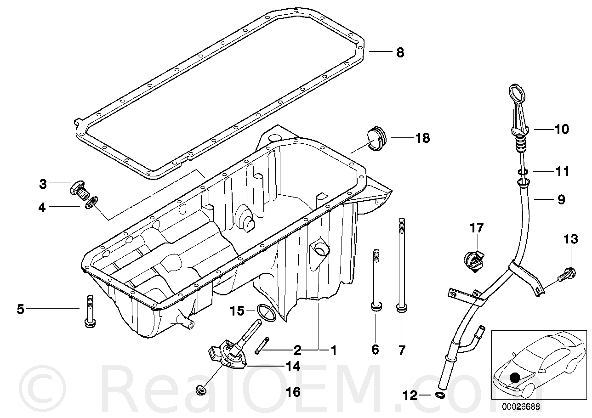
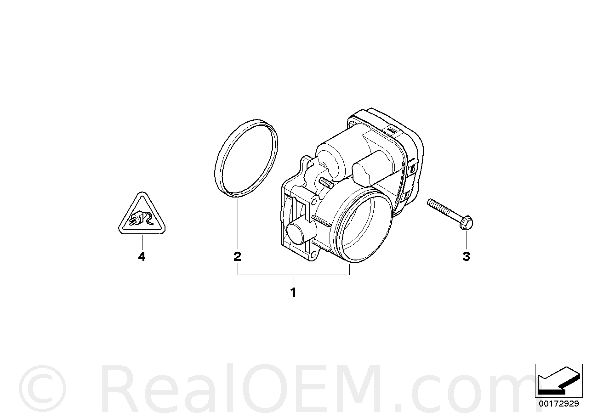
The M54 requires that you remove a few more items than the M52: the throttle body has to come off, as well as the electrical junction box in front of it. It is easier to get to the CCV if you pull off the oil filter housing; since I was replacing that seal as well, there was no additional labor. Replacing the upper CCV hoses will be easier if you pull the distribution rail they are attached to off the intake manifold. Removing the dipstick tube allows a little more flexibility as well, and is only a single bolt to remove (see below).
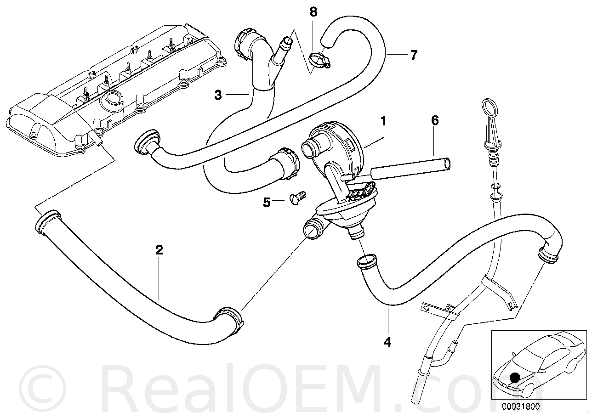
The cold weather CCV valve is an extremely tight fit. Do not screw it to the manifold until you have the hoses attached; you will want a little maneuverability to get them on, particularly the upper one. A little WD40 on the O-rings makes it much easier to push the connectors onto the valve.
Everything was somewhat munged up, as expected, but the dipstick tube had a lot of nasty brown sludge in the drain tube. I pulled the tube, cleaned the drain, flushed it with brake cleaner and blew it out with compressed air. If this drain is blocked your new CCV will not work as intended. I strongly suggest you take this extra step to ensure that oil condensate can drain back to the pan.
Get replacement intake boots (at least the one that attaches to the throttle body and ICV), as they will likely tear when you remove them. Clean the throttle plate and ICV if necessary.
Life's tough. It's tougher when you're stupid. -John Wayne
Member
So you were able to do without removing the intake manifold? That's good news for those with M54 and M52TU that haven't replaced one.
I removed the entire manifold to replace mine and it was a biotch!
Führer of the Dance
Yes, I did it without removing the intake manifold. The biggest problems are the limited visibility under the manifold and the fitting of the upper CCV hose to the valve, as well as positioning the valve in line with the screw holes. The trick is removing or relocating ancillary components that limit access to the area under the manifold, which is nonetheless much easier than removing the whole manifold. The job took me about 4.5 hours of steady work from beginning to end, including an oil change.
Life's tough. It's tougher when you're stupid. -John Wayne
Member
good work. looks like a tough job.
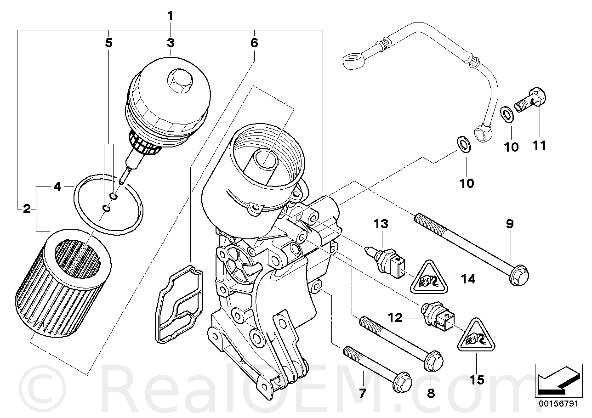
Questions: when you say, referring to hoses, "particularly the upper one," are you meaning the #2 or the #3 in this diagram?
Also, the oil filter housing needs to removed. Why? Is it that the hose to the vanos is easier to remove? Thanks!

Last edited by GSA1; 10-30-2009 at 05:22 PM. Reason: sp
Führer of the Dance
#3 is the upper hose. Removing the oil filter housing gives considerably more room to access the area under the manifold, which in turn helps in positioning the CCV and attaching the hoses.
Life's tough. It's tougher when you're stupid. -John Wayne
Member
By intake rubber boots, do you mean #'s 3 and 7?
http://www.realoem.com/bmw/showparts...19&hg=13&fg=15
I would also replace the throttle body gasket #2:
http://www.realoem.com/bmw/showparts...01&hg=13&fg=15
Last edited by Jason5driver; 10-30-2009 at 07:34 PM.
Looking for an E39 belly pan , passenger front inner fender liner
Führer of the Dance
Yes, #3 & #7. To be fair, #3 wasn't too bad; #7 was a mess and came apart as soon as I tried to remove it. The throttle body gasket wasn't in bad shape at all, though if I knew I'd be removing it I probably would have replaced it preemptively.
Life's tough. It's tougher when you're stupid. -John Wayne
Member
Gonna do this today on my M54. Did you replace the oil filter housing gasket when you did your job? Thanx.
Führer of the Dance
Yes, I did the oil filter housing gasket. I had a small amount of leakage from it and the VANOS oil line fitting on the back of it. The old gasket was very hard and brittle. Before removing the housing, be sure to at the very least open the oil filter canister to allow the oil held there to drain back into the pan; I opted to do a full drain of the oil system just to minimize the mess. Clean the sealing surfaces thoroughly.
Life's tough. It's tougher when you're stupid. -John Wayne
Miami Performance Inc.
Awesome!
But....you Don't have to remove the throttle body. Just move the junction box and have the right tools and it's a breeeeeze.
'02 E39 530i/5sp Topaz Blue/Black Interior - MegaSquirt3x - Garrett GTX3582R turbo - E85 fuel - Apex FL-5 - 265/295 tires - Custom Porsche Brembo BBK - 600whp @ 22 PSI
'15 E84 X1 35i M Sport Alpine White/Coral Red Interior - H&R Sports & Bilstein B6 - Velgen VMB5 - 265/305 tires - ETS FMIC - MPI Charge pipe & DME Flash - 3.5" down pipe
Member
I think the throttle body was removed in order to clean it, and to clean the ICV as well.Originally Posted by JackEatsEmoKids

Diagram of the oil filter and housing:
http://www.realoem.com/bmw/showparts...01&hg=11&fg=30
BimmerFiver recommends replacing #5 - distribution unit - on the intake:
http://www.realoem.com/bmw/showparts...79&hg=11&fg=40
It is also recommended to replace the oil dip stick o-ring - #12:
http://www.realoem.com/bmw/showparts...87&hg=11&fg=10
Last edited by Jason5driver; 10-31-2009 at 10:45 AM.
Looking for an E39 belly pan , passenger front inner fender liner
Führer of the Dance
I inspected the distribution unit and blew through it with compressed air to make sure it was clear. It did not show any signs of significant sludge accumulation. The dipstick O-ring was in fine shape as well.
I couldn't figure any way to get at the lower screw on the CCV valve without removing the throttle body; the plastic cover over the actuation mechanism was blocking it completely. If there is a way to do it without removing the throttle body, it escaped me. Nonetheless, it was good to get it out and clean it, as the edge of the throttle plate had some significant carbon accumulation.
Life's tough. It's tougher when you're stupid. -John Wayne
Member
Also, I think the cold weather CCV comes with (2) hoses:
So, you need buy #4 vent hose, #7 return hose, and maybe #6 vacuum hose...
http://www.realoem.com/bmw/showparts.do?model=DT43&mospid=47584&btnr=11_2194& hg=11&fg=15
11 61 7 534 237 GENUINE BMW
http://www.eactuning.com/ssf/part_nu...ch/11617534237
www.eactuning.com/parts/product_details/11617534237
Last edited by Jason5driver; 10-31-2009 at 10:49 AM.
Looking for an E39 belly pan , passenger front inner fender liner
Member
# 6 on my car was blocked off--anyone have a vac hose there? Could you tell us where the other end hooks up?
Führer of the Dance
#6 appeared to be blocked off on mine as well. FWIW, my CCV did not come with any hoses. BMW may be selling it with and without under two different p/ns.
Life's tough. It's tougher when you're stupid. -John Wayne
Member
# 6 above...very important...it's a rubber cap.
I replaced my CCV years ago, using the non-winter version and it came from the dealer without the plug, # 6.
When my CCV was replaced recently, the winter version was used and it came with # 6.
"I'd smash that (Jennifer Connelly) like a failed coup in sub-Saharan Africa."
~Macktheknife in my epic Jennifer Connelly OT Thread
Member
+1, I have completely diassembled everything and had to remove the throttle body too. It was needed to access the CCV screw. Everything's out and I'll finish tomm'w. Had to carve the pumpkin.
How did you install hose #3? I am finding that you must route the hose back up partially. Then you must attach the CCV since this hose requires a 1/4 turn to lock and not just insert to lock. Installing this hose is a b*tch. But I think I have the answer and will report back.
BTW, how bad is reusing the throttle body gasket? The dealer did not have one this afternoon.
Führer of the Dance
I didn't see any indication that #3 required a turn to lock; it seemed to have the same sort of O-ring connections as all the other hoses. Nonetheless, it is the worst one to get connected by far. A little WD40 on the O-ring helps a lot, but it still isn't easy.
Life's tough. It's tougher when you're stupid. -John Wayne
Member
There is a turning process used in attaching that hose to the ccv--it requies that the hose be turned and locked--if you just pressed your on--I would check and make sure you don't have a vacuum leak there.
Führer of the Dance
Hmmm....I checked that every hose connection was tight and locked before I proceeded, so I think I'm OK. Odd that they would use a different type of connector on one union and another on all the others. I didn't notice any difference, though I didn't examine each connector carefully.
EDIT: Perhaps the twist-lock was an earlier style of the part. There have been changes; for example, the RealOEM diagram shows a band clamp securing #7 to #3, but the new parts use a standard O-ring lock like all the others. I know that #3 engaged with a positive click on the CCV valve when I finally got it positioned, and was quite secure when I pulled on it. I doubt that would have been the case if the connector was improperly attached. I cannot find any photos of the M54 valve to confirm this, however, and the M52 valve uses a completely different arrangement for the top connector.
SECOND EDIT: OK, since I'm paranoid and curious, I went out and pulled a few things apart so I could check that #3 was well-secured to the CCV valve - it appears to be, not moving at all when pulled. I can't see it, since it is buried under the manifold, but I cannot imagine it would be this secure unless it was properly attached to the valve.
I also retrieved the old valve from the trash so I could examine the connection. It is indeed a twist-lock, but is otherwise identical to the other press-fit connections, using an O-ring to seal the connection. Furthermore, the lip over which the connector must lock is no higher than the press-fit connections, and is similarly tapered, meaning that a press-fit is entirely possible, if difficult. This is important, since the orientation of the twist-locking arrangement involves a quarter-turn of counter-clockwise rotation of the valve, which seems to make it utterly impossible to attach with the manifold in place. I suspect that the purpose of the twist-lock is not to facilitate installation, but removal, as the twist direction is consistent with rotating the lower portion of the CCV valve outward and squeezing the connector to release is not possible in the confined space under the manifold.
Perhaps one of our resident dealer techs could shed a bit more light on this?
Last edited by 02Pilot; 11-01-2009 at 12:31 PM. Reason: Automerged Doublepost
Life's tough. It's tougher when you're stupid. -John Wayne
Member
I will have to ask about the connections...
Looking for an E39 belly pan , passenger front inner fender liner
Member
See my recently posted DIY for the M54 (moved to the DIY section). The need to rotate the CCV to lock hose #3 is stupid. There is not enough room to do this unless you remove the intake manifold. I simply ground down the retaining lip on the CCV nozzle to about 1/3 it's original length. That reduced the rotation requirement to about an 1/8 of a turn (45 degrees). It still locks firmly in place.
If you use the insulated CCV, you need to slice off enough foam on the backside to make it completely flat. That 1/8" clearance makes all the difference in getting the CCV into place and rotating it.
Führer of the Dance
A quick update: the occasional off-idle stumble I experienced seems to be gone, probably as the result of sealing a vacuum leak or two. Seems a bit smoother too. I'll be checking gas mileage over the next couple days - not expecting any major improvements, but might see a little bump due to improved intake airflow efficiency.
As noted, it is possible to install all the components, even the cold weather ones, without modifying them and without removing the intake manifold. That said, making a few slight alterations may make the whole thing considerably easier.
Life's tough. It's tougher when you're stupid. -John Wayne
Member
+1.
I would be hesitant to modify any of the connections or hose, in fear of causing any vacuum leaks...
Thanks!
Jason
Looking for an E39 belly pan , passenger front inner fender liner
Führer of the Dance
To be fair, I don't think the modification described has any danger of causing a vacuum leak. The seal is an O-ring that seals against the inner surface of the CCV valve inlet, while the material removal described is on the outer surface. As long as enough of the ridge remains to positively engage the locking clip, the seal will not be compromised.
Life's tough. It's tougher when you're stupid. -John Wayne
 Posting Permissions


 Reply With Quote
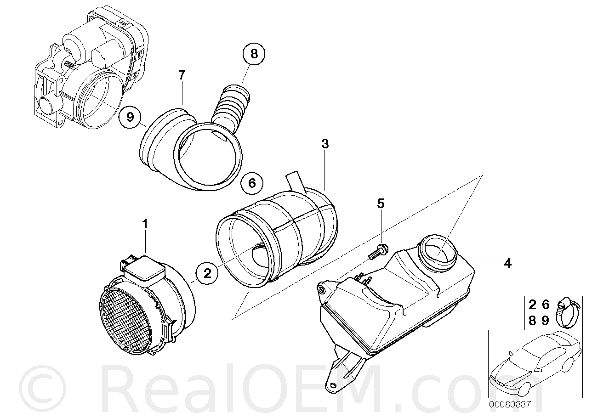


Bookmarks