
 Memberish
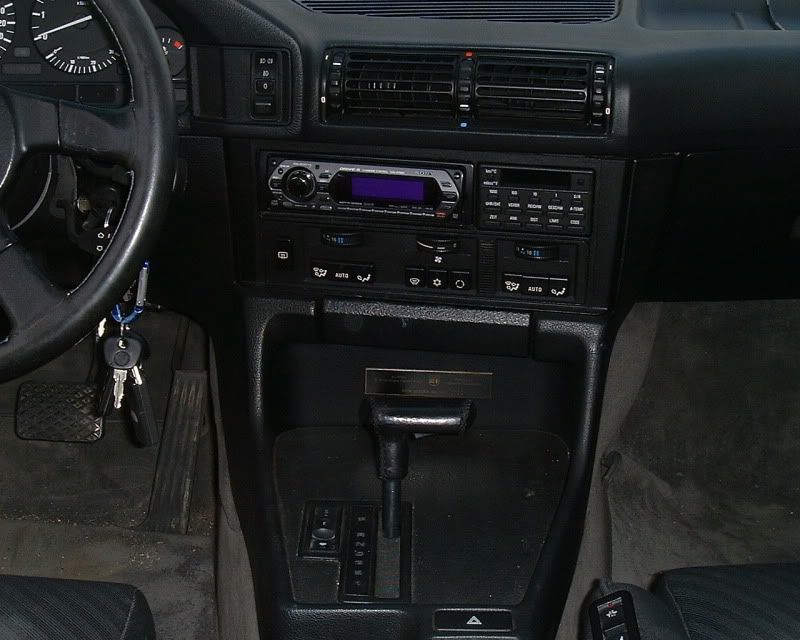
Winter is getting very near so I can't put this job off any longer. When I bought my E34 the HVAC was pretty messed up. About the only thing that seemed to work properly was the blower fan. I couldn't seem to get any heat when I wanted it yet it would roast me in the summer. Also, the AC doesn't work (next year's project). My car has the dreaded IHKA Automatic air conditioning, which to me seems a bit over the top. It's a computer controlled system that has full control over the heat & AC and where that air is directed via 10 stepper motors attached to plenum doors. The system was used mainly in the E32 but it also made it's way into the E34 and E31. Regardless, the focus of this DIY is changing the heater core, not working on the IHKA system. I know many people in North America don't have the IHKA so there will be differences in a few of the procedures. I hope this post helps those without IHKA to change their heater cores as well.
The heater core on the E34 was much better thought out by BMW compared to the previous two generations of 5 series cars, On the E12 and E28, the entire air condioning evaporator box must first be removed before accessing the heater core. This meant discharging the AC refrigerant and charging it after the work was done. Now on the E34 the heater core sits in behind of the evaporator instead of in front of it and is no longer buried. The entire center console must be removed from the car before getting to the core. Overall the job is easy, the hardest part being the center
console removal and re-fitting. It’s time consuming, it took me about 6 or 7 hours (and another 5 hours to write this!) so plan on a full day. I also did a few other side jobs like installing a new heater valve and played with the sword so that pushed the time up. Shogun has a write up on the heater core R&R that is very good but is lacking pictures. I didn’t find any other DIYs on the heater core R&R for the E34 so I decided to make one. Maybe there are write ups out there, I didn’t see any. I loosely followed Shogun’s instructions when I did mine, thanks Shogun for the help and inspiration.
Apparently, there are two different types of heater core for the E34. This DIY is for the early version of the core. If your car was built January 1990 or later you may have a different heater core than what's shown here. Procedures for the different cores may or may not be the same....IDK.
Check your build date and see what version of core you have by entering the last 7 digits of your VIN at RealOEM.com
http://www.realoem.com/bmw/select.do
Center console removal:
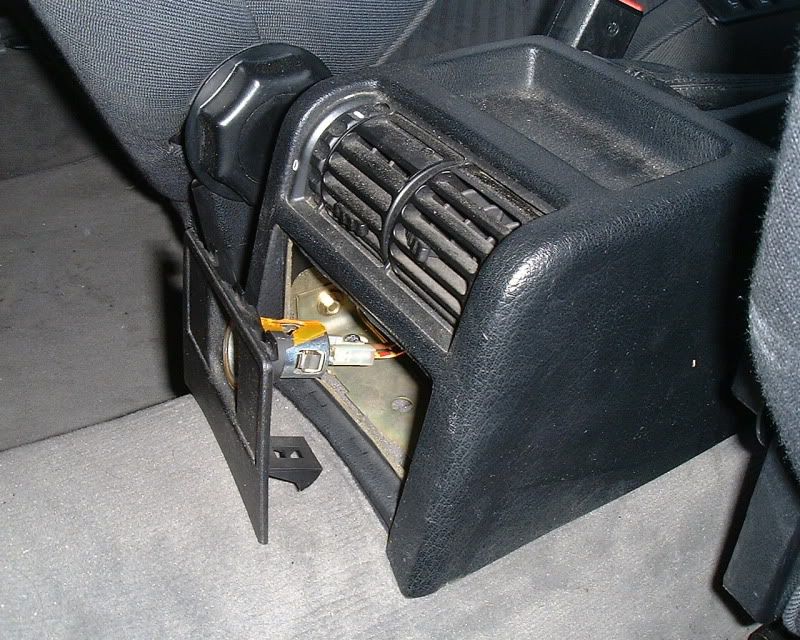
We start in the back seat. It would be a good idea to pull the back seat and disconnect the battery. I did mine with it connected but it would be safer to do this job with the battery disconnected. A poor stereo install by a previous owner may have wires exposed which could short. Also there is less chance of damaging something expensive, like the OBC. Remove the rear cover on the console by prying out the bottom of the cigarette lighter panel. If you pry on the top you risk busting some plastic clips. Detach the lamp and wires from the cigarette lighter.
With the panel gone you'll see 4 screws. Two are hex head and 2 philips head. With a 8mm socket or wrench remove the two hex head screws.
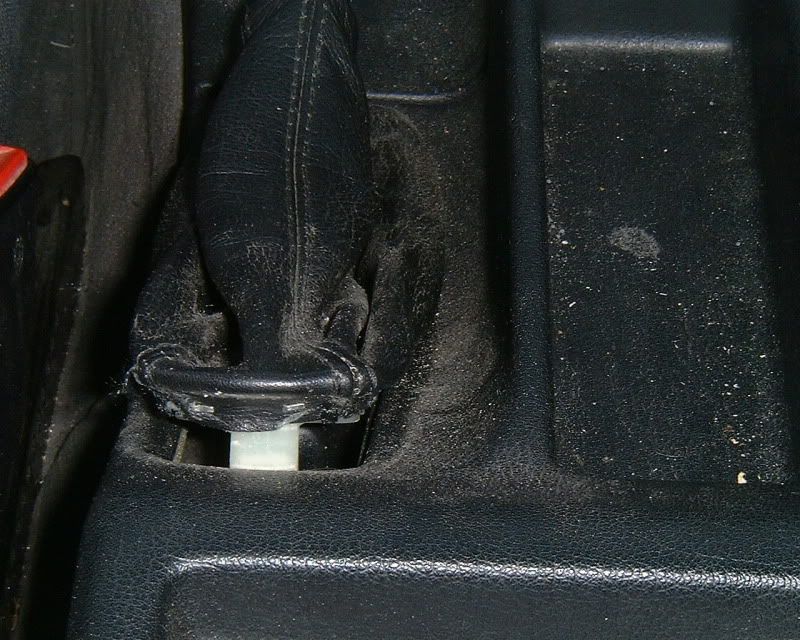
Pry up the rear of the parking brake handle boot to release a plastic clip. The boot is hooked on the front so pull the boot back to release that. You will find a hidden screw under the boot. Remove it and the screw in the tray from the forward portion of the rear console. The rear half of the center console will now be free. Pull the parking brake boot over the handle (so it's inside out) to make it easier to feed the base through the hole. Next we go after the front part of the center console.
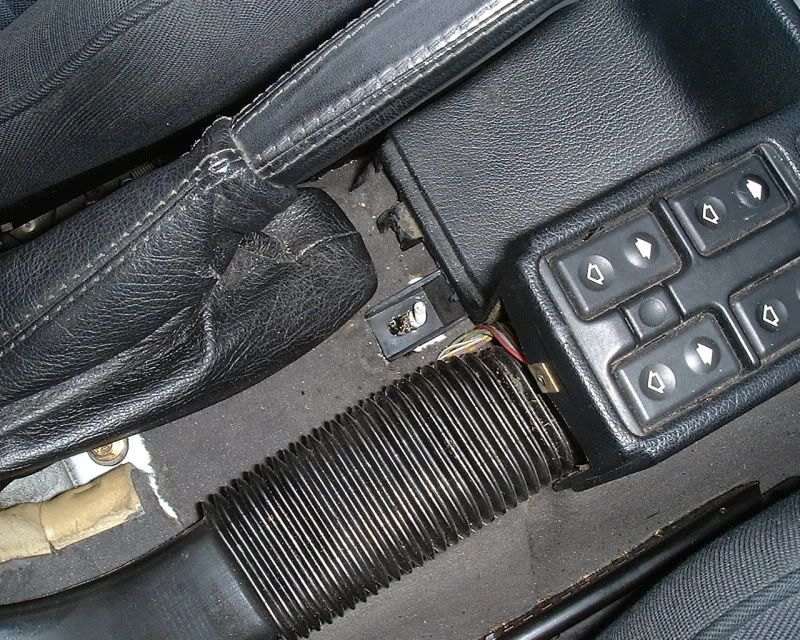
Slide two fingers in under the window switch cluster and push up. Disconnect the wiring harness. Do the same for the emergency flasher switch.
Parking brake ON! Or block the wheels. Remove the ashtray. Remove the shift knob. Automatics have a small set screw on the handle that needs to be removed before it can be pulled off. Remove the shifter surround by lifting the front to release two clips. You'll need some sort of tool that will hook the panel and lift. You shouldn't have to pull hard. Don't pry at the rear of the panel or you'll bust plastic hooks.
Disconnect the wires to the transmission switch. For a auto, put the transmission in 1st gear to make the console removal easier.
On both sides of the console are decorative trim pieces, remove both revealing four screws. Remove the 4 screws.
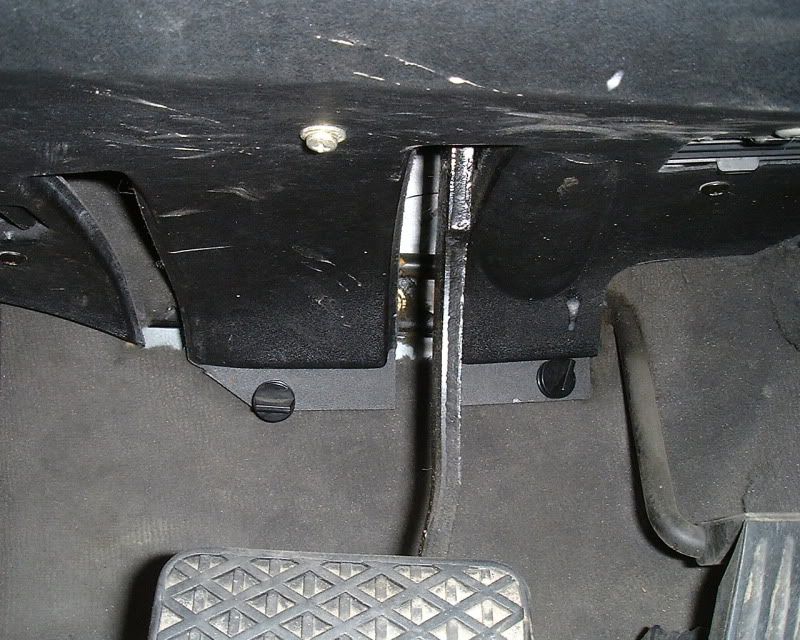
Remove the driver underdash kick panel. There are three screws along the top. There are two plastic clips on the firewall. To remove the clips give them a ¼ turn to release. There are 3 screws holding a plenum duct to the panel. Remove these three as well or you will have trouble getting the panel out.
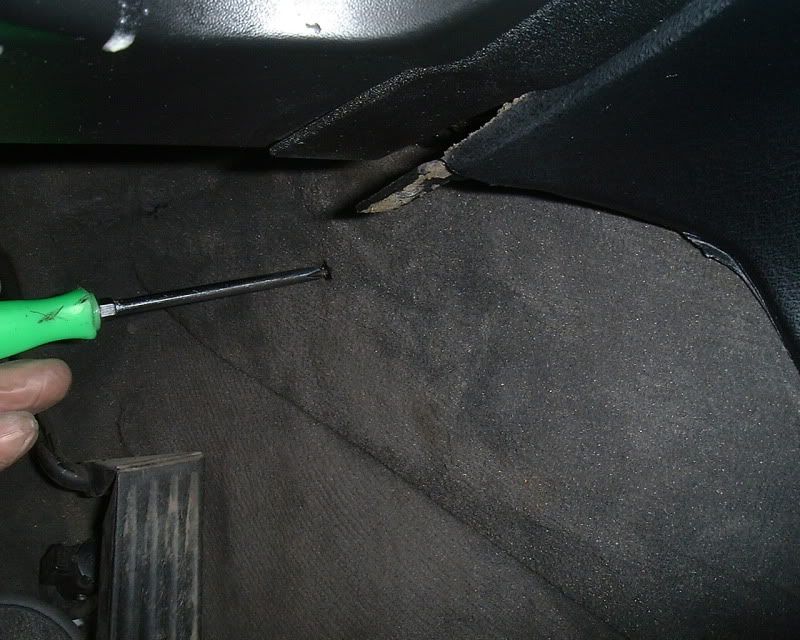
Remove the glove box. There are two hinge clips at the back. Lift the lever to release them. The two straps are held on by spring clips. A small flat screwdriver will be needed to release the lock on the clip and slide them off. Remove the two carpeted panels from the transmission hump (one each side) that are held on with 1 screw each.
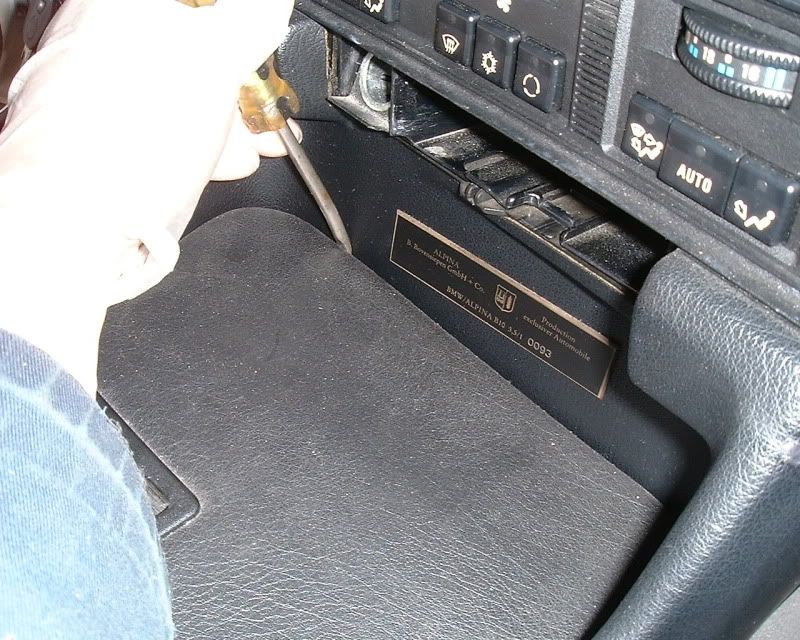
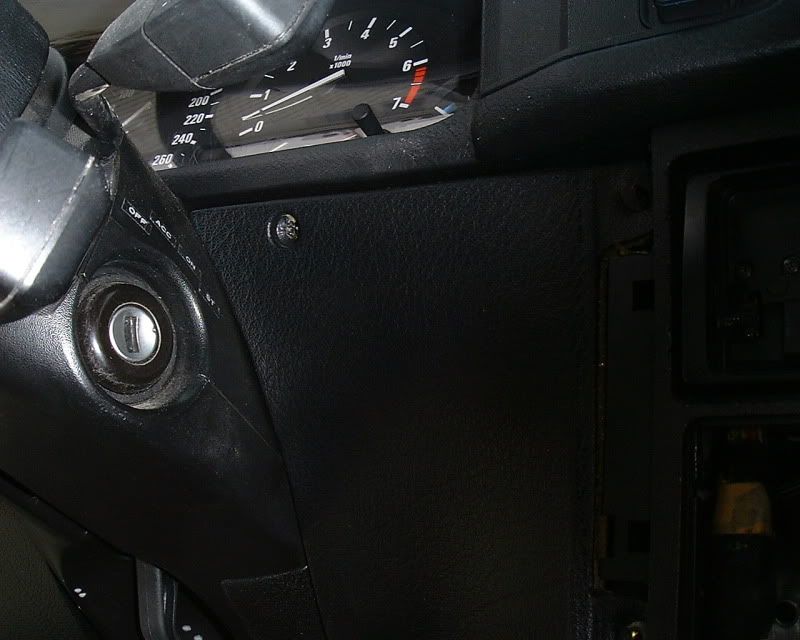
Above the glove box and next to the center console is a plastic cover. It will need to go. Remove the 1 screw and the plastic retaining clip as shown in the picture. Then remove the connector for the flashlight from this panel, it’s just snapped in.
There is 1 screw on each side of the center console attaching to the heater box, remove these.
There will be a screw on each side of the center console up high. One hidden by the glovebox and one under the instrument cluster. Remove these as well.
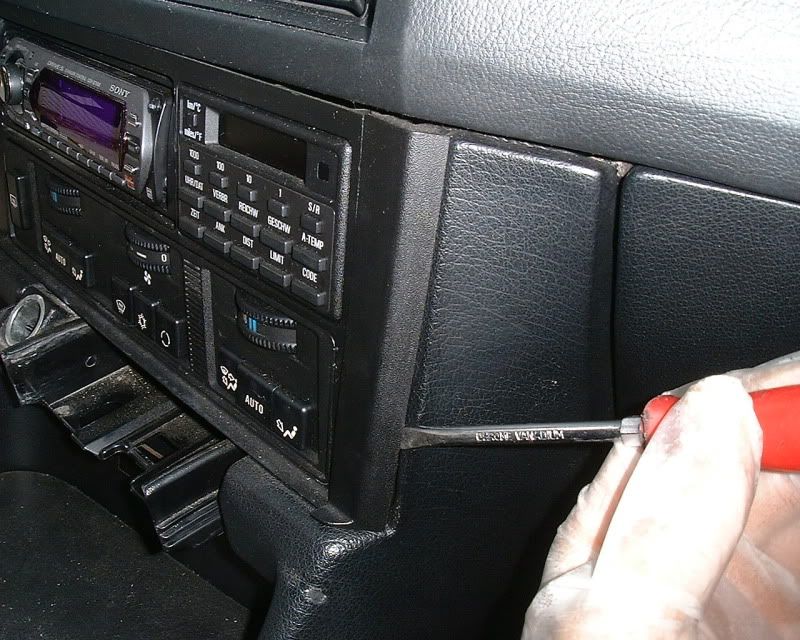
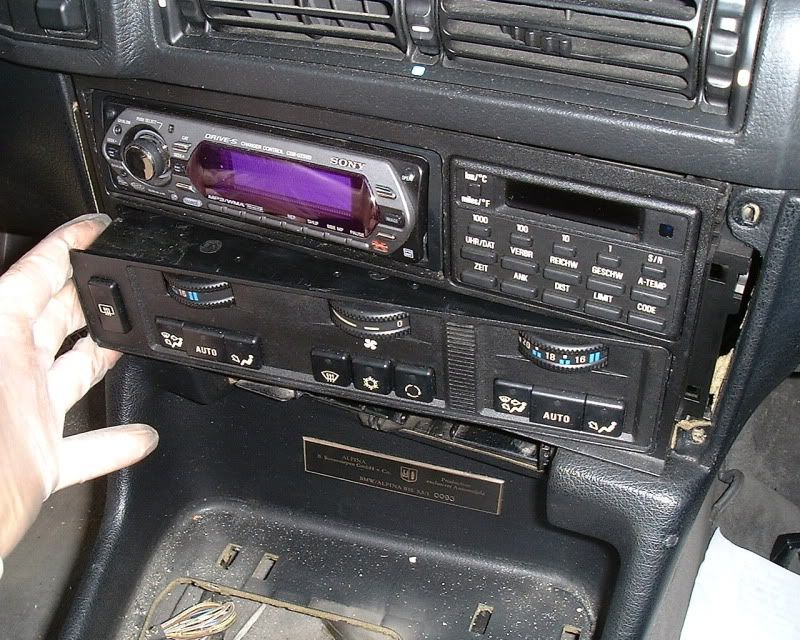
Remove the IHKA control panel by prying out the left side. Once the left side is out the right side can be unhooked. Disconnect the two wiring connectors from the back.
About now the center console should be pretty much free to come out. Keep in mind there is still the wiring connector for the cigarette lighter. If you know you can remove the stereo now without fuss, do it. At the rear of the console is 1 fastener that will need to be removed.
Once the console is lifted above this stud it should be free to slide backwards. The panel for the stereo and OBC will stay behind. With the console moved back you should be able to reach you hand in and fish out the connector for the cigarette lighter. Disconnect it. Now it’s a matter of figuring out the secret position to allow the console to be removed
from the car. For me it was parking brake on hard, seats back fully and I wiggled it out the passenger side. With the center console removed, pull and remove the heat duct from the transmission tunnel.
Also it would be good if you could remove the stereo and OBC so they are not in your way (because they will be).
Disconnect the harness connector from the back of the OBC frame to free it up.
Heater core removal:
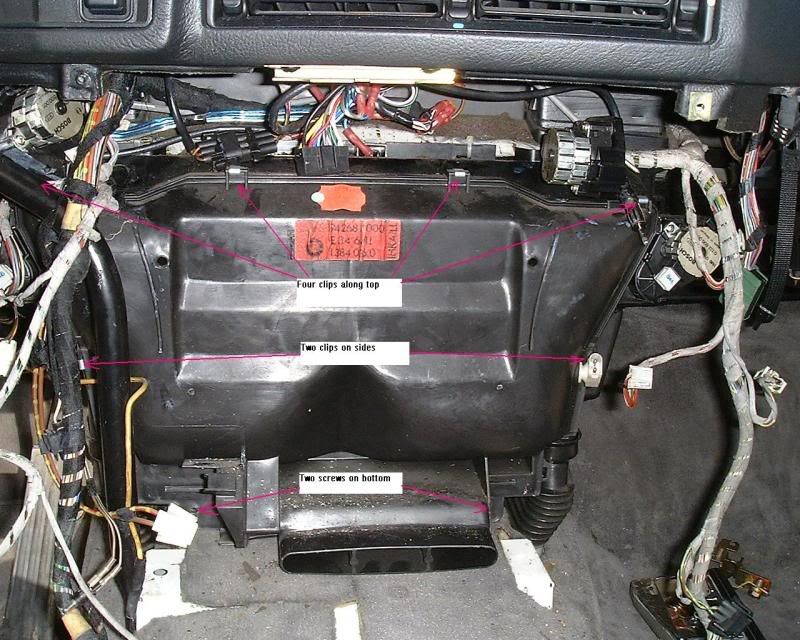
Disconnect any wires that may be in the way for pulling the large cover. At each side of the bottom is a mounting bracket. A 13mm wrench or socket will be needed to remove these. With the bolt gone remove the Philips head screw and remove both brackets. The cover is now held on by 6 small steel spring clips. Four clips along the top and one on each side. The picture shows the locations.
Cut any zip ties that attach the various harnesses to the cover
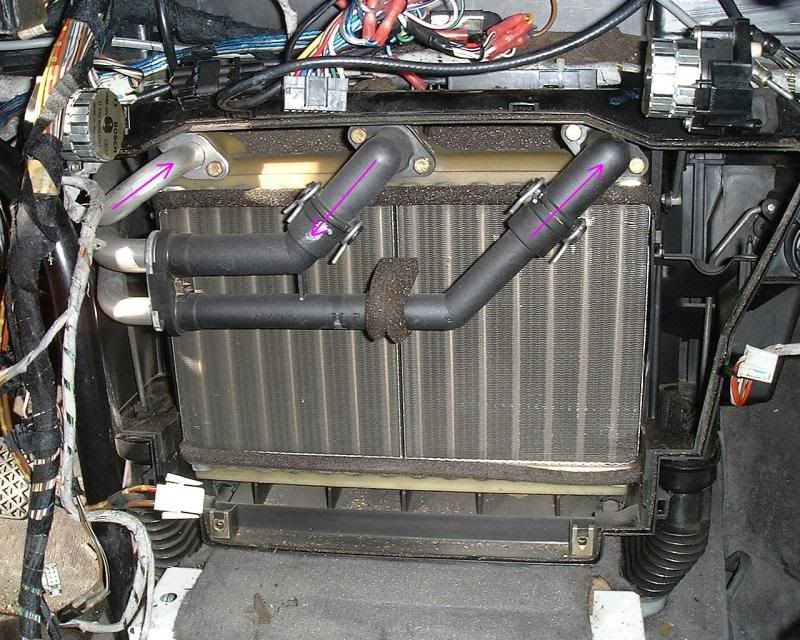
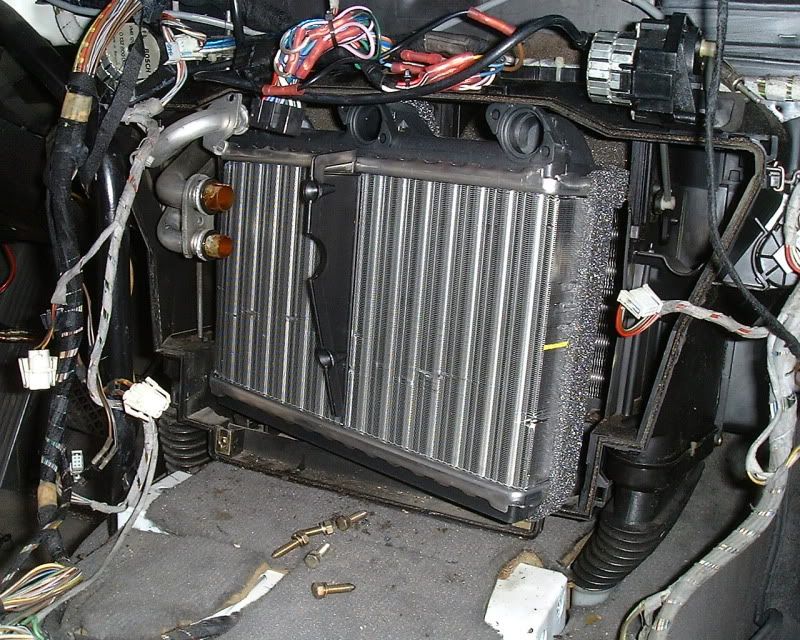
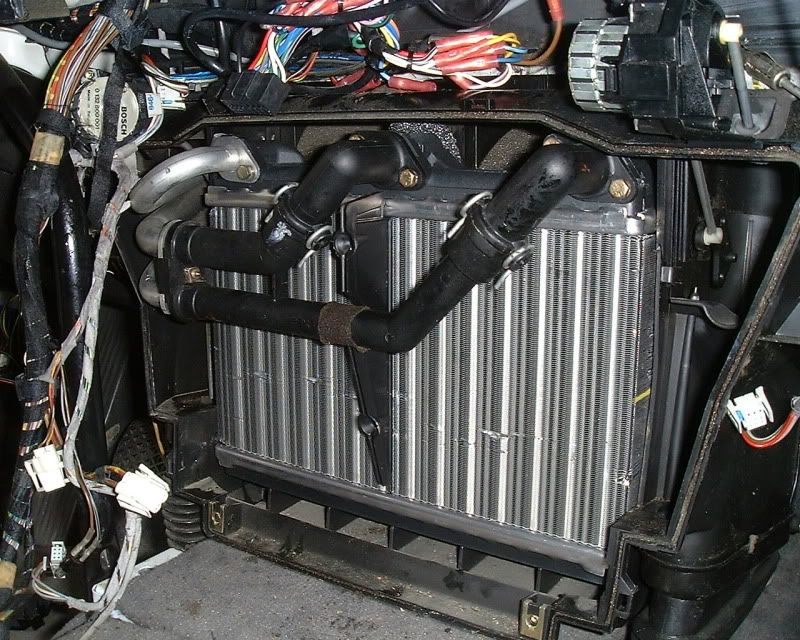
With the cover off you now see the heater core and it’s associated plumbing. Hot coolant flows into the right or left core from the sides and the center pipe is the return. You’ll now need an 8mm socket to remove the screws, a pair of pliers for the spring clips, a container to catch coolant of at least 500ml or 750ml in size and lots of paper towels to
catch any spilt coolant. It should also be noted the engine should be cold with no residual pressure built up in the cooling system or else you will be in for a nasty surprise (and the chore of cleaning your interior). I didn’t drain the cooling system on my car before performing this. I also left the cap on the reservoir to vapor lock it and prevent the entire cooling system from draining into the cabin. I should also mention that several months prior, I removed the heater valve from my car and plugged those three lines. So, at the core, the two outside lines were plugged on the
other side of the firewall and the center return line was still connected to the cooling system at the engine. Once I cracked open the pipes I had about 250ml drain out then it stopped.
Start by removing the bolt & nut that connect the aluminum pipes to plastic. Have the container in place and split the joint open. Let it drain while you remove the spring clips and 8mm bolts from the pipe flanges. If you start getting excess coolant draining (more than ½ litre) you might have to stop operations, close it up while you drain coolant from the car. So proceed slowly and watch your container to make sure it doesn’t overfill. Alternatively, you could pinch off the feed and return hoses in the engine bay. They make a style of clamp for hose that looks like a pair of vise grips but with rounded jaws so it won't damage the rubber. Or if you were really desperate, you could use a C-clamp to pinch off each hose.
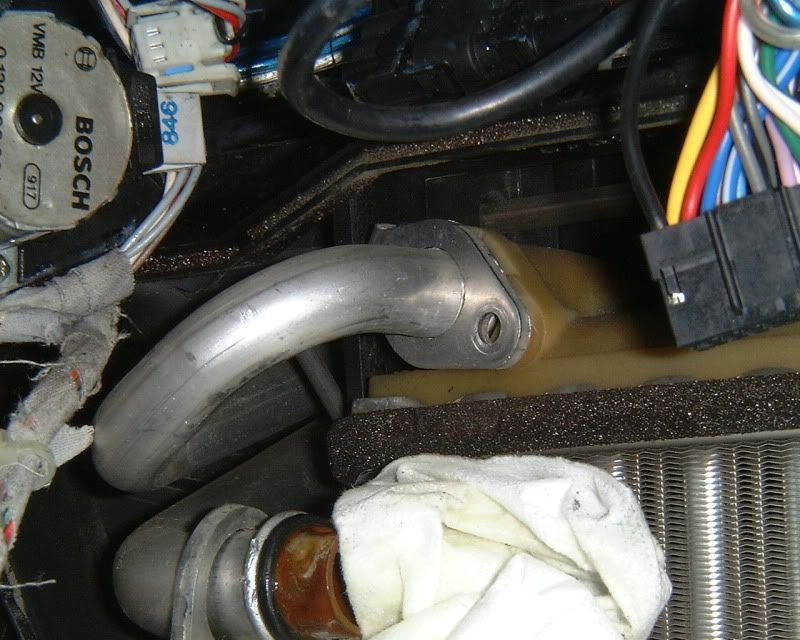
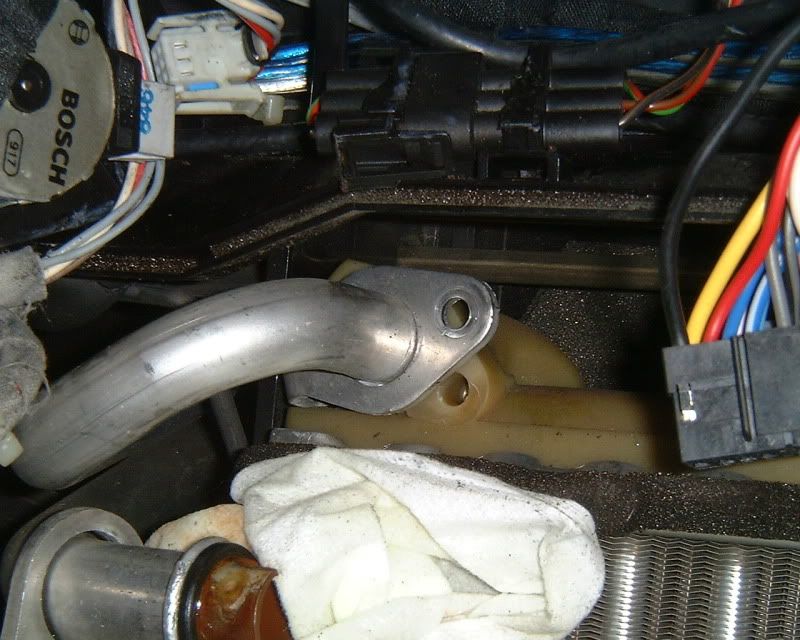
If it dribbles a bit and stops then pull the flanges off the top of the core. A little more may drain at this point. Remove the twin plastic pipes from the car. If all is still good, proceed to remove the feed pipe for the drivers side core. Remove the one bolt and give the flange about 1/8 turn to unlock it as shown in the pictures.
As you pull the left feed pipe off the core you’ll get a little more coolant spilt. Paper towels may be needed here. Cover the carpet with them to catch anything residual. With all three pipes disconnected from the core you can remove it by swinging the passenger side out first. Make sure the left pipe is pulled out of the core far enough so it doesn’t catch
& bend. Keep in mind the core is still full of coolant so it must be kept upright at all times until you get it out of the car. Some paper towels over the holes may help prevent spilling on the seats or carpet while removing.
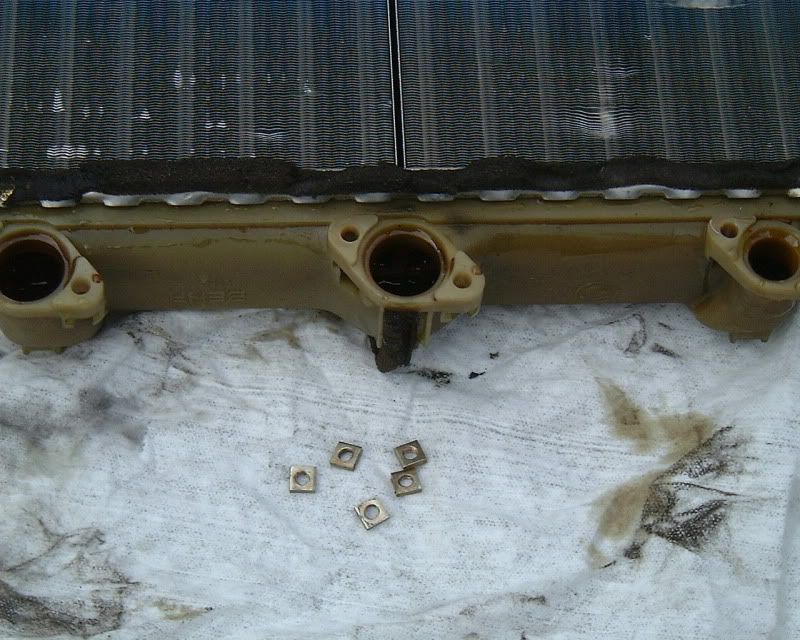
Remove the core from the car and drain it. Clean the heater core cavity well if you have had leaking coolant. The smell can persist for some time if it was left. On my heater box there are drains on both sides (for coolant I’m assuming).
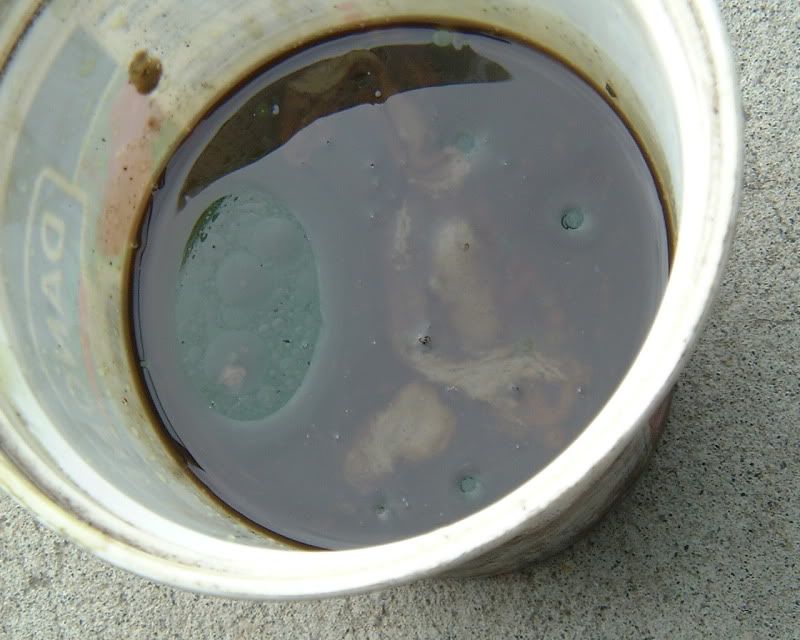
Ugh! Looks like I have some investigative work to do. The coolant in my heater core had engine oil!!! Looks like I may be doing a headgasket DIY in the near future. I suspected that one side of the core was plugged. That plus the heater valve on one side was seized. A big viscous lump of grey schmeg fell out of one of the pipes when I removed them. Flushing the old core also shows water wasn’t getting through on one side. Flush the plastic pipes before re-installation.
The old heater core will have 5 square nuts attached by the flanges. Make sure you don’t lose these when draining coolant into the pail. You’ll need to transfer these to the new core.
Installation:
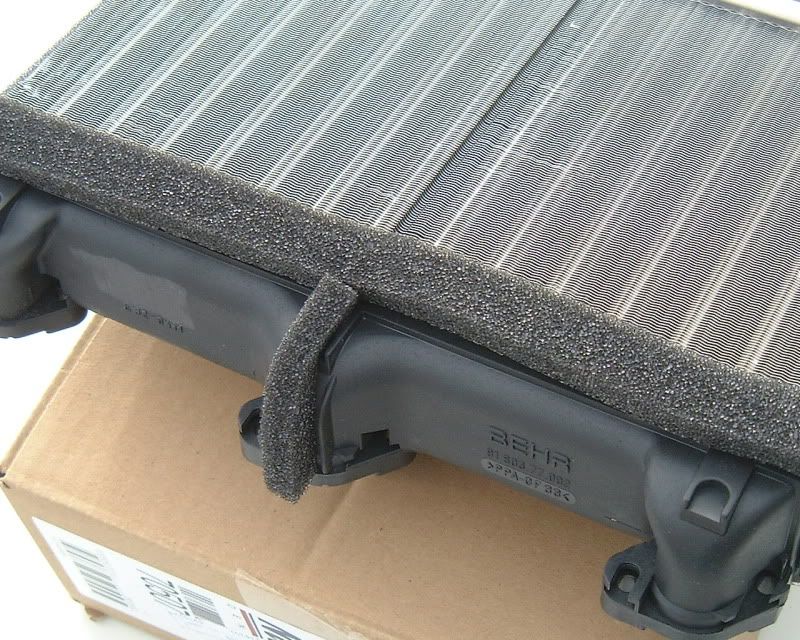
The new core comes with foam strips, O rings, a partition and instructions. I bought mine from a Worldpac source and paid $200 shipped to my door (Canadian dollars), it should be about $170 to buy in the US. I was expecting a cheap Chinese copy but when I opened the box it had Behr written all over it so all is good.
Start by placing the medium length foam strip across the back.
Place the short foam strip over the top of the center flange.
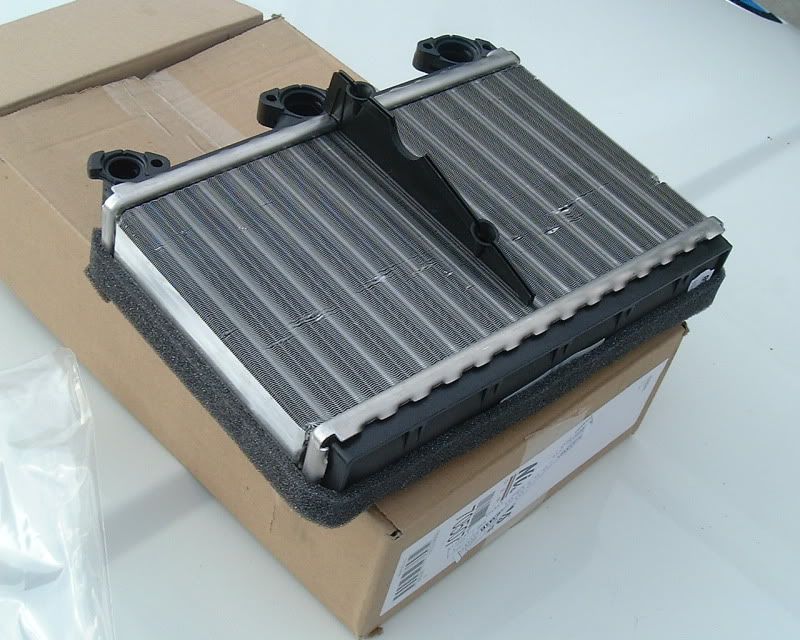
Flip it over and install the partition. Install the long foam strip on the bottom and both sides of the core.
O rings:
The new heater core comes with O rings. In my case, they weren’t all supplied. On my car I had 7 O rings total. Luckily, I had a kit of O ring assortments here and was able to select ones that fit. You won’t want to risk re-using the old O rings because the may be dried out and cracked. Also, by now they are probably now called “square rings” from being compressed for so long.
O rings can be bought cheap from the dealer. Here’s the part numbers.
Item 9 = 64118379131 (20.29mm Dia)
Item 8 = 64111374238 (13.98mm Dia)
Item 18 = 64111355780 (17.12mm Dia)
The two O rings on the plastic pipe elbows are not listed But I’m pretty sure they were the same size as Item 18. I had a small leak at one of these joints so I replaced all the O rings with new.
Drop the 5 square nuts into the slots behind each of the flanges and keep the core upright from now on. Slide the core into place behind the left coolant pipe. Note it will be harder to push in because you’ll be compressing the fresh foam.
Once it’s in, pull it back to mate with the left coolant pipe. Once you’re confident the core is correctly fit, start attaching the plumbing making sure O rings are present at all joints. With everything attached and lining up you can now attach the spring slips on the pipes and tighten down the flange bolts.
Now would be a good time to top off the coolant in the car and start it up. When I did this job on my car I drained out about 750ml from the pipes and core. I also installed a new heater valve so I’m guessing about another 250ml for that. So I was low about 1 full litre. If the coolant you drained is clean, pour it back in. If it has a bit of dirt & bugs in it and you want to re-use it, filter it with a funnel and a paper towel. The HVAC control panel will need to be plugged in temporary to make the system come alive. With the cap on it should build up pressure so you can see if any leaks develop. It would be much easier to deal with any leaks now rather than having to do it all over again. With the car running you can check for flow on both sides of the core. It should quickly get warm. Bleed air from the cooling
system if it needs it.
With the core in and no leaks it’s time to install the cover.
Re-installation is basically the reverse of removal. Don’t forget to re-attach any electrical connectors you may have pulled. Zip tie the harness back where ever it was attached before.
Enjoy!
I know these instructions are not for everybody. Those without IHKA will have a few different procedures to follow. If anybody wants to add more to cover different cars, please feel free to do so.
Thanks for reading my long winded DIY
Trevor M
Last edited by Trevor M; 10-23-2009 at 07:05 PM. Reason: added info
Mine: 1988 635CSi Euro in Diamantschwarz Metallic, 1989 ALPINA B10 3.5 in Alpineweiss II,1981 528i in Kastanienrot-Metallic, 1958 Isetta 300 currently in rust repair
In the family: 1958 Isetta 300 in Federweiss/Pastellblau, 1987 635CSi, 2000 M5
My YouTube Channel
Wheel whore & a BMW mech
Props to you for making this DIY!
Glad to see someone is willing to make a DIY with good pics on this kind of job!
Though i only wanna add that re-using the coolant is a little overkill IMHONew coolant is cheap. Specially if it's only 1 litre missing, about $5 to buy new (maximum). If you don't have the money for it, just go for clean water as it's such a little amount of water/coolant being leaked.
Member
Thank you for the DIY. I was wondering, if my heater works fine but sometimes I smell coolant out of the vents, would you recommend replacing the whole heater core, or just put new o-rings and check the hoses?
Wheel whore & a BMW mech
Originally Posted by MikeHsu

I would recommend to replace the orings only. Depends on how long the car has travelled through all the years though.
Are you sure the leak isn't comming from under the hood?
Memberish
As part of the heater core R&R I performed, I did a couple of side jobs as well. I wanted to include these in with the main body of the DIY but the 30 pictures per post limit prevented me from doing so. So here it is
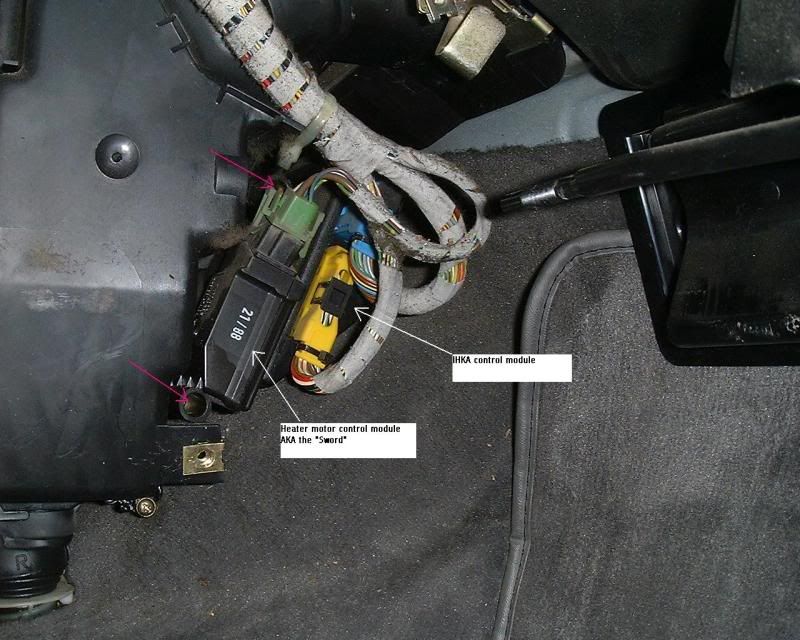
The Sword:
I wanted to pull the sword because I read there are those that have had problems with it. Mine worked fine controlling the fan speed but I wanted to look at it anyways and check for cracked solder joints. Swords are expensive to buy but easy to fix. The main culprit being cracked solder connections on the PCB. The solder cracks on these from repeated thermal cycling and vibration. Different temperature coefficients of the materials used to construct the module (fiberglass board, solder, electronic parts) cause different rates of expansion & contraction during these heat cycles. Over time and thousands of heat/cool cycles, the microscopic movements of this expansion and contractions will crack the weak spot on the joint. This weak spot is normally the solder that holds the joint together. Once the solder cracks the joint weakens even more allowing it to be susceptible to vibrations. Eventually the joint fails when it can no longer carry electrical current reliably. Once the electrical current in interrupted by a cracked joint, arcing can start which may damage circuits elsewhere. So some preventative measures taken now can stop bigger problems later.
To check for cracked solder joints I like to use a 10X magnifying glass. The naked eye might not be good enough. Depends on your vision, I know mine was good once upon a time but now I cant see dick without glasses. But with a 10X glass I can tell without question if the joint is good or bad. Anything that looks suspect should be re-soldered. Which means heat the joint, add a bit of fresh solder and allow the joint to re-flow.
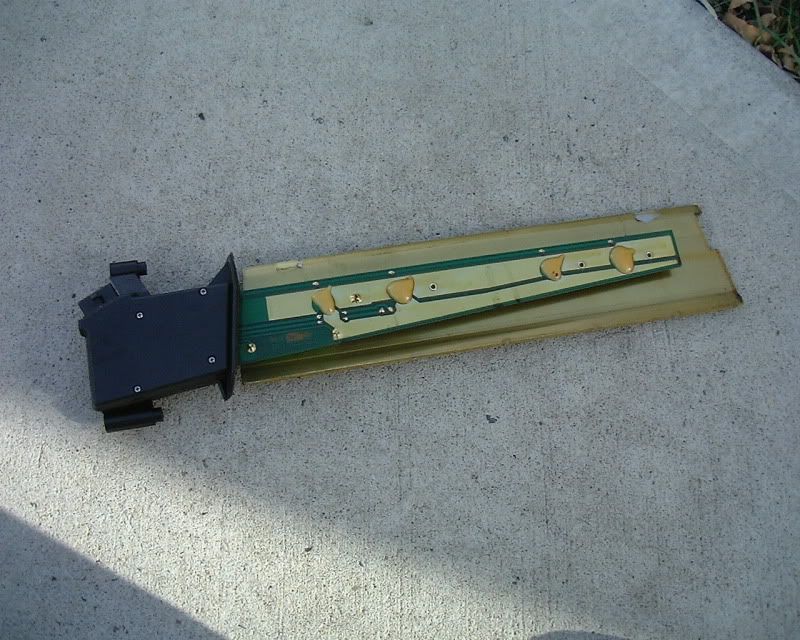
The sword is accessible from the passenger side, up high on the HVAC box. If you have erratic fan behavior, definatly remove the sword and have a look. Pull the connector and remove the two screws. It will now slide out.
The long metal sword is actually a heat sink for the power transistors that control the motor speed. Clean the sword to allow maximum heat transfer to the surrounding air when its in use. A layer of dust or fuzz will insulate it and cause it to get hotter than it needs to be.
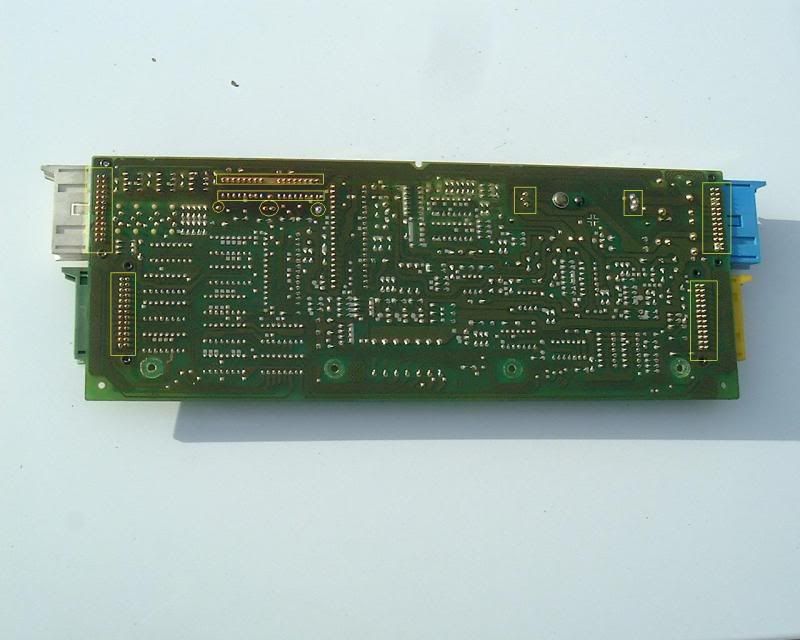
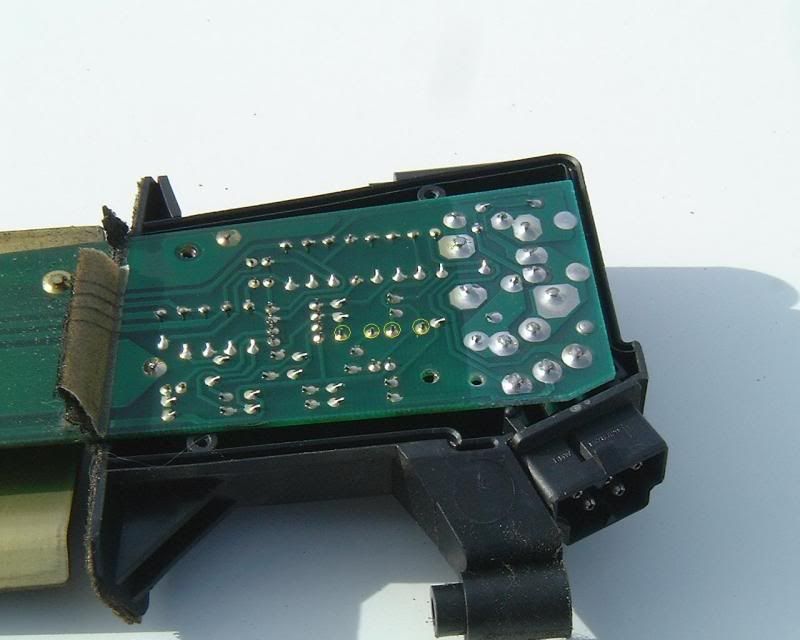
Four small Philips screws removed will allow you to open the case to the electronics. Check carefully for cracked solder joints. Part of the board is coated with a conformal coating. It is coated to protect the electronics from dirt & moisture. If you need to do any soldering this coating will need to be cleaned off. Use something sharp like a pick and lightly scrape the coating off the joint. Be careful not to damage the soft copper traces on the PCB or youll have bigger problems to fix. Once the joint is cleaned off you can heat it and re-flow with fresh solder. On my sword I found 4 joints that looked suspect. They are circled in the picture. They werent cracked yet but looked close. These boards are double-sided fiberglass with plated-through holes. This type of board is very resilient from cracking and last a long time in all but extreme cases. But then, the automotive environment for electronics is considered extreme, it can be pretty harsh with temperature and vibration.
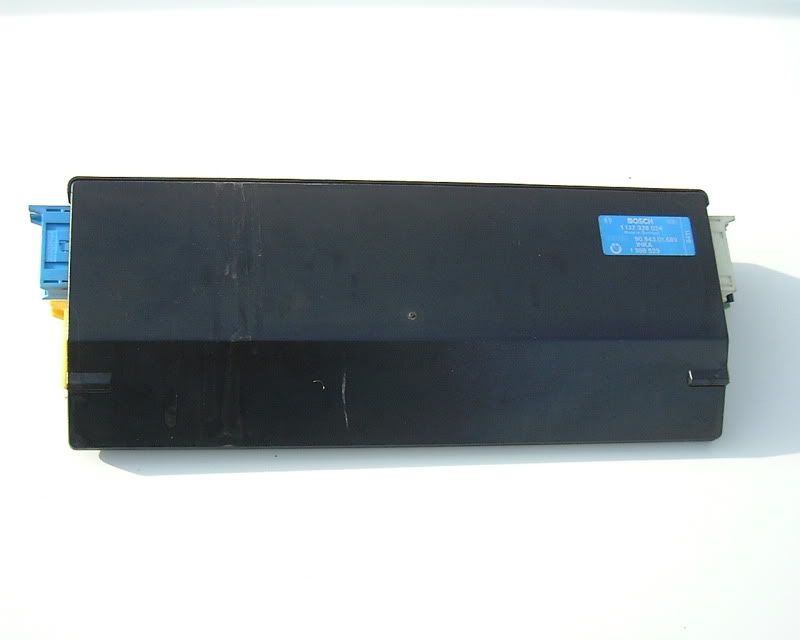
The IHKA control module:
I also pulled the IHKA control module to check for bad joints. Static sensitive devices are used on this board so precautions are advised if you decide to open it up.
http://www.csciltd.com/gen_iv/static.htm
The module is removed by first pulling the two connectors off the drivers side. Then pulling the two off the passenger side. These connectors are color coded so you cant mix them up. With all the connectors off, press the plastic locking tab and slide it out. It would be best if the sword was already pulled & out of your way.
I found 4 cracked joints on the two 120 ohm resistors circled in the picture. Other areas to check are boxed in rectangles. These would be the connectors and other components that give off high amounts of heat. Notice the top area that looks darker than the rest. This area has been roasted by a couple of components that emit high amounts of heat. I found joints that looked suspect in this area.
Mine: 1988 635CSi Euro in Diamantschwarz Metallic, 1989 ALPINA B10 3.5 in Alpineweiss II,
In the family: 1958 Isetta 300 in Federweiss/Pastellblau, 1987 635CSi, 2000 M5
My YouTube Channel
Member
Great write up...it helped me alot this past weekend when I did my heater core.
Thanks
Member
fantastic write up! I thought the entire dash had to be removed which would be a bigger pain.
BMW Humper!
Awesome DIY man! I might have to do this myself soon and this will help a lot! One question though, and it's probably a dumb one but what is R&R? lol
BMW CCBC Member
remove & replace
BMW Humper!
Lol knew it was going to be something like that, just hadn't heard that phrase yet...
 Posting Permissions


")
Bookmarks