
 uʍop ǝpısdn
Don't pay the ripoff prices (a few hundred bucks last I checked?) for the 'real' tool when you can make your own from a few simple, readily available parts to the tune of $25-$30 at absolute most. It works just as easily, and will last just as long. Now, as requested from the other thread.....
Shopping list: *all parts can be found at Home Depot/local pipe or plumbing supply store. To find a local supply (they are allll over the friggin place around me), simply plug in the keywords plumbing/pipe supply *your town*, *your state* into google maps.
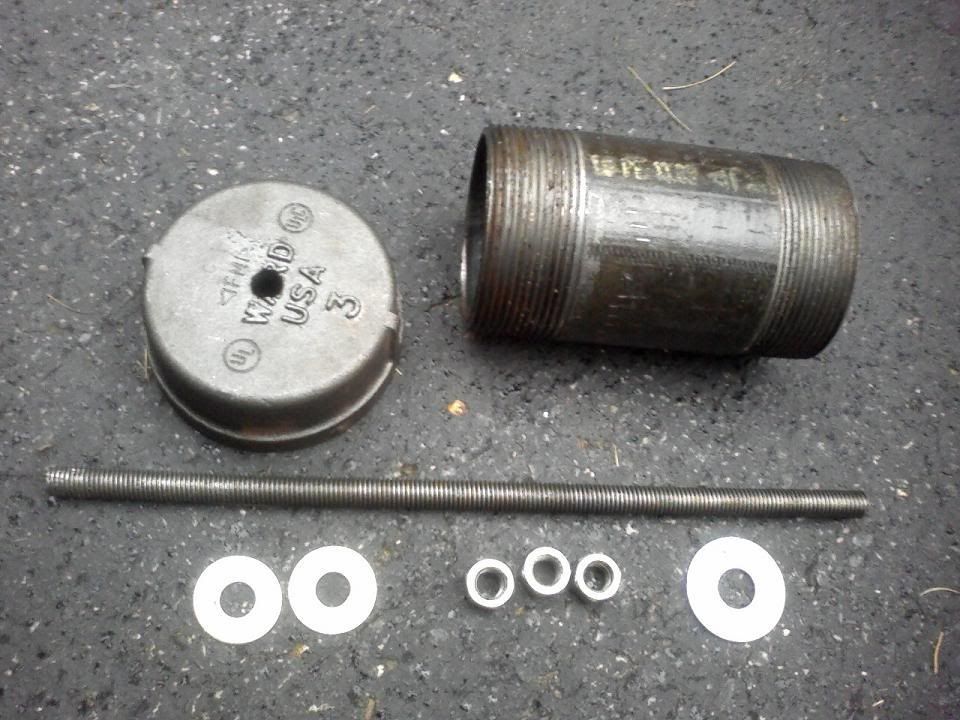
- Qty 1 3" dia black pipe nipple, standard 6" length (Purchased at local pipe store, as HD only stocks up to 2" dia)
-Qty 1 3" black pipe end cap (Purchased at local pipe store, as HD only stocks up to 2" dia)
-Qty 3 grade-8 1/2" nuts (Home Depot)
-Qty 2 grade-8 1/2" washers (Home Depot)
-Qty 1 3/4" steel washer (Home Depot)
-Qty 1 length of 1/2" steel threaded rod (Home Depot)
Pic of all the bits (after prepping for assembly):
Tools (to assemble tool, and to use tool):
assemble:
-1 Dremel w/ cutting wheel -or- Jigsaw/Bandsaw w/ metal cutting blade
-1 Drill Press or Hand Drill
use:
-1 Box Wrench
-1 Vice-Grip
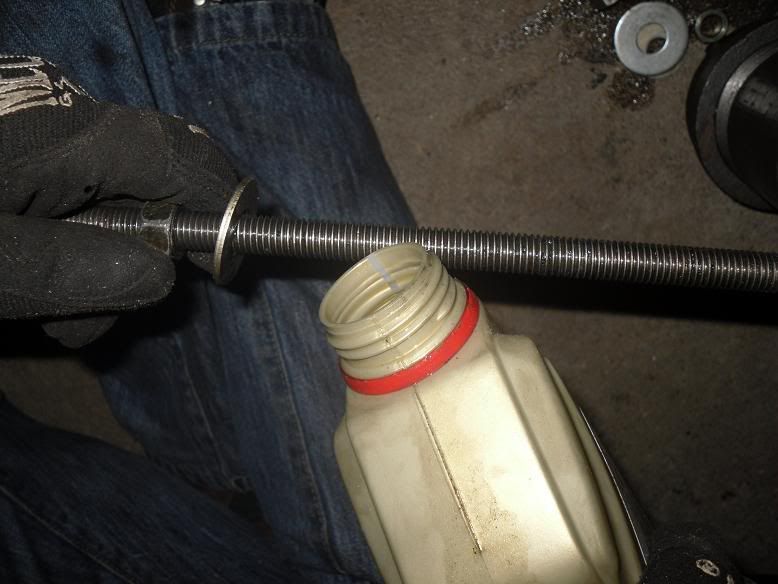
-Oil (I used a nearly empty leftover quart of 10W60 that I had laying around)
-Flathead screwdriver (or other equivalent thing to use as a wedge- actual usefulness is debateable. I just used it to be double sure everything was aligned for the easiest extraction possible)
-Handheld Propane Torch
To Assemble the Tool:
-In the Pipe End Cap, drill a hole in the center to slide the 1/2" threaded rod through, with a small amount of clearance in the diameter.
-The threaded rod can be purchased in either 12" (not in stock at my store) or 3' lengths. If purchased in a 3' length, use the Jigsaw/Bandsaw to cut it to an approximate 10" or 12" length (this length leaves a fair amount of margin when using the tool).
-The tool can be configured and used in 2 different ways; one way to remove an oem bushing, and another way to install a bushing.
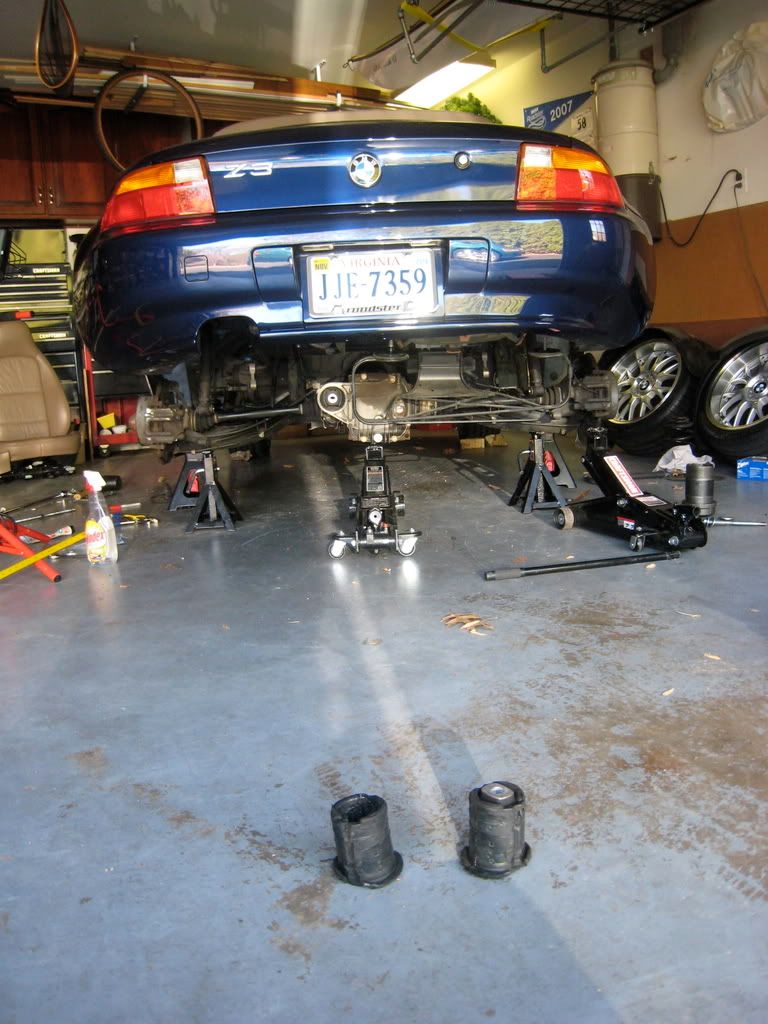
Removing the Subframe Bushings:
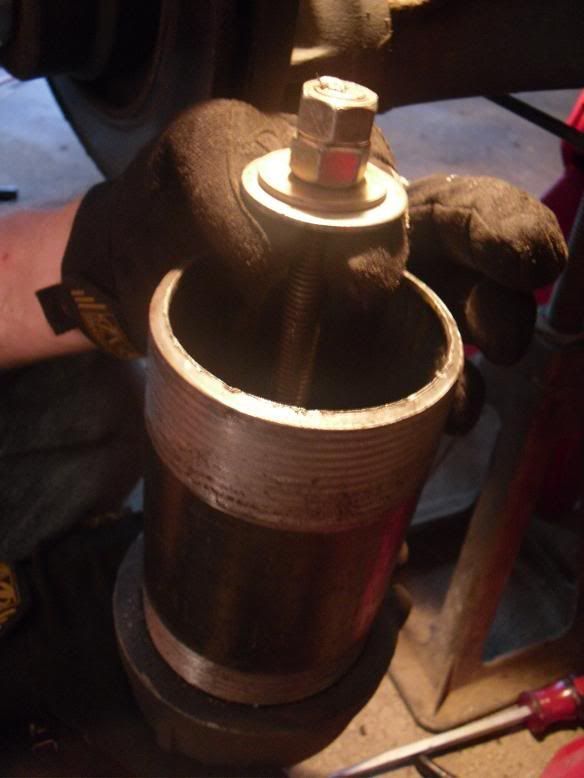
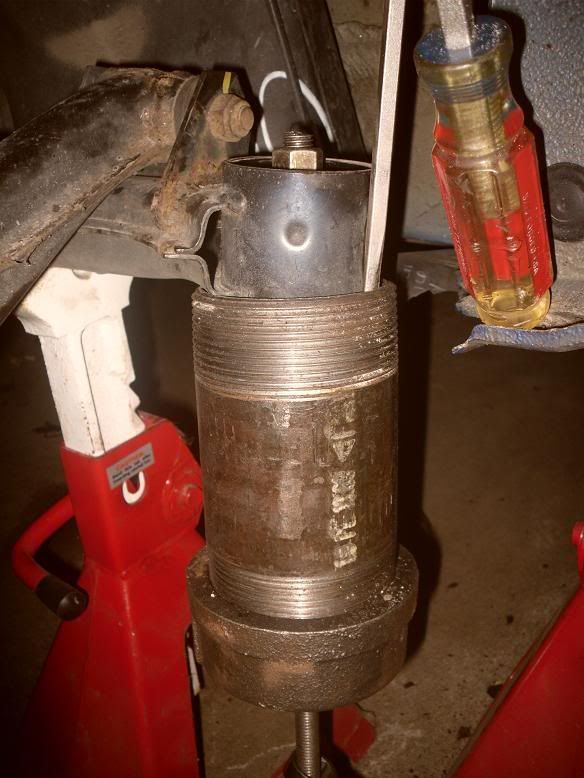
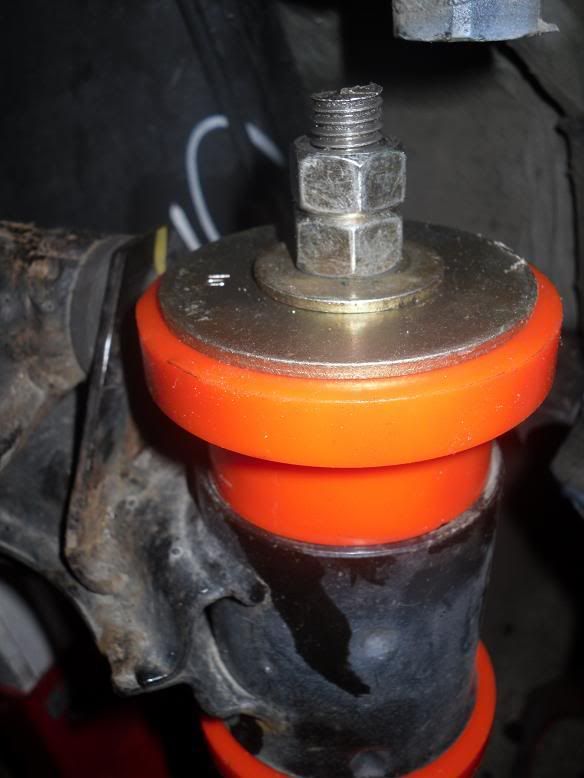
Tool will be used as it is seen configured in the following pictures:
Top:
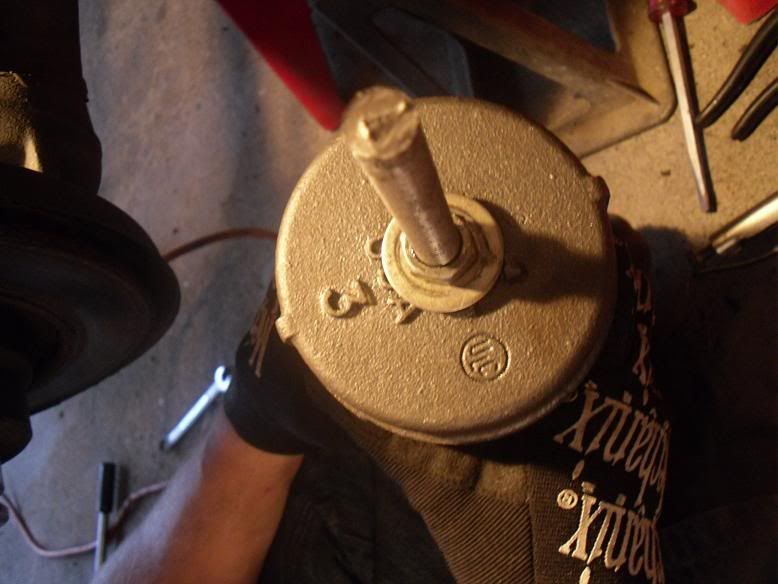
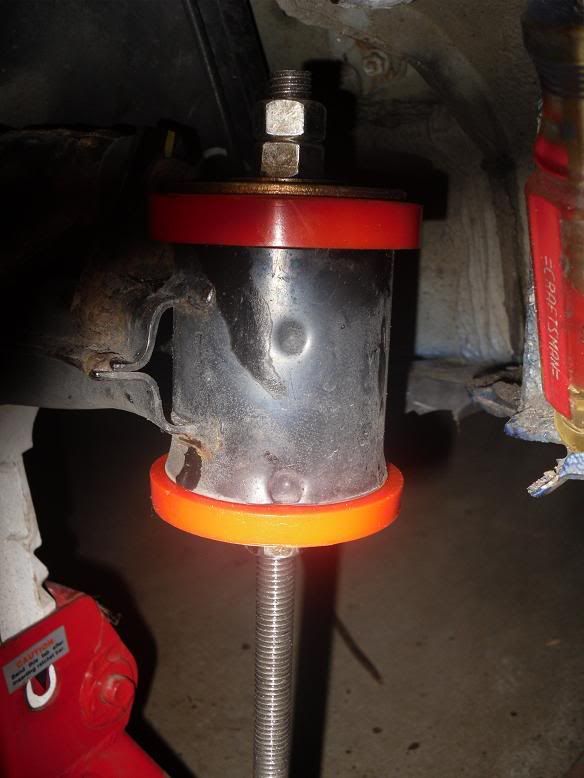
Bottom:
1- Be sure to oil the threads with a small amount of oil. While using the tool with the proper technique, oiling may not even be necessary at all with how easy the stock bushing comes out, but it is in the interest of potentially extending the useful life of the rod should some stubbornness be enountered.
2- Assemble the tool onto the bushing... on the underside of the tool is 1 1/2" grade-8 nut with 1 1/2" grade 8 washer, on the top side of the bushing is 1 3/4" washer, 1 1/2" grade-8 washer, and 2 1/2" grade-8 nuts locking together. Wedge flathead screwdriver on outer side if desired.
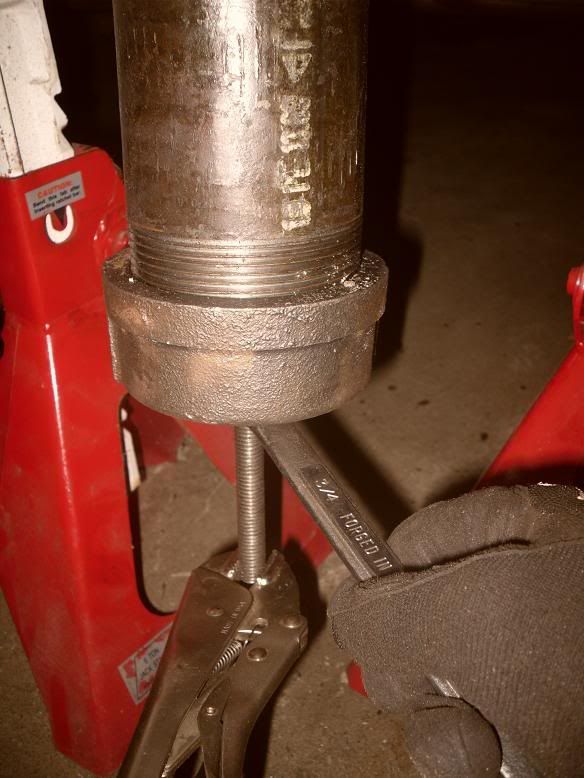
3- With the box wrench on the bottom nut, and a set of vice grips clamped on the bottom of the rod for leverage and to prevent spinning, tighten tool so that it is preloaded and snug, beginning to compress the bushing.
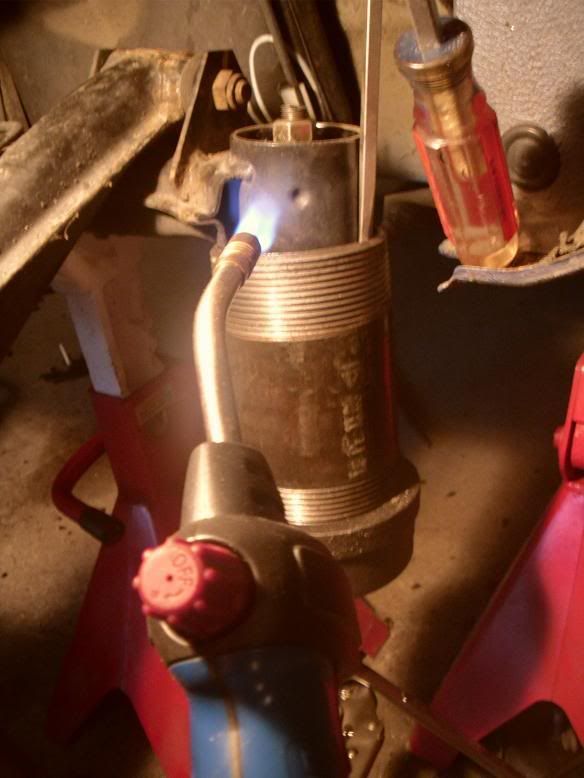
4- Apply heat from the propane torch against the outside of the bushing sleeve on the subframe to heat it up and get the rubber soft and oily. You only need to apply it for a quick min or two.
5- Tighten the tool to extract the bushing. Stop maybe one or two times through the extraction to re-apply heat from the torch. When getting close to the end, you will hear the bushing sucking itself out.
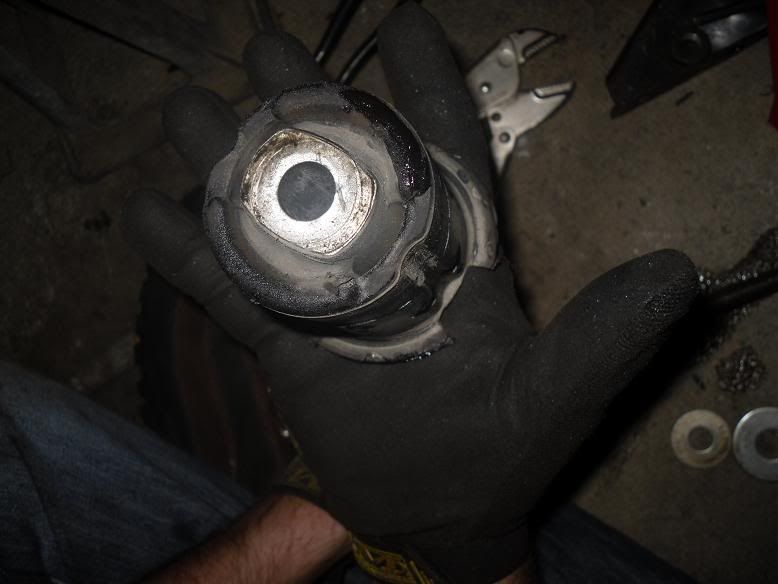
6- Look at the bushing that is now in your hand, and be amazed at how friggin easy it was!
*** note: to remove IE bushings with this tool, the bottom bushing lip must be slightly kissed with a Dremel sanding drum to fit the 3" pipe around it, and no washers used on the very top to compress just on the metal insert back through. Top half can be popped out with a rubber mallet very easily.
Installing a new IE bushing:
- The tool will be used again to install the 2 piece bushing, only without the 3" pipe components, and with the addition of the large washer included with the new bushings or from the old ones.
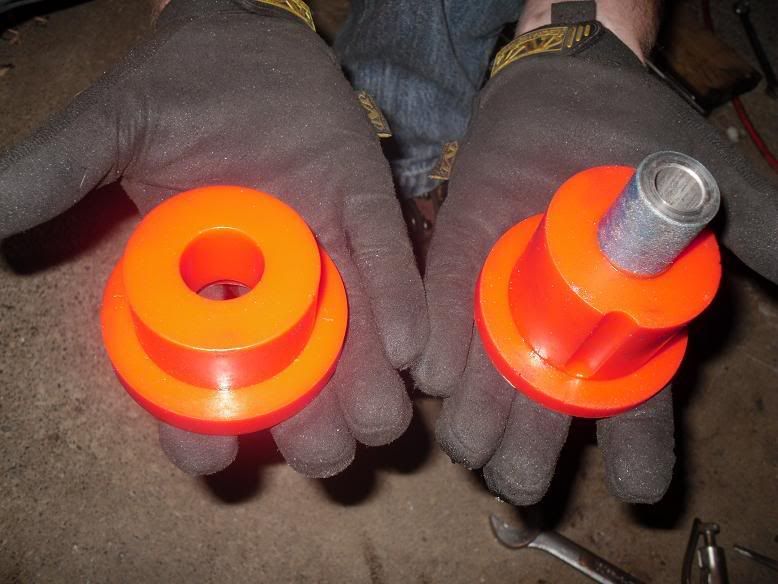
1- Check out the bright, shiny bushings.... half with the metal insert is the bottom, the other is the top.
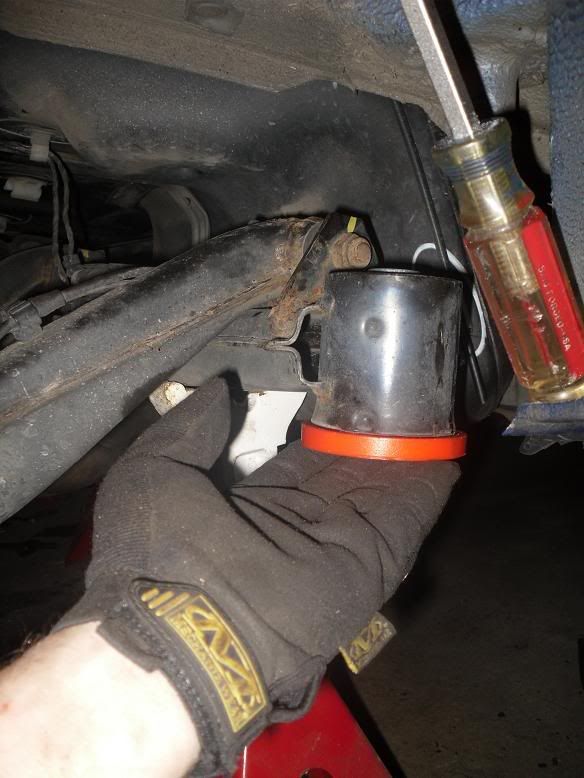
2- Insert bottom piece by hand into the bushing sleeve on the subframe... it should slip in by hand fairly easily.
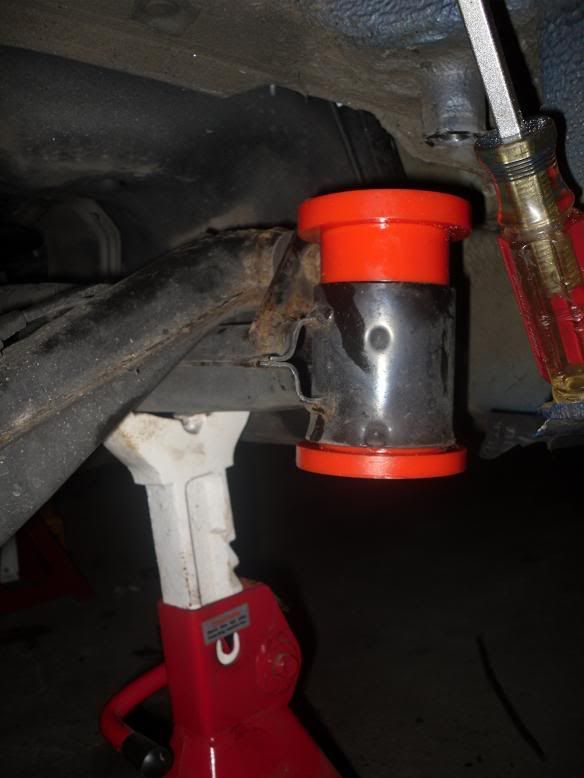
3- Place the top half on the top side of the bushing sleeve.
4- Assemble the tool onto the bushing. Lubricate the rod. The rod goes through the pieces, with 1 1/2" grade-8 nut, 1 1/2" grade-8 washer, and 1 3/4" steel washer on the bottom side. On the top side is 1 large washer (included with bushings, or taken off with oem bits), 1 1/2" grade-8 washer, and 2 1/2" grade-8 nuts locked together. Assemble Box wrench and Vice-Grips onto bottom of rod as before.
5- Tighten the bits together, and the bushing will easily squeeze into place!
Job of removing and installing the bushings themselves should only take a few minutes apiece each way. Oh, and if you're wondering what the random inverted screwdriver is in some of the pics, I used my long one to prop the partially unfastened fender liner out of the way... made work way easier.
Thank you to my wonderful GF for sitting in the garage through the process to take the pics
Last edited by Itsablurr; 07-28-2009 at 05:46 AM.
BMW M3 - Ferrari 348 - Chevrolet Chevelle
Member
BMW CCA Member
Very good write up. Thanks for putting that together!
Member
very nice share...thanks...
denice25...
________
Wow, great writeup. Do you notice a difference?
uʍop ǝpısdn
Oh, and just as a note, I absolutely abuuuuuuused the threaded rod when trying to install my 1st set of IE bushings before I discovered they were for an E30 (as can be seen in my other thread from a week ago). Threading survived just fine. If it can handle the abuse (cranking on a 14" wrench/extension bar for leverage, banging with a mallet to try and tighten it to compress solid metal, etc) that I put it through, it will last many many extractions and installations without any problem whatsoever, no question.
Thanks! The bushings are one step of many along the way to getting my shredded trunk/diff mount situation put to bed.Originally Posted by JCK

When I did the bushings, I also repaired and seam welded the trunk floor, cross brace, and mount tabs. I got it all put together the evening before I left for China on business (where I'm posting from) for 3 wks. Needless to say, until I get the sucker fully reinforced, I'm not going to be putting any abuse at all on the car.
When reassembling the rear, however, I did notice how much tighter everything was, with WAY less flex. It made reinstalling the diff a bit of a pain with reduced clearance. Also, a quick test drive revealed that there is indeed a bit more transmission of noise from the diff (along with something loose and clunking in the rear after re-assembly that I'll have to go back and find/fix).
...and I also have discovered that my clutch master cyl may be scrap... but thats another thread to be made when I get back.
Last edited by Itsablurr; 07-28-2009 at 05:45 AM. Reason: Automerged Doublepost
BMW M3 - Ferrari 348 - Chevrolet Chevelle
Member
Very helpful, This is definitely on my list of things to do.
:facepalm
you couldn't just squeeze the bushings into place? I've never had to force the two halves to come together.
Member
I did something similar, but used a pulley puller similar to these
I would think one of their advantage is that they are cheaper and normally have a square thread which takes the abuse and the pressure much better. I clamped it on the subframe and apply pressure to the aluminum sleve inside the stock bushings.
Once the sleve was pushed as far as I could I used the blowtorch for no more than 30 seconds (as you say it slightly melts the surface of the bushing and make it oily). It slid right out.
I took pix but it was night and they came out too dark.
I would think your way would work best if you're not completely removing the subframe...
Last edited by LPCapital; 07-28-2009 at 12:30 PM.
ZetaTre
2003 BMW Z4 2.5i
2009 BMW X5 xDrive35d
2006 Ducati 999S
2012 Ram 2500 Laramie Longhorn 6.7 Cummins
Member
Great write-up, too bad I already replaced my bushings. I'll keep this in the back of my head.
Member
I just finished the job using more or less the same home brew tool. Just preload the bushing, apply a little heat and it slides right out. I used a heat gun and it worked like a champ. The first side took a bit, but once I got the process figured out it was a breeze. My car has just a tick under 60k on it and and the stock bushings looked alright but I definitely noticed a difference. It's not night and day, but very noticeable.
Member
BMW CCA Member
My PowerFlex Race bushings had to be pressed in. I suspect the race bushings are a tighter fit.
Member
Great write up, as usual. That's the Pbfut tool isn't it? I thought the threaded rod had to be something harder than what you would normally find at Home Depot.
uʍop ǝpısdn
Thank you
I was under the same impression for the threaded rod, but the stock that I picked up at HD in the hardware section seems to be able to easily handle the abuse and then some. No cause for concern from me, at least.
BMW M3 - Ferrari 348 - Chevrolet Chevelle
Member
I had a hard time finding a local pipe supply that was still in business in the tougher times we're having and it took me some time to find what I needed online. Just wanted to let people know there are options out there.
http://www.thegreathardwarestore.com...C-p/874443.htm
http://www.thegreathardwarestore.com...C-p/456456.htm
Member
I'm going to be using the tool made here, but I was wondering, when I go to "get to" the bushing in the subframe, how much of the subframe do I need to remove? I would think I need to remove the shock on the bottom, remove the spring, the bushing mount (obviously) and the subframe mounts in the center near the drive shaft?
Or is this making more work out of it then needed?
Member
Easy to use? :-)
Great write up!
E36/8 2000 M Coupe Cosmos Black/Black
Shark, Conforti CAI, B&B Exhaust, H&R, Bilstein, AKG Subframe/Diff, UUC TME Red/Caps, Swapped Front Hats, Ice>Link.
================================================== =======================
Member
Once you get everything out of the way I remember a total of 3 bolts other than the bushing mounts themselves: One on each shock and one on the diff. I pulled the springs out because they were loose and looked like they'd fall out out their own if I didin't. Also, I ended up removing the bushing pins for a little more room to work. Probably could have gotten away with out that though. Going into it I was really worried about the disassembly and the tool, it turns out that the biggest issues were wrangling the rear end assembly once it dropped and getting the bushing support brackets re-installed.
Member
Hardened rod is needed if you don't want to use a torch. Which I recommended for two reasons. One, you are very close to the plastic fuel tank. Two, subframe has a protective coating on it to keep from rusting. Heating will weaken the metal and destroy the protective coating. It is also important to use a washer very close to the size of the bushing and trim a relief in it to pass by the keeper dimples in the subframe sleeve. If you dont, the tool has been known to pull the center of the OEM bushing out and leave the outer ring of the bushing in place. Heating does make the job easier in some ways but I am not sure I would suggest it. After helping many with the tool over the years, and fielding some pretty odd questions from some experienced car guys, I would say that it probably is not a good idea to suggest the heat method to the general forum population. Many do not realize that is a gas tank right next to the work area.
Dan "PbFut" Rose
 Member
I've done that
Kelvin
Member
Is this right?
Thanks.
///M Practical
Scroll down to the section on subframe bushings. Link courtesy of fmcfad01.
http://e368.blogspot.com/
Member
thanks!
Member
another old thread I'm bringing back...
This thread is awsome, and has great info... and all these homebrewed bushing tools are great... however, what ever happened to using C-clamps? I've done a few urethane suspension jobs on other cars and trucks... and my harbor freight hydraulic press, and a large C-clamp were my best tools when re-inserting new bushings.
For the subframe bushings, it "looks" like using a large C-clamp (and some fender washers to pretect the bushing) would work great. I havent done this on my Z3 yet... but I will soon, however, is there something I'm missing here?
The 3026 tool is simply awsome, but at that price, I'll have to stick with pullers and the press... unless someone can rent one to me
Anyway, once again, thanks for all the great tips and info!!
Member
This is by far the coolest thing ever! I just wanted to tell you thank you for this write up. I was able to remove my subframe bushings in 5min. It worked so well I did the same thing using a 2 1/2in pipe and 3/8 rod to remove the trailing arm bushings as well. It took 20min to cleanly remove all my bushings. It also took me less then 15min to install the new polyurethane bushings in its place. This is something I will share with everyone I know. Thanks again!
Member
Bringing this back....
But this DIY tool will work on an e36 328i subframe right?
- Jeff
 Posting Permissions


 Reply With Quote


Bookmarks