
 Member
I have searched the FAQ and also been all the way back to 2005 and have yet to find a great writeup on the best solution to mounting a euro front on a us car. There is a lot of discussion, but I am looking for pics...
I've got the euro brackets, and I understand I need to do some cutting to get those in there due to the US sheet metal. Does anyone have a picture of this (both sides) from inside the engine compartment? I am not sure what I would have to cut... and I am not really equipped to do much cutting without just hacking away at it.
The other approach, custom brackets. Is there a simple, tried-and-true way to make front brackets that use the US mounting points? Anyone have a favorite design... or even better yet, a set of brackets for sale?
I have Ken Danielson's US tuck brackets... and was going to try and see if there's a way to mod those to work, at least in part. That's my next thought.
Any help is appreciated. I am tired of screwing around. I just want the damn thing on there. The US bumper is making me upset just looking at it.
Current: 1987 Zinnoberrot 535is - M-tech body kit and other Euro parts
Previous 1970 Turbo Look 2002, 1982 320i - Both with Metric Mechanic 2300 motors, dual side-draft Webers and track-mods
Member
Those bumpers make nice work benches, a place to set beer, soda cans, etc..
I like mine, and they look real good all shined up.
Robert
Tbd
UlTiMaTe DrIvInG MaChInE
I was just explaining this to someone yesterday.
So, the euro has the brackets that go from the inside of the wheel well (on frame rails), through the front clip, and through the euro valance.
to adapt the euro brackets to a US-spec car, you would need to cut a "slit" in the us valance and clip. You would also need to drill holes through your frame rails (2). Obviously there are many options but i think that would be the easiest.
This is not an Easy thing. It takes time and trials for fitment. I would PM DJBoomer and ask how he did his. His job came out really well.
Bav's Build Thread: http://www.stanceworks.com/forums/showthread.php?t=2498
Member
aha! so the euro brackets go on the wheel side of the frame rail vs the inside/engine side?
That answers a lot of questions for me if that's true. Now I understand what I have to do...
I was completely stymied because I was trying to put it on the inside.
Current: 1987 Zinnoberrot 535is - M-tech body kit and other Euro parts
Previous 1970 Turbo Look 2002, 1982 320i - Both with Metric Mechanic 2300 motors, dual side-draft Webers and track-mods
E21 Legion
No the Euro brackets go inside the engine bay by the frame rails. I didnt have to cut my valance either so I have no idea what Ricky means by that. I only had to redrill the bracket and notch it. I also had to do a minor notch in the frame rail itself towards the front clip. If I have time I'll get some pictures up.Originally Posted by gerryc

Member
ok. crap. confused again. ;-)
Pics would be great. Thanks.
Current: 1987 Zinnoberrot 535is - M-tech body kit and other Euro parts
Previous 1970 Turbo Look 2002, 1982 320i - Both with Metric Mechanic 2300 motors, dual side-draft Webers and track-mods
Member
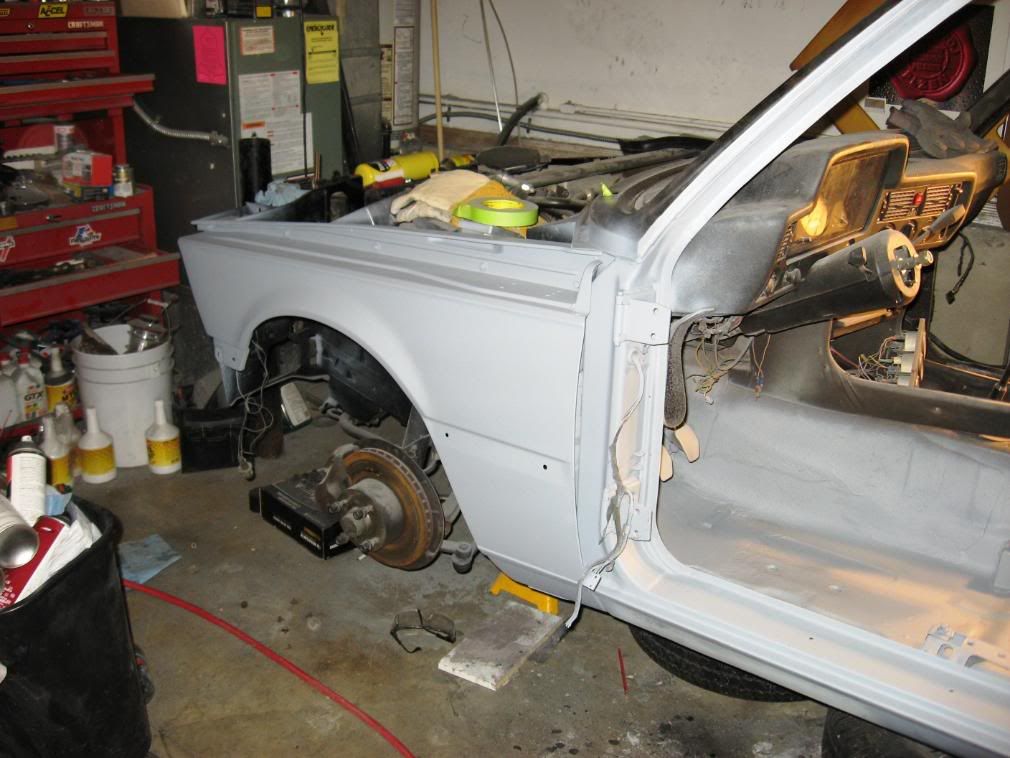
Mine mount on the out side of the frame rail. I'll look to see if I have a pic...
Here you can see where the bracket would mount on the outside of the frame rail, although the bumper is not currently installed, you can see the mounting holes and the discoloration where the bracket had been mounted:
Here you can kind of see that the only opening to insert the bracket is on the outside of the frame rail.
Last edited by Jester323; 05-21-2009 at 04:48 PM.
e21: 1981 2.5L sleeper
e21: 1982 323i Baur TC 1 # 4210
e21: 1980 323i project or parts car, can't decide
e21: track car project
e46: 325XiT

click here for the latest updates
E21 Legion
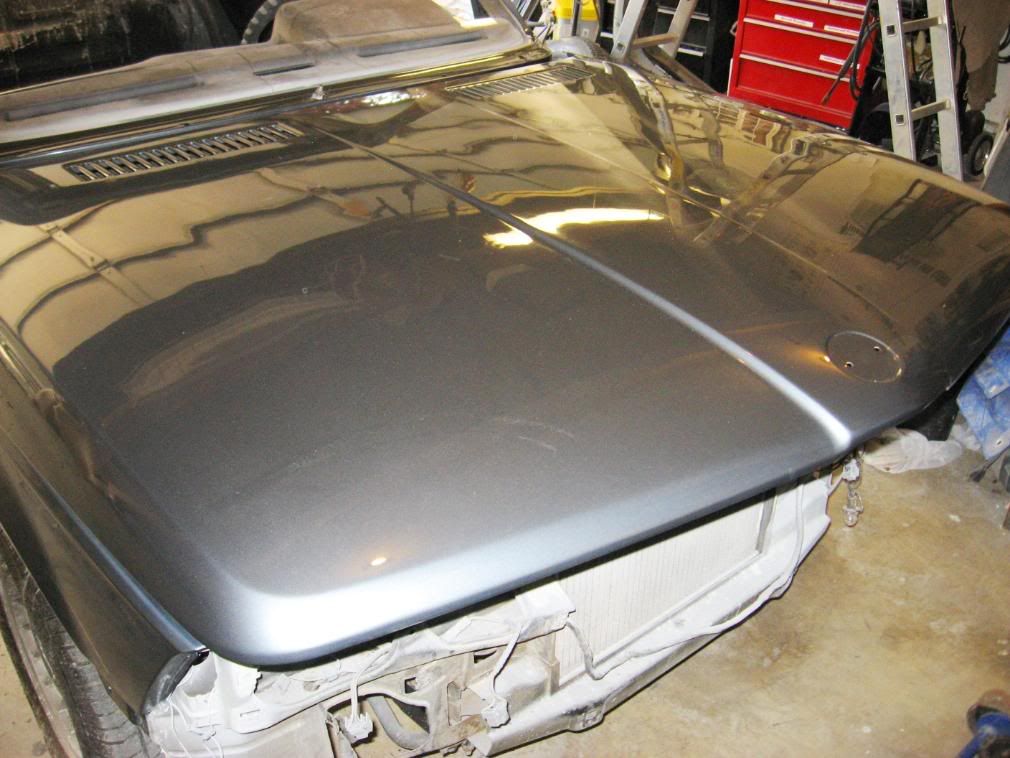
Well I guess we can say it works both ways. You cant tell in this pic the location but this is how the stock brackets look protruding thru the valance mounted in the engine bay.
edit/ Now I need to go home and look at the 323i and the 320i and see why I mounted them inside and not outside. I did this 9 years ago and kind of had no idea what i was doing!
I checked my 323i and it is as you described Jesse. Guess I was wrong, but at least it worked for me by mounting them on the inside.
Wish I new about this forum 9 years ago!
Last edited by blitzed310; 05-21-2009 at 11:58 PM. Reason: Automerged Doublepost
Member
ok. front done.
It was a long day. all day.
I chopped and drilled and fitted and re-fitted... and then chopped and drilled.
Now that i'm done and step back to look at it I think the chrome is too scratched and banged up to use it long term. It came that way and it was cheap...
As for the which-side-of-the-rail question for me? Outside.
I will post pics and a writeup soon.
I will be embarrassed if anyone ever takes the valance off and looks at my hack job on the front of the frame rails. Actually, no I won't. But it's messy. Tetanus hazard. Burned out a rotozip trying to clean it up. Melted the rubber coating on the outside of it.
Thanks for everyone's help. On to the back bumper... That should be easy with my shiny new brackets... (thanks TXMatt!)
Last edited by gerryc; 05-22-2009 at 10:14 PM.
Current: 1987 Zinnoberrot 535is - M-tech body kit and other Euro parts
Previous 1970 Turbo Look 2002, 1982 320i - Both with Metric Mechanic 2300 motors, dual side-draft Webers and track-mods
Member
look. here's what you need to do. Give me your euro bumpers for free. I'll then mount them on my car, and send you pictures at my liesure. Then next time you get a pair, you'll know what to do.
Member
great idea. you sit by the door waiting for the UPS guy. Don't get up, you might miss him.
;-)
Quick pic update. i have a lot more with the valance off showing where I cut. etc.
Also, note that the bracket is *not* at the same angle as the frame rail indentation. That was an interesting discovery...

Last edited by gerryc; 05-23-2009 at 10:21 AM. Reason: Automerged Doublepost
Current: 1987 Zinnoberrot 535is - M-tech body kit and other Euro parts
Previous 1970 Turbo Look 2002, 1982 320i - Both with Metric Mechanic 2300 motors, dual side-draft Webers and track-mods
Member
Done. Front and rear. Rear valance to come.

Last edited by gerryc; 05-31-2009 at 07:25 PM. Reason: Automerged Doublepost
Current: 1987 Zinnoberrot 535is - M-tech body kit and other Euro parts
Previous 1970 Turbo Look 2002, 1982 320i - Both with Metric Mechanic 2300 motors, dual side-draft Webers and track-mods
Member
It looks great man, well done! Your US valance isn't really THAT noticeable in the pictures.
What are your plans with the front spoiler? Do you plan to paint it red or leave it black? IMO having it matching the rest of the car would set it off nicely and compliment your new bumpers.
Member
Your car looked pretty good with the US bumpers. Perhaps it was the color or the spoiler, but it was not to bad IMO. Now it looks even better - WOW! Those bumpers look so clean are they new? Where did you find them? Great job.
Member
thanks.
The bumpers i got off of ebay... lots of elbow grease and chrome polish. The thing that makes the difference is the new rubber strips I bought from Maximillian. Makes them look very fresh. The chrome isn't great. On the front especially. the car is really a 10 footer...
I am going to fit a back Zender valance I got on ebay. Will do that some time soon. At that point I am going to have them both painted. Maybe side skirts too... No big hurry on those. I want to see how it all looks. Trying not to have that "crap-slapped-on" look.
May have more of the car painted too. I will have several holes to fill in the rear from the US bumper parts and license plate lights. Maybe I will remove the markers too. The front valance is trashed under the airdam. May get a replacement and have that painted too...
This car is a blast to fix up. ;-)
Thanks to all of you.
BTW, I have had jeeps and several other cars with active online communities. this is by far the best. Low flame, great knowledge.
Current: 1987 Zinnoberrot 535is - M-tech body kit and other Euro parts
Previous 1970 Turbo Look 2002, 1982 320i - Both with Metric Mechanic 2300 motors, dual side-draft Webers and track-mods
Member
Looks great. Couldn't you lower that rear license plate now?
Member
license plate is part of the rear valance project. need to create some structure under there to hook it all to.
I have a brand new one of the black between-the-lights things to put in there, and a license plate light setup... just need more time...
and maybe some duct tape...
and a 2x4.
kidding.
Current: 1987 Zinnoberrot 535is - M-tech body kit and other Euro parts
Previous 1970 Turbo Look 2002, 1982 320i - Both with Metric Mechanic 2300 motors, dual side-draft Webers and track-mods
Member
Is that the US rear valence?
Member
Well you did one heck of a job cleaning those bumpers up and with the new impact strips they look brand new in the pics. All your hard work paid off and they look perfect - great work!
I also used the Zender piece when I did my euro bumper conversion years ago. I first painted a satin black to match up with the rocker panels. Later when I got side skirts and I had everything painted body color. Looking back, satin black looks better IMO because it matches the panel between the tail lights better. You might want try the Zender now and just paint it black. It would match up pretty nice with your trunk spoiler. You can always have it painted body color later.
As for those holes from the license plate. As a temporary fix I used use some round plastic body finish caps from you local auto store. I painted the outside ones body color and left the center black. I use a little silicon to seal them.
I am done experimenting. I am having the car repainted this summer and I will have a euro valance installed. After that, all body kit items go except for the front spoiler.
Here are some pictures of the Zender in black and body color just to give you some idea of how it looks.
Satin Black
Body Color

Member
thanks for posting. Anton, how did you mount the rear spoiler?
G
Current: 1987 Zinnoberrot 535is - M-tech body kit and other Euro parts
Previous 1970 Turbo Look 2002, 1982 320i - Both with Metric Mechanic 2300 motors, dual side-draft Webers and track-mods
Member
NICE! Paint the front & rear Zender valances body color & add some Hella headlights and you're done. Looks good.
Last edited by Rennsurfer; 06-01-2009 at 11:41 PM.
Cheers,
Mark
1982 320i 5spd.
1987 Volvo 245DL Estate 5spd.
1967 Volkswagen Beetle 4spd.
Too many skateboards & surfboards to count.
Member
Gosh dang those Euro bumpers look so slick.. but I wonder how many 320's the US bumpers have saved? I mean, you could hit a cement wall going 60 and probably pull the US bumpers and not find a scratch to the body of the car
Edit: Also, update your profile pic. The car looks so much better now.
Last edited by jaredmac11; 06-01-2009 at 11:07 PM.
Member
For the Zender "under bumper" piece I used sheet metal screws along with a silcon auto adhesive I found at the local auto parts store. You can conceal the screws behind the bumpers. For the lower quarter panel you can also run a couple screws inside the rear wheel arch (inside the fender). I also used some silcon adhesive to connect the rear to the side pieces. I used the same stuff on the body mainly around the screws mounting areas. Do some test fitting by clamping the 3 peices together first - getting everything lined up can be a pain. An extra set of hands will come in handy - I could have used someone to hold it during the test fit and mounting process.
You might try using some of that 3M double sided auto adhesive tape in place of silcon or some type of glue. It is what is used to mount emblems and side molding on new cars. If you have ever attempted to debadged a new car you know how crazy strong that stuff is. You can also use a few little pieces of that tape during your test fit to hold it up to find the right mounting points + you can see how it looks before you finally mount it for good. The Zender is not that heavy so a fat roll of that 3M tape along with a few concealed sheet metal screws should hold it fine.
Your car sure looks clean - I know you said it's a 10 footer, but the paint sure looks fresh in those pics. Keep up the good work!
Member
no, it's true. I just hit a telephone pole, but they're pretty sturdy themselves. The car was largely unscathed, except for a wheel that fell off for other reasons at the same time.
3 extra HP, eatin' hay.
Dammit, you just made me laugh.
 Posting Permissions


 Reply With Quote


Bookmarks