
 Member
i used the blk color on tan carpet, for contrast w/blk floor mats,
also works well on door panels to give a fresh look.
Hindsight is 20/20
Wow I didn't know that existed ?!?!"spray electrical tape"
My floor mats are in good shape but the color is shot! Same with my rims.Originally Posted by royemello

Last edited by curtnutss; 11-03-2010 at 10:43 AM. Reason: Automerged Doublepost
Member
its like liquid tape (@home depot) but in spray form.
can be used on a rubber air damm as well, stays soft - ish uv protected
i use a lot of plastic paint , drys fast & sticks to everything, "krylon fusion".
also use, made by performix - plasti dip (spray) like the rubber dipped tool handles, but in spray, @ h/d as well. been on my sponge rubber (rear) spoiler for 2 yrs - still looks great & does come in colors
Member
just epic man, keep it up I'm learning a lot from this...
damn I wish I had a garage lol
Hindsight is 20/20
I don't have one any more, I'm out in a parking lot now !
__________________________________________________ __________________
So I just rebuilt one of my axles, on my apartment patio.
so for all you guys that say you don't have a place to work, I say "rubbish" lol..!
first off you can do this job with next to nothing!
I drove my car on to a curb so I could climb under it and with a 8mm alan head and a ratchet broke all the alan bolts loose, and I had to push the car back a bit to get to all of them. I had to push it instead of just turning the wheel, I didn't have the car on a jack.
but the axle was loose but still wedged in so I had to use the trunk jack to lift the car up a little "not even off the ground" but the axle came right out !
Before I got started I checked the boot kit to see if it was all there.
the part number is ( 33219067906 ) and the Brand is "LOBRO" OEM !!!
In the kit you get " A boot attached to a flange/ one cover flange/ one retaining circle clip/ one boot clamp/ and a bag of grease. $35 for two kits you need two per one axle.
This is what we start with "this was not the ripped side" but you do one you do both!
Start buy removing the end plate with a flat head screwdriver and tap it with a hammer.
Then remove the circle retaining clip from the end of the axel haft.
With the flat head screwdriver and hammer tap the other plate loose.
I was able the just pull off the CV joint, but you may need to use a press or be creative.
I then dismantled the CV joint and cleaned the parts in my home made cheap parts washer !!!
I found a nick in this not good but I don't have another one so what do ya do...
I rebuilt the joint with WD40 at first and then greased the joint.
I used WD40 at first so I could see what I was doing and fiddling around with grease is annoying ! Note after you grease and are ready to reassemble the CV joint to the shaft make note that you put the groove to the outside or the outer end of the shaft! and don't forget to install your new circle clip.
Now it's time to close it all up by putting on the end flanges, I used the bolts to line up the holes and then taped lightly with a hammer. now just tighten up the boot clamp and the end of the boot, and repeat on the other side.
Clean of all the excess grease off and in stall back into the car .
Done and all with out a garage !
Last edited by curtnutss; 11-11-2010 at 11:31 PM. Reason: Automerged Doublepost
Member
WOW! I just read through all 9 pages and I am seriously impressed. I just found a 88 535is that I may be picking up and this thread was super helpful for little things to think about.
Very nice work, nicely done!
Member
wow curt, and I thought I had it hard working on a 20x10 concrete pad in front of my full garage! serious props for replacing that axle using a curb... and nice rebuild post, I'll almost certainly be doing that at some point, great write up.

Be a part of racing history - http://www.gofundme.com/TorMcIlroyRacing2013 and help me race in 2013.
Hindsight is 20/20
Hey thanks for the encouragement guys!
I just reread my post, I must have been tired when I wrote it ! ... LOL ...
I'm going to resurface and paint my rims 1 by 1 but I got 5 so it's all good !
Muslim Redneck
+1 awesome write-up!
Member
Curtnutss.... You impress me with the limited space and time you have.. great write ups and continue to be an asset to us all.
Wes
E34 535i/5 (Dirty D)
RIP E21 320i/4 (Hammerhead)
Hindsight is 20/20
Thank you, Thank you !
I just posted the write up in the DIY thread and the top of the E28 page.
Member
My excuse is the weather man reading your thread makes me feel lazy.
Hindsight is 20/20
I've done a lot of work on my car and I have not posted so here goes !
I will start chronologically...
The return spring for the clutch pedal broke as a result a cracked pedal box.
so I got both. It wasn't actually the spring it was the top of the bolt that kept the spring in place.
Sorry everyone no elaborate write up on this one! this one was kind of a cluster F*^k! but you will need to unbolt the steering column.
_____________________________________________
Then I fixed a small but annoying rattle, Heat shield.
This was quick in & out type of thing "I used my curb", reference to previous post .... LOL !
_____________________________________________
I finally got to the rust at the license plate lights.
Before:
I sanded the area, I then used a rust dissolver. "no photo, this was icky stuff I was not trying to get it all over"
I used some primer I had to cover the area, I got a guy I work with to paint it "WITH NO CHARGE" thanks !!!
No photo of it with paint it's so close you can't even tell. only if your me LOL but it was free so who cares ! I also disassembled the lights and cleaned them.
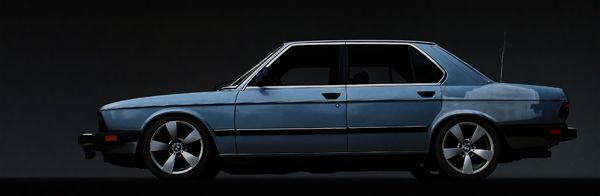
This is just a photo of what she looks like at the moment ...
AND this is a photo of my E21 320is before I did all the work that I did to it.
just found this photo thought I would share.

Last edited by curtnutss; 01-25-2011 at 10:16 PM.
Member
You outshine us all curt... make us all look bad
can't wait for the post covering the pedal box replacement, done in the rain with just an adjustable wrench and a hammer, using a milk crate to hold it up!! (not making fun, mearly admiring your ability to work in crazy positions).
keep it up!
Last edited by 320 bimmer; 01-24-2011 at 09:17 PM. Reason: Automerged Doublepost
Be a part of racing history - http://www.gofundme.com/TorMcIlroyRacing2013 and help me race in 2013.
Member
Reminds me of when I read "The Grapes of Wrath"....
Member
Whats your mojo juice? i need some..
Wes
E34 535i/5 (Dirty D)
RIP E21 320i/4 (Hammerhead)
Hindsight is 20/20
Just because I thought this would be a good way to start a post
So I had a ton of water under the carpet !!!When it rains in socal it really rains hard! I think I know where the water is coming from that's a problem i will address soon.....
I shampooed the carpet and its drying now ...
Last edited by curtnutss; 01-25-2011 at 10:21 PM.
Member
Hey curtis check your sun roof drains and how are your vapor barriers behind your door cards?
Hindsight is 20/20
Sun roof drains, are ok, that was the first thing I checked.
I think I get some water in by the windows at the top of the door.
But I think it's coming from my windshield the rubber has shrunk and on the upper corner on the passenger side has pulled away just a little but enough.
and I might need trunk and or tail light seals ...
hey thecrassdubber I'm going to the "pick a part today" !
oh yeah "Twelvizm" joined BF the guy from PNWfahren he got that 320
Hindsight is 20/20
Feeler ........
I'm wondering if any one would be interested in buying my 5'er and if so how much !!! ?
All it needs is exhaust, the trans prop shaft seal (gets a slow drip sometimes)
brakes are 75%, tires are good should get through summer, other than that it's great.
Licensed in WA good until july
to see what i've done to it just read though the thread if you have any Questions just ask !
Money is to fund an adventure I am planning! I have a number in my head and am wondering what this community feels this car would be worth.
Oh yeah 266,692 on the clock and I was told the motor has less BUT I have no way to tell for sure if that is true or not but it is still running strong ! (VIN # on motor does not match the VIN # on the car).
Member
ADVENTURE?! I love adventure, where you headed?
I'd love to buy it, but I am also moving away, so I cannot... good luck with the sale curt!! On price I'd say asking around the 3 grand mark would be good for that car, despite the miles.
Last edited by 320 bimmer; 02-09-2011 at 07:17 PM.
Be a part of racing history - http://www.gofundme.com/TorMcIlroyRacing2013 and help me race in 2013.
Hindsight is 20/20
Open ended travel overseas with my camera, I'm bored with working with no results !
We'll see, Getting all my Ducks in a Row ....
1/4 life crisis .... LOL !
Last edited by curtnutss; 02-09-2011 at 08:35 PM.
Member
Sweet, sounds fun! if you're passing through england after september could probably meet up...
Be a part of racing history - http://www.gofundme.com/TorMcIlroyRacing2013 and help me race in 2013.
Hindsight is 20/20
I will be !
Member
Good Luck!
 Posting Permissions


 Reply With Quote


")


Bookmarks