
 Member
DIY: Vader Seat Repair/Disasembly./Swap
I know there are a couple DIY’s out there, but I thought I would add another.
The goal of the DIY documented was to swap a pair of Vader Seats into my M3/4 and then install the M3 Luxury Seats into my E30. Since the Lux seats were going into the E30 coupe, I needed to swap seat frames, so that the Lux seats would fold forward, for passenger entry. The Vader seat frames would swap frames with the Lux seats and have a fixedt back.
You can also use this DIY to switch a beaten and battered driver’s side upholstery with a nicer passenger side, or vice versa.
The DIY can also be used for repair, leather or foam replacement, bolster adjustment etc etc…..
*I have not included the E30 install, as there are already some threads out there, which cover the fabrication that needs to be done.
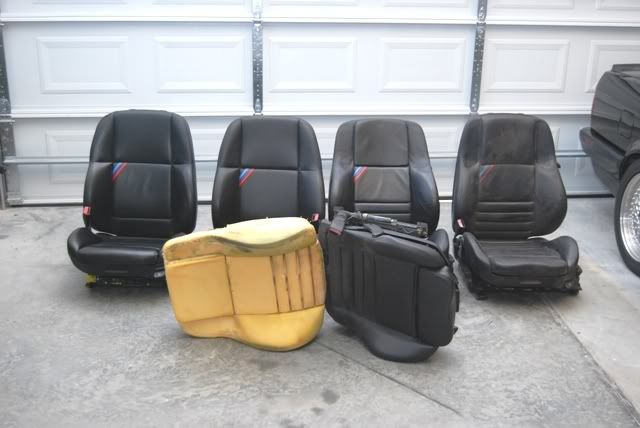
I started out with five (5) seats, three (3) salvaged Vaders (heated/manual) and (2) Luxury (heated manual) I had a 3rd Vader b/c of a damaged leather seat back.
Please disassemble at your own risk. I have done this a couple of times, so I am versed at how they come apart. It is fairly simple, but I will not be responsible for torn leather/fabric or broken parts, if that happens. J
***If you have already removed your seats, skip to step 4.***
Step 1: Disconnect Battery. (13mm)
Step 2: Unbolt seats from vehicle. (16mm bolt/nut) Sorry no pics….First, adjust the seat to its tallest position, as it makes nut/bolt access much easier. Move the seat forward to access the rear bolts and move it back to access the front nuts. Next, disconnect air bag/pass sensor/heat connections from underneath the seat. It is easiest to do this by removing the head rest and tilting the unbolted seat forward. You should see several electrical connections under the seat, disconnect them all. After all the electrical is disconnected, remove the large TORX bolt that holds the seat belt to the seat frame, it is also easiest to access the bolt by tipping the entire seat forward.
*If you have made it this far, you can do the rest. If not, you should probably stop.
Step 3: Remove Seat from vehicle. With the head rest off, make the seat as small as possible. (i.e. adjust to lowest and most upright position, I also suggest that you center the seat on the rails) this will make it easier to get out of the vehicle. On the sedan it was easier to pull the front seats out the rear doors, on the coupe, just tip them out the side. If you have a helper, use them now, so you don’t scratch or damage paint/leather taking it out.
Seats Removed (posing sexy)
***With the seats removed, you can start disassembly***
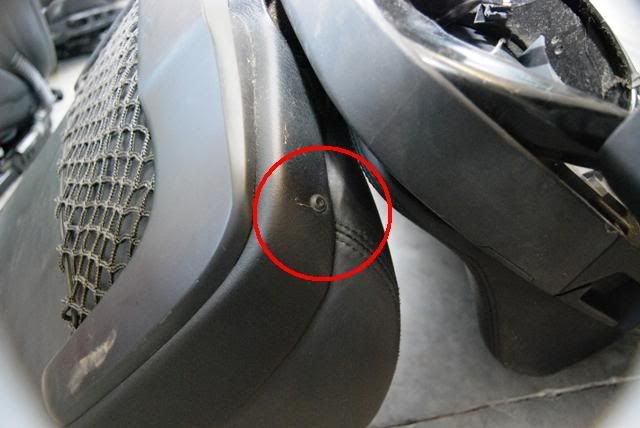
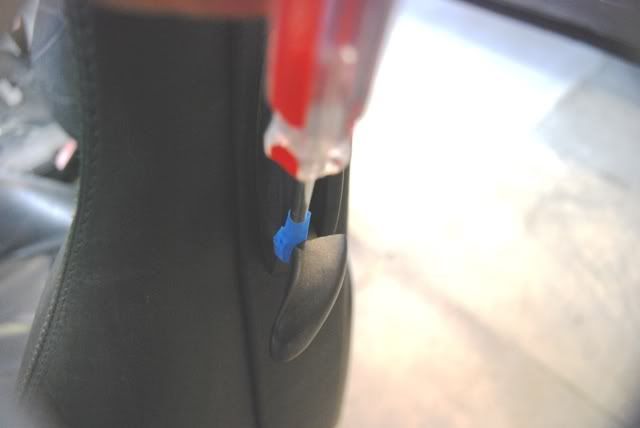
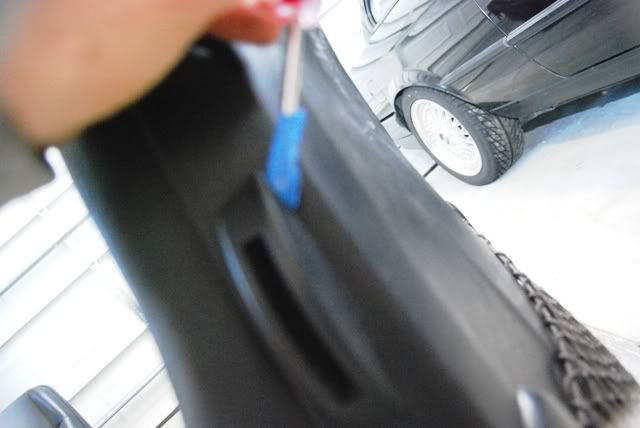
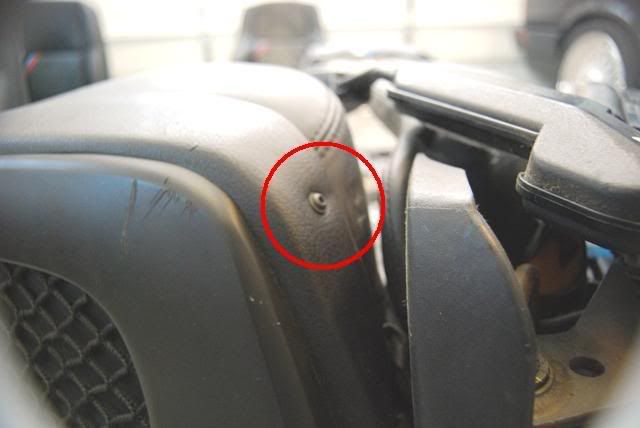
Step 4: Remove Seat Back: First remove the tilt lever (if applicable) on the side/sides of the seat. I did this by wrapping some tape around a flat head screw driver (for protection) and prying the pieces off using leverage against the seat. Both pieces should pop off with a bit of pressure.
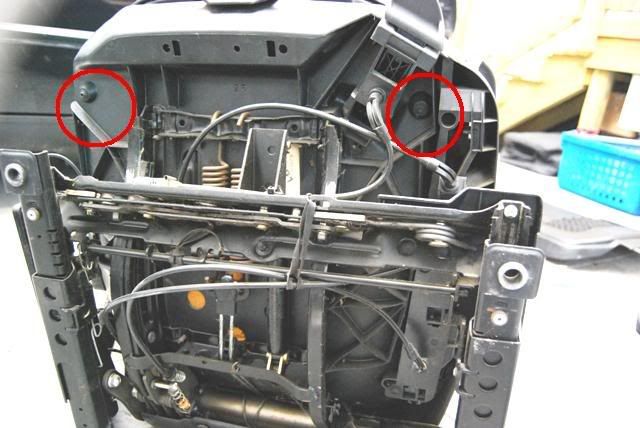
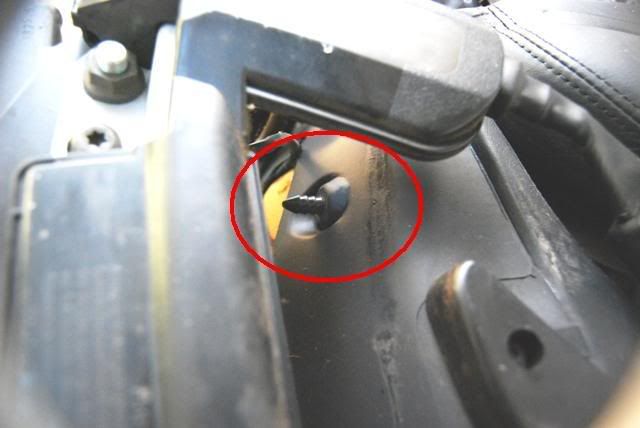
Next, remove the T20 Torx screws on the left and right bottom of the seat back. It is easiest to access these screws by either tilting the seat on its side or declining the back to its most upright position.
Once you have removed these pieces, you should be able to pull up on the seat back to remove it. Or in my case it basically fell off.
Step 5: Seat Back Leather Removal: Please use caution at this point, as leather and or fabric can rip if you are not careful. As you can see in the pic, the leather is hooked onto tabs around the perimeter of the seat back. I found it easiest to push back (towards the tab) and unhook the material from the tab with my fingers. I suppose that you could use some type of protected pliers, but I am anal and did not want to risk damaging the leather, even though this section is covered by the seat back which you just removed.
*note: in the corners the leather is doubled up on the tabs.
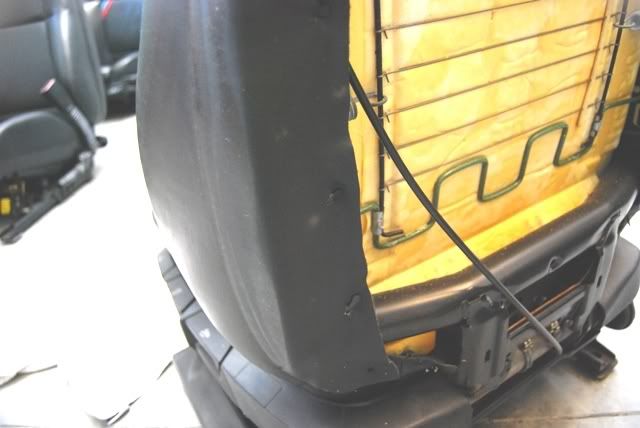
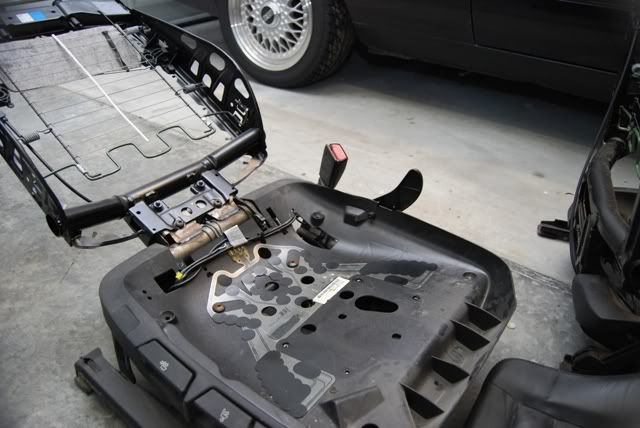
Step 6: Seat Back Leather/Padding Removal: After you have unhooked the material from the perimeter of the seat, double check to make sure that you conquered all the tabs!!! Once you have made certain it is completely “unhooked”, wiggle the entire seat back (foam padding and leather) off of the seat frame. It should look like this:
*note: if you have heated seats, you will need to thread the electrical connector up from the bottom of the frame to completely remove the back padding. This may require you to cut a zip tie or two.
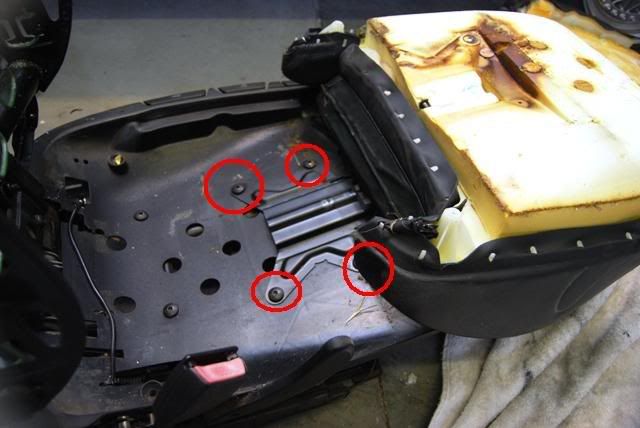
Step 7: Seat Bottom Removal: First, remove the two torx screws that secure the front of the seat bottom to the seat frame. Access the screws from the bottom of the seat, it is easiest to have the seat lying on its back to accomplish this.
Next, you will need to “pop out” two plastic push pins that hold the rear of the seat cushion to the seat frame. There are a few different ways to do this. I used a pair of needle nose pliers and squeezed the pin together and pulled up on the cushion. These pins are easy to break, if you do, don’t worry, they are not that crucial to holding the cushion down, as the rear of the seat bottom fits snuggly under the seat back once assembled. I forgot to picture the second pin, but it is definitely tucked up under there. It is easiestto access these pins by adjusting the seat to its tallest position on the frame.
Once you “pop” the pins, your seat bottom will look like this:
*note: if you have heated seats, you will again need to thread the electrical connection through the seat frame.
Now you can remove the four torx bolts that hold the adjustable extension to the frame, as seen above. The bottom cushion can now be removed from the seat frame.
This is what your seat will look like once all is removed.
Leather removal is basically the same as the seat back, except the tabs on the seat bottom are plastic.
***For those individuals swapping seats, you will need to remove the passenger occupancy sensor pad as seen above. On my Lux seats this sensor was integrated into the actual foam cushion, under the leather. On the Vader seats, it was attached to the seat pan with adhesive. This may vary with years. You can remove it for swapping to another seat with some heat. I used a heat gun, but a hair dryer would do. *If you do not switch out the sensor pad, you will get an airbag light that will never go away. I believe that on pre-96 vehicles the occupancy sensor did not exist, but I could be wrong.
RE-ASSEMBLY: Pretty much the reverse of the disassembly. When you re-attach the leather to either the seat cushion or the seat back, I recommend using a x pattern alternating sides from the bottom. This method worked well for me and left me with nice taught finished product.
Optional Steps:
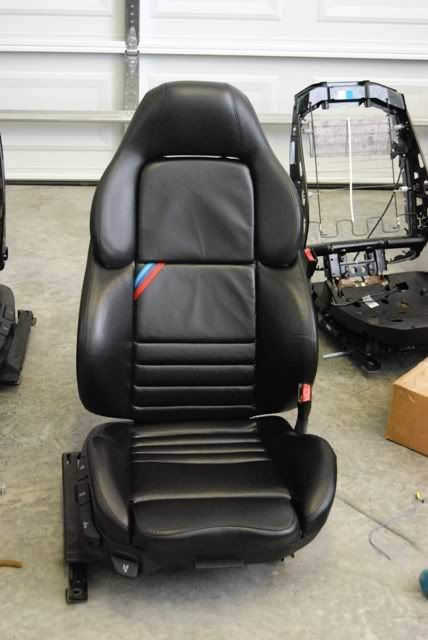
Re-color Leather: This would be the best time to re-dye your leather, as you can access all the nooks and crevasses that may be hard to get to on an assembled seat. I went ahead and did this on the Vaders that I was installing in my M3. It is a fairly straight forward method. I was able to source a re-color kit locally, but a said kit can easily be found online. I was amazed by the final product.
Bolster adjustment: I am not too sure who was riding in these seats before me, but I have to say, the side and bottom bolsters were a “tad” bit out of adjustment. To remedy this, I used a convincing tool to adjust them into a position that was more suitable for my body type.You can play with the adjustment somewhat by temporarily putting the cushions back on and testing your adjustment.
*Be careful not to “adjust” them too much, or the seat back cover will extend further than the seat back padding and leave you with an unsightly gap….I have heard…..
Foam Repair: As I mentioned above, my bolster had been stretched, which also stretched and damaged the foam padding. To fix this issue, I removed the leather from the foam. It will simply pull right off, but I suggest that you be very careful, so that you do not rip the fabric. Remember some of these seats are almost 15yrs old. Once removed, I simply sprayed some adhesive inside the foam tear and used some fabric tape to close the seam. There may be a better way to repair the foam, but this method worked fine for me.
Leather Seam Repair: On one of my seat bottoms, I had about and inch of seam that had split. I think that this is fairly common on Vader seats. To repair this, I simply removed the leather from the foam cushion and hand stitched the torn seam. If you can’t sew have a female help you. J
Heated Element Repair or Replace: EXPERTS ONLY. If you are repairing, replacing, adding or swapping heating elements, you will have to pull the leather from the foam. Once off, you will need to remove several wire rings from the foam padding, which hold the heating element to the padding. This is easiest to do with a pair of hog ring pliers. Take your time here!!! Well Documented DIY: http://forums.bimmerforums.com/forum....php?t=1165042
Last edited by VoLkSbOy80; 01-29-2009 at 01:00 PM.
Member
good thread to keep
fyi the little side lever pulls right out, no need to pry it with a screwdriver
Member
Wow, two great seat threads in two days. Nice work!
Member
Nice write up. One question though, How do the headrest come apart? Does the plastic cover just unsnap? Or does it need to be pulled in a certain direction?
Member
"Well Documented DIY: http://forums.bimmerforums.com/forum....php?t=1165042"
HEY! thats meha ha I read the title and said damn I beat this guy to it by 1 day! ha ha too funny, but now we know how to remove the dove and the black!
By the way thanks for the compliment!
Member
I did not take apart the head rests, so I am not sure how they disassemble. SorryOriginally Posted by kimsey

Member
Nice write up. My seats are terrible. May just do new covers. This will help.
Member
Referring to step 4:2nd picture;it is easier to pry the tab up from inside at the top and down at the bottom with a screwdriver.MVC-014F.JPGMVC-015F.JPG
BMW Tech
Are there any variations in seats? I have a 6/94 build date M3 and those lower bolts for the seat backs are not there
Bleed Green Club member 2Mod List Soon
Member
Not certain, but I imagine that the have to be screwed in somewhere...
Member
There is a guide to taking the other seat types apart, the assembly is quite different. If you do a search it will come up. I kept finding it when looking for how to take apart the seats I have like the one in this thread.
holla, holla, holla
great write up.. i was just about to start a thread asking for one of these because i have to re stitch mine..

Member
BMW CCA Member
Nice write up. For those doing this, keep in mind that the foam/leather assemblies are the same for passenger and driver seats.... an easy way to even out any wear is to swap them
'But Dad.... it's PURPLE!'
Member
How do fix the seat if that part broke so that the screw won't hold it in anymore?
I would have to make a new hole, then find the original hole for the seatback in order to do it, unless there is some sort of washer kit that can seal up the hole?
My seat feels back like it won't support my right shoulder anymore...it just leans back on the one side and is very annoying...
318ic, with style 67 e46 m3 rims, apexcone 5000k headlights, some sound system that is bumpin but have no idea what it is...and all the electrical problems that make a bmw a bmw.
STYLE 67 e46 M3 rims for trade for anyone who has a set of 4 17's and a spare (I'm open to many styles as long as they are OEM)...pm me for info and pics! I'm letting them go for a STEAL!!! I need a softer ride for me and my rugrats...
Member
Just used this thread to switch my black passenger vader leather/foam seatback and bottom and headrest over to my sedan driver side seat frame. Worked like a charm, although my vader had variations from yours, like the screws on the bottom of the seatback weren't there(it was staples instead. Along with a few other differences like the levers for tilt forward were different. Anyways, got it figured out, so thanks for this write-up! Now i'm working on getting another passenger side vader to switch to my passenger side sedan frame. It actually looks kind of cool having a tan seat bottom and back plastic piece with the black leather in my tan/black interior. Next i'm going to do the center door panel inserts in black, hopefully I can find another helpful writeup for that.
Member
Nice write up! I've been wanting to replace the foam in my drivers side seat as it is quite worn out. Anyone know where I can find replacement foam for our seats?
Dyno'd at 227hp/217tq
Mods: Euro HFM kit, TMS ltw flywheel, cast Zimmerman front rotors, HP+ pads, Falkin Azenis, 3.23 Diff, stock everything else.
Currently all blowed up.
Member
nice job, always wondered what they looked like from the inside.
Member
Could you give us a little more detail on how to repair the seat pads #2 and #3? You can get them both from pelican parts for around 300$, but i would rather fix mine.

Member
I will try to help until the OP gets you an answer. The donor seats typically the passenger seat will have good foam. If it doesn't you can get foam from an upholstery shop which you use to build up to your tastes but don't get carried away because the fit is tight and you don't want to over stretch the leather. I actually put a patch of leather where the foam has part of the metal frame sticking through on the side bolsters. Just remember you have to reattach the leather to the foam with either small hog rings or with zip ties which I used.
Did I answer your question?
You are just building up a worn down seat to your tastes but be sure to test and leather so that it fits too...
Last edited by fun2drive; 11-11-2009 at 01:59 PM. Reason: Automerged Doublepost
Member
Nice diy! The one you put together looks mint!
Member
I just had to bump this.
Thanks for this write up, it really helped me out. Getting my seats reupholstered and figured I could take the seats apart to save a little on labor costs.
Past BMWs: 84 318i, 88 M3, 92 325i, 95 525i, 73 2002, 97 M3/4
Member
No more beat down non sport seats in the 325! I ended up just dropping the Vaders straight in. I did tear one Vader down before I realized that the seat belt hole was there on the Vader base. Tearing them down then putting them back together took around an hour or so.
For what its worth I used Vaders from a 4/98 M3 to a 8/91 build 325i sedan. Some of the last e36 made into one of teh first e36s built!
Member
I would strongly suggest chasing the threads with a tap and die set. When I was removing my vaders and putting in some aftermarket seats I ran into a problem of bolts or nuts not wanting to go on smoothly. After chasing the threads everything was butter. Doesn't take very long and nothing will fight you afterward.
Member
I'm in a process of taking apart one of my seats and it's much different for a '95. Tilt levers are not pulling out at all.
Check out my M Roadster projects and DIYs:
Cooling system part 1: https://youtu.be/ERqztIL1DPw
Cooling system part 2: https://youtu.be/-DnclDkn2hI
Power convertible top: https://youtu.be/KLYNqkCBh_M
Head unit removal: https://youtu.be/LKe9fPKrAqE
Stealth Bimmer Pilot
i have the same problem. since its getting nicer out...i may try again. btw great write up!
2000 Cosmos M5 - Stock
1995 Alpine White III M3 mods - APEXCONE/DDM 6000k HID's, Smoked DEPO Clear Corners, Smoked DEPO Tails, 3.5" HFM, 24# injectors, TRM chip, Seawood Engineering CAI, APEXCONE/DDM Cat-back, Raceland header.
Not a DDM fanboy. Just cant beat the prices.
 Posting Permissions


 Reply With Quote


Bookmarks