
 Self-Medicated
Welcome to my first DIY.
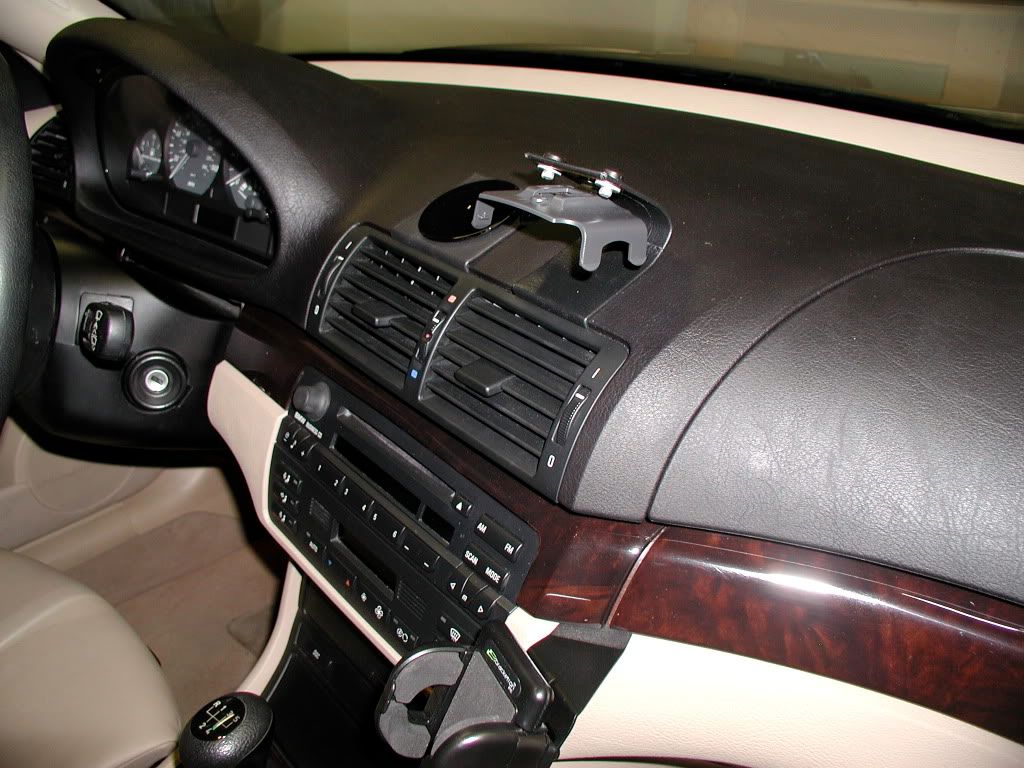
This will show how I built and installed a simple mount for a GPS unit (or any other device that uses a suction cup) that is installed just above the central air vents. The purpose for building this is that I did not want to have the GPS on the windshield, because it obstructed my view, and I don’t like the suction cups on the windshield. For me, the ideal place to put it is right above the central air vents on top of the dash, where there is no obstruction of view, and I can easily see the GPS screen without taking my eyes far off the road. Before this, the problem with mounting it there on the dash was that the adhesive base for the mount would ruin the dash if it were removed. And the dash is slightly curved, so the adhesive base would not stick as well as it would to a flat surface. The solution I came up with is very simple and requires a minimal amount of tools and material. In addition, the mount can easily be removed with no marks on the dash if you decide to remove it.
Material needed:
-Piece of metal to bend into base.
-Material to wrap the metal in.
-Glue for securing the fabric onto the metal.
Tools needed:
-Vice to hold metal when it is bent to shape.
-Hammer (for bending metal).
-Sheet metal cutters (if needed).
-Metal file or sandpaper.
-Razor blade knife.
Step One:
Remove the trim above the glove box and above the stereo. This can easily be done with a flat-head screwdriver, starting with the trim closest to the passenger door side. Once these are removed, you will see two screws at the bottom of the air vent unit that will need to be removed.
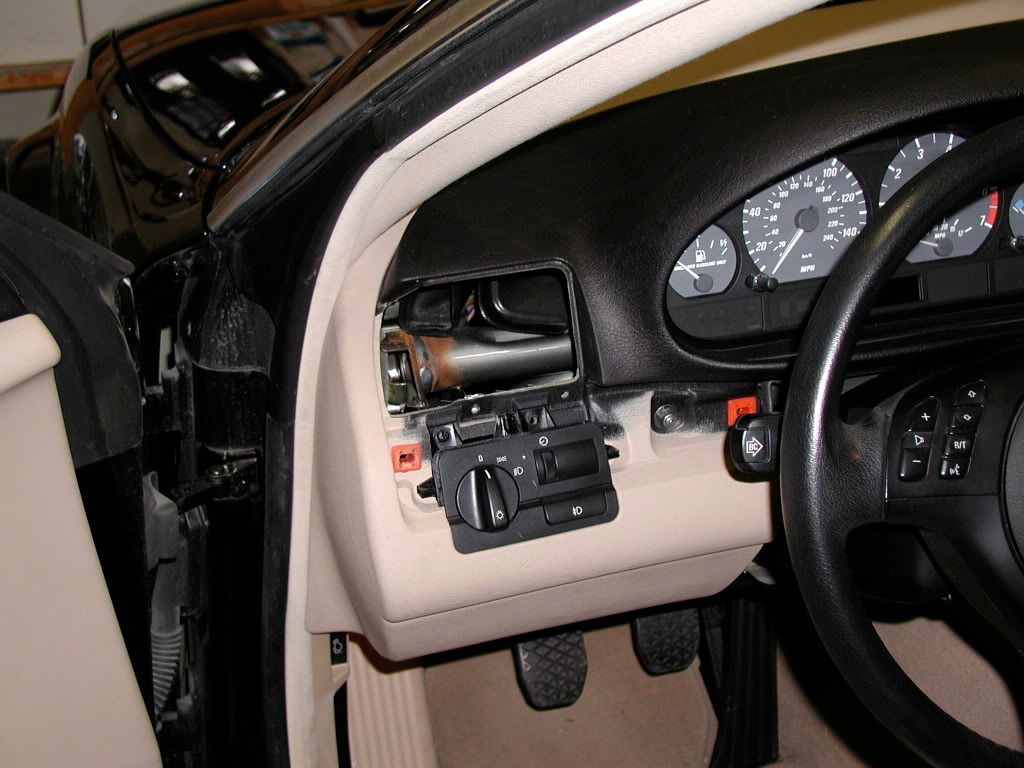
Step Two:
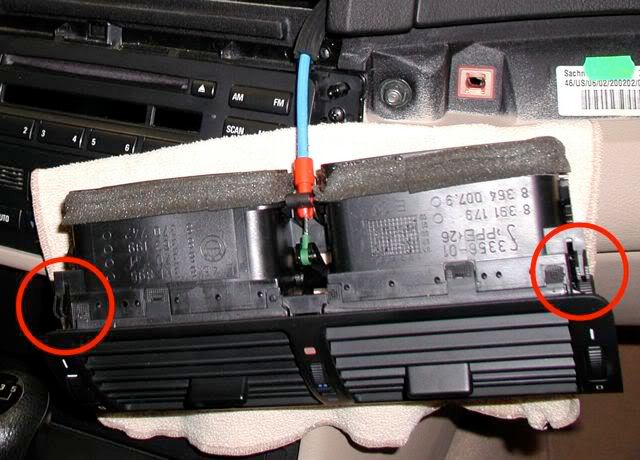
Now the hardest part, removing the central air vent. There are four plastic clips holding the air vent in place. Two are on top (circled in red in picture below) and two are on the bottom. To remove it, I gripped the top of the vent with my fingers and pulled down, then out. Then gripped the bottom and pulled up, then out. This process was repeated several times until it started to come out.
Once removed, I let it hang by the cable that controls the central air vent temperature. I used a towel behind the air vent to keep it from scratching anything on the dash. If it is in the way, you can also disconnect the cable from the vent to completely remove it, but I did not think this was necessary.
In addition, I removed the two clips on the bottom of the vent (they just snap off) so the vent will be easier to remove in the future. The bolts on the bottom will hold the bottom in place securely. Do Not snap off the two clips on the top of the vent, these are all that hold the top of the vent to the dash.
Step Three:
There is a thin piece of material that will need to be trimmed off so the metal brace will fit in place better (circled in red below). I used a razor blade knife with a new razor. Be very careful not to let the blade slip when cutting. Any loose ends can be filed off. Before doing this, I placed towels on top of the stereo to catch any material that came off.
Step Four:
Below is a picture of the steel brace I used. It was about 3” x 6”. It should be something strong enough that it will not bend easily by hand, but can still be worked with. I used a wood brace made of galvanized steel from a hardware store, but other materials would work also. Since they are only about $0.50 each, I suggest buying two in case you make a mistake bending the metal the first time like I did.
Next, I used a vice to help shape the metal to the form needed. Be sure to leave enough space on the top to support the GPS mount that will be mounted to it. If the metal needs to be trimmed down, be sure to file off any sharp edges.
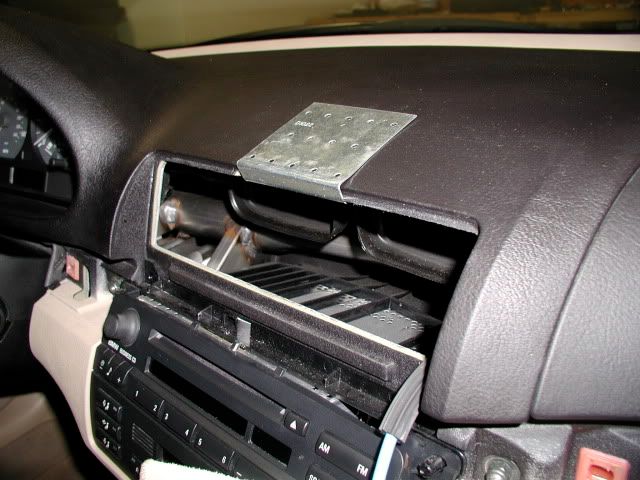
It will take some adjusting to get it just right, but when finished it should fit snug with just a little room for the material to wrap around it. The top piece should be flat to create a better base for the adhesive of the GPS mounting base, while the front and bottom should be molded around the front and bottom of the dash as close as possible to prevent any movement.
The brace is itself is held in place when the air vent is secured back in place. No gluing or bolting on is needed.
Step Five:
Glue fabric onto the metal brace. I used material from an old shift boot. It is a very good match for the dash, but similar material can be found at a fabric / craft store.
The metal should be sanded of filed down to create better adhesion for the glue. I suggest using a glue specifically made for the metal you are working with. Something like Gorilla Glue may work, but it tends to foam up when drying if too much is used. Be sure to put a piece of fabric (such as a thin piece of felt) on the side that sits directly on the dash. This is very important so that the dash is not damaged.
Step Six:
Once the glue is completely dry, it can be mounted in place on the dash. Slight adjustments can be made by hand to tighten or loosen the brace if needed for a tighter fit. Put the air vent back into place. The top clips should snap back in place and tighten the two bolts on the bottom. There will be a slight gap at the top of the air vent, depending on how thick the material is you used and how well it is formed to the contours of the dash. This should only be a very small gap if it is done right. Next, replace the trim pieces that were removed and add the adhesive GPS mounting base.
After this, the suction cup on the GPS unit can be put on the base.

Last edited by Techno Viking; 02-11-2010 at 06:43 PM.
Quality
awesome!
License Revoked
Woah, that toggle between the A/C vents actually does something! I say we investigate!
lol
Really nice job man! I wish I could somehow get the same results.
Oh, and can I have the vector file source for your BMW sig?
Last edited by Phypha; 01-21-2009 at 05:12 PM. Reason: Automerged Doublepost
Member
This is a great DIY and the finished product looks great! Nice job....
Member
I was thinking of doing this for my TPMS but with a smaller piece of metal. You could actually use this method for a multitude of different devices. Personally I hate anything suction cupped to the windshield. Good job!
Self-Medicated
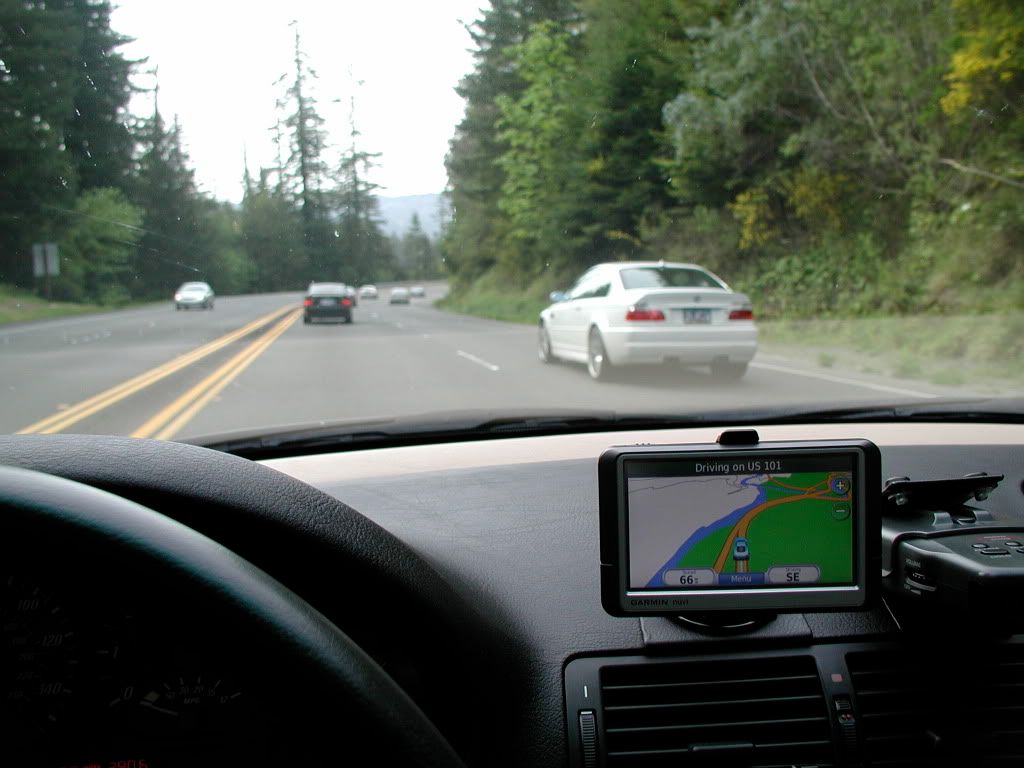
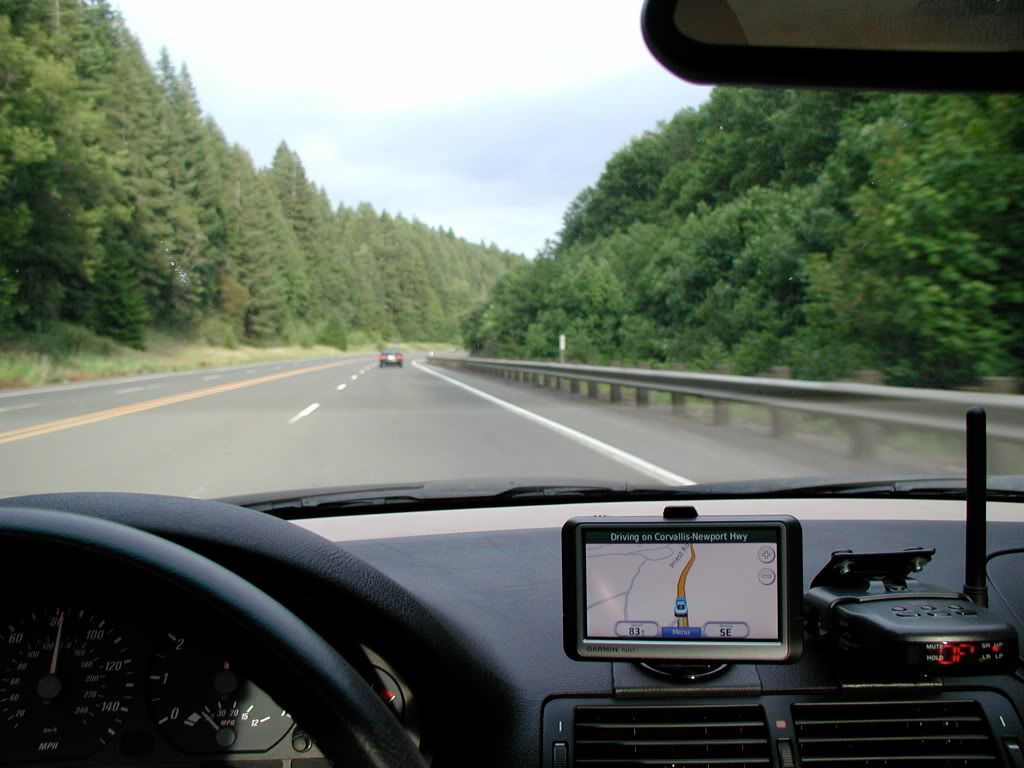
Here are a few pictures of what this looks like when driving.
The other device next to the GPS is a Uniden analog scanner, attached in the same way as the GPS mount.
Member
Great Thread!
Where did you route the wires for the GPS power?
Is it possible to route them through the vents?
When there front panel is removed can you reach through to the lighter and tap into that?
Member
Nice!
Self-Medicated
For short trips I just run the GPS off it's battery, it should last for a few hours on it's own. For longer drives, and if I'm also using the scanner, I plug a splitter into the cigarette lighter to supply power to both. Both of the power cords are secured together using zip ties. I also removed the ash tray for extra room to tuck in the extra wiring & plugs.Originally Posted by orbojeff

It would be possible to hard wire it through the vents to a power source. If you want to tap into the lighter for a power source, you will probably have to remove the stereo, climate control, sunglass holder, etc.. to route the wires back there. But since I have not done this myself, I can't say for sure.
For my car, I wanted to customize it without drilling holes, damaging the dash, etc... and still be able to easily return it back to stock.
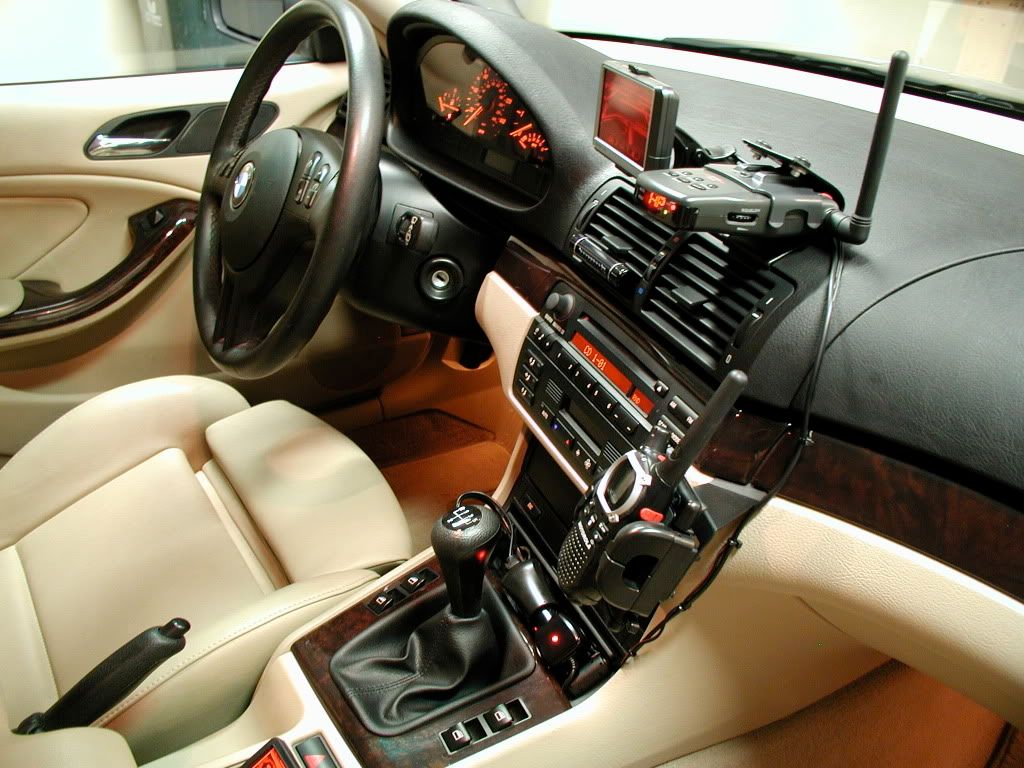
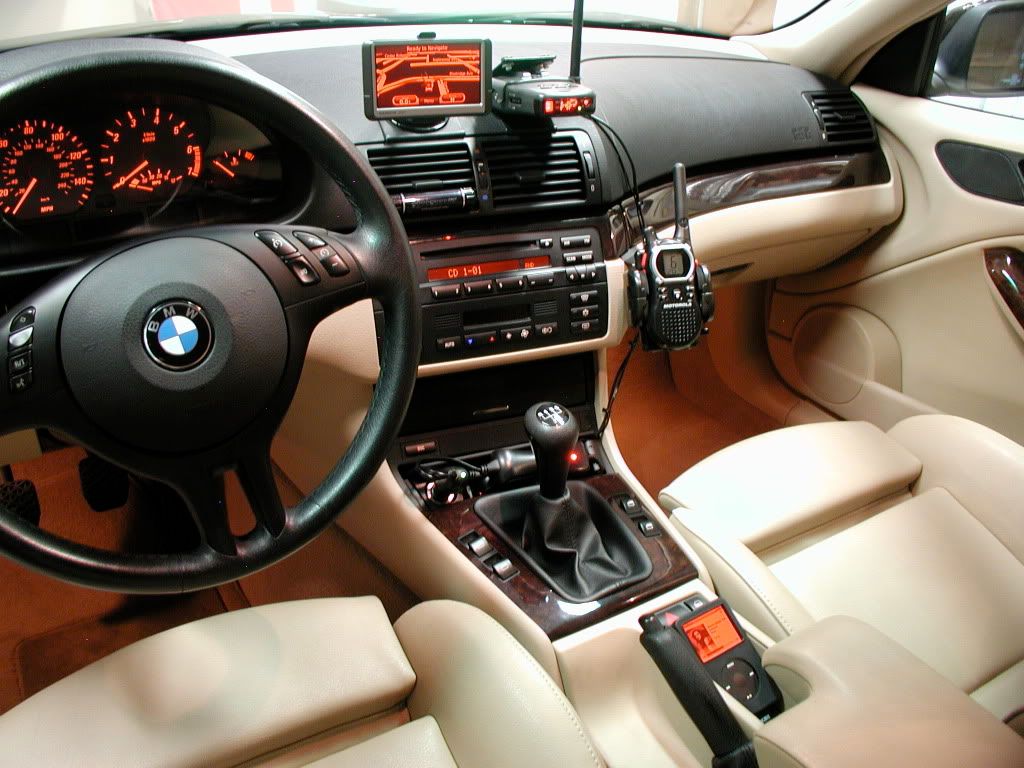
Here are some pictures of what it looks like now:
And with the GPS & scanner removed:
Member
awesome DIY, this thread just made me not want a double din anymore
OP quick question, you think this would work well if you mounted it on the driver's side vent?
i love this DIY but i would prefer it on the left to keep the dash as clean as possible
Last edited by jjr4884; 07-07-2009 at 11:36 AM. Reason: Automerged Doublepost
Russo
Self-Medicated
Yes, it can be done in the same way, but the width of the bottom of the mount that goes into the vent area would have to be a bit thinner. That vent is very easy to remove, just take out the trim, unscrew the vent at the bottom and slide out.
Originally, I was going to mount the scanner above the left vent, but decided not to for the following reasons:
-The space there is very tight, the scanner I have would barley squeeze into that space.
-Since I wanted to use the cigarette lighter for a power source, having it on the far left side would not be as convenient as having it mounted in the center.
-Anything mounted there would be directly in the way of the airbag on the pillar should they deploy.
Member
i have the gps! lol
Member
Hey Techno Viking, hows your ipod hooked up =]?
Member
thanks again for the info, i'll be doing this soon (hopefully with a harmon kardon 810)
Russo
Member
How did you get your GPS to display in red? I have a Garmin as well (Nüvi 255W) did you download something for it or is it somewhere in the settings? I just like how it sort of matches the BMW's gauges and radio color when illuminated.
Self-Medicated
The screens of the GPS (and iPod) are both covered with a material called Rubylith. There are several places online where it can be purchased, including ebay where I got mine.
Basically, I cut the film down to about 1mm larger than the size of the GPS screen, and there is a very small gap between the screen and the frame around it where it can be put in. It's a tight fit, but has stayed in place. It's just like a red screen protector and all the touchscreen functions still work with this on. Works great at night and is a very good match for the other instruments, although it is harder to read on sunny days. Also, I set the brightness to 100% to use with this cover.
The iPod has a piece of Rubylith put under the screen cover of the iPod case.
Member
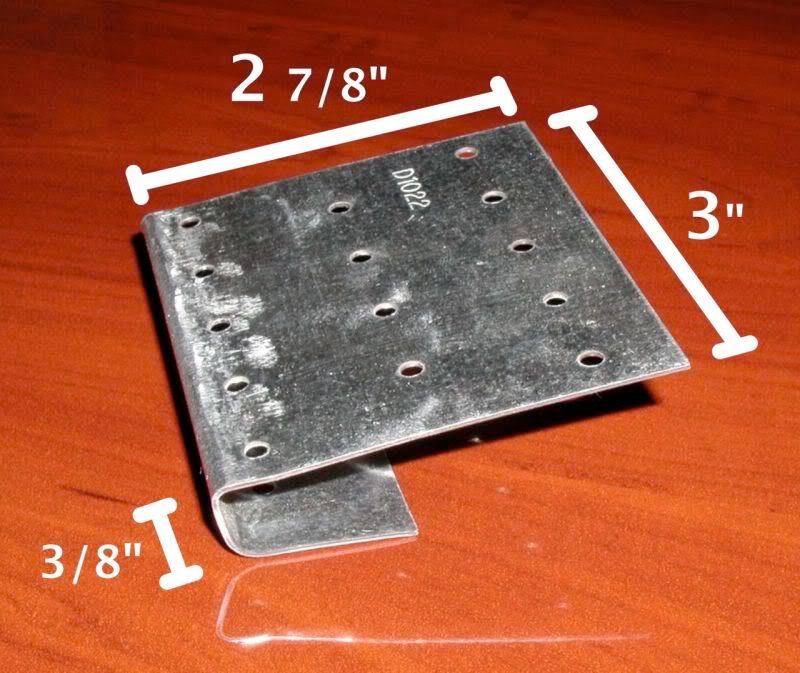
Whoa, I didnt even notice the iPod in the pic. Looks Great. Great DIY as well. One question though, do oyu happen to know the measurements of where you made the bends? I'll be going to Lowe's soon to pick up a piece of metal so I can make one of these. I've been trying to get a dash mount ever since I got my GPS but just couldn't see spending $40 on the Garmin brand which is just and over-sized bean bag. (Looks tacky) however, this is clean and a helluva lot cheaper.
Self-Medicated
Below are the measurements for the mount I made. This is for a plastic GPS suction cup base that is 2 1/2" in diameter. Of course, if you have a larger or smaller size GPS base, the top piece should be adjusted accordingly to make sure you have enough surface area for the entire GPS base.
The section on the bottom that slides into the air vent should be between 1" to 1 1/2" long. Unless you get lucky on the first attempt, several slight adjustments will need to be made to get a really good fit.
Member
Awesome, thank a million. (late response FTL)
Member
Cracking DIY.Gonna have to do this soon. And i'm gonna get orange lights for my footwell now as well!!
E46 330Ci: Umnitza P46 Headlights + Custom LED Halos; Eagle Eye smoked taillights; LEDs fogs; M3 bonnet conversion; M-Sport Front & Rear bumper; Replica M3 mirrors: Rear lip spoiler; Carbon fibre strut brace; Aluminium rear strut brace; H&R Sway Bars; LSD 3.15 ratio; F30 front & rear Brembo BBK conversion; ECU Remap; F32 Front Seats; GROM Audio
Quality
Self-Medicated
^^ Nice. Any problems with the GPS vibrating while driving with a mount arm that long?
Quality
yeah if you don't flush it fully against the dash...but once you adjust it we have no problems.
Member
Wow, Just got my center vent out, it is too hard I thought I was going to break something, but lucky me, nothing breaks. I wasn't plan to install the GPS holder or anything, but rather to find out where the cricket noise originated from, my noise does not come from the small air blower on driver side, but it relates to the center A/C, heat air blower fan, becuase it only starts when running AC on lower speed like 2 bars and usually when changing fan speed from lower to higher or vice versa. It is annoying, I did lots of search but couldn't find any post that could pin point the issue, in my case it doesn't seem has to do with pully or tensioner. I think it is with the ac fan, still could find out where is the fan located and how to remove it.
Member
BMW CCA Member
Clean DIY, I would also like to know how you hooked up your iPod? Also, CLEAN interior
2016 328ix | Wagon | M-Sport | Alpine White | Black | iND | 513M | AC Schnizter | MPerformance |
2005 330CiC | Sparkling Graphite | Black | 6MT | ZHP
2004///M3 | Individual Sterling Gray | Imola Red | 6MT | Eisenmann | Style 163M | SOLD
2011 X5 35d | Black Sapphire | Nevada Brown Cinnamon | Sports Package | Totaled
2009///M3 | Interlagos Blue | Pallidum Silver | DINAN | MPerformance | DCT | SOLD
2002///M3 | Steel Gray Metallic | Imola Red | 6MT | Convertible| SOLD
2006 X5 4.8iS | LeMans Blue Metallic | Creme Beige | SOLD
2006 ///M3 | Silver Gray | Black | Competition Package (ZCP) | 6MT | SOLD
2000 ///M5 | Oxford Green Metallic II | Caramel Nappa Leather | BMW Individual Black Birch Trim | SOLD
2003 X5 4.6iS | Black Saphhire Metallic | Black Sport | SOLD
2006 X3 3.0i M-Sport | Silver Gray | Terracotta | SOLD
 Posting Permissions


 Reply With Quote


Bookmarks