
 Member
Sorry if this is a repost. I just thought it was pretty neat that someone's done it.
http://www.porsche928forums.com/down...CISRebuild.pdf
Member
Thanks for the link.
I have a spare 323i fuel distributor that isn't working. And until now, I didn't have adequate information to proceed. This is just what I needed to get mine back on the bench to fix.
Member
very nice. I've never heard of anyone having good success getting them to seal back up, but that's all in how careful you are, the o-ring material you use and of course indian head is also and excellent idea.
I'll add this to the faq.
Last edited by jrcook320; 08-18-2016 at 08:21 AM.
Speed Racer
Member
when i first got my 323i the FD leaked. so i "rebuilt" it using this guide. but when torquing the bolts that hold the two halfs together two of them broke. it actually worked but it still leaked a lil. i ended up buying a used one that didnt' leak.
-Josh
Member
You'd have to take the FD apart, measure the o-rings carefully and buy them in bulk from mcmaster carr in Viton, NOT buna-n/nitrile which is what hardware stores carry. Buna-N doesn't last in fuel.Originally Posted by BoomerDJ

The problem is that you'd need 4 or 2 or whatever, and you have to buy in packs of 100, 50 or 25 etc depending on the size. Some sizes are pretty expensive for a small quantity.
banjo_84us@yahoo.com
We have a hose and gasket shop in town where you can buy any and all o-rings that are made. There's one in every city, check the yellow pages.
Member
so what's the name of this "glorious" o-ring store...? i let my 320 sit for a year and somehow the #4 cyl plunger is stuck and fills my intake runner up with fuel....i'm not amused. lol it took a really quiet day and some young-guy hearing to note what was going on. so i guess i'll have to under take this task as well. though believe me i'm going to try to tap the casing lightly so as not to have to do this. note to self, make sure you put gas treatment in and run it for awhile...oh yeah and don't leave it with a domestic car guy..:- (
Member
There aren't individual plungers. Either the injector leaks or the distributor just needs adjusted at that port.
swap injectors to narrow it down.
Member
did swap them...i thought one injector was stuck open so i changed it out..still same thing, i didn't try putting say #1 cyl on #4 port and see what happens beacause i thought they were individual..hmm..ok well more to go on that but i've never touched the individual flow screws.
Member
adjusting individual flow screws is dangerous, I've never done it either. Now that I think about it, it's not likely that one port would be that far off out of the blue. A broken oring is more likely.
Member
well i guess i'll still open it up and inspect it anyhow? though as we all have seen pointed out, its well worth your effort to make sure you have all that you need (parts and know-how) before dissasembly.
Member
Well opened it up, saw no broken o-rings, they were all still flixible and soft, (no cracks) i looked in and around for any debris or obstructions...nothing...is it possible that the F/d was fine and maybe the control pressure is too high thereby mechanically forcing the injectors open when the baffle plate is level? If not maybe the central plunger is worn and allowing fuel pressure past when its not actuated. I took the inlet duct off (so the baffle plate would stay still) and cranked the motor and the injectors still sprayed but it sounded like more of a blowing across a blade of grass sound, kindof a high whistle...any ideas. What about the electro-mechanical i guess solenoid that attaches to the motor side of the F/d and connects to the Return fuel line, that releases excess pressure right?
Member
I have lots of ideas. Many of them have already been written in the faq. There are 100 things I would do before I thought it was necessary to pull a fuel distributor apart for a rebuild. Usually when an FD goes bad it's due to rust or scratches on the plunger rod which CANNOT be repaired. If it were worn enough to cause leaking it would leak out the bottom of the distributor as well.
First off, how do you know only the #4 injector is continuing to spray? Have you done an injector flow test? Pull the injectors, put them each in a jar and jumper the pump. You will see if you have a leak right away.
Think of control pressure as "counter pressure". It does nothing more than push down on the plunger rod/sensor plate. The higher hte pressure, the harder it pushes and the less the rod & sensor plate move and the leaner the mixture is. That said, control pressure has no effect on fuel flow to the injectors while the sensor plate is at rest. If the injectors are spraying with the pump jumpered you need to simply back the mixture screw off until they stop, then back off another 1/8 turn.
Member
I had done a flow test, before the F/d dissasembly. It yielded much more gas coming out of the port that i had #4 hose hooked up to and those results stayed with the port when i moved the hoses around. This is the primary reason that led me to pull it apart. I thought there was an obstruction or a clogged port due to it sitting for a year. I'll work on that "counter pressure" idea with the mixture screw. I did take the caps off the for the individual flow screws but just to look at them, they were all at the same level, and the inner workings for each port seemed also level. The control plunger has some friction spots on it, but no rust or scratches, like the side of a engine piston just friction wear.
Member
bum deal, the link isn't working.
It's a cracker car
Try again - it worked for me
It's a cracker car
Try again - it worked for me
Member
nope web page not available. must be google chrome....
Member
here's a repost of the rebuild I did.
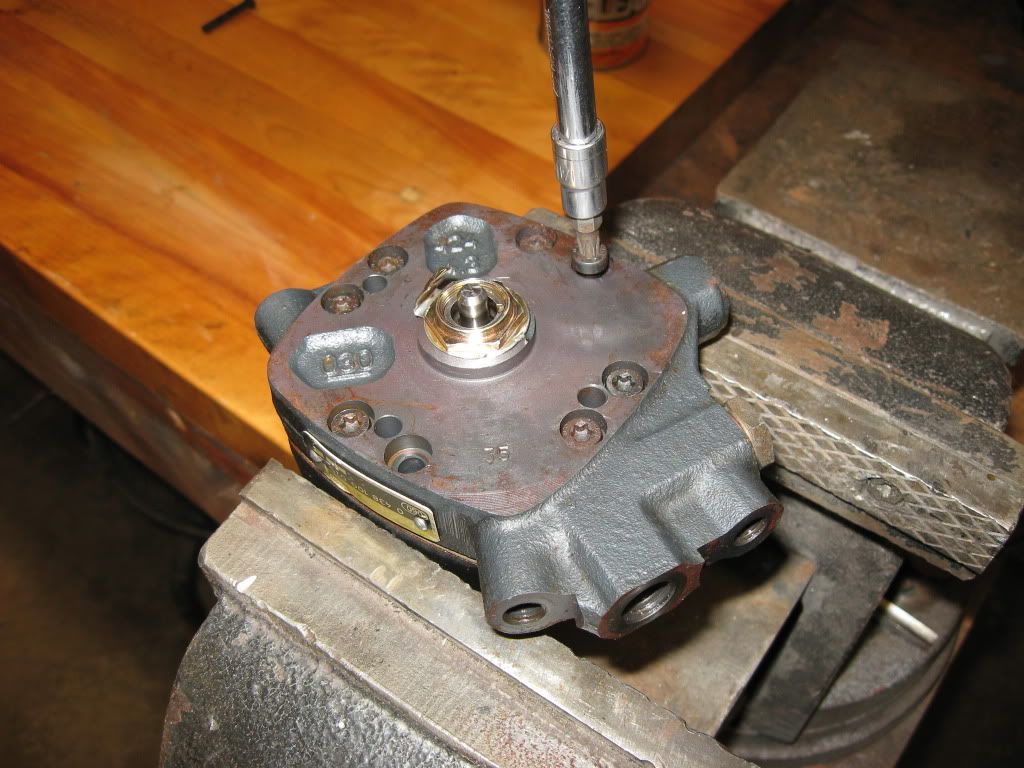
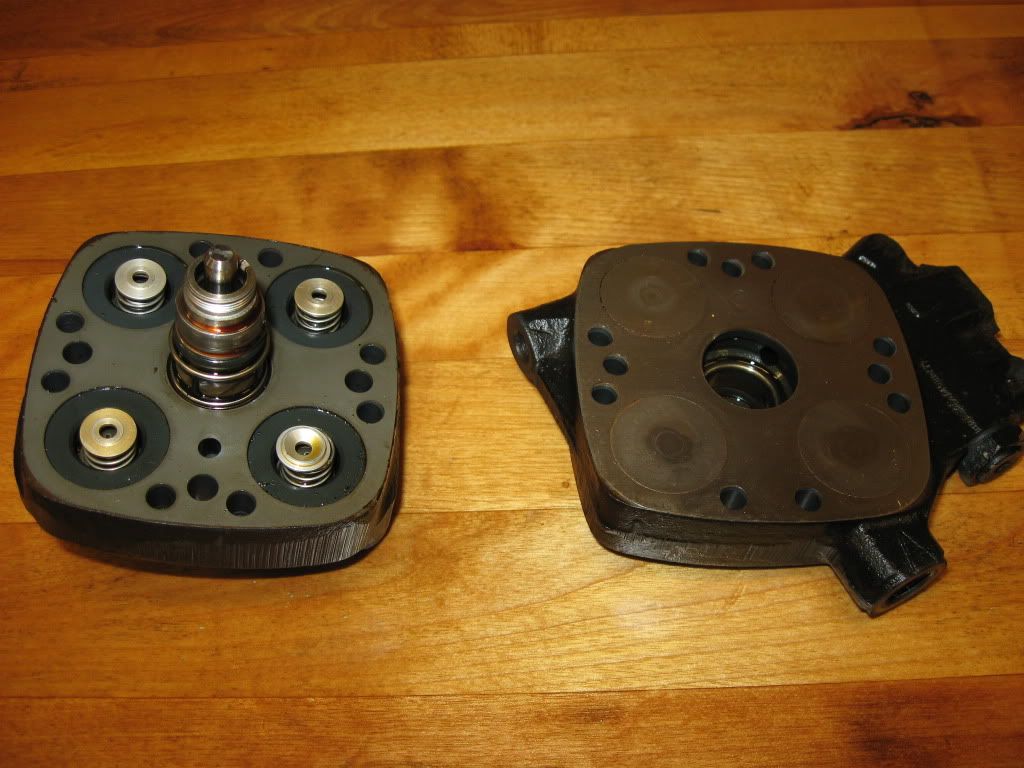
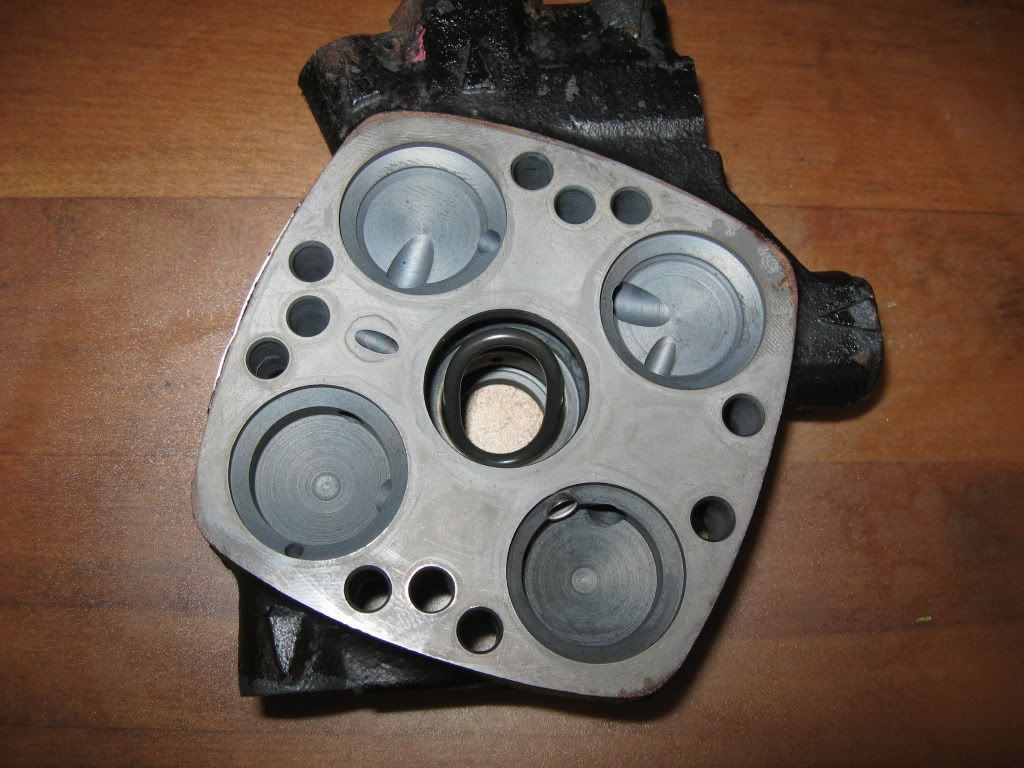
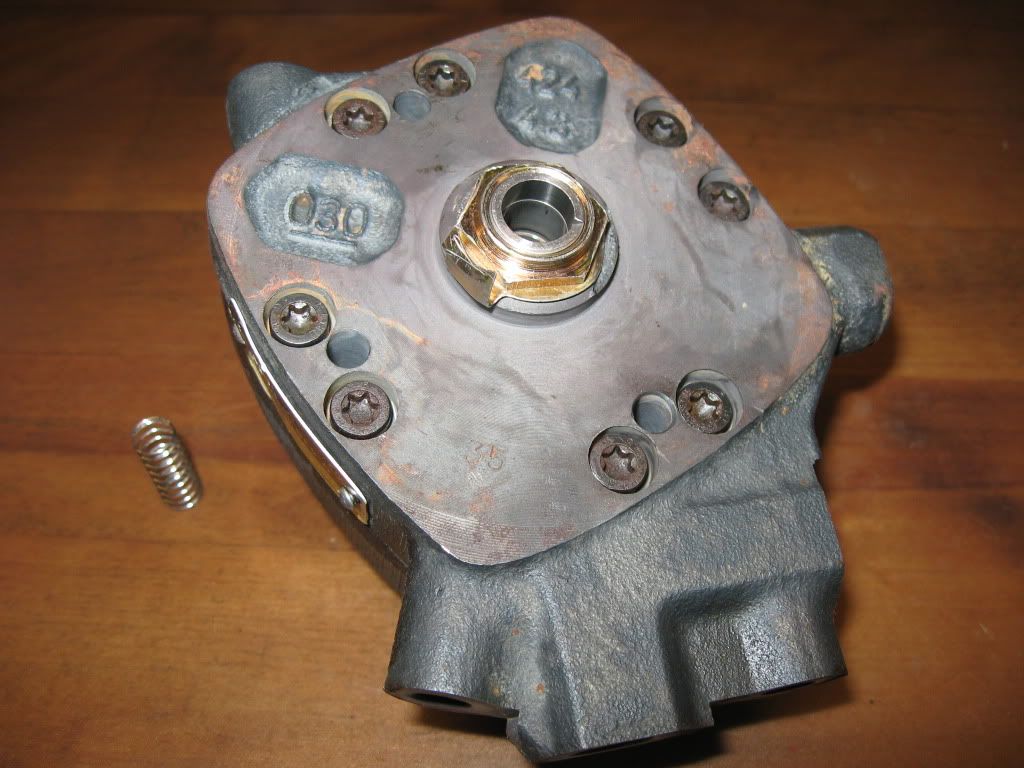
Remove torx bolts:
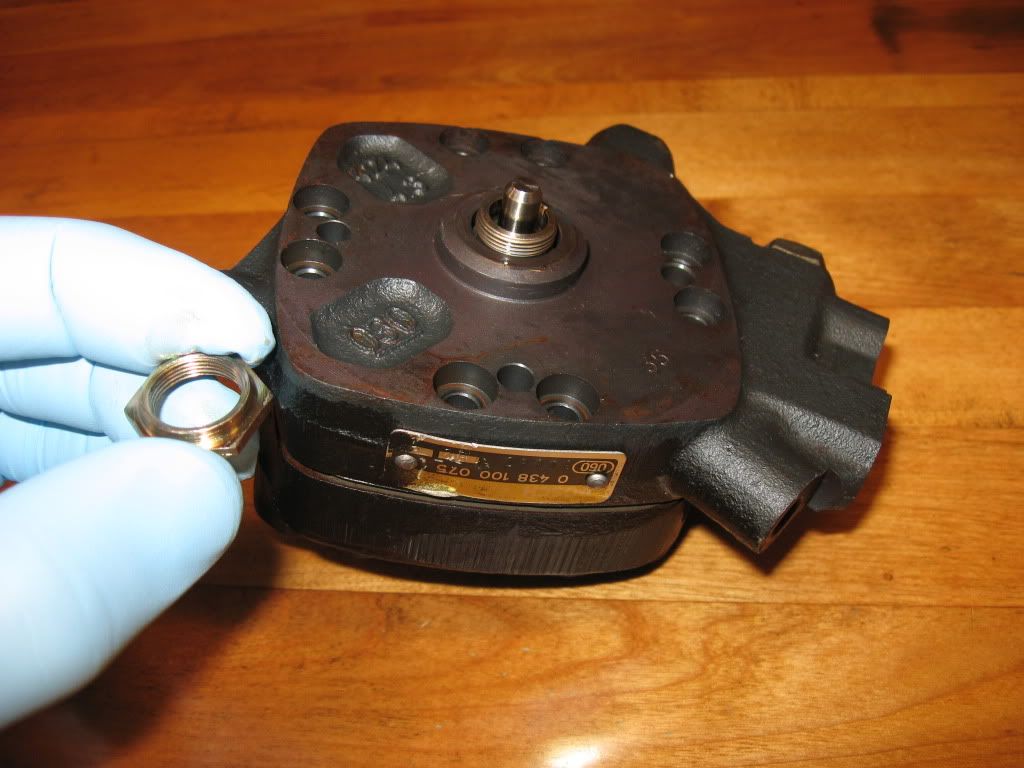
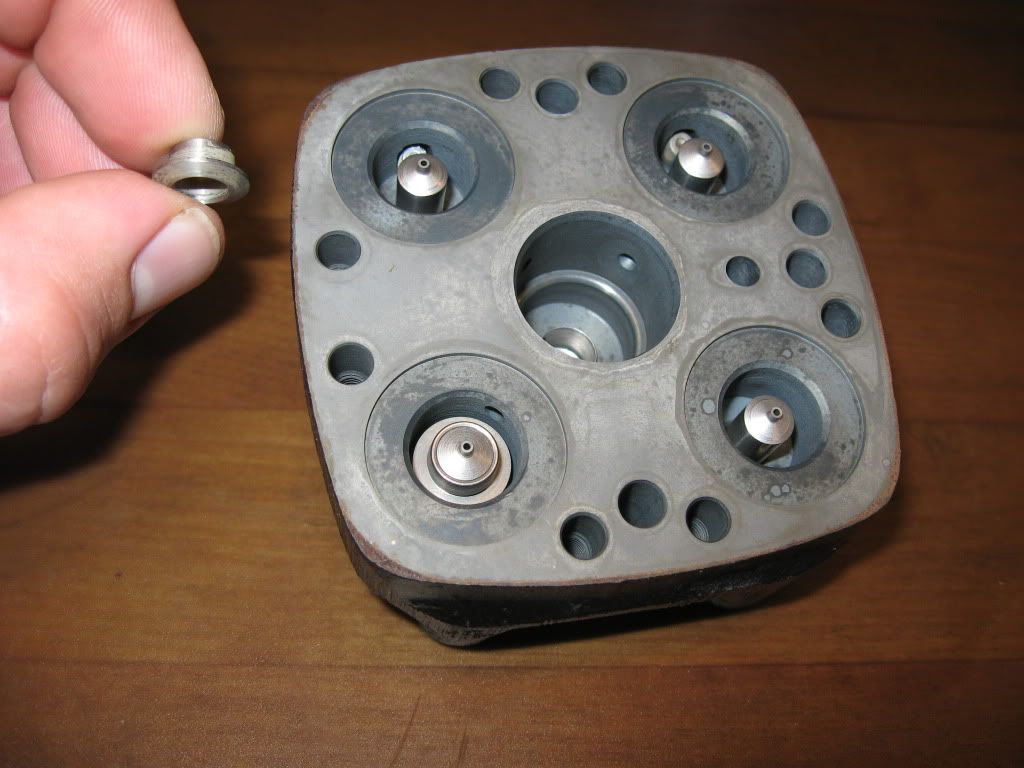
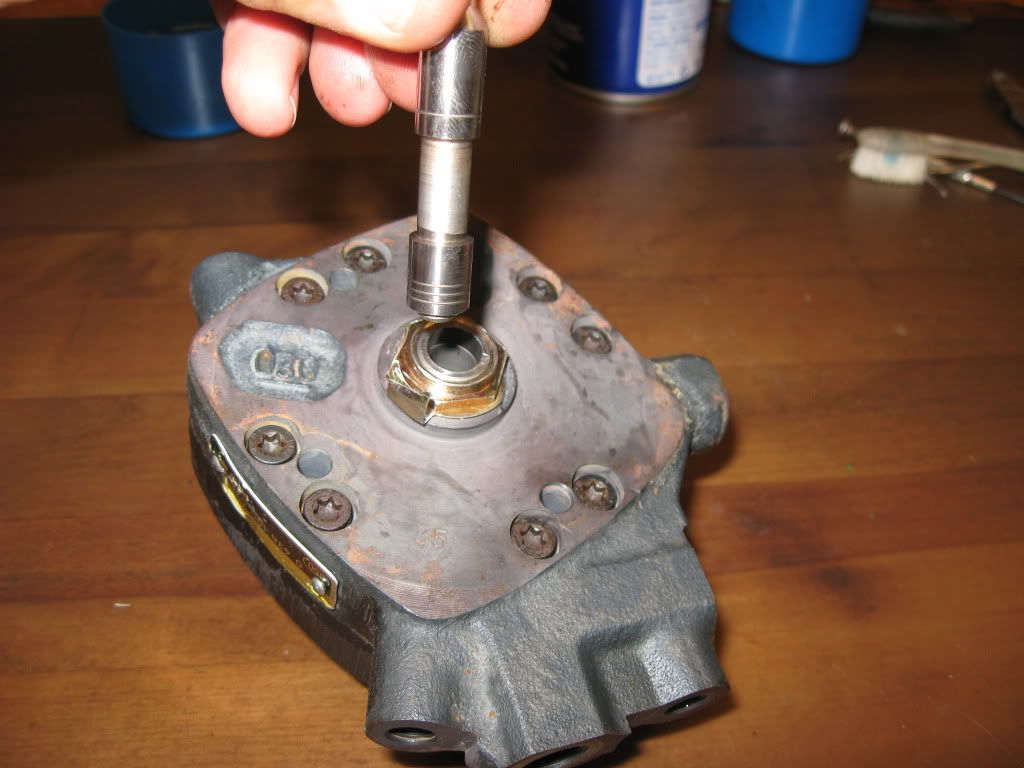
Remove the metering rod nut:
Separate halves:
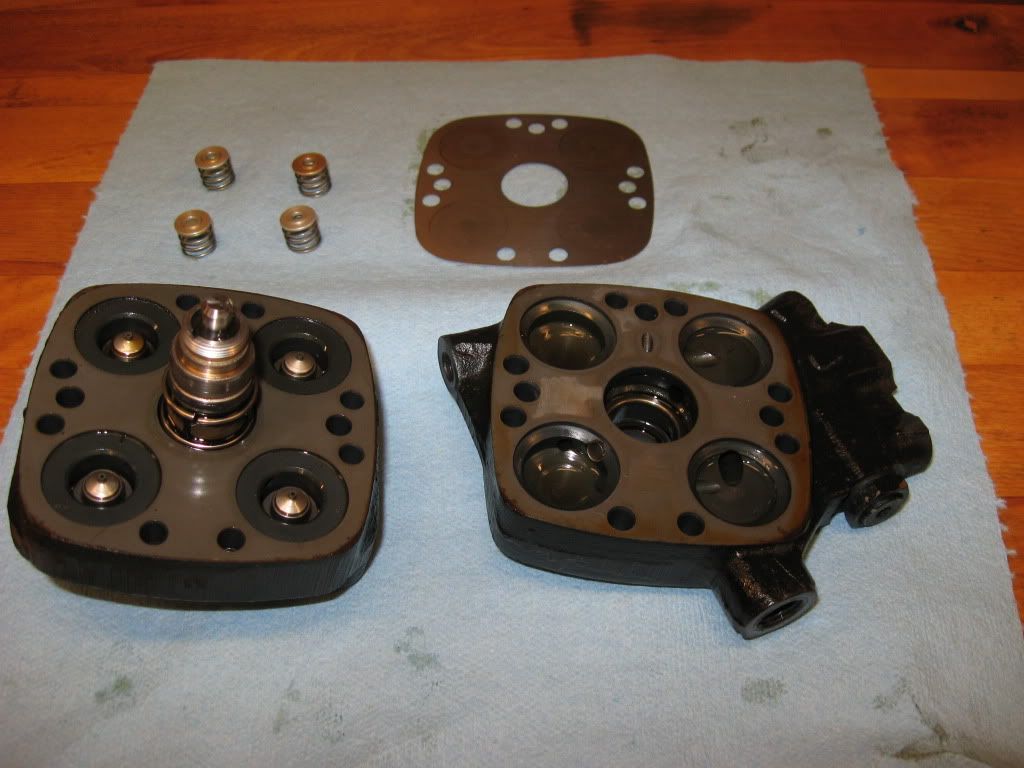
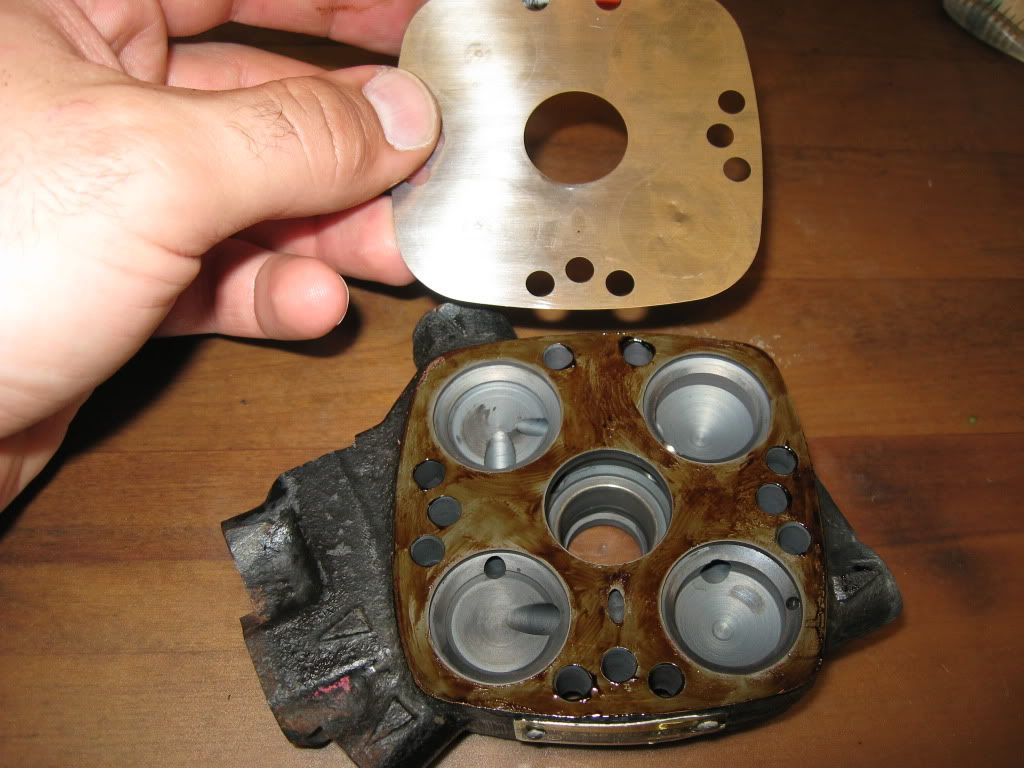
Here you can see rings of varnish buildup on the diaphragm and in the crevices of the chambers. This is very difficult to remove, even when brushing with carb cleaner (the best solvent to remove varnish):
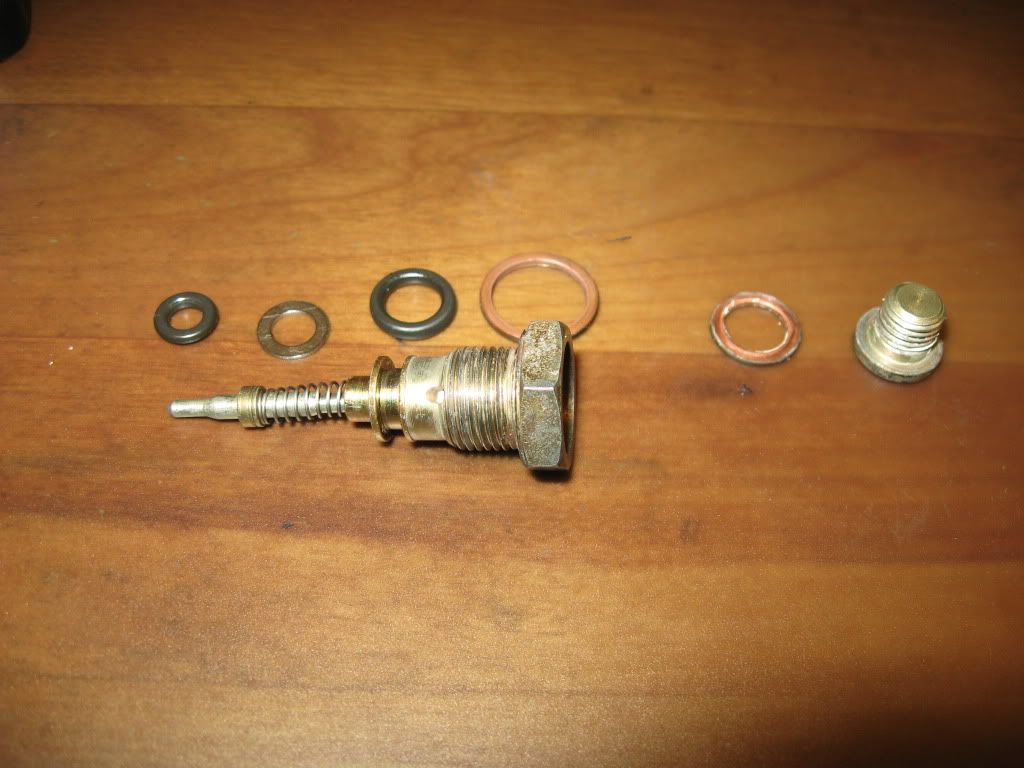
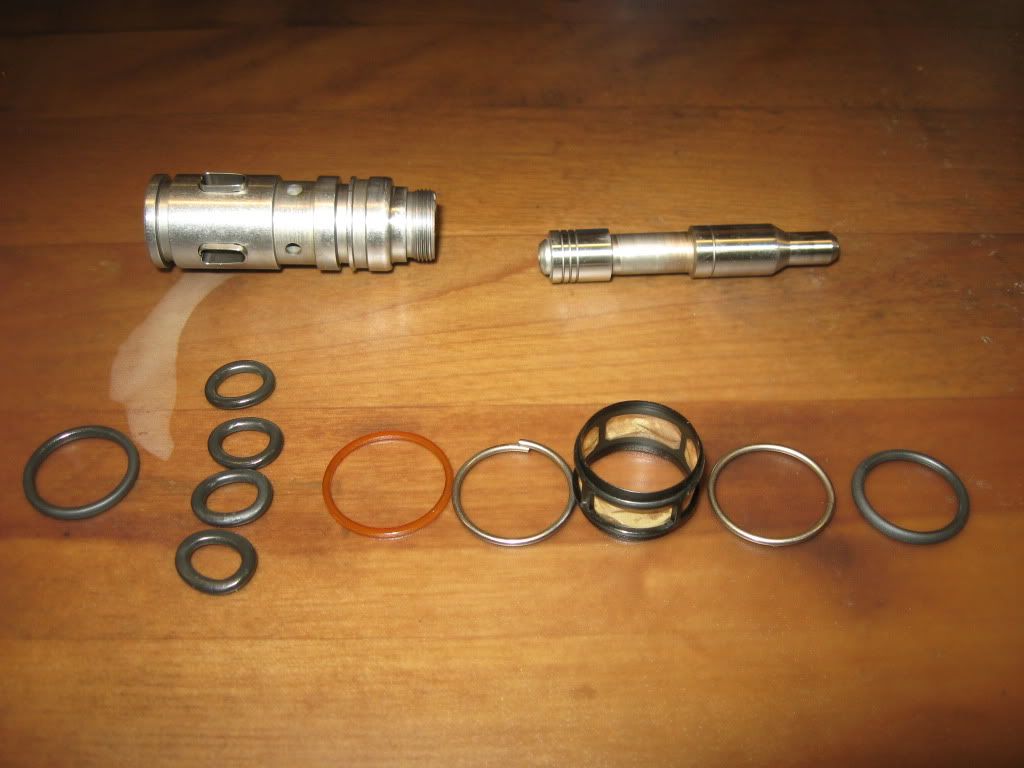
Remove metering rod assembly:
Gently remove o-rings (don't scratch the ring grooves):
Disassembled metering rod housing.
O-rings sizes:
(2) 2mm CS - 15.5 ID x 19.5 OD (far left and far right)
(4) 2mm CS - 7.5 ID x 11.5 OD
(CS=cross section)
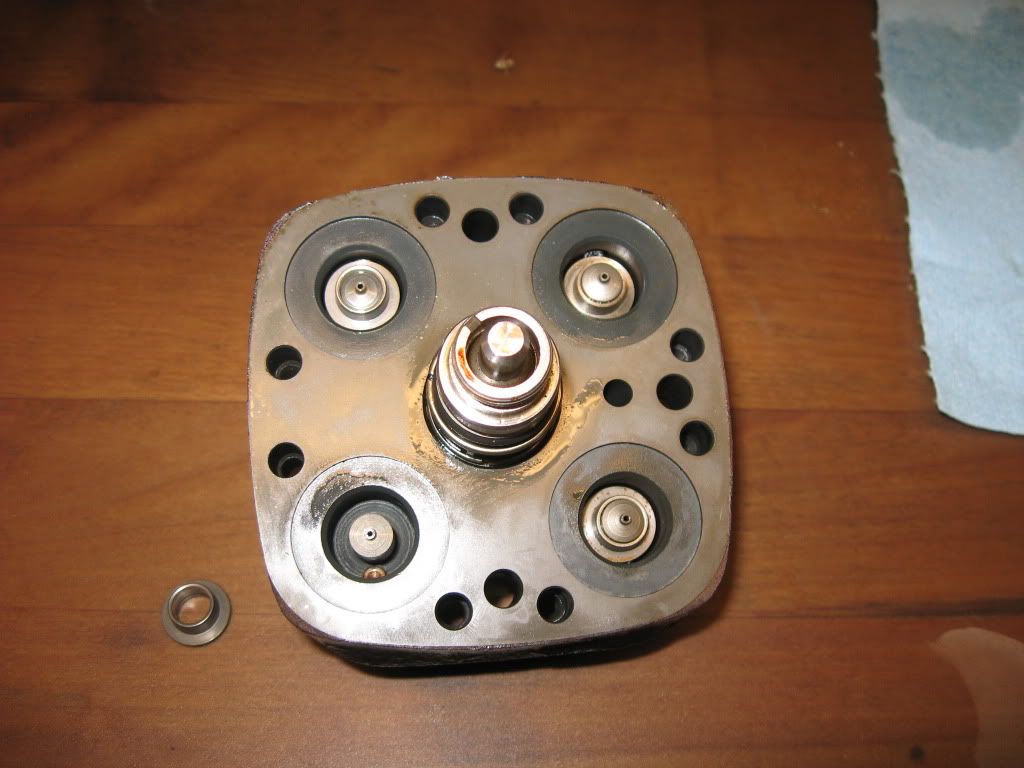
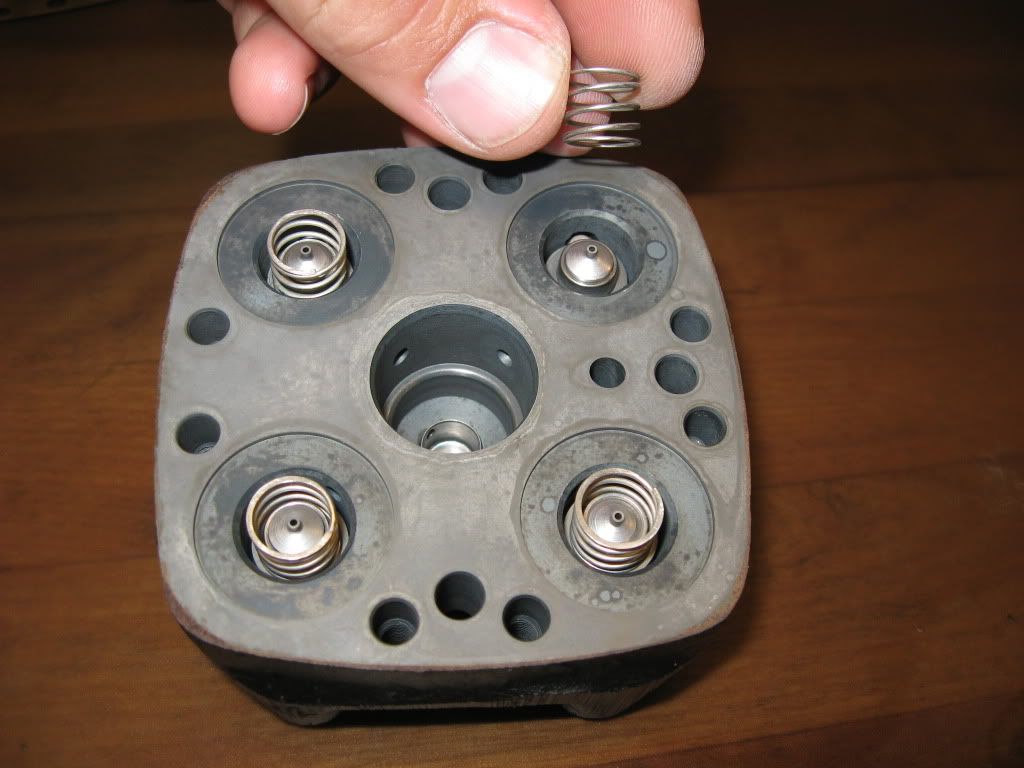
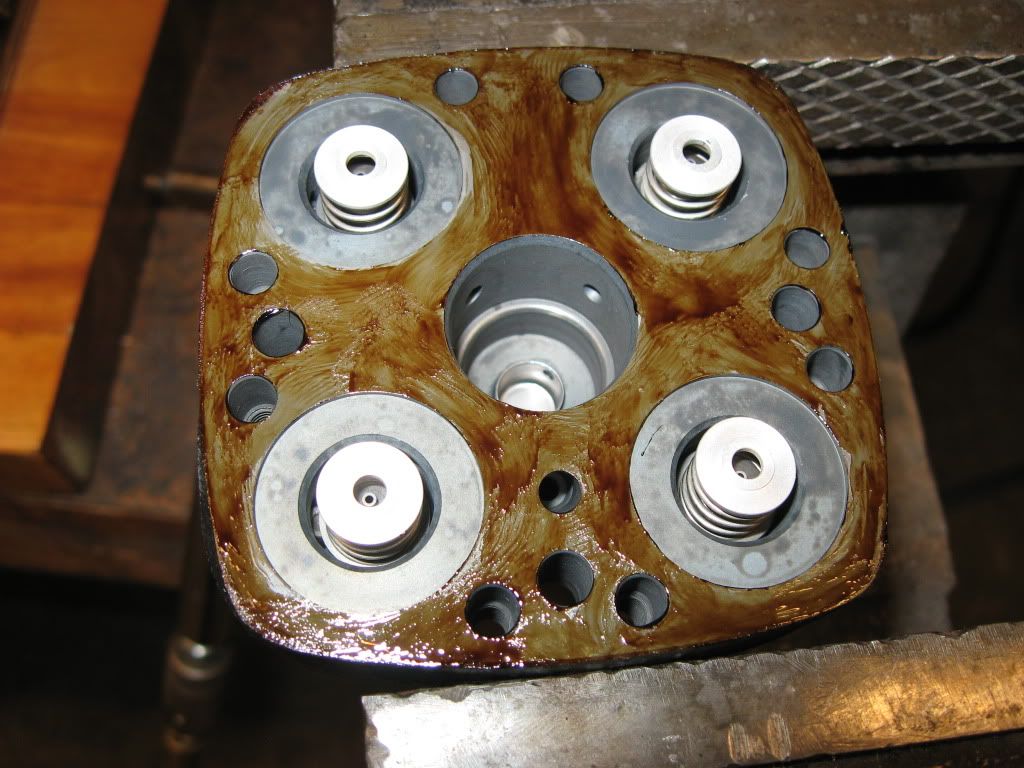
After spraying everything out with carb cleaner. Here you can see the upper spring perches, as well as the perch height adjustment screws (the allen bolts next to the injector bango bolts). This is how counter spring pressure on the diaphragm is adjusted to calibrate the flow between each port. You can also see the valve seat for each injector:
Counter springs, these are what push the diaphragm away from the port valves to maintain the .1 bar pressure differential between the upper and lower chambers.
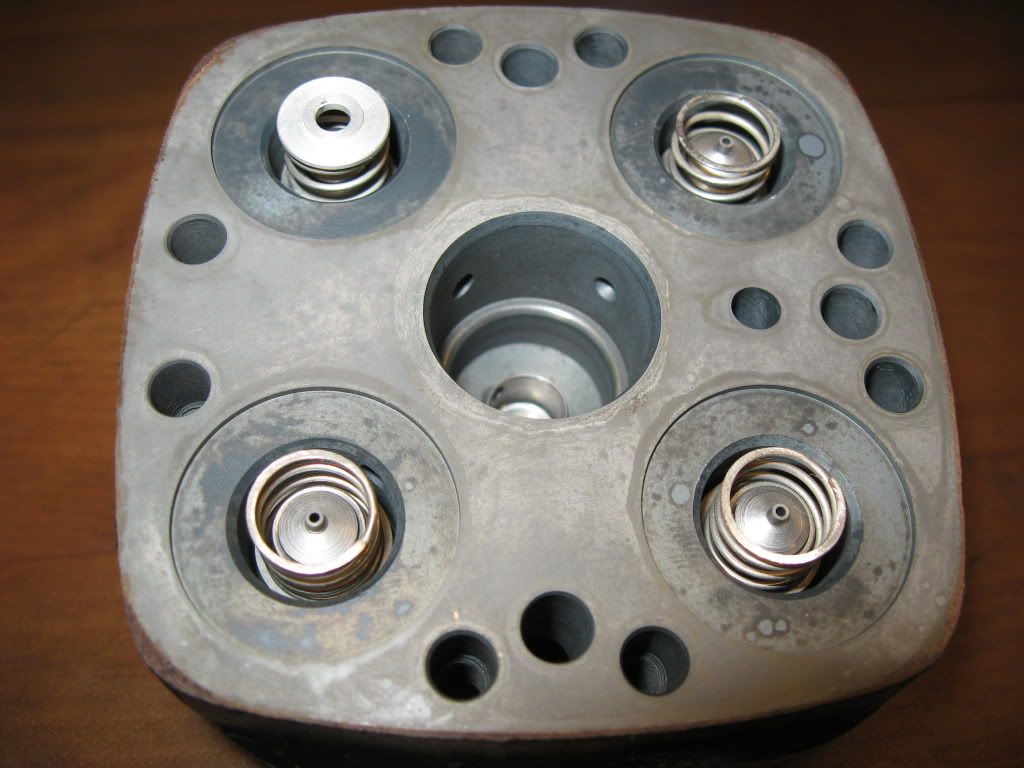
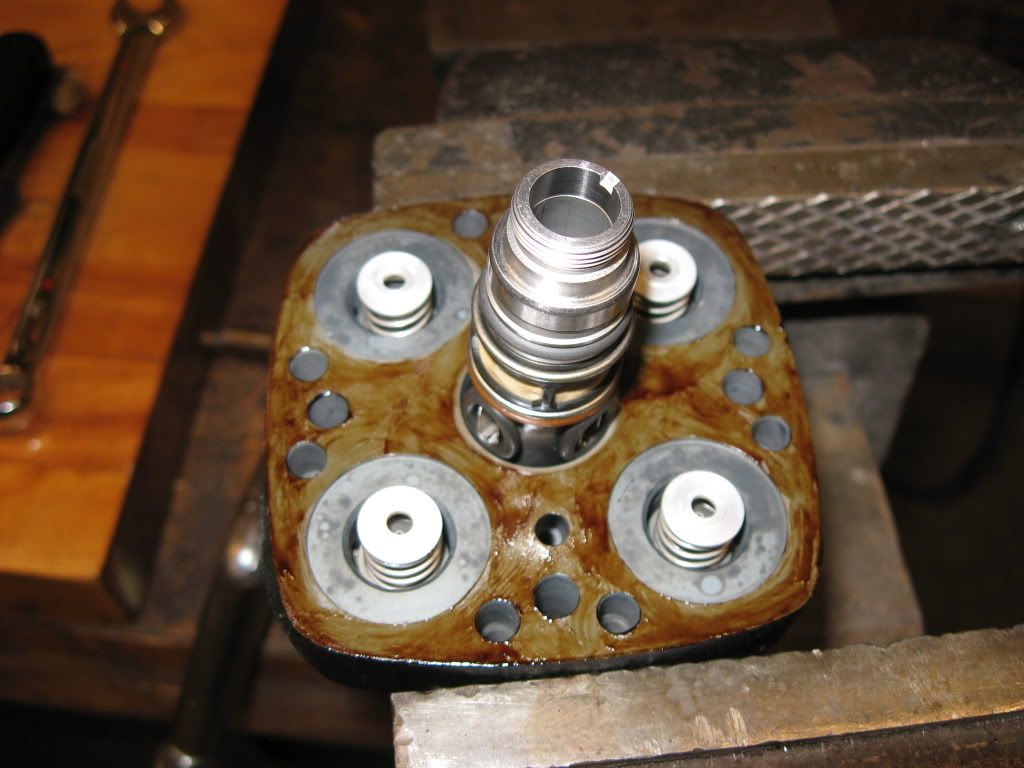
Lower spring perch installed, this contacts the diaphragm directly:
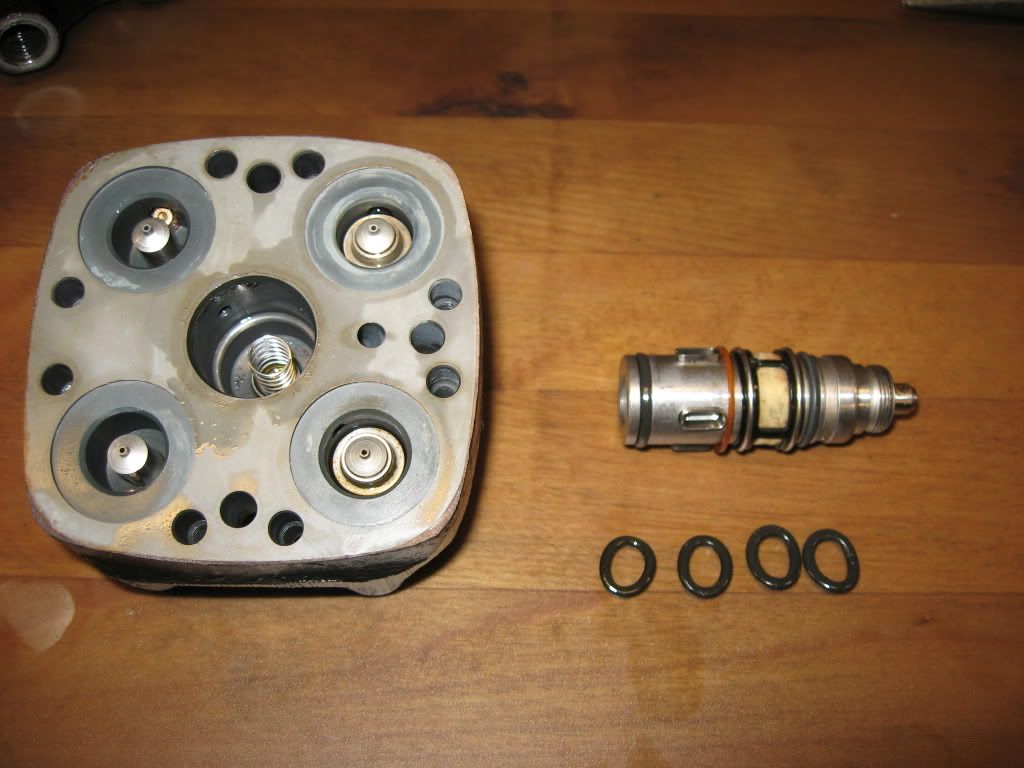
Installing the metering assembly seal, also showing each lower chamber:
O-ring size: (1) 3mm CS - 18 ID x 24 OD
Lower half coated in gasket shellac, showing the control pressure circuit pin hole lining up with the hole in the lower half of the FD. This pinhole is what "divorces" the control pressure circuit from main fuel pressure. It allows the WUR to bleed pressure off of this circuit without lowering system pressure:
Upper half coated, be sure to keep it out of the ports. Coat both halves at the same time:
Installing the metering assembly in to the upper half, be sure to lube the o-rings, it's a very tight fit and it's very easy to split them. Once installed, place the diaphragm over on to the lower half, then carefully position the lower half/diaphragm down onto the upper half and metering rod assembly:
Install the screws, tightening them down in a cross pattern evenly until they are tight. torque to about 4-4.5 ft-lbs (48-54 in-lbs). Screw the nut down on to the meter rod housing and bend the lock plate to lock the nut. Be sure to put the metering rod spring back into the bore before installing the metering rod:
Installing the metering rod, lube with a light oil (WD-40 or similar) and slide it up and down to ensure smooth travel, then bend the retaining tab on the locking plate over the end of the metering rod (if equipped):
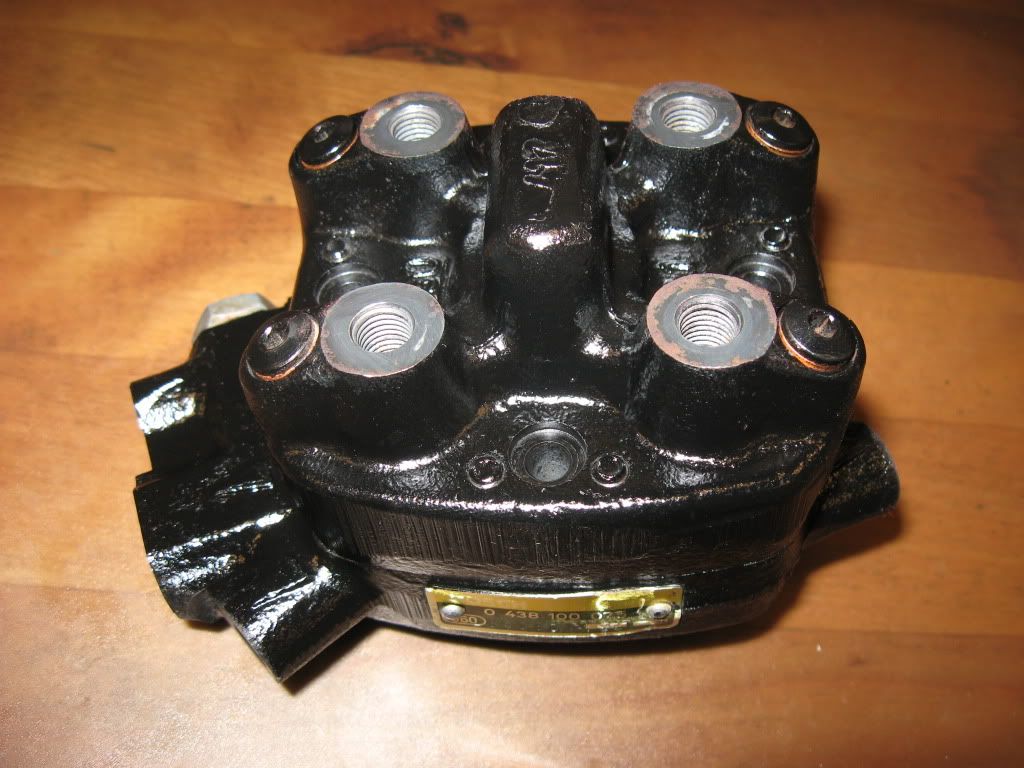
All done and freshly painted:
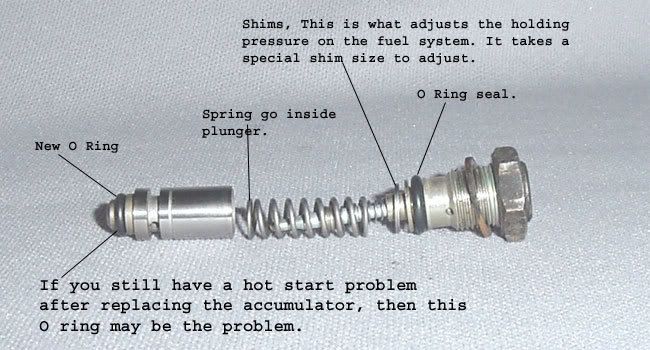
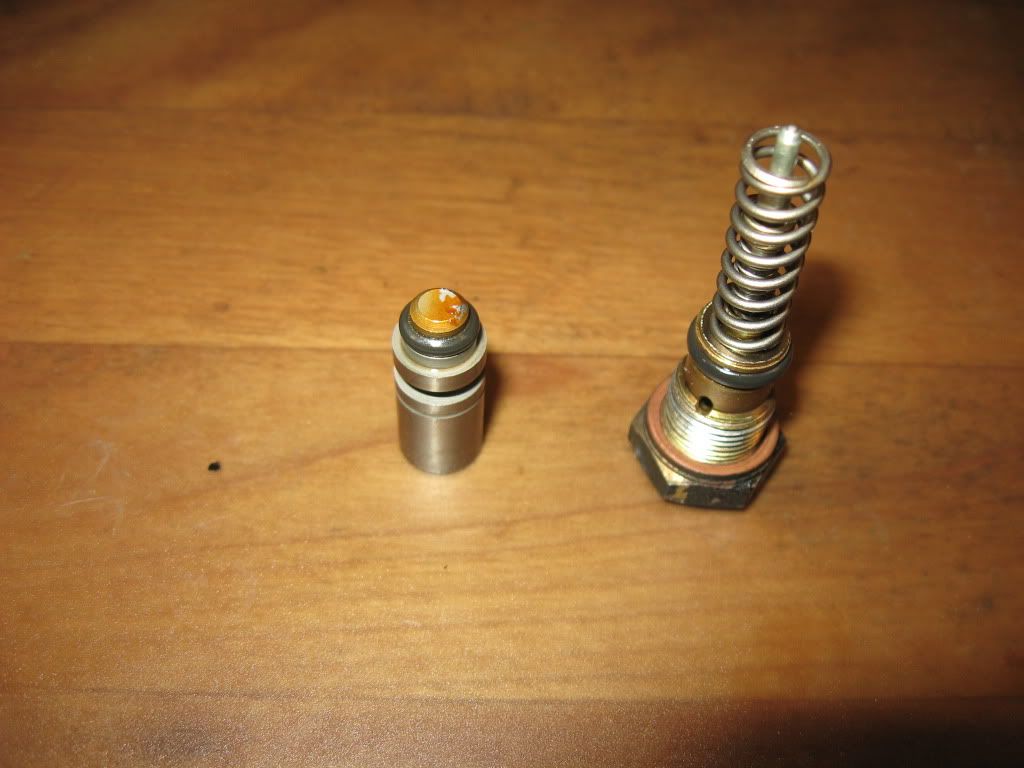
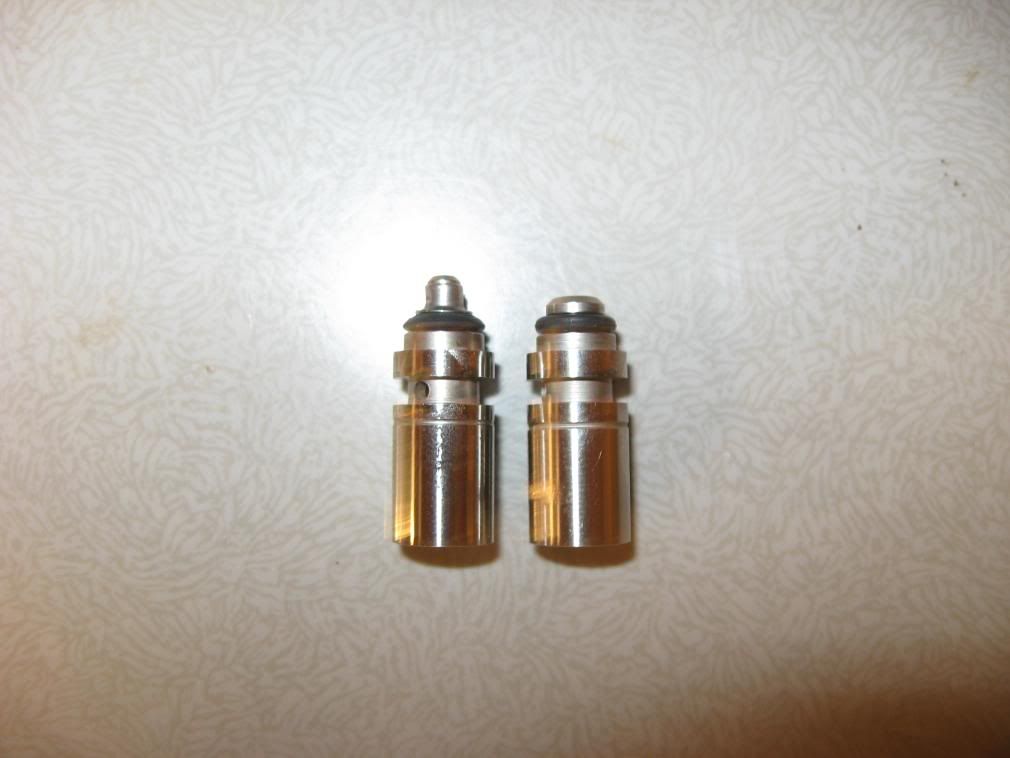
Pressure regulator o-rings:
Last edited by jrcook320; 02-11-2012 at 02:04 PM.
Member
got it using chrome. i can email it to you if you'd like.
Member
one job worth paying a pro to complete. save money on other projects.
Member
Oh Nice! Great writeup! so gotta pick up some cleaner and gasket shellac, looks like a good late night desk job! Thank you!
Member
Josh,
You've got guts.
I can also rely on most good posts of yours costing me a minimum 1/2-hour productivity any day.
Awesome pics!
On a more serious note, did you document part numbers from McMaster for all the parts/o-rings you replaced?
Do you have spares from buying in bulk?
Lastly, the FD rebuilt above did you put it back in service and how did it perform?
Thanks for everything.
Eric P.
Member
I do have the o-ring sizes.
There are 3 o-ring sizes. The material MUST BE VITON. If you use standard buna-N they will fail. They can be purchased in bulk from Mcmaster.com, or switlikbob has recommended
The O-ring Store where they can be purchased individually.
On the metering assembly (CS=cross section):
(2) 2mm CS - 15.5 ID x 19.5 OD
(4) 2mm CS - 7.5 ID x 11.5 OD
And the metering assembly bore in the FD housing:
(1) 3mm CS - 18 ID x 24 OD
I priced them out on the O-ring store.com and they came up to $15.84. Not bad...
For the pressure regulator:
Small o-ring for old style needle/crimp piston (shown on the left below):
Viton 2x4mm (cross section x ID)
Small o-ring for new style 1 piece piston (shown on the right below):
AS568A size #008 - 3/16" ID x 5/16" OD (~ 5x8mm)
Large o-ring to seal regulator body to fuel distributor housing:
Viton 2x7mm (cross section x ID)
I don't have spares as I didn't need to replace these o-rings. They were in good shape.
I rebuilt it for another guy and he said it worked fine.
Last edited by jrcook320; 01-19-2016 at 12:47 PM. Reason: Automerged Doublepost
 Posting Permissions


 Reply With Quote


Bookmarks