
 Oo [|] oO
NOTE: Please refrain from posting comments, if you have something you would like to add to the FAQ you may post here or by a PM
OK. It seems as though a lot of new E21 owners tend to ask the same questions. So I am starting this thread in hopes that it will stay up and become parked so that these same questions aren't asked over and over again. So newbies. This is where to look to answer pretty much almost any question your little hearts desire answered. Whether it be maintaining your car, modifying your car, fixing your car or just learning more about this awesome little car. E21er’s with seniority, please add to this if there is anything I miss, which I am sure there will be. Here it goes.
EURO BUMPERS:
Euro bumpers were not given to us E21ers that have US specs. To add these to your vehicle, you must adapt brackets to your US spec that will hold the Euros. The rear is quite the adventure in comparison to the front. The front one will fit directly into the old US bumper holes in the valance. However, the rear is more elevated than the US bumpers and must have new holes made. While doing all this, it is in best interest to fill in the old US bumper holes since they are quite large in the rear. The Euro bumpers can be purchased for a pretty penny at almost any BMW dealer and are also available online at www.bavauto.com where almost anything that was factory for the E21 can be purchased. The complete Euro bumper assembly is $324.95 each.
BUMPER TUCKS:
Bumper tucks are quite common these days for those of us that don't want to pay over $600 for Euro's. To do this modification, one must cut a slit or hole into the old bumper shoks and press them in to bleed the juice. Once this is done, the bumpers usually won't pull back out to their original position. Also, you must shave away some of the old accordion looking bumper bellows on the sides.
SUSPENSION:
Shocks are redily available for our cars along with springs. The beauty of our cars is that we were given a coilover setup in the front and rear. So adding coilover suspension is very simple for our little cars. Many people also add strut bars to their cars to help strengthen the upper half of the car. These can be purchased from many places including Neuspeed, www.bavauto.com, www.racetep.com/e21, www.wallothnesch.com, www.vacmotorsports.com, www.e21parts.net and a number of others I am forgetting. Another addition is sway bars. 320iS was given a rear sway bar and a bigger front bar. But if that is not enough, BBS, vacmotorsports, TopEndPerformance and others sell bigger sway bars. Camber kits for the front and rear can also be acquired from Bavarian Autosport.
BATTERY RELOCATION:
Many of us relocate our batteries to the trunk for better wieght distribution. To do this, you must go to a car audio shop that sells about 1 guage wire in large amounts. About 13 feet is good for use for the positive connection. The positive is connected to the starter. The negative should be about 2 or 3 feet to use. This just connects to one of the rear strut towers. A battery bracket is made for us by TopEndPerformance and E21Parts.net which is also a rear strut bar. E21 Parts also sells the battery relocation kit now for an easy job to save time.
SEATS:
Many of us don't have an appreciation for the big old non-bolstered bench seats that are stock. A quick upgrade is to find a set of Recaro bucket seats that were a factory option on the E21 320iS. This is much easier than any other after market seat since the later E21's had a strange seat to floor design. If you look closely, one side is bracketed closer to the floor than the other half, which is more elevated. Yet the seat rests flat. Strange. Huh? If you are to put racing seats, Corbeau sells a racing seat bracket for our cars. Otherwise, you must be creative on how to adapt the seats.
STEREO'S:
E21's with air conditioning have the stereo facing upward, which was fine for the time of cassettes. If you put a cd player in this way, it will more often than usual skip while driving. So to remedy this, people either remove the AC to relocate the player or just relocate it to a different part of the interior like where the ashtray would be or in the glovebox.
WEIGHT REDUCTION AND GUTTING:
This is where my knowledge is most worth something. My car is heavily gutted. It is a simple an cheap upgrade.
Here's a few things one can do to remove weight from the car and to help gut it:
-remove the carpet and sound proofing about 20 pounds
-remove the backseat about 10-15 lbs
(Should be two screws at the front of the butt part. Top piece slides up and off.)
-remove the sound system about 5-10 lbs
-remove the front bumper about 25-30 lbs
-remove the Air conditioning about 55-65 lbs
-remove windows in the doors about 5-7 lbs each
-remove the inner metal door panels about 5-7 lbs each
(must be sawed out)
-remove the spare tire and metal spare tire well about 25-30 lbs and 7-10 lbs
(also must saw well out)
-add fiberglass or carbon seats
-swap rear window and 1/4 glass for plexiglass
-remove heater core
-add lightweight wheels
-remove window washer assembly
-add a fiberglass or carbon fiber hood, trunk, and door panels. These are available from Kormann and Vacmotorsports
CAGES AND ADDED STABILITY:
The most well known cage for our cars is built by auto power and is a bolt in half cage. These usually are around $400-$500 new. Other famous companies that make cages for our cars are OMP and Wiechers which are located in Germany. Getting a hold of these cages is more difficult considering shipping costs.
EXTERIOR ACCESSORIES:
Many exterior parts can be changed, modified , or replaced. Here we go:
-Our cars came with same size head lights and bright lights. However, the euro specs were given oversized head lights and smaller brights. But, the base models (315, 316...) were given Single oversized lights. Similar to the standard 2002 front lights. Finding these lighting kits is difficult and must have matching buckets for the lamps to fit into. The aftermarket upgrade is to put a box shaped headlight kit into the front. This is a very weird upgrade that isn’t too famous anymore.
-Front corner lights are not appreciated on the US spec cars usually due to there size being almost double to that of the Euro specs. To remedy this, you can purchase a new set of Euro assemblies from W&N for about $70 during the holiday season. They can be purchased in orange or clear. The only problem with these Euro blinkers is that they do not stay on as parking lights. Only work as blinkers. Custom wiring must be done to adapt them as parking lights.
Another option is to let the sun bleach the orange out of your US lenses if you are cheap and just want the clear corner effect.
-The U.S. spec front valance was given a rubber/plastic air dam in the front on the 320iS versions. It bolts up in four places on the corners of the valance. Other options are the Motorsport Valance from Vacmotorsports, the Alpina front skirt from W&N, or the Kamei front skirt, which is kind of similar to the 320iS skirt.
-Fender flares are added by some enthusiasts on this forum. There are several custom flares for the E21. There are the factory 2002 Turbo flares (available on eBay), the AC Schnitzer flares (available from Kormann), the Group 2 flares (eBay), or the Group 5 flares (fairly impossible to get and require a front skirt and rear wing).
-The center taillight panel was always just black. But every now and then, one can find a red reflector panel on eBay that says BMW, ALPINA, 320i, or 323i on it to replace the old black panel.
-There are many rear wings for our cars. Some tend to add the E30 M3 rear spoiler. There is also many rubber, bolt on, lip spoilers that were designed for our cars. Alpina makes one that covers the whole end of the trunk lid including over the BMW emblem and model badge. FOHA, AC Schnitzer, and many other brand name rubber lip spoilers can be found on eBay. Sorry. Can’t find them brand new anymore. These are usually four blots that require drilling into the trunk lid.
-Badge deletion is not as easy as the newer bimmers where it is merely glued on. The “320” badge is actually anchored to the trunk lid by 4 nipples that hold onto rubber grommets on the inside of the boot. The “i” is easier. This is just glued on.
-Door handles are black on the E21. Many guys here like the chrome look. This is simple. Find an E28 5 series. Their chrome handles fit exactly onto our cars.
-Side skirts and rear skirts for our cars are kind of tough to come by. But they are out there on eBay and sometimes on the forums. They were made by companies such as Zender and Kamei.
THE ALWAYS BREAKING HAZARD SWITCH:
Not much can be done to remedy this broken button. A new one can be purchased from the local BMW dealer or Bavauto. But more often than not, this new part gives out fairly quick too. Sorry. Not much advice from anyone on this subject.
THE 55mph WHEEL SHIMMY:
Around 55mph, our cars tend to wiggle a little too much. Not dangerous. Just annoying. To fix this problem, a set of new control arm bushings made of polyurethane is said to help delete this annoying "shimmy". E21parts.net sells complete control arms with the bushings for $215.00. To complement your ride quality even more, E21parts.net has designed pressure cast, 90A urethane rear subframe mounts with your choice of reconditioned and modified mounts, or new OEM modified mounts.
EXHAUST:
Ansa is the most known for a factory style replacement catback upgrade. These can be purchased from Bavauto. Stahl is one of the best headers for the E21 being that they are equal length tubing. And are a sought after company. Bavauto also makes a set of Headers for our cars along with the 323i. These headers are only for manual transmission cars though and are approximately $400-$700 new depending on M10 or M20 engine.
GAUGES:
The gauges on the standard E21 are an 80mph max speedometer, and a black and white tachometer with a red line between 6,7,and 8. Some of the higher package iS models come with a 120mph speedo and a 140mph speedo. This is a fairly difficult item to get your hands on. In Europe, some E21s came with a Tachometer that had a 6,7, and 8 that starts with a green line that turns into a red line towards 8. Another fairly rare item. E21 also sells a white faced gauge kit to give the E21 a more modern sportier look for $85.00.
The E21 Alpina came with an extra three gauges on top of the dash. They were the Oil Temp, Oil Pressure, and Volt Meter. One can acquire this gauge pod and gauges from Bavauto brand new.
The prices are as follows:
$79.95 - VDO 3-gauge Instrument Panel
$36.95 - VDO Sender Adaptor for oil pressure sender
$32.95 - VDO Gauge - Oil Temp (requires sending unit)
$32.95 - VDO Gauge - Volt Meter
$32.95 - VDO Oil Pressure Gauge - 150 psi
$32.95 - VDO Sending Unit - Oil Pressure
$25.95 - VDO Sending Unit - Oil Temp - For 17mm Hex-head Drain Plug
HOOD INSULATION:
Nobody likes the old pealing hood insulation that is still original. E21parts.net has created a high quality FAA approved aircraft insulation material. This is thermal/acoustic foil faced fire retardant blanket type insulation. It carries a Class-A fire rating and has 99% pure aluminum reinforced foil facing. Approximately 3/8" thick and foil faced on the edges. Use a quality spray on contact cement to attach the insulation panel. It is foil faced on both sides for more durability. Can be purchased for $47.50.
HOW TO GET A POLISHED LIP
http://forums.bimmerforums.com/forum...d.php?t=800627
Well guys… I will add more to this when I come up with more. Until then, please add anything useful that I did not add here.
Last edited by Broly238; 08-02-2007 at 12:58 PM.
...KISS MY EYES AND LAY ME TO SLEEP...
Member
Hi top list but here is few things of the top of my head you can add.
For suspension you can leda.co.uk for coilovers and ground control for coilover kits & top mounts. Also K-mac for top mounts and adjustable rears. Whiteline for a secondary adjustable front roll bar.
Corbeau no longer make the set frames since their factory in England was burnt down & rebuilt last year.
Customcages in the UK do a multipoint weld in cage.
I have Gruppe 2 body kits, Gruppe 5 bodykit in the pipeline, GRP wings (fenders), doors, boot & bonnet. Billet alloy spherical bearing top & rear mounts. Quick rack kits (LHD subject to group buy). E12 diff conversions and e30 engine mounts.
The latter e30 “smiley” headlights are decent upgrade.
Jason
Member
Here's a table of contents on what I've posted:
General E21 Info
Wheel Info
CIS Troublshooting
Suspension
Common Mods/Upgrades
Turbo Charging
Barry, great idea but there's some misinformation in there that you may want to correct. The stuff I'd add or change is below:
EURO BUMPERS:
I would mention that used bumpers can be found on Ebay for about $300 for a decent set front and rear. Also, the stock Euro bumper brackets can be used for the front, but you have to drill new bolt holes. For the rear there are 4 options: 1) Making custom rear brackets and leaving the US sheet metal as is, 2) making custom brackets and covering the US sheet metal with a Zender rear skirt or similar 3) or having a body shop smooth the US sheet metal, 4) or having a euro rear valance welded on which will include mounting holes for the rear bumper. The sheet metal is available at Bavauto.com. The 4th option allows the use of the stock brackets.
BUMPER TUCKS:
I would recommend drilling holes in the shocks. The shock oil may be under pressure so wear eye protection and have rags handy. Once the shock is compressed, drill another hole so you can bolt it that way.
SEATS:
The recaros were standard on the 320is and were an option on regular E21's, both pre and post 1980. A set in good condition can fetch a price over $400 or $500, but they can be found for less every now and then on ebay.
STEREO'S:
To remove the A/C for the purpose of stereo positioning you also have to find a non A/C center console which is hard to find in the US. They can go for over $100 on ebay.
This is simply not true. All US e21's and euro 6 cylinder E21's had the dual 5 3/4" lights, only the 4 cyl euro e21's had the 7" single lights. No E21 came from the factory with the big low beam/little high beam setup. That is an aftermarket kit from Hella that was designed to give the 4 cyl cars quad headlights and it is NLA.Originally Posted by BARRY E36 M325

The aftermarket square headlight conversion is not considered an upgrade by anyone and is an excellent way to ruin any E21.
Also available used are Zender and BBS front air dams.
The most common side skirts were made by Zender. There are 2 types, one called low end and one called high end. High end skirts have flares that run along the wheel wells and look like an '80s conversion van. The low end skirts are straight, are favored by many and seem to be harder to find. Joe would be happy to post a pic of his low end skirts.
You can repair the broken hazard switch easily. Heres a link on a DIY. I've had my new hazard switch for over 20k miles and it hasn't broken. Just treat it like your girlfriend's "special places" rather than yours and you'll be fine.
For the rear subframe mounts, it is very easy and much cheaper to make your own molds and fill your own with polyurethane. Here's a link to the DIY
EXHAUST:
Top End Performance sells a nice header in the $150 range. I would buy this or buy used before spending $400 on a header that will yeild 5 hp over the stock manifold.
Again, not true. Pre 1980 US E21's had 120 mph speedos. Post 1980 US E21's ALL had 85 mph speedos as required by law. The 140 mph speedos came from other BMW's. I am running a 140 mph speedo from a 1975 530i and it reads exactly 10 mph fast. Someday I'll have to have it calibrated.
Last edited by jrcook320; 12-10-2008 at 05:26 PM.
S50 Powered 2.9 M20
Barry nice thread.
#1) I like to add the following.
M20 stroker info for the e21 323i:
Use of the eta block with the 323i 200 series head.
Building a 2.8 out of a 325i engine with eta or 524td crank.
Building a 2.9 M20 stroker with the s50 rods and s50 crank.
These have been covered in depth and I can dig these up to add to this thread,
as they are always being asked.
#2) 323i's did come with a green/red tach, and a spedo in Kilio Meters and MPH that was 140 mph. I have two instrument clusters from two different 323is..
that i will be using to make my car, and one of them is a left had drive 323i.
#3) ZF made a quick steering rack that was a rare motorsport item,
that can be reproduced by Jason in the UK's kits
#4) Both Ansa, Racing Dyanmics and Supersprint made headers for the e21 323i.
"..Horsepower is a measure of work done over time, or the rate at which work is done."
http://www.cardomain.com/ride/579694/1

Member
77-79 320i (US)
2.0L m10
K-jetronic fuel injection
8.1:1 CR
BHP: 110 @ 5700
Torque: 112 ft-lb @ 3750
4 spd manual
3.64 Open Diff
23mm front sway bar - up to 9/77
22mm front sway bar - 9/77 to 9/78
No rear sway bar
0-60: 10.5 sec
Top Speed: 106 mph
80-83 320i (US)
1.8L m10
K-jet w/ Lambda control, catylitic converter
Compression Ratio: 8.8:1
BHP: 101 @ 5800
Torque: 100 ft-lb @ 4500
Getrag 245 5 speed (80-82)
Getrag 240 5 speed (83)
3.91 Open Diff
22mm front sway bar* - 9/78 to 9/81
23.5mm front sway bar* - 9/81 on
No rear sway bar
0-60: 11.1 sec
Top Speed: 105 mph
* updated suspension design
The 320is was a sport package available between 80-83.
Sport options:
Badge Delete
3 Spoke Sport Wheel
Leather shift knob
Recaro Seats
Front Air dam
3.91 Limited Slip Differential (LSD) 25%
23.5mm front sway bar
16mm rear sway bar
Sunroof
Deluxe tool kit
Fog lights
BMW Parts ETK online (Exploded Parts Diagrams)
Online parts cataloge with exploded diagrams & part #s of every BMW
BMW Fans
Real OEM
Wiring Diagrams:
E21 Wiring Diagrams
Parts suppliers:
General Replacement Parts:
bmaparts
autohausaz
autopartswarehouse
Pelican Parts
OEM/Mobile tradition/hard to find stuff:
Walloth & Nesch - In Germany, hard to find euro stuff
Maximillian Importing - Mobile Tradition online catalog
OEM and Performance parts:
Bavarian Autosport - excellent customer service, good performance stuff, can get anything the dealer can get and anything the dealer won’t.
BMP Design - decent selection, good performance parts
Custom Performance parts/bmw machining services:
Top End Performance - offers lots of cheap hot rod and racing parts
Metric Mechanic - rebuilt performance engines and trannies
Korman
Ireland Engineering
Vac Motorsports
Aardvark Racing - 2002 focus, but sell big brake kits (volvo girlings), recaros, lsd's etc.
BMW Salvage Yards:
2002 AD - extensive selection of used parts
Bavarian Auto Recycling - good used parts
Bavarian Engine Exchange - rebuilt engines, tranies and diffs
Other E21 Forums:
Tricord
Jeroen's E21 Network
Last edited by jrcook320; 12-11-2008 at 05:21 PM.
Member
Stock Wheel Size: 13 x 5.5 et18, 4x100 lug pattern, 57.1mm center bore
Stock Tire Size: 185/70R13
The most common upgrade wheel size is a 15x7 et12-15 with 205/50r15 tires. I’ve heard of 18mm offsets fitting on some wheels. On a 15” wheel a larger offset will not work because the inside lip of the wheel hits the tie rod ball joint. Some 16” and all 17” wheels with higher offsets will fit because the diameter is large enough to clear the tie rods, but it still best to keep the outside of teh rim as close to the wheel well as possible. On a 7" wide rim, regardless of diameter, that means aim for an offset between 12mm and 15mm.
4x100 Honda and VW wheels will fit with spacers, but keep them hub centric and try keep your net offset at 15mm. For example, a 16x7 et40 wheel will require a 25mm spacer to give you a net 15mm offset. Also, a good idea with spacers is to upgrade to lug studs. You can buy them from BMP.
Wheel Technical Information
If everything I just said makes no sense to you , go here and learn how wheel dimensions are measured:
Tire Size Calculator
If you’re trying to play around with various tire sizes to see what will work, try this tire calculator:
Last edited by jrcook320; 12-11-2008 at 05:20 PM.
Member
The BMW 320i and 323i are the only BMW’s to be equipped with CIS, aka Bosch K-jetronic. CIS stands for “Continuous Injection System”, so named because the injectors are mechanical valves that spray constantly rather than being pulsed the way efi injectors are. CIS was also used on many other European cars from the 70’s, ‘80’s, and even the ‘90’s, including Porsches, Vw’s, Audi’s, Ferraris, Lambo’s, Volvo, Mercedes and the Delorean to name a few. In its day the system was considered state of the art, though it’s strength is emissions, not performance. This system is almost entirely mechanical, in good tune is very robust, and is amazingly adaptive to performance modifications.
First off, if you’re trying to trouble shoot a problem or are just asking a question, knowing what each component is and what it does will be a big help to you and to us as we try to answer your questions. Read and study the links below to learn what things are and what they do. There are a few components that often go by different names. The Control Pressure regulator (CPR) is the same thing as the Warm-up Regulator (WUR). The Air Flow Meter (AFM) is also called the Lift Plate or Sensor Plate. The auxiliary air valve is also called the Idle Air Valve. I generally refer to the fuel distributor as the FD, the air flow meter as the AFM, and warm up regulator as the WUR.
Bosch K-jet in detail (volvo specific) .pdf format
K-jet.org
Auto solve writeup on K-jet
CIS trouble shooting:
If you’re having CIS problems, the most valuable book you can buy is “How to tune and Modify Bosch Fuel Injection” by Ben Watson. If you buy this book, you’ll also need to get a CIS pressure test kit. For only $60, JCWhitney sells them for less than half the price that Bavauto and other BMW suppliers do.
CIS pressure test kit
Vacuum Leaks
If you’re having drivability issues such as hard starts, stalling, or no start, the first thing to do is check for vacuum leaks, then check again, then once more for good measure. The K-jet system is extremely sensitive to vacuum leaks, if there is even a small one the sensor plate won’t lift high enough and your mixture will be lean, sometimes to the point that the motor won’t even run
Common places to look are the oil cap seal, cracked/loose vacuum lines, dipstick o-rings, crank case vent lines, intake boot, etc.
To check for leaks, spray starting fluid around all suspect areas with the motor running, or if it doesn’t run do it while a helper cranks the motor over. If there is a leak the motor will suck the ether in through the leak and the idle will rise or the motor will sputter briefly. If in doubt, replace old rubber hoses with new to be sure.
Hard Cold start/Rough running when cold
The most common 2 problems I see being asked are hard cold starts and hard warm starts.
A hard cold start accompanied by a rough idle when cold is often caused by an incorrect (lean) mixture when the motor is cold, which is often due to a dirty or misadjusted WUR. A dirty WUR has a greater effect on a cold control pressure, and thus cold fuel mixture, because the WUR needs to flow more fuel to allow for the lower control pressure that a cold motor needs. As the WUR warms up, the internal valve closes anyway, so any restriction caused by dirt won’t effect fuel flow as much.
Often just cleaning the WUR can help. If this doesn’t help, then your options are to adjust your mixture to be richer, install another WUR, or do a full pressure test and make your WUR adjustable to bring it back in spec.
WUR Servicing
Hard warm start
A hard warm start is often due to an internal system leak causing a drop is rest pressure. This results in vapor lock on a hot engine. The causes for this leak down are a leaking fuel pump check valve, leaking system pressure regulator o-rings, leaking accumulator, or leaking cold start injector. The accumulator can be tested easily by disconnecting the vent line and jumpering the fuel pump. It's easy to tell if there's a problem with the pressure regulator through simple inspection or the o-rings. If the cold start injector is leaking it will need replaced.
1 - Leaking fuel pump check valve - The most common cause, costs about $15. A leaking check valve will usually only cause hard warm starts.
2 – Leaking Pressure Regulator - How to replace pressure regulator o-rings
3 - Leaking Accumulator
A small leak in the accumulator can cause hard warm starts but if it's large enough it can leak off enough pressure to keep the car from starting at all. To check for an accumulator leak, disconnect the small rubber line from the back of the accumulator and plug it with a golf tee or bolt and clamp it. Shove some fuel hose onto the nipple on the back of the accumulator and run it into a gas can. Jumper the fuel pump. Some fuel will spray out of the accumulator, this is normal as the rear chamber will have some fuel in it from the in-tank pump (the fuel line we disconnected). If the fuel flow does not stop then the diaphragm is leaking and it needs replaced.
4 – Leaking injectors or cold start injector
To check for an injector or cold start injector leak, remove the injector and place it in a jar and jumper the pump. If it drips it leaks. If your main injectors are all dripping slightly, you may first want to try backing your mixture setting off a tad to make sure it's not just set too rich.
Jumpering the Fuel Pump
Most fuel system component testing you’ll need to do require you jumper the fuel pump.
To jumper the pump you have to turn the ignition on for the pump to run. Jumper terminal 15 which is hot when the start-run bus is on (ignition switch on) and 87, which is the hot lead to the fuel pumps, WUR, and aux air valve. Note, i've recently found out from other members the orientation of the relay plug can be different than what was on my car, so make sure you connect correct terminals by checking the orientation of the plug:
Re-adjust Base Mixture Setting
If you’ve done major fuel system work such as swapping fuel distributor or AFM or you have a non-running car it’s a good idea to re-set your base mixture setting. To do this, jumper the fuel pump. Turn the mixture screw clockwise (rich) until you here the injectors start to spray. Back off till they stop, then back off another 1/8 turn. This should get the mixture setting close enough for the car to at least run.
Fine Tune Mixture Setting
If you clean your WUR, swap fuel distributors or AFM, replace the fuel pump or even filter, or install hotrod parts like header or cam, expect to have to do some fine tuning of your mixture for it to be perfect or even run afterward.
I adjusted my mixture by ear and feel for years before I had a wideband O2 gage. It's not difficult to get a smooth running car with no gages or measuring equipment. With the motor running, adjust rich (CW) till idle starts to slow or stumble, then adjust lean (CCW) till it does the same, then adjust to half way between those 2 points.
If you want to be more accurate you can adjust the mixture by reading the voltage from the oxygen sensor, or by reading the duty cycle of the frequency valve with a dwell meter.
On a stock 320i you could also install a narrow band air/fuel ratio gage which only costs $30 and uses teh stock oxygen sensor. It is accurate right around stoichiometric ratio and is adequate to set your base mixture with. At WOT the fuel system will go richer than what it can read, but it's not a safety issue and the fuel system was designed to cope with an NA motor.
CIS Pressure Specs
For those that have a CIS pressure gage and just need to know the pressure specs, here they are for the 80-83 e21 320i:
Fuel pump delivery (as measured through the fuel return line): 750 cc's/30 seconds
Cold control pressure:
50 deg = 17 psi
75 deg = 26 psi
100 deg = 35 psi
System Pressure:
65-75 psi
Warm control pressure:
39-45 psi
Rest pressure (leak test): above 22 psi for 20 minutes
injector opening pressure: 45 psi
Complete CIS Test Procedure
The pressure gage takes the place of the fuel line that runs from the top of the fuel distributor to the inlet of the WUR (the larger of the 2 ports). Make sure your shut off valve is on the WUR side of the pressure gage.
1) Measure cold control pressure first. Make sure valve on your gage valve is open and the motor is stone cold. Disconnect the plug on the WUR so it doesn't heat up to warm control pressure while you measure. Jumper the fuel pump. You'll need to estimate what the cold control pressure is based on outside temp.
2) Measure system pressure next. With the pump still jumpered, close the valve. You're now blocking flow to the WUR and the pressure above the control plunger will rise to equal the pressure in the lower chamber of the FD (system pressure).
3) Next measure warm control pressure. Open the valve, start the car and let it come up to operating temp. If you can't start it, plug the WUR back in watch control pressure rise until it stops moving.
4) Last, measure rest pressure (leak test). unjumper the fuel pump and watch the gage. It should stay above 22 psi for 20 minutes. If your rest pressure drops then fuel is leaking either at the check valve, system pressure regulator, accumulator, cold start injector, or WUR. See the warm start section above for procedures on how to test each component
5) Injector flow test: Pull the injectors and put them each in a jar or graduated cylinder and spray for 10-20 seconds. Check for good spray pattern out of each injector, total volume delivered should be equal
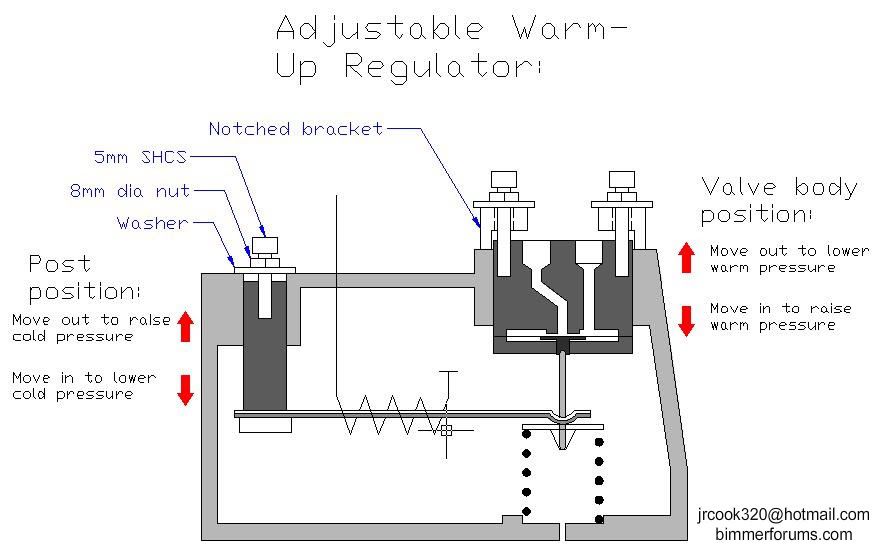
How to tune the WUR:
You should never have to buy a new WUR unless the internal valve is rustys or the heating element is broken. You can make the WUR adjustable, this link is a good start but I consider it incomplete so I'll write my own DIY when I get a chance:
How to tune your WUR
Here's a diagram I drew up on how to make both cold and warm control pressure adjustable. This is how my WUR is set up.
Last edited by jrcook320; 11-18-2008 at 10:53 PM.
Member
The best thing you can do to your E21 is suspension. I would recommend starting with lowering springs and good shocks, then sway bars and poly bushings, then strut tower braces, then camber adjustment.
The most common lowering springs are H&R and Eibachs. They will lower the car about 1.5" all around and offer similar price, quality and performance. Bilstein HD or sport shocks are an excellect choice. The sports are valved very stiff (for the street, anyway) and are designed for use with lowering springs. Eibachs or H&R's with Bilstien sports will knock the fillings out of your teeth, but for real racing you still want true coil overs. Ground Control provides good value and is the best bang for the buck but there are better and more expensive options available from place like Top End Performance and Vac Motorsports. The very best is the LEDA setup already mentioned.
The stock sway bars are 22mm front and no sway bar rear. The 320is had 23.5mm front and a 16mm rear sway bar. Suspension Techniques makes 25mm front and 19mm rear bars.
E21 Shimmy
Most e21's suffer from a shimmy between 45-55 mph at some point in their life. This is mostly due to a poor front suspension design that relies on the sway bar to control fore and aft movement of the control arms in conjunction with worn suspension components.
The 77-79 models have a 2 piece bushing design that is clamped by the sway bar washers. On the 80-83 models, the control arm, bushings and sway bar were redesigned presumably to improve this issue, and consist of a 1 piece metal sleaved bushing that presses into the control arm. These bushings are very soft and are mostly hollow and I consider them to be the weakest link in the front suspension.
The best way to eliminate the shimmy is to first make sure the front suspension is in top shape. The ball joints, tie rods, upper strut bearings, wheel bearings, control arm bushings and steering rack bushings all need to be in excellent condition. Also make sure your wheels are properly balanced and that you have even tire wear. The steering rack bushings often get so oil saturated that they are more like gel than rubber. Bavauto sells poly steering rack bushings that will help control the shimmy and give the steering a nice crisp feel. After things are in good shape, if you still have the shimmy the next step is to upgrade your control arm bushings. You have 2 options:
1) Fill your control arm bushings with Polyurethane casting compound:
Front Control Arm Poly Bushing DIY #1 (thanks to Jester323)
Front Control Arm Poly Bushing DIY #2
2) Have a set of poly bushings custom machined at a local machine shop.
Poly Subframe Mounts
How to fill you subframe mounts with urethane
E30 poly subframe bushing DIY
Rear strut tower brace DIY
Rear strut brace
Adjustable Rear Camber
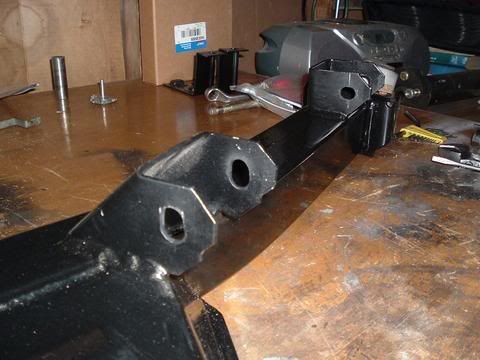
One issue that e21's have (and most early bmw's) is severe negative camber when lowered. One way around this is to buy camber adjustable trailing arm bushings, other option is to slot the subframe to allow for camber adjustment. Here is a pic of my subframe, there is still much room for improvement
:
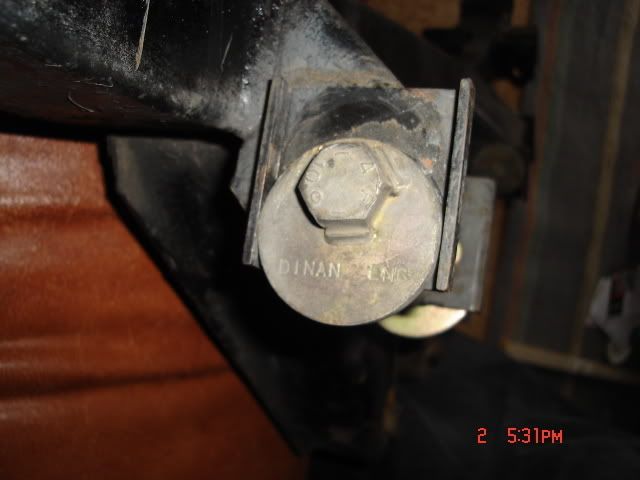
This is a better option, weld plates onto the subframe and use eccentric bolts to adjust them. This is jjgbmw323i's (Joe) Dinan/Korman rear subframe and is a much better setup since the adjustment won't move once tightened down. Ireland Engineering sells kits for the 2002 and e30, they may sell one for the e21 but I haven't looked into it yet. I plan on going this route in the future.
For more info, here's a great writeup on e30 subframe modifications:
E30 subframe
Cutting Springs
Last edited by jrcook320; 12-11-2008 at 06:18 PM.
Member
Remove Your A/C
Lets face it, it will cost more than the car is worth to fix it. It wieghs ~50 lbs. Get rid of it.
Electric Cooling Fan
Remove the belt driven fan and install a 14" or 16" electric fan. You will feel in on the butt dyno. Wire it in on the stock electric cooling fan circuit. If you've removed your A/C you can wire in a switch to take the place of the A/C control switch which pulls 12 volts off the heater circuit. Run a wire from that circuit to the plug behind the driver's side bright light. When your switch is closed it will trigger the fan relay. You will also need to run a diode inline (the stock A/C circuit had one that probably got removed when you pulled it) on that circuit to prevent current from your radiator temp switch back feeding into the heater circuit and blowing your heater fuse.
Cold Air Intake/Trunk Mounted Battery
Cold air Intakes can be bought from TEP or MattE21. To properly install a cold air intake you have to move the battery to the trunk. You can pull a battery cable from an e30 or you can buy a 2 gage battery relocation kit from Summit Racing for fairly cheap and buy a standard battery hold down kit at any autoparts store.
Battery in Trunk DIY - by Madhatter
Ignition
Cap and rotor from 77-79 model
Wire set 110-8025 from Jegs: $66.99
Bosch Red Coil: $37 from Ireland Engineering
AR52 spark plugs: $12 from Jegs.
The '77-79 cap is socket style which allows for more wire options, like American V8's. The rotor has a smaller nose so it has less spark scatter at high rpms. The Bosch red coil allows you to run a higher gap, up to .050".
Advanced Timing
Advance your timing a few degrees. Either time the motor on the "Z" on the flywheel rather than the ball if you're using a timing light, or advance a degree or two and test it on the butt dyno. Advance the timing till you don't notice any difference. If you get ping, run higher grade fuel or back the timing back off.
EDIS Conversion
If you're serious about ignition there is a lot of power to be had with a fully programmable ignition using off the shelf Ford parts and a Megajolt controller:
EDIS Conversion Thread
Header & Exhaust
Buy a used header off of ebay or new from TEP. Their header is decent and only costs $150. Also have a custom 2.25" exhaust made up at your local exhaust shop. Mandrel bent exhaust is even better, use mandrel bents from JC Whitney or Summitracing and have it welded up or weld your own. 2.25" is ideal for a stock motor with bolt ons, 2.5" is a little large unless you're turbo'd or have a hot NA motor.
If you want a complete, top notch bolt on exhaust that is dyno proven, buy Old Man's system here:
http://www.factoryworks.com/320iexhaust.htm
Camshaft
The stock cam is around 264 degrees. Upgrading to a 278 or 280 will give you more top end, provided you have the intake and exhaust for the motor to breath there. The largest cam that you can run with CIS is a 292. TEP sells regrinds and new cams for a reasonable price, or you can pony up some serious cash and buy a Schrick cam from Bavauto.
Larger 80mm Air Flow Meter
The stock 1.8L air flow meter has a 60mm sensor plate. This can become a restriction in the intake, especially on a motor with higher compression, free flow exhaust, CAI, and a cam. A simple remedy is to swap the upper half of the air flow meter with an 80mm unit from a ‘77-79 320i. This will gain you a few ponys on the top end and a definite boost on the butt dyno. Afterward you will have to re-adjust your mixture setting. Here's a few pics of the 2 side by side for comparison:
AFM upgrade
AFM upgrade/rebuild
65mm E12 throttle body
For my turbo system I installed a 65mm throttle body off of an e12. Here's pics of the install.
E12 Throttle Body
Custom Throttle Cable
Lightened Flywheel
You can install a lightened flywheel for $150 from TEP. Weight will be reduced from about 20 lbs to about 13 lbs. Your motor will rev quicker and you'll make a little more power due to the reduced rotating mass of the enging.
Heavy Duty Engine Brace
E21parts.net sells an engine brace that is a very nice piece. I copied Fred's idea and found a cheap alternative at my local autoparts store:
Engine Brace DIY
Volvo Brake Upgrade
Stock calipers are very expensive. If you want to upgrade to vented rotors, the 323i (which are the same parts as the '77 320i) calipers and rotors just bolt on. The problem is that new OEM calipers for vented rotors are very expensive at about $400 each. You could buy a custom Wilwood setup from Massive Lee for that price.
A cheap upgrade that allows you to run stock vented 323i rotors is the volvo brake upgrade. Rebuilt calipers cost about $60-$70 each, are 4 piston over the stock 2 piston, and have about 30% larger pad surface area which provides more stopping power with less clamping force. If you track your car, you will probably want something that will allow for larger rotors, but for the street and occasional autox, these are much better than the stock non vented setup.
Volvo Brake Upgrade
Rear disc brakes
The easiest way to install disk brakes on the e21 is to swap E21 323I rear trailing arms. The trailing arms are different than the 4 cyl trailing arms with brackets for caliper mounting. The bearings and stub axles are also 323I specific and are not interchangeable. However the rotors are the same as used on the E30.
DIY/caliper rebuild to come.
Pushbutton Start
This one's not all that common but I like it. My ignition switch broke and left me stranded at a friends house 2 hours from home. I pulled it twice trying to fix it to no avail, so we went to autozone and bought wire and switches to hot wire the car.
Pushbutton Start
Euro Turn Signal Dual Filament Mod
http://forums.bimmerforums.com/forum...d.php?t=487916
5 spd Tranny Swap
For those unfortunate souls burdened with an automatic, here's a great DIY to swap in a manual:
5 Speed Swap
M20 Swap
Here's a nice writeup from Todor on his m20 swap.
320i m20 swap
Last edited by jrcook320; 12-11-2008 at 03:02 AM.
Member
There are no readily available turbo kits for the m10 on the market, but there are companies that will develop custom kits for your application. One company that comes to mind is Top End Performance. There were also several companies that developed kits back in the ‘80’s, and these do turn up on forums and ebay from time to time, among the most common are BAE/Century and Calloway. If you’re determined to turbo your car but are on a budget you’ll have to design and build it yourself. Start by reading Maximum Boost by Corky Bell.
The most important things you'll need are a turbo manifold, a properly sized turbo, and a way to manage fuel and timing. TEP and Pro Turbo both currently sell new tubular manifolds for the m10. Other than that you either have to weld up your own or scrounge ebay for used stuff. I was able to find a rough casting of an old Dinan manifold on ebay for $100.
It is possible to turbo with CIS and there are a couple members on this forum that have successfully done so. However, the STOCK CIS is only good for about 180 to maaaybe 200 hp if it's in tip top shape, and you will still need to upgrade a few components at a minimum to make your system safe.
1) No matter what, spend the $250-$300 on a wide band O2 meter. Without this you have no idea what your fuel system is doing and you'll burn something up. This is as important as the turbo itself.
2) You need a way to enrich the mixture under boost. The stock frequency valve is not adequate to do this, nor is the mixture adjusting screw. The correct way to do this on CIS is to install a boost sensing WUR from a volvo 240 turbo or audi 5000s. Forget any garbage about boost switches firing a cold start injector.
3) You will need a way to retard timing under boost. The easiest & cheapest way to do this is to install a boost retard/vacuum advance canister on your ignition distributor to pull timing under boost.
If you start with those three things, you'll be able to safely fuel up to 190-200 hp (maybe, I've seen no hard data on the stock fuel system, that's only what I've read). However, be advised that as far as k-jet goes, the stock fuel system is far from ideal. The fuel curve of the AFM bowl is not designed for a turbo 4 cylinder, and the fuel distributor will become a bottle neck in fuel flow.
A good option is to swap in a fuel distributor and AFM from a volvo 240 turbo as this system will mount in the stock FD/AFM location (on both the 1.8L and the 2.0L). You'll be able to fuel up to 220 hp, the AFM is 80mm (rather than the 60mm the 1.8L uses), the fuel curve is much better matched to a turbo application, and the FD will flow more fuel.
You should be able to get more than 220hp out of that system by installing a fuel pump from a porsche 911 turbo (bosch "984" motorsport pump), removing the injector port filters, and shimming fuel pressure up to 85-90 psi. One good thing is that your stock injectors will pretty much flow as much as you can throw at them, provided you don't crank your system pressure too high.
If you're not opposed to custom fuel supply & return lines and making mount brackets for your AFM, then the best fuel distributor/AFM combo for a 4 cylinder turbo is from a porsche 924 turbo (931). At 76mm, the AFM is slightly smaller than the Volvo and the fuel distributor is a smaller 4 cylinder casting (compared to the 6 cylinder casting of the volvo). But, the AFM is downdraft and has much better flow characteristics, and the FD can flow more fuel.
My fuel system currently consists of the following components:
924 turbo (931) FD with port filters removed and system pressure at 85 psi
931 AFM
911 turbo (930) bosch motorsport fuel pump
Volvo 240 turbo WUR
Mercedes Benz 6.9L brass injectors
VW mk1 injector lines
With this combo I'm now approaching 250hp which is currently the highest hp level I've seen on a 4 cyl turbo running straight k-jet with a single 4 cylinder FD/AFM and no auxillary injectors. This includes all of the guys on 924.org where I sourced my FD/AFM. I have also seen guys run v8 FD/AFM's with 2 injectors per cylinder, but the cost to do so is higher as teh parts are harder to find.
Basic Fuel/Timing Components Needed
Wide Band O2 meter
Volvo 240 turbo or Audi 5000s WUR – enriches mixture under boost
Volvo 240 turbo ignition canister – retards timing under boost
Upgrade CIS Components
Volvo 240 turbo FD & AFM
Or
Porsche 924 turbo (931) FD & AFM (downdraft)
MSD BTM – to retard timing under boost
Basic Turbo Parts List
Turbo header or manifold
Turbo
Turbo oil supply/return lines
Turbo coolant lines
Down pipe/ exhaust
Charge pipes
Intercooler
Blow off /bypass valve (1g DSM valves work well)
Larger throttle body
boost controller
Boost gage
Heavy duty clutch
For more turbo build info:
My turbo thread 1
My turbo Thread 2
My turbo thread 3
CIS update
My web page
DJ's turbo build thread <--He's smart and kept it all in one thread.
Last edited by jrcook320; 11-03-2008 at 11:57 PM.
Member
http://e21.tricord.be/forum/view.php...hub+conversion
There are a couple pics missing in the write up these are the pics they are from www.superbmw.com
So I finally tracked down all the part numbers to convert the front end to E12 five lug hubs, here they are. All part numbers are from http://www.realoem.com
Front struts from 77-79 E21
LEFT FRONT SPRING STRUT Qty. 1 Part no. 31311114614
FRONT RIGHT SPRING STRUT Qty. 1 Part no. 31311114615
Hubs from E12/528i
WHEEL HUB Qty. 2 Part no. 31211123434
Bearings inner/outer E21/E12
TAPERED ROLLER BEARING Qty. 2 Part no. 31212634103
TAPERED ROLLER BEARING Qty. 2 Part no. 31212634106
Last edited by bastianblessing; 10-07-2007 at 11:15 PM.
Member
Ignition Upgrade from Distributor/Points to Electronic
The most common upgrade, that gives you drivability and reliability will be switching from a distributor or points system to an electronic system. CraneCams makes a perfect kit to do this with the Fireball XR700. This kit makes the upgrade easy, and very accurate as compared from a distributor type system.
LINKY: http://www.cranecams.com/?show=brows...umber=700-0231
http://www.bimmerparts.com/item.wws?...immerparts.com
Adjusting your Valves/Clearance
The OEM Spec for your valve eccentrics should be .006 to .008, for higher mileage engines use .006. Craftsman makes a good carbide feeler gauge that starts at .002 and moves up to .006 so you can feel how tight it is getting.
PN For Eccentric: 11 33 1 744 354
PN For Bolts: 11 33 1 744 355
PN For Washer: 11 33 1 258 327
PN For Hex Nut: 11 33 1 744 333
More to come soon.
Last edited by rocket859; 10-25-2007 at 11:18 AM.
Member
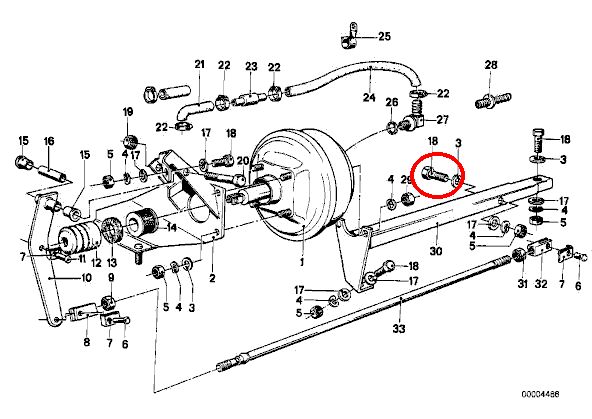
This is one for those with RHD cars. When I bought my car the brakes would stick on, especially the warmer it was. I found that the PO had tightened bolt 18 too tight so the lever that lies between the channel would bind. Back this bolt (circled in red) off 1/8 - 1/4 turn and it will take care of the problem. It lies just beneath the coolant catch tank on the right side.
Member
Member
California Smog Info for engine Conversions
OCTOBER 2004A Referee Center is a state-contracted vehicle emissions test facility that provides certain Smog Check
services for motorists. A Referee Center is authorized to offer specialized inspection services that are beyond
the scope of California's licensed Smog Check stations. Referee Centers are located primarily at California
Community Colleges throughout the state.
Referee Centers also provide training and work experience opportunities. The Bureau of Automotive Repair
(BAR) trains referees and provides technical direction and equipment. Referees also train students for careers
in the automotive industry.
Referee Centers:
Note: Prior to applying for a Repair Cost Waiver, consumers should apply for the Smog Check
- Inspect Vehicles with Engine Changes, Gray Market Vehicles, and Specially Constructed
Vehicles Engine Changes.Vehicles whose original engines have been replaced with an engine not originallyGray Market Vehicles.
offered for that vehicle’s year, make, or model.Vehicles imported into the United States that do not meet U. S. EPA standards.Specially Constructed Vehicles.Vehicles, such as dune buggies or kit cars, that are deemed “speciallyOnce these vehicles are inspected and certified by a Referee Center, a BAR label will be affixed to the
constructed” by the DMV.
vehicle. Any licensed Smog Check station may perform subsequent inspections as long as the BAR label
remains in place and the vehicle’s emissions equipment remains the same.- Certify Vehicles with Limited Parts Exemptions Motorists whose vehicles fail a Smog Check because of missing or modified emission-related parts, must
replace those parts. The BAR’s Emissions Parts Locator service helps motorists locate difficult to find
emissions parts or if the parts cannot be found, a Limited Parts Exemption is issued. When a Limited
Parts Exemption is issued, the motorist must take his or her vehicle to a Referee Center for inspection. If
it passes all other aspects of the Smog Check inspection, the vehicle will be certified. If the parts are
available in time for the next required smog inspection, they must be installed before the vehicle can be
certified. BAR’s Emissions Parts Locator service can be reached at (800) 826-3566.- Issue Smog Check Repair Cost Waivers Repair Cost Waivers are available to everyone who has a vehicle that fails a biennial inspection and
who's emission system has not been tampered with. It allows a vehicle to be registered without passing its
Smog Check inspection by providing a temporary (two year) extension of time to complete all emissions-related
repairs. To qualify, at least $450 in emissions-related repairs must be made to the vehicle at a licensed Smog
Check station. The waiver may only be used once by a motorist during their ownership of the vehicle.
Consumer Assistance Program. Click here to learn more about CAP, which provides up to $500 in Smog
Check repair assistance to eligible motorists.
To Make a Referee Appointment
Call (800) 622-7733 to schedule an appointment with a Referee Center. The Referee will charge a fee for the
Smog Check inspections and services performed.
Referee Centers also offer:
- Training and Work Experience Opportunities
Referees also provide training opportunities. Training includes career path information in the automotive
industry with emphasis on obtaining a smog technician license.- Student Lane Technician Program
Referee Centers offer paid, on-the-job, smog technician training to qualified students. For more information
on this program, call the Foundation for California Community Colleges' Operations Manager at
(916) 491-4464.
First you wanted to kill me, now you want to kiss me...BLOW!
Member
Hazard Light Switch Repair Link:
http://www.bmwe21.net/hazard.htm
Speed Racer
removing needles from gauges by 82eye
http://forums.bimmerforums.com/forum....php?t=1021264
Member
As some may read couple days ago I went to the BMW shop to have transmission seals replaced. Getrag 245 transmission. They replaced the output shaft seal #11 p/n 23121205340, gasket #10 p/n 23121222355 and shifter rod seal ( not shown in the photo, p/n 23121282394). After all that - no 5th gear and very hard shifting to 3rd and 4th. Shifter doesn't go in the gate for the 5th. After some research and work it was fixed. Actually 2 problems were present.
First overtorquing the output shaft nut will result in harder shifting, retightening fixed that. It should be 72 lb/ft. Very important!!! Thanks Jeff!
Loss of 5th gear happened because after replacement of the gasket #10 p/n 23121222355 the tech reinstalled 5 bolts ( #14) holding
#12 BACKUP RING p/n 23111203721 in wrong order. 4 bolts are m6x20 and one bolt is m6x18. p/n's are 07119913472 for shorter M6x18 and 07119913477 for longer 4 M6x20 bolts. Shorter bolt HAS TO BE INSTALLED AT 1'O clock position, it was installed at 7'o clock position. Which resulted in M6x20 bolt at 1'o clock position which was too long to let shifter rod ( inside the transmission) reach the 5th gear. Switched bolts- everything is like new!
Hope it will help someone on the future. Make sure to put the bolts in proper order!
Max
Last edited by VacMan; 07-17-2008 at 03:39 PM.
Member
e21: 1981 2.5L sleeper
e21: 1982 323i Baur TC 1 # 4210
e21: 1980 323i project or parts car, can't decide
e21: track car project
e46: 325XiT

click here for the latest updates
Member
here are a few pics to go along with this... I've been meaning to recreate this ever since Fred's site went out of commission... Sorry for the crappy pics, my goo camera just died...
Pop the center grill in the dash out, a smaller flat head screw driver seems to help, then push the hazard switch out from the back side.
Use a pocket knife and a srew driver to gently seperate the two halves.
seperate slowly & the inner spring will stay near by.
You can see here where the pin on the little metal arm slides in the groove on the opposite half.
This is the pin/arm closer up:
Use a pair of needle nose pliars and bend the arm in a tiny bit so that the pin/arm stay engaged with the corresponding groove.
Then reassemble the pieces and test. No more Bic pen caps stuck in there to keep it turned off...
e21: 1981 2.5L sleeper
e21: 1982 323i Baur TC 1 # 4210
e21: 1980 323i project or parts car, can't decide
e21: track car project
e46: 325XiT
Member
After a while, performing the rebuild per above via rebending of the arm outwards further will eventually lead to metal fatigue and/or plastic deformation and eventually render the switch locking mode DOA or functioning on a limited timeline basis.
Fear not, as this switch has 8 more lives.
You can take the spring out (shown at the bottom of pic) entirely :
and now, this switch is now no longer able to retract outwards. Then thread a small dia wood screw into the face of the red lens, centered to the white triangle logo, so you can manually pull the switch mechanism outwards to invoke the hazard light function. To cancel function, push lens all the way inward. Through friction, the switch will/should remain in closed position until the owner, or inspection tech, invokes the switch.
I've done this mod back in ''06, and to date, it has demonstrated to me that this works even better than the arm rebend mod. With the arm rebend mod. over a period of time, the pressure of the spring will eventually win over the locking angle of that pin and the hazard will come back to life on its own. Most, if not all of the time, I will not know this until I go to crank the car, and find out that the battery's dead. Then upon recharging, I find the lights are on hazard mode.
Member
the frequently asked questions are good..
Member
Why was this unstickied?
Retired BW Fueler
because there was a bigger/better FAQ made. there's a link to this thread in it, actually.
Jake
Member
Oops, I guess that's what happens when you miss the meetings!
 Posting Permissions


 Reply With Quote


Bookmarks