
 Member
I know there are other threads on this, but the supply list wasn't that great. If you've made one before could you list absolutely everything needed to make it. Thanks.
Member
***********Originally Posted by IRPancake

I am in the process of building a home made tool. I still need to obtain more parts. I did purchased the 3" diameter pipe and black malleable cap from this site:
plumbingfittingsdirect.com/black1.html
Hope this helps..
Member
Thanks. I was under the impression most things could be obtained from home depot or other similar stores. What other parts are there needed besides those? washers, nuts, etc?
Member
Please note. This is a Shadetree tool. It can fail and hurt you!!!! Pay attention to what you are doing and it will work very well. If you are not experienced with bushings, or less mechanically inclined, use the commercial version.
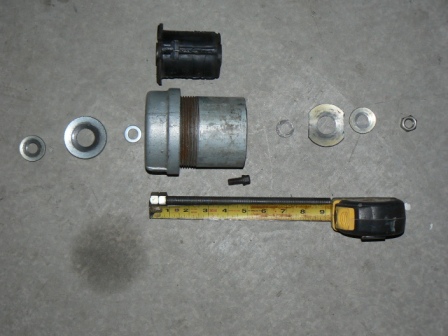
3 pipe, capped, totaling 5 to 6 inches in length from inside of cap to edge of pipe
All hardware is grade 8 or better.
Two 7/8 washers. One trimmed to pass by the dimples in the subframe bushing collar
Two ½ washers to distribute load onto the other washers.
Two 12mm washers. The 12mm washer will fit inside the 7/8 washer and keep it centered on the rod. If you can find large washers with ½ holes then you can eliminate the ½ and 12mm washers.
About 10 of hardened ½althread. 9/16 actually fits the bushing hole better and is stronger but tends to bind during the pull. ½ rod works better overall.
3 nuts. Lock two together at one end of the rod. Use the other to pull the bushing as you turn the rod with the two lock nuts.
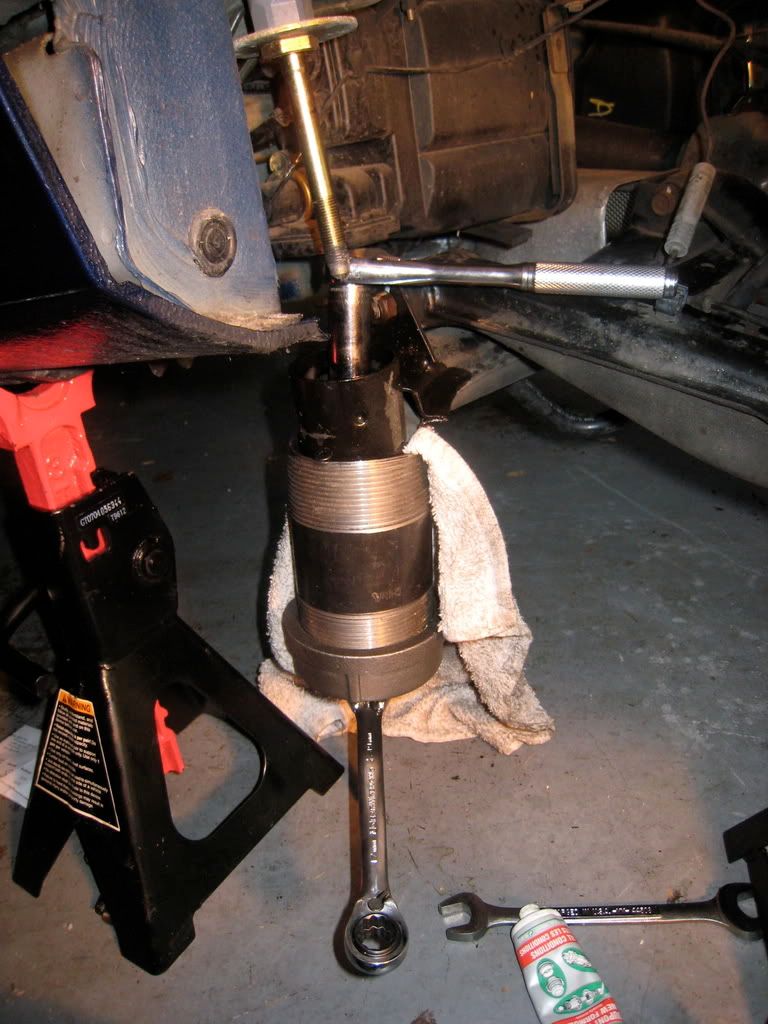
There is a small header bolt in the picture. When you place pressure on the tool, it will tip relative to the collar. I wedge the bolt between the lip of the 3pipe and the collar. This eliminates bind and promotes a smooth pull.
The rod usually comes in 3ft length which is good as you should have a few extra nuts and rod available in case the load over powers the treads. Keep the rod lubed, and work at a moderate pace. Rest from time to time and the bushing will pull with no problems. About 10 to 15 minutes a side. Trying to pull too fast just over stresses the tool. Use a long ratcheting braker bar. The tool in the picture has more than 10 cars on it. Ive replaced the rod 3 or 4 times and use a new nut for every pull.
Click for high res
Dan "PbFut" Rose
Member
Dan,
Thanks very much for the materials list and the information.
Any special tips on aligning the tool or making sure the pull is straight? The specialized tool seems to be made to fit the recesses in the bushing flange and I wondered if those recesses were critical.
Thanks again
Bob S.
Davis, CA
"Age and treachery can beat youth and talent!"
Bob S
Davis, CA
Member
Nothing particularly critical. Drill the hole in the cap a bit oversize so the rod can wiggle some. Be close to center. The lip of the pipe rests against the cross bar of the subframe when pressure is applied. Since there is nothing to push against on the opposite side of the collar, the 3"pipe will tip when pressure is applied. That's why I just wedge something between the collar and the lip of the pipe opposite the cross bar to keep the tool from tipping. This thing is crude at best so you will be needing to pay attention to how it's acting and adjust if needed. The old saying, you get what you pay for applies in spades with this one.
Dan "PbFut" Rose
Member
Awesome, thanks for the list!
Member
Got it. I understand perfectly.
Do you see any advantage to adding a thrust bearing to the rotating nut(s)?
Here's an example from McMaster Carr.
Here's the home page http://www.mcmaster.com/
search for item number 60715K11
Bob S.
Bob S
Davis, CA
Member
I'm working on a different design that uses a small hydraulic bottle jack. The jack sits in a cradle suspended by four cables from the bolt through the center of the bushing. The jack works against a U-shaped bridge that goes through the notches of the bushing flange, pressing against the subframe.
My goal is a design that is small and light. With the jack removed it should be easy to store and inexpensive to ship.
Using a bottle jack instead of a screw has a bunch of advantages. Small 1.5 or 2 ton bottle jacks are very inexpensive ($10), widely available and about the same size worldwide. They don't wear out, which gets rid of the risk of needing a fresh rod or nut part way through the job. They are much more efficient at transferring force than screw threads, which means less physical effort and better feedback over how quickly the bushing is sliding. And it won't impart a twisting force during the pull, so the spacer can be a simple bridge rather than a heavy 3" pipe.
The downside is needing a sling and bridge to change the pushing force to a pulling force. I'm trying to figure out a connection to the bolt head that's cheap, easy to find and doesn't require fabrication. Ideally it will allow using rope instead of wire cable, and allow the sling/cradle to be just looped over after the bolt and cap are in place.
The bridge is another issue. I'm not certain how strong (and thus heavy) it needs to be. If it flexes and moves out of column, everything falls apart.
Member
The bushing can't be pushed from the bottom? The bottle jack idea doesn't sound that bad.
Member
BMW CCA Member
That's a great idea. I'd like to see pics when it's worked out!
Member
You should consider using a Greenlee K/O cylinder. Remote cylinder/pump, but the bolt contracts under hydraulic pressure, instead of extending.
Would be perfect for this application.
Although, I'm thinking that if you're going through that much trouble, you must plan on using it more than 1/2 times
Talk About Glovebox Sag!
Good idea randy butt I think the greenly knock out tool is more than the subframe tool.
SKIKEMCOUPE
Member
So?
Some people will spend any amount of money to make a task simpler or faster w/less required effort. This would fall into the faster less effort category.
Talk About Glovebox Sag!
Ahhhh great idea Forbs I dident see where u were going at first but if its simpler and faster u are after this could b your "Golden ticket". I used them all the time when I was a Industrial Electrison.
SKIKEMCOUPE
Member
Randy speaks from experience. I've worked on cars all my whole life and made my share of "one off" tools in my day. They either suck and you end up just wasting a lot of time, or they work great but you end up just spending a whole lot of time making the tool you'll only use once. I've done 2 Z3 subframes now and both times I've dropped the entire subframe down and used my press. Not saying this is the best way but I have a 20 ton press and a lift so it was the easiest/most logical for me.
2000 M Coupe
[Always in progress !!!]
I Am My Own
http://www.harborfreight.com/cpi/cta...emnumber=96718
For $80.00 it is a steal. This is the way I am going.
Member
Stroke will not be long enough and you will still need a way to secure the ram.
Dan "PbFut" Rose
Member
Nicely done Dan.... thank you!!!!
Patrick
PA
__________________________________________________ ________
Racing... because golf, football, and baseball only require one ball.
I Am My Own
Now, now, don't be so negative about it! LOL.
The ram is threaded internally and I will be using the home made method of bushing tool. The threaded rod will screw into this and from the bottom where you would use the wrench to turn the nut the ram will be used.
Stroke is short, I know, so when it reaches the end I just release the ram and from the top of the bushing tighten the nut and contiune to do so until the bushing is removed.
Regards
Alx
Member
The tool is threaded for a 3/4" stud, so you'll need an adapter.
Harbor Freight also has a pitman arm puller that looks like a possibility for a bridge in place of the 3" pipe. It's cast of ductile iron and is pretty hefty. The only problem is that it's 30mm wide and would have to be ground down to the 19mm or 20mm to fit in the notches on the bushing. Grinding that much away could take a long time, but it's more feasible for most people to make than something that requires welding.
 Member
I pulled my bushings yesterday with a homemade tool. I had a tough time finding the hardened allthread. Threaded rod comes in various grades. Home Depot and Lowe's carry Grade 2 rods which are too soft. The strongest is Grade B7 but only construction suppliers carry it in stock. A few online places like www.allohiorod.com carry it but you need a $25 minimum purchase. (one three foot length is $5). I ended up using a zinc-plated steel rod which lasted one pull but is cheap and easier to find. I would use a larger washer at the top. On my first pull, a one inch washer just sheared out the center metal cylinder of the bushing. I had to repeat the pull using two 2" washers which did the trick. (they will clear the dimples in the bushing collar and you need two because one will just bend inside the bushing from the pulling force) The second bushing came out on the first try with the larger washers.
Member
I ended up renting the tools
Member
Hey KBH22102-
Thanks for sharing your experience. I have gather most of the home made tool pieces...even a grade 8 allthread for $10. I have been trying to read up how to take apart the rear end to remove the bushing. Just wonder if you have a detail step-by-step process on how to remove the parts to get to the bushing? Did you need to remove the mufflers, rear differ, brake lines, hand brake cable...etc? Thanks and looking forward for your feedback!
Member
Check this thread from yesterday. Car 54 lists a good writeup about halfway down
http://forums.bimmerforums.com/forum...d.php?t=963604
 Posting Permissions


 Reply With Quote


Bookmarks