
 Member
I took the best information from all the threads and began tackling the fan clutch removal and installation of an electric fan in my 530.
I would like to thank particularly forum members 16Valex for his write up & johnstern .
JimLev's endless contributions and the way he mounted his electric fan lead to the discovery of the Fat Daddio, the key to a super easy electric fan install!
So here are the key components needed for this DIY
Fat Daddio Aluminum Cake Pan 18" x 2 " $23.99 from Amazon. This shroud opening is exactly 18 inches, this pan fits the shroud absolutely perfectly!
http://www.amazon.com/gp/product/B00...?ie=UTF8&psc=1
Summit Racing Fan PN SUM-G4904 $86.97- I followed 16Valex's recommendation on this because it's a curved fan which lowers the noise level.
http://www.summitracing.com/parts/sum-g4904
Derale 16749 Fan Control 16749 $46.97- Kudo again to 16Valex. This controller is ideal for its adjustable temperature setting.
http://www.summitracing.com/parts/der-16749
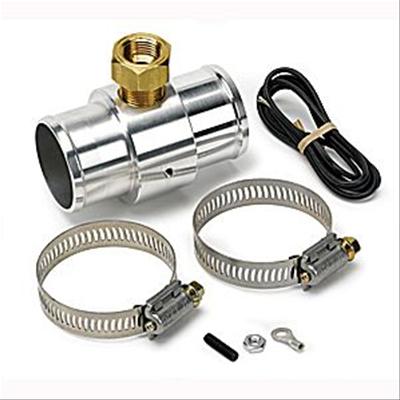
Autometer 2283 Radiator Hose Adapter $46.97 - This is the adapter of choice as everyone seems to use it. It offers the ability to maintain the factory lower hose which is ideal. Seems a bit cheaply made to me but it should serve the purpose find.
http://www.summitracing.com/parts/atm-2283
BMW Fan Shroud- I already have a new one in my car but decided to buy another to play with. It's not necessary but depending how old yours is and how fragile it is, you may want to replace it for $50
http://www.eeuroparts.com/Parts/2975...d-17101438457/
Here's 16 Valex's photos of where to cut the lower radiator hose to install the ATM-2283. Make sure you use teflon tape on threads or a loctite product specific to this application. I used Loctite 565
After receiving the Fat Daddio cake pan, I checked for fitment, absolutely perfect. This pan is solid as well, nice and thick and lightweight!
Next I traced a circle just larger than the pan. It should be 15 3/8 round if you desire to draw a perfect circle.
Next either cut the lip off the pan first or the center. I used a jig saw for both. Cut slowly with a fine tooth metal blade It's a bit awkward to cut the lip off and hold the pan at the same time so be careful
If I were to do it over again, I'd cut the lip first and the center second. Here's a pic of the center cut out. Remove the lip off the pan next
Next, I cut just the plastic top vent holes from the shroud just because I wanted a cleaner look with the aluminum being consistent all around. It's not really necessary
Test fit into shroud looks perfect, stainless steel 1/4 20 hardware and loctite used on the nuts.
You will need to grind off a bit of the plastic off the fan in order for it fit in the pan. Here is a photo showing a test fit before I cut the lip of the Fat Daddio
I used this connector from NAPA for a quick disconnect in case I ever needed to remove the shroud
Here's the finished product. Make sure your fan blade orientation looks like the picture below, if not take off clip and turn the blade over. Black wire is negative, blue wire is power. Remember, the air blows towards the engine
Make sure you don't mount the fan too far back. You don't want it resting against the radiator. Check side view for clearance
If you want another 1/4 inch of added clearance, remove the fan blade, then remove the three torx screws. As you can see, there are three spare hole.Rotate the fan
and reinstall screws into the other three holes. Pic below courtesy of 16Valex
You can simply follow the Derale's instructions to wire this into the car. Thanks to 16Valex for the electrical hookup suggestions:
http://www.bimmerfest.com/forums/sho...36&postcount=7
For 12V constant, I will likely go straight to the positive post on top of the engine for safety
You will need to unlock the ODB in your BMW to set the temp. I plan to follow 16Valex's advice and set it to come on at 95C.
I used this video and you are accessing feature number 7. If you can't access #7, access #19 first first. Watch both video's it's self explanatory
https://www.youtube.com/watch?v=UlIi89xN_IE
If your instrument cluster has two reset buttons, the procedure is similar
https://www.youtube.com/watch?v=cO_tBe58ew8
If you'd like more features, read on.....
If you'd like to have the fan run at approximately 20% at all times you will need the following items. Otherwise the fan will only kick on when it hits the specified temp you dictate
www.digikey.com
Thanks johnstern for the PN's * below
1 relay 255-1828-ND *
2 resistors 10ohm 50watt KAL50FB10R0-ND * these resistors will get hot and need to be heatsinked to metal.
1 thermal grease part for underneath above resitors 345-1006-ND *
1 1Amp switch of your choice
Using JimLev's schematic below, you can tie in all the above parts with the Derale controller. Note Jim's schematic shows one resistor but there are two tied in parallel. See john stern's photo below.
The switch in the schematic will let you bypass this feature in winter months etc.The setup below was my first attempt at mounting parts, not acceptable. Disregard the second switch in the photo that is for the next feature....
JimLev also came up with the idea to let the fan fun for an additional 2 minutes after killing the ignition to allow engine/plastic parts to cool. I loved this idea as it should
help prolong the life of all the plastic parts under our hoods!
An electrical engineer friend of mine discovered a perfect Time delay relay and came up with the ciruitry to tie it into JimLev's above schematic. Here it is:
1 Time delay Relay TDR-PMF
http://www.wolstentech.com/products/...delayrelay.php
2 Diodes 2 1N5400-ND Digikey
1 1 Amp Switch
Here's the schematic:
That's all for now. It takes a week to get the Wolsten Relay and I am waiting for a nice anodized box to mount all the electronics. I may install everything but the added electronics this weekend if I have some time.
Last edited by fmzip; 11-08-2015 at 10:57 AM.
Swap Addict
BMW CCA Member
Nice! Are you going to paint the aluminum cake pan shroud? I would think if it was flat black with black hardware, it would look close to factory.
-Paul
2003 "M5" - Full M5 conversion, AMG C63S 6 piston front calipers, Porsche Panamera 4 piston rear calipers, GC Coilovers, Eibach ARBs, UUC Evo3/DSSR, Borla Exhaust w/Muffler Delete, BMW NBT with Carplay/Android Auto, Bi-Xenons, e38 Style 37 M-Pars, e60 Hubs 530i 6-speed swap build thread2005 Range Rover 4.6is (M62TU Powered) - 4.6is Engine Swap from X5, BMW NBT with Carplay/Android Auto
2006 Porsche Cayman S - Soul Performance Competition Headers and Exhaust, H&R Coilovers, 718 Boxster Spyder wheels, Rennline 35mm rear spacers
Almost There
Moderator
That mount is genious. New standard may have set here. Nice work.
A cake pan... awesome
Member
Awesome thread! Leave it to Jim to come up with an ingenious way to do things.
Member
Very nice and professional look. The reason I was successful in my conversions is because of JimLev and many others here to contribute.
2010 BMW M6 SMG Coupe * Black Saphire Metallic * Full Leather Merino Black
2019 BMW X3 M40i * Alpine White * Mocha Leather
Former:
1997 BMW 532M (528i with 3.2 S52 engine from E36 M3 / 5 speed manual)
1998 BMW 540i 6 Speed
2003 BMW M5
 Echo Three Niner
Very clean job with that cake pan!
2003 DINAN 5 | M54B30 | Titanium Gray Metallic | Stage 3 Engine Software | High Flow Throttle Body | Cold Air Intake | Free Flow Exhaust | Performance Automatic Transmission Software | Front Strut Brace | OE 18x9 BBS RS745 Style 42 on 265/35-18 MY BUILD THREAD: [Click]
Member
It was a piece of cake.... Lol
Member
No, I like the aluminum contrast. Spray paint never cuts it for me.Originally Posted by blackknight530i

Member
wow, that is simply ingenious... MASTA-BAKER!! lol, This will also be on my list to do!
Member
So legit. I've been doing all your mods. lol. This is next on the list!
Member
Regarding the radiator hose adapter:
Does anyone know if it will also work for the V8 cooling hoses? I believe they are the same size as the I6, correct?
Do you know what is the size thread opening of the female brass adapter on top of the radiator hose adapter?
Any details on how you placed that wire in there? What is that black stuff?
Thank.
Member
This guy used the 2283 on his 540 and 528. I almost went with the Spal fan he mentioned but the current draw concerns me:
http://forums.bimmerforums.com/forum...on-97-BMW-528i
The thread size is 3/8. The black wires are attached to the one piece brass sensor from the Derale 16749 kit. This sensor is then threaded into the Autometer 2283 aluminum piece. The 3/8 brass piece as pictured below that comes the 2283 is not used.
- - - Updated - - -
It's my duty to keep you young-guns busy modding
- - - Updated - - -
LOL....masta-baker!
Just call me Chef-zip
- - - Updated - - -
Thank you for the kind words.
I was pretty stoked with it myself. I couldn't have found a more perfect aluminum piece to work with.
Last edited by fmzip; 07-11-2014 at 01:02 AM.
i<3urgirlM5
That cake pan looks quite sharp. I have a 14" fan from my s4, I may try to adapt it
Current
2008 E70 4.8 BSM/Black - 100% Options2007 335i SG/Coral Red - 6MT - Ets, Spec, BMS, VRSF, Broadway Static
2004 325i AW/Black
Past
2000 M5 Silverstone/Silverstone - ST Coilovers
1998 E36 M3 - Tiag, Bride Gias, RK Tunes, M50, AA Track Pipe..
Member
Looking good!
ლ/(ó、ò)\ლ Oops!
Gonna start to buy these parts soon. Even if they don't go on my current car I can hold on to them.
2003 540iA///MSportMods:
///M5 Automatic Folding Mirrors,
///M5 Rear view Mirror(Thanks to LaLaRay),
///M-Tech 1 Dual stage steering wheel (Thanks to tmvE39E53Z32TT),
Old Style "Wolf Whistle" Alarm Siren,
E38 18-Way Contour Seats (Thanks to GSXRliterbikz),
E53 x5 4.6 Sport Cluster (Thanks to GSXRliterbikz),
E38 center armrest with iPhone 4 craddle (Thanks to GSXRliterbikz),
Slotted & Drilled Rotors with Stainless Steel Brake Lines,
19" M Parallel wheels (Thanks to DennisCooper),
Brushed Titanium Trim Vynil Wrap
Member
bookmarked
Member
Better get your fat daddio before there's a shortage in supply!
ლ/(ó、ò)\ლ Oops!
^Ha! No Kidding!
2003 540iA///MSportMods:
///M5 Automatic Folding Mirrors,
///M5 Rear view Mirror(Thanks to LaLaRay),
///M-Tech 1 Dual stage steering wheel (Thanks to tmvE39E53Z32TT),
Old Style "Wolf Whistle" Alarm Siren,
E38 18-Way Contour Seats (Thanks to GSXRliterbikz),
E53 x5 4.6 Sport Cluster (Thanks to GSXRliterbikz),
E38 center armrest with iPhone 4 craddle (Thanks to GSXRliterbikz),
Slotted & Drilled Rotors with Stainless Steel Brake Lines,
19" M Parallel wheels (Thanks to DennisCooper),
Brushed Titanium Trim Vynil Wrap
Echo Three Niner
Well, I just bought a $33 cake pan just in case I ever want to do this, LOL!!
2003 DINAN 5 | M54B30 | Titanium Gray Metallic | Stage 3 Engine Software | High Flow Throttle Body | Cold Air Intake | Free Flow Exhaust | Performance Automatic Transmission Software | Front Strut Brace | OE 18x9 BBS RS745 Style 42 on 265/35-18 MY BUILD THREAD: [Click]
Almost There
Moderator
Cake pan global shortage!
Member
It's a bimmerforum bake sale.
Let's get baked!
- - - Updated - - -
Got a few goodies in the mail today.
New aluminum housing from Amazon to mount all the electronics on/in:
http://www.amazon.com/gp/product/B00...?ie=UTF8&psc=1
, snagged up a few black anodized heatsinks for the resistors from work today.
And the Wolsten time delay relay showed up, super fast delivery

Last edited by fmzip; 11-08-2015 at 10:58 AM.
Echo Three Niner
Looking forward to seeing it all in your engine bay.
2003 DINAN 5 | M54B30 | Titanium Gray Metallic | Stage 3 Engine Software | High Flow Throttle Body | Cold Air Intake | Free Flow Exhaust | Performance Automatic Transmission Software | Front Strut Brace | OE 18x9 BBS RS745 Style 42 on 265/35-18 MY BUILD THREAD: [Click]
Member
Got my parts installed on the new box.
Planning to do the install tomorrow

Last edited by fmzip; 11-08-2015 at 10:59 AM.
Major Lazer
Tidy work as always.
2003 M5 LSx l 6 Spd Manual l 4.10 LSD
Build Thread
The chassis must always be regarded as a means to an end and never as an end itself
Member
Good to hear! Nice work BTW!It was a piece of cake.... Lol
 Posting Permissions


 Reply With Quote


Bookmarks