
 Member
So I've seen many build threads come alive in this section and I'm following most of them. I've always meant to start one up, but I was just waiting until I could actually contribute something to this section. Hopefully, this thread will help out someone who plans on attempting something as similar I am.
Let me start off my giving some sort of an introduction and how I ended up with my current vehicle.
My obsession with the e34 started when I was stationed in Italy during the years of 2010-2012. One of my supervisors was moving back to the states just as I was coming over. I ended up buying his '91 520i for $800. Typical beater, dents in the fender, trim panels missing, interior in tatters, but man, that engine was strong. This thing never let me down ONCE and I beat the hell out of it. Quick photo.
Fast forward to July of 2012, I got orders to Burlington Vermont. It was really important to me to buy a car sooner rather than later so I didn't have to rely one anyone for rides, luckily for me an older man was selling a turbocharged '89 535i. With my experience with the 520i, I knew that I wanted to test drive this thing. Fell in love, bought it. This car had never seen a winter and was shipped to Vermont maybe around 3-5 years ago from California. Unfortunately, this guy knew nothing about cars. So everything that was done to this car was lost when he bought it from the previous owner. Quick photo of when I bought it.
Took me almost a year and a half to uncover everything that was done to this car. First off, there is a m106 turbo motor (k27) from an '83 745i with a brand new refreshed head, BEGi RRFPR, MSD ignition box, 30lb injectors, M5 diff, M5 clutch kit, Bilstein struts and H&R springs, custom 3" exhasut, Borbet Type A's 17x10 rears, 17x8.5 fronts. The motor runs great, however the wiring is just a mess and I don't know how efficient the current DME is at running this motor.
I've ended up putting in tinted smileys, clear tails, front clear turn signals, euro trim, removed the tint, removed those window guards, removed center caps on the Borbets, removed the mechanical fan and installed a Volvo electric fan, added a Innovate MTX-l wideband, UCC short shift kit, UCC HD transmission mounts, custom gauge pod, painted front grille black due to paint flaking and some pitting.
Some current photos, minus the tint. I'm sure most of you have seen these so just feel free to scroll through them.
So here is what the engine looked when I bought the car.
A weekend of removing everything, redoing a lot of the wiring, some paint, and putting back in some powder coated parts.
Next the interior had to go. It was a light blue interior with ratty non-trim door panels. Unfortunately I don't have any before photos due to embarrassment. However, here are some after photos once I converted it to black.
So this leaves me on the current project I'm working on, Megasquirt. As I stated earlier, I'm unsure of the current DME running this engine. Hitman X (guru over in the e23 section) and others have had a hard time identifying it. Here is a link to the thread of you want to check out some photos of it.
http://forums.bimmerforums.com/forum...tifying-engine
So I ended up purchasing the unassembled diypnp 55 pin Bosch unit from diyautotune along with some other bits to eventually go wasted spark.
DISCLAIMER: I'M NOT RESPONSIBLE FOR ANY MISTAKES YOU MAKE THAT END UP DAMAGING YOUR PERSONAL PROPERTY. MEGASQUIRT AT YOUR OWN RISK.
THIS SHOULD ONLY BE USED AS A REFERENCE, DO YOUR OWN RESEARCH TO ENSURE A SUCCESSFUL INSTALLATION.
Current stock pile of parts after about a year or so of slowly collecting. Includes, Bosch 55 pin diypnp from diyautotune.com, JimStim Stimulator, 179 DME, m30b35 engine harness, b35 60-2 trigger wheel, CPS, VR sensor, variable TPS, DB39 tuning cable, ICV, and some other parts I'm sure I'm forgetting.
Where I stand currently with the unit I'm building. Most jumpers are in place, only a few away from being able to load firmware and begin tuning. Waiting on some answers from Matt Cramer, diyautotune employee, great guy, he has helped me out a lot. Here is a link I started at msextra.com, hopefully if you are attempting this, it may help you. http://msextra.com/forums/viewtopic....fb53f0831bf756
The pin outs I've been using, also can be found on page 130-21 of the Bentley service manual.
My four year contract expired with the military, so I'm now back in Northern Florida going to school full time. This will hopefully give me even more time for projects such as these or just the opposite. I think that's all for now, I'll periodically add on to this thread with MS updates as well as to answer any question anyone has. Also, shout out to e34diyer, JesterMX6, and goatthumper for the MS inspiration.
EDIT: 3/29/2014
So up to this point, it was really simple being able to follow their directions. Most of the information I've been following has been clear enough where I wouldn't double guess myself, but I've been having some clarity issues with the jumpers. The following info can be found in the depths of the internet, but for everyone's else sake, I'll post up what I've learned thus far.
For a more in depth and a step by step process via diyautotunes instructions, check out my personal facebook album showing almost every step I made in building this unit.
https://www.facebook.com/media/set/?...1&l=5d896435fc
In order to get a to get 12v switched power/main relay/fuel pump working, you need to jumper connector board pin 27 to Relay 2 INPUT, than jumper from Rely 2 OUTPUT to connector board pin 36. At this point you should already have connector board pin 3 to "fuel pump" on the main board and connector board pin 37 to "12v" on the main board. Should look like this. Use hot glue to secure the jumpers.
Next we will connect the S1 ignition output to connector board pin 1. Easy enough.
NOTE: Be sure you've enabled the correct ignition configuration. If you have the stock ignition system than use this photo.
I plan on going wasted spark eventually with this unit, but until now this setup should work.
Hopefully before you solder the pin connection for the VR+ to 47 you have noticed you need an 18k resistor in order for it to work properly. There are two ways you can do this, solder one inline of the jumper or you can make your own circuit via the proto area. I choose the inline way, ensure you use a heat sink to avoid possible shorts.
As of now, I'm stuck on what needs to be done in order to run variable TPS and I'm currently finishing up the circuits for the IAC, I'll post photos once I complete them. If anyone has any questions regarding any of the steps that I skipped, just let me know. I have taken photos of every single step I did, so it wouldn't take long explaining.
EDIT: 4/1/2014
To complete the IAC circuit, pin 4 on the adapter board must be jumpered to IAC OPEN and pin 22 jumpered to IAC CLOSED. The IAC edge connector pin can be left alone.
For this circuit to work correctly, be sure jumper the enable option, shown below.
If you are using a M50 variable TPS like I am
Pin 1: 5v
Pin 2: Signal
Pin 3: Ground
And with your pin out:
5v: Pin 53
Signal: 52
Ground: 19
If you are using stock TPS, jumper it to GND with a 1k resistor.
At this point, I'm done with the assembly. Currently working on loading firmware, ect. Don't forget to solder in the boot connector and use the jumper when installing firmware.
EDIT: 4/4/2014
So finally got the firmware loaded after a day of wondering what I was doing wrong. I'm going to post the troubleshooting steps I went through in case some has a problem with theirs. In my case, it was user error while following the directions on the firmware installer and these steps did nothing in order to tell me what I was doing wrong, but they are worth posting.
Use this as reference when installing firmware, out of date, but still could be somewhat useful.
http://www.diyautotune.com/diypnp/do..._firmware.html
Troubleshooting link/testing the com system on your laptop for functionality
http://www.msextra.com/doc/ms2extra/serial_setup.html
For test C. (CPU socket serial loppback test) the photo they show is for a DIYPNP 1.1v, for a 1.5v you need to jumper pins 4 & 6.
Here is a photo.
So now I just got to work on calibrating the sensors and work on/install a base tune.
EDIT: 4/5/2014
So I took the time tonight to remove the useless vibration damper and install the 60-2 trigger wheel that megasquirt will use to get a VR reading. I went ahead and took off the other rusty pullies and sanded them real good and painted them with a high temp engine paint. It's not powdercoat, but a lot better than what they were.
Re-installed.
What came off the m106.
4/14/2014
Been looking around for a base tune that runs off the current firmware (3.3.1) . Haven't had any luck and I'm sure there has to be a way to convert an older firmware tune to a new one without corrupting the options, but haven't been successful. So I just started from scratch and manually have been putting in base ignition and timing options, this way I've also became a lot more familiar with TunerStudio. I haven't mess too much with the tables and I'm relying on the autotune feature of the registered version once I get it started.
EDIT: 4/19/2014
So in preparation for the 55 pin megasquirt, I need to get this engine running on 1.3 montronic rather than the 1.(0.1?) it has in now. To be fair its half motronic/half hack job from the previous owner.
Right off the bat I can tell that I might have some troubles with some things hooking up properly. For example, the sub harness that connects to the starter is different between the two harnesses due to the different models of starters. I did some researched and I'm going to use this thread as a reference. It goes into detail about how the 1.3 harness has three wires while the earlier version only had two.
http://www.mye28.com/viewtopic.php?p...light=#1170622
EDIT: This worked ^
Next are these two wires that connect to the transmission. I'm unsure of their purpose but I believe I remember reading about how that's how the older computers read the crank signal, since no trigger wheels were included on these engines. If I am right, then there shouldn't be a problem due to the cps and trigger wheel I have sourced.
If anyone with knowledge of this, please let me know.
EDIT: Confirmed only needed for motronic 1.0
Lastly, there is a long wire that connects via a twist pin connector on the sub harness. When I pulled the harness, this wire wasn't attached and I'm unsure of where it belongs. Thoughts that come to my head are 02, but again, only speculation.
EDIT: Confirmed as 02 wiring.
Where I'm at currently with the harness swap.
Before
Wires pulled.
After. Does this look some what correct?
Before
After
Harness removed
EDIT: 4/20/14
Happy Easter!
So didn't have too much time to work on this being Easter in all, but managed to install the sub harness assembly between the alternator and the starter.
The metal tube need modification on order to fit properly and so I just ended up cutting 1 1/2" off towards the starter side. Fits perfect and bolts right up to one of the mount screws and a threaded hole I wasn't previously using.
Where I cut the tubing.
EDIT: 4/21/14
Everything is hooked up minus the 02 and the ICV. Going to a local shop to have them make a custom intake pipe to allow it to reach over the valve cover over to my intercooler. Maybe they can also shed some light on how I can wire up the 02 sensor.
Shots of the harness in.
So right after school I headed over to a shop a friend of mine recommended, we were able to come up with a pretty simple design that should suffice for the ICV setup.
EDIT 4/22/14
Starts and stumbles and immediately dies. It was pointed out that 1.3 runs on high impedance injectors, while the previous 1.0 used low impedance. Also that the 022 AFM has a different voltage curve then the 027 AFM. Hopefully I'll be picking up both of those items today from used applications in the local salvage yard.
Just got back from the salvage yard, picked up the AFM from from the 89 535i they have there and was extraordinary lucky finding a 95 supercharged Buick Riveria which come with 29lb high impedance injectors from the factory.
So sadly, when I went to bleed the fuel lines before installing the injectors, the starter doesn't seem to be engaging. As in, I'll turn the key all the way, and nothing, not even a click. Battery is maybe 3-4 months old, so I don't suspect it. Ensured CPS is plugged in, unplugged battery for 15+ minutes, that's where I'm at now. Any ideas?
Good news is that the injectors and the 027 are installed.
EDIT: 4/23/14
Well turns out, like always, it was something small and simple. When I installed the injectors, I didn't remove the harness from the car. Instead, I just lifted it up and moved it away. In doing this, a female clip connector that's used on the older starters, was pulled off. You would think that would be one of the first things I would have checked, but never had a problem with it before. Oh well, lesson learned.
So plugged that back in and she started and started idling really rough due to the injectors. Quickly messed with the AFM in order to get the fuel ratio above 11 for a nice idle. I planned on dialing that in a bit more once I get it fully operational, however I found out that once I gave it a bit of throttle it would stumble and stall out. Forgot that the 02 sensor still isn't wired in and I'm hoping this is the culprit. Anyone know how to wire an sensor into the 1.3 plug? Two white and a black going into what looks like the end of an 02 sensor, and a solid grey grounding to the outside.
Holding the 02 wires that go into the harness, while the wiring for the 02 is just right of my hand with the black, red and white wires. Any help would be appreciated.
EDIT: Ended up going and buying a universal 4 wire Bosch. Wire colors matched up and was only $60.00.
Before the harness went in, I had to lengthen the AFM cable for as my AFM isn't in the stock location and it needed a bit more wiring to get where it needed to go. I doubled checked my wiring and the connections match up, pin for pin. One wire looked a bit loose so I uncrimped it and plan on recrimping it. I figured I would test to see how the car behaved while throttle was given without the AFM connected at all. When I unplugged the AFM, the car hesitates slightly for a moment, I feel there was more of a difference in my older setup, than returns to what seems like a decent idle and is even able to have the throttle engaged no problem.
While I'm still double checking my wiring and 02 sensor, it's worth to keep in mind that the e34 535i I pulled this from suffered from a large head on collision. While the AFM seems unscathed, in the back of my mind there seems to be a larger possibility of it being faulty than normal. Further testing will ensue.
EDIT 4/24/14
It's up and running. Haven't driven it yet, it's about 1am, but I went out and got an 02 sensor and threw it in. Check engine light is gone as well as any hesitation or stumble. I was under the impression that it would have at least idled and reved fine. Anyway quick video of it starting. Also, my valves are set to spec. Not sure why they sound so loud in the video.
http://youtu.be/uGwlHyi1e-o
Drove it to 15 miles to school this morning, everything went great. Stayed out of boost because I swapped the wideband 02 out for the stock one and I don't know exactly my idle fuel ratio. The older stock one was welded in such a position made it impossible for me to remove without dropping the exhaust. So I'll try to go get that sorted out today. I'm very pleased, that since the first time I've owned the car the MPG gauge and all my functions on the OBC are working correctly.
EDIT: 4/25/14
Have over 50 miles on this setup and no hiccups. Got the 02 and wideband both back in the car and idles at 14.6-14.8, easily the best idle it's seen in a long time. I'll have to keep monitoring it some more, but it may be a tad lean during acceleration, maybe low 13's. Adjusted wastegate back up to 5psi and still no hiccups. Not going over 5psi, for I'm not sure how well the 179 handles boost.. I'll just wait for the MS to be put in.
EDIT: 4/30/14
I had adjusted the BEGI RRFPR accordingly and now goes to 11-12 when in full throttle, of course this will be going up for sale once MS is setup. I also ended up purchasing a timing light today, so hopefully by this weekend I'll be making more progress with the MS.
Things that need to be done.
-Piping made for IAT bung to replace AFM
-Establish a base tune
-Verify timing
-Wiring wide band into MS
-Optional, but would like to get my variable TPS wired in.
EDIT: 5/5/14
I got a base tune to use from user SoopaGhetto from R3vlimited, it was originally used on a m20 turbo he had but I've adjusted the fuel requirements and should be a good start up and tune from there. Currently running 3.2.5 to support the the tune. Still waiting on a new intake pipe to be made with the appropriate bung made for the GM IAT sensor I plan on using, will set it up to work with the current AFM until then.
Plan on using the following wire colors for reference when wiring the TPS.
BRN/ORG is GRN
BRN/BLK is signal
BRN/BLU is 5v reference
http://forums.bimmerforums.com/forum/showthread.php?856880-*DIY-Plug-n-Play-Megasquirt-for-the-535i-525i-and-U-S-M5&highlight=variable+tps+megasquirt
EDIT: 5/7/14
For the last two days I've been chasing a problem while trying to calibrate my TPS. I was having troubles with rising ADC's while trying to calibrate the TPS, I solved this by grounding my TPS jumper to the main board, rather to the adapter board. This solved my rising issue, but now I'm still missing voltage to my TPS. I'm assuming that I need to jumper in a 5v reference some where into the adapter board (my guess is pin 7) but unsure where, as no manual covers this. I'll post pictures of the 5v reference if it is needed and where the jumper belongs.
EDIT: 5/9/2014
Okay, so I've been in contact with some people on msextra and basically, if a stock switch type tps is being used it won't show any ADC while trying to calibrate. A variable type will be the only type you will actually need to calibrate. If you have anymore questions about TPS calibration, check out this thread I created on msextra. In the last post it's mentioned that jumping pin 12 to a vref on the main board would allow you to run a variable, however, you would most likely have to run an entirely new wire to the TPS or tap into the AFM voltage wire. I haven't tested this, so use with caution. http://www.msextra.com/forums/viewtopic.php?f=101&t=54118
EDIT: 5/29/2014
Finally after three weeks, my clamps and fasteners came in for my mtech skirts. Got them installed last weekend, huge improvement over the bare rocker panels before. Still don't have mtech moldings, and I admit they look a little funny without them, but after I get some more important things straightened out because they are pricey. $$
Here is the site I referenced which was great, all the part numbers that you need are listed here.
http://www.bmw4life.com/mTechSkirts.htm
EDIT: 6/1/2014
Had a cheapo BOV pipe I had lying around that I bought off e34diyer around two years ago. Sent that off to get a bung welded in to fit the GM IAT I'll need in order to remove the AFM.
Installed
To connect the IAT, just solder/crimp the wires from pin 1 and 4 to the new IAT pigtail. There is no polarity so it doesn't matter which one goes to what. Also, be sure that you calibrate the sensor via tunerstudio with the right resistance, I used the following numbers.
EDIT USE THIS
Deg C Resistance (ohms) -15 12002 30 1707 100 187
I should have more time to work on it tomorrow and hopefully I'll figure out why I can't get it to run.
EDIT:6/2/2014
Huge update! It's 2am and the car now starts and idles on Mega Squirt, and pretty damn well. I'll start fine tuning it tomorrow, shout out to SoopaGhetto on R3vlimited for sending me such a great tune. The problem I was facing was that the unit wasn't running the fuel pump, I jumpered the fuel relay and started no problem. I'll have to go back through my work and find out why this is occurring.
Short video of start up.
https://www.youtube.com/watch?v=4-lMZGAg0PM
Got a lot accomplished today. Set timing and starting tuning fuel tables via auto tune. Also installed the lower temp radiator temp switch 80/88 Celsius, part number 61318376440.
Getting idle settings tuned.
Managed to get the unit to fit in stock location and able to get the lid closed all the way.
I accomplished this by swapping (forgot the name of that module) with the MS. This way the MS is able to sit a bit deeper in the box allowing the lid to be placed on top.
I also wired the DB9 tuning cable through the firewall and connect the USB to serial adapter in order to tune from inside the vehicle.
Now able to tune from inside the cabin.
More to come.
EDIT 6/3/2014
Drove to and from to school today, about 30 miles, all while having the autotune feature enabled for the VE fuel tables. That thing is amazing. Assuming that the resistance values are correct for the IAT, I was seeing 150 sitting in traffic and below 140 while cruising. Relocation of the inter cooler to the front will be the next big thing I'll do, however, I'm pretty set on having the TB flipped to the other side of the manifold so that could complicate the process. Other than that things are great, still haven't tune in boost, taking things slow but already a huge improvement over the 179 DME.
EDIT: 6/4/2014
So I believe that I was using resistance values not quite accurate. I'm using these as of now.
EDIT USE THIS
These are the ones found on the diyautotune.com website. Temps now read around 110F while cruising and I didn't see them surpass 130F. I'm still going forth with the FMIC setup for hopefully lower numbers. I managed to work out a deal with a friend who happen to be selling one that should work, picking it up tomorrow.
Deg C Resistance (ohms) -15 12002 30 1707 100 187
Also, I'm not sure if I mentioned this or not but the MS isn't grounding the fuel relay. I've been having to jump the relay manually in order to drive. I'm looking into this problem tonight.
Okay, I ended up just grounding pin 3 to a ground on the main board for now. It seems to turn on and off the pump accordingly. Still looking into why the fuel pump pin isn't grounding.
EDIT: 6/7/2014
Little update. First off, jumpering the pin 3 to a ground does in fact power the fuel pump, but unfortunately megasquirt sees it at full load and will run super rich. So I re-wired it to how I had it before and still looking into the problem.
I also ended up picking up that intercooler from a friend and although it's a tad large than I anticipated, I believe it will fit fine. The biggest problem I'm facing now is the front tow hook, but I believe I'll be able to work around if for now.
Now I'll just have to work on trimming the bumper and then having the mounts made.
EDIT:6/7/2014
So last night I trimmed the front panel with a dremmel and got to a good point where I was able to set the intercooler in a decent position (photo above). However, I had cut the panel so much and when I went to open the hood the front panel on the passenger side bent in and couldn't support the weight of the hood. That that was obviously a huge set back that needed to be corrected. First thing today, I went to a yard near my house and pulled an other front panel. Took me about an hour and a half in 95 degree weather, never again. $15 bucks later I'm heading home.
My first attempt needed improvement and a different design, I ended up coming up with the idea of cutting it from the opposite side and to be very careful to get the cut as close to the IC as possible, that way if need be, it could help support the hood. Also, this way makes routing the pipe a lot more convenient and sits nicely where the A/C condenser was. The only draw back I came up with is that if I would have to remove the entire front panel if for some reason I needed to take out the intercooler.
The panel has no movement even with all of my weight on it. It was a pain in the ass, but at least I learned from my mistakes. This way also requires absolutely no modification to the bumper, another plus.
Here's what I came up with.

Last edited by ZenitramNaes; 03-21-2015 at 02:32 PM.
'89 535i/5 Holset WH1E turbo
Follow my m106 megasquirt build thread here
Follow my R75/6 build here. Youtube - Dispatch Moto
Member
Very nice. I loved my m106 in my 745. I drove that thing for 10 years across the US, up the Rockies and back down again all the while with the turbo screaming in the background. At 300k I scrapped the body but kept the engine where it still lives on in my son's e28.
I'll be following your build.
good luck.
demet
e34 Addict
Subscribed
Member
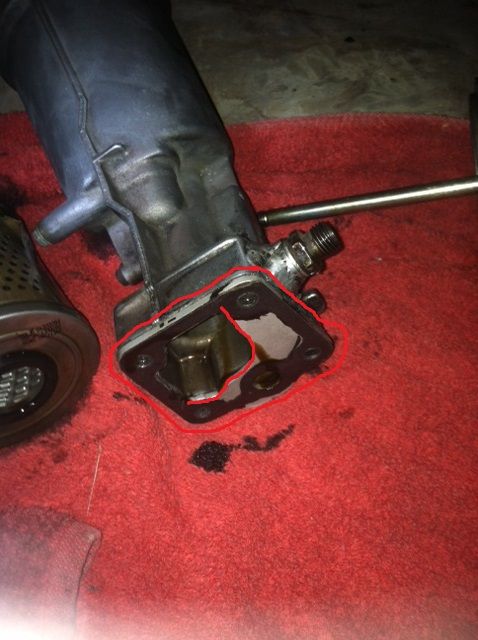
That's not an m106. The intake manifold is from an m30b35, and only the b35 has an oil filter canister that points upward. You have an m106 turbo setup on an m30b35.
Go ahead and bite. Plenty for everyone.
Member
I can show you the knock sensor threads on the block and the vin on the block showing the 745 it came out of. The oil canister looks like it was swapped in from a m30b35 with some modification for an oil return. It's a b34 head with the b35 intake manifold and valve cover. However before I knew this was a m106 a had got what I had assumed was the right intake manifold. Still planning on get the head port matched, but other things seem more pressing.
Last edited by ZenitramNaes; 06-01-2014 at 01:50 AM.
'89 535i/5 Holset WH1E turbo
Follow my m106 megasquirt build thread here
Follow my R75/6 build here. Youtube - Dispatch Moto
Member
The oil filter canisters aren't interchangeable between b34/m106 and b35, so I'm not sure how you made that work. Pics?Originally Posted by ZenitramNaes

Go ahead and bite. Plenty for everyone.
Member
The m106 oil return for the turbo looks like this:
The b35 block doesn't have this boss cast from the factory. The b34 block does have the boss but obviously it's not drilled for the oil return.
demet
Member
The m30b35 has a casting for the knock sensor that isn't tapped, the m106 has a central sump... I'm confused, take pics of your oil filter housing?
- - - Updated - - -
Also: m30
M106:
You can see how the filter housings won't work when inverted, so an m30 housing shouldn't work on an m106.
Go ahead and bite. Plenty for everyone.
Member
I haven't looked at the m106 oil filter ports layout closely, but my 88 535 with the b34 did accept the b35 oil canister quite nicely. Even the drain back function worked.
It's quite possible that the earlier m106 block could be different. If anyone is interested I could post up a pic when I get a chance.
demet
Member
Glad to see you finally posted a thread man! I've been keeping up with your progress via Instagram
1990 535i Black / 5spd / 4.27 LSD / Factory BBS Body Kit / Bilsteins / Dinan Chip
Member
awesome! love the car. drool over the borbets! that grill needs to be red!!!!
-Alex
Member
Of course, I'll post some pictures up in the evening. I just recently took it off to replace the gasket, too. It had some sort of an adapter in order for the oil return to work more efficiently. At least, that's what I figured it was for.
Thanks, I've been on the fence for a while about making one. It's a lot of work, but if I can help one person out than it's worth it to me.
I know, it was only meant to be temporary. I'll get around to it eventually.
- - - Updated - - -
As promised
Can see here the plate that covers the bottom of the canister.
'89 535i/5 Holset WH1E turbo
Follow my m106 megasquirt build thread here
Follow my R75/6 build here. Youtube - Dispatch Moto
Member
That sure looks like an m106, that's so weird about the oil filter, I wonder if Whit can shed some light on this, they aren't supposed to be reversible like that, from what I've always known.
Go ahead and bite. Plenty for everyone.
Member
I wanted to do that so bad when I used to daily my e24, that oil filter is so irritating with greasy hands.
Member
Hey! Great to see you post a thread! I'm taking another crack at Megasquirt myself, so maybe we can swap maps soon.
E30 325iC turbo convertible project in progress (updated 12/23/15):
Car fully tuned on completely rebuilt M20 w/forged internals, MLS head gasket
Suspension, brakes, exhaust fully installed
New carpet, custom reupholstered seats installed, door panels painted to match
Custom center console gauge panel installed
Plastic bumper conversion complete, MTech2 front spoiler installed
Rear bumper conversion in progress
Build thread: http://forums.bimmerforums.com/forum...on-engine-swap
Member
For sure! How or what are you going to do differently? Did you find a way around the automatic transmission problem you were facing? I've been taking to 9mil, mye28.com, and he is willing to share his maps as well. Honestly though, I might just start with the base map diyautotune offers and go from there.
'89 535i/5 Holset WH1E turbo
Follow my m106 megasquirt build thread here
Follow my R75/6 build here. Youtube - Dispatch Moto
Member
Hoping to scope the trans signal tomorrow and see if we can emulate it.
E30 325iC turbo convertible project in progress (updated 12/23/15):
Car fully tuned on completely rebuilt M20 w/forged internals, MLS head gasket
Suspension, brakes, exhaust fully installed
New carpet, custom reupholstered seats installed, door panels painted to match
Custom center console gauge panel installed
Plastic bumper conversion complete, MTech2 front spoiler installed
Rear bumper conversion in progress
Build thread: http://forums.bimmerforums.com/forum...on-engine-swap
Member
So, looking at the filter housing mount on the block... there's two ports. One is for oil into the housing, the other is for oil out of the housing. A feed in and out... if you've inverted the filter housing, that would have to mean you're feeding your oil filter backwards, from the inside out.
Considering there is an anti drainback valve in there that normally allows pressurized oil in, but not out, that valve *should* now be acting like a restriction in the housing. Here's where there's trouble in my mind... if you start the car it should fill the filter with oil until it forces all the oil out, but There's also a bypass valve in the oil pump to prevent blowouts in the event of too much hydraulic pressure. I'm concerned with the inverted oil filter that you guys have either blown out the anti drainback valve and are filtering backwards, or it doesnt work at all and your oil pumps are bypassing the filter.
Thoughts?
Member
I'm confused, what do you mean by inverted? It's difficult to say what is going on, since I wasn't the one who did this. My understanding is that it's providing pressure into the turbo oil feed. All I know is that this setup has been working for 4+ years with no problem, please excuse my ignorance on the setup. Here is a photo of it mounted up, if it helps.
'89 535i/5 Holset WH1E turbo
Follow my m106 megasquirt build thread here
Follow my R75/6 build here. Youtube - Dispatch Moto
Scotty don't!
I dig this.
Current
2005 E55 AMG
1998 Silverado K1500
1964 Impala
1964 Chevelle 496ci
Past
2000 Avus M5
1988 Suburban K1500
1987 Suburban K2500
2007 Suburban
1999 K2500 Suburban
2000 MGM
1999 K2500 Suburban
2001 Stratus 740i Msport
1990 750iL
1995 540i/6
1996 MGM
Member
sub'd. dont know how i missed this.
13 Grand Cherokee Limited V8 - Daily Driver - Wife
97 Z3 2.8 Roadster
95 325i Sedan - Project #ebayE36
90 BMW 535i/5 - i should probably work on this again...
Member
Everything is pretty much hooked up. Need to go get a intake pipe fabed up for the ICV tomorrow and at some point need to figure out how to hook up the 02 sensor, but other than that I think it will run.
The only problem I'm facing now is that my fuel pump is not receiving power. I've jumpered the relay, still nothing. Tested the harness at the pump in the trunk and there is no power. I've traced power all the way from the fuel relay to the engine/body pin connector and it's good. So somewhere between there and the back seat I'm losing power.
I think the CPS can be ruled out for two reasons. The resistance checks out, and correct me if I'm wrong, but even if the CPS is faulty the fuel pump will still prime.
Any ideas? The way it was set up before was that it totally bypassed the conventional grn/violet wire and was directly wired from the terminal in the bay to the pump itself via a wire he ran under the car. I want this done right, so I'm trying to avoid having it wired like that. Again, any help is appreciated.
Last edited by ZenitramNaes; 04-21-2014 at 06:46 AM.
'89 535i/5 Holset WH1E turbo
Follow my m106 megasquirt build thread here
Follow my R75/6 build here. Youtube - Dispatch Moto
Member
on the factory ECU, the only way the fuel pump primes is if the AFM door is pressed open correct? in which case, MS should be sending a prime signal to the pump relay when you key on since there's no air flow meter.
if you're getting power to the relay, and you're getting power at the relay on the wire that goes back to the pump (meaning the relay isn't toast), you're got a wire crossed, bad fuse if you're running one, or a short somewhere between the relay and the pump. only way to really trace it is either with a cable tester, or run a new one.
13 Grand Cherokee Limited V8 - Daily Driver - Wife
97 Z3 2.8 Roadster
95 325i Sedan - Project #ebayE36
90 BMW 535i/5 - i should probably work on this again...
Member
Awesome work, subbed.
"You may all go to Hell, and I will go to Texas."
Davy Crockett
www.Angry-Ass.com
My Build Thread Part 1, Part 2
DIY E31 X-Brace Mod and Install
DIY Rear Seat Backrest Modification for E32 Armrest
Member
Thanks for the reply Jester, looks like the only sure way is to trace the wire and test it along the way. Also, I'm attempting to start It via via the 179 dme.
Btw, before I took everything apart, sometimes when I used the wipers the car would stall for 4-5 seconds then come back to life. I'd imagine a short some where. Could be related I suppose, something tells me the problem lies under the back seat whether related or not.
Last edited by ZenitramNaes; 04-21-2014 at 12:21 PM.
'89 535i/5 Holset WH1E turbo
Follow my m106 megasquirt build thread here
Follow my R75/6 build here. Youtube - Dispatch Moto
 Posting Permissions


 Reply With Quote


Bookmarks