
 Member
Does anyone have one of these for sale? My hatch will no longer stay up, so it's time to replace the struts. If anyone has any alternatives, Im
all ears and can go to harbor freight to get what I need.
Member
Randal Young, also known as NoodlesandSam was nice enough to let me borrow the tools for the cost of shipping. Now that I'm done with them, having replaced my hatch struts, I'm about to send them back to Randal. But with his permission I'll send them to you next, again for the cost of shipping. You can contact him here. noodlesandsam at yahoo dot com
Coupeless Racer
A long pry lever is all you really need.
I like the unicorns.
'99 Z3 Coupe - Jet Black/Black (1-of-114)
'99 M Coupe - Estoril Blue/Black (1-of-82)
'03 540iT - Sterling Gray/Black (1-of-24)
'16 Z4 sDrive35i - Estoril Blue/Walnut (1-of-8)
Member
I'm currently borrowing the tools from noodles and sam. Contact me at drobbins at woodrobbins dot com.
Purist?
+1, you really dont need anything special. I just used one of the long pry bars I got from harbor freight tools. It is really pretty easy to do.Originally Posted by JoshS

2003 540iT M Sport, Black Sapphire on Black, CWP, DSP, rear shades, Climate Comfort windshield SOLD
1988 325i 4dr/5sp, Lachssilber Metallic on black leather, stock
2002 Ford Excursion Limited 4x4 7.3L Powerstroke Diesel, 160k and I replaced the alternator. Once.
2005 Toyota Land Cruiser, Galactic Gray Mica
Journeyman Somnambulist
I won't argue for or against the tool set, but here is a Flickr album I posted of the parts and the process using the tools. You may be able to decide just looking at the pictures. (I have since sold the tools).
And here is a thread of a DIY including a TIS excerpt showing the process.
Regards,
2014 i3 BEV, 2016 X5 xDrive40e
Myrtle Beach SC
Member
tinius - you might not realize, those WERE your tools. I purchased it from you and sent it to another member who then sent it to noodles.
For those who don't have long pry bars available, instead of buying them, why not just get in line with noodles. I am assuming it has to be even slightly easier to use than pry bars given they were designed for the job.
Member
I'd love to rent a set. Can I put myself in line?
Member
the tools you speak of are being sent to me this week. as soon as I get the job done, Ill contact the owner of said tools. 9hooker send me a private message.
Member
I definitely need to replace my struts for the hatch. About how long does it take?
Member
I did mine with a prybar from HF, took me almost an hour.
Member
I did both of my tourings using the tools. I cannot imagine trying to do the job without the tools. More power to the guys using prybars - I just have no idea how you would line things up inside the roof to re-install stuff without the tools. - JT
Member
i got my parts yesterday and will do the job on sunday. i may setup a video camera and record the whole thing. This will be my first time doing this.
Member
Sweet. My parts are also in.
Member
I need to change mine also, hey 03e39t, can you post a pic of the pry bar you used from HF?
Could be helpful to me and others.
Thanks in advance.
firetrax > 00e39t
- - - Updated - - -
I would gladly get in line to pay shipping to use the tools, but it sounds like they will be in use for some time to come?
When adding my name to the list, does anyone know how many head knocked enthusiasts are in front of me?
I'm eager to end my head knocking adventure...
Member
Everything you need.
Member
I used my fan clutch tool to press the hatch strut back on the mount. I did not have enough room to get my pry bar on top. The second side only took 15 minutes after I figured things out.. The first side took a good bit longer.
Member
this would be awesome.
Journeyman Somnambulist
mmathews, did that work for both the door and the glass struts?
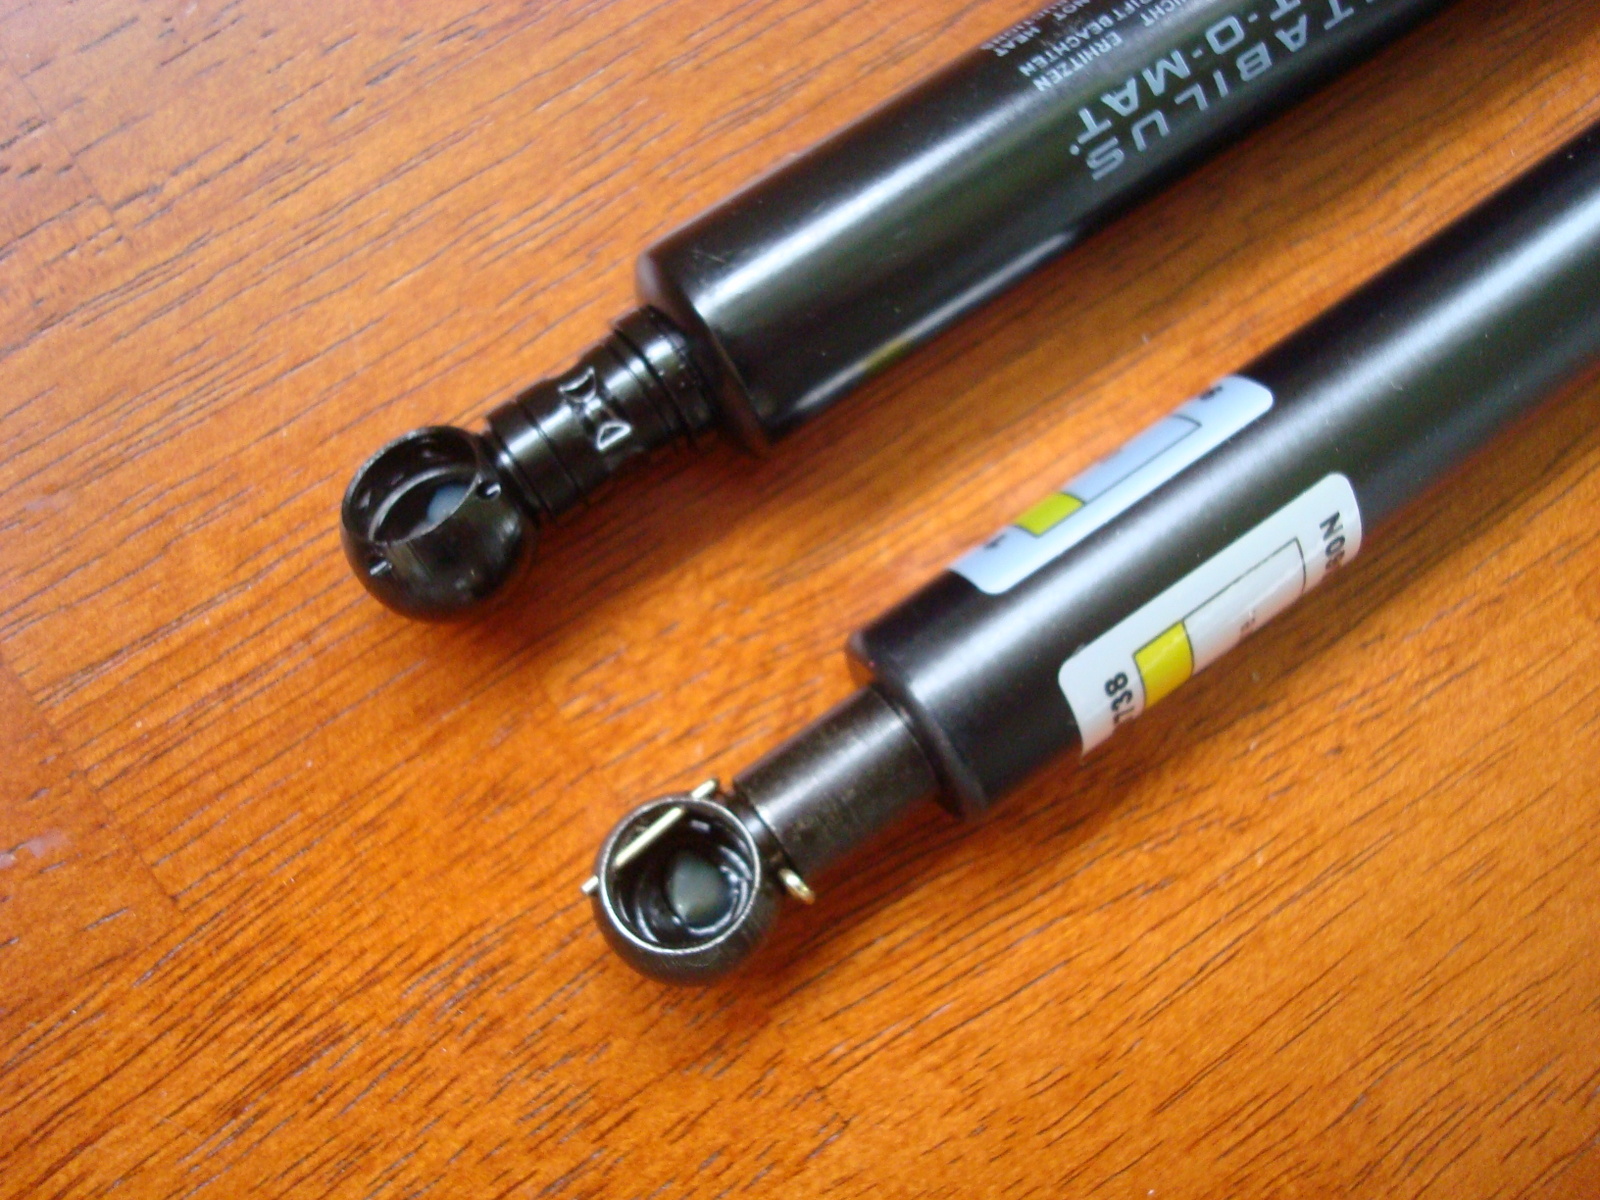
Important tip: sometimes the smaller strut for the glass will come with a wire retainer installed on the ball/cup end. That must be removed if you're going to pop the socket onto the ball at the far end. The cup has a c-ring retainer inside, anyway, to keep it in place, so the retainer is not needed. When I bought these for a previous car, one came with the retainer and the other didn't.
Thanks and regards,
- - - Updated - - -
Not to slight your work and thanks for the pry-bar info, but I would protect the metal edge where the door gasket was pulled off. That edge needs to be straight and true when you replace the gasket for the seal to work and keep out rain and wind noise.
Regards,
2014 i3 BEV, 2016 X5 xDrive40e
Myrtle Beach SC
Purist?
Ditto
2003 540iT M Sport, Black Sapphire on Black, CWP, DSP, rear shades, Climate Comfort windshield SOLD
1988 325i 4dr/5sp, Lachssilber Metallic on black leather, stock
2002 Ford Excursion Limited 4x4 7.3L Powerstroke Diesel, 160k and I replaced the alternator. Once.
2005 Toyota Land Cruiser, Galactic Gray Mica
Member
i have been working on this all morning, and it is a total PITA. I stil have the left side to do. Having a hard time getting the new tailgate strut to pop in place. the window strut was relatively easy.
Last edited by scott99540it; 08-25-2013 at 12:37 PM.
Member
Scott,
I agree the process is unusually difficult. But quite do-able. This operation like most all operations on the BMW is not about luck or strength. It's 95% technique. So, calmly and gently try these steps.
To get the big strut installed:
1. Install the pin through the strut, and through the pin boss. The pin boss is the little hole in tailgate arm. With the strut installed it prevents the end of the strut from going too DEEP into the cavity, or not deep enough. Assuming of course your tailgate is fully open. When you install it make SURE the ball head is facing DOWN. So that takes care of one variable: the DEPTH of the strut head.
2. Gently place the collar of the strut tool around the neck of the strut. You're not going to be able to hardly see anything in there, so I don't recommend trying. You're going to do this all by touch and by VISUALIZING the the ball-connector and the strut socket. One good clue that your tool collar is properly placed is that the little metal pin that sticks out the side of the tool will line up at or very close in proximity to the pin boss, where the strut pin and the little C clamp is located. That takes care of variable number two: holding on to the strut neck at the proper location.
Now you are not going to force anything. You're not going to swing the strut back and forth wildly. Instead you will:
3. Calmly and slowly swing the neck of the strut back and forth in a little arc until you have high confidence that you have placed the ball socket on the ball head like a little hat on a crown. You HAVE to BE SURE. If you're not sure, calmly and gently swing the strut back and forth until you're sure. It's also possible you may have to raise the tailgate slightly to get the ball-socket at the proper depth in the cavity--but you should not have to HYPER-EXTEND the tailgate.
4. Now that you're sure you have precariously placed the strut socket on the crown of the ball, you are going to GENTLY and with CONTROL push STRAIGHT DOWN ON THE SOCKET. This is done by raising the tool arm UP, preventing the tool from TWISTING. Not necessarily so easy. You should feel a snap or hear a click. If you do this very slowly it is possible you will not feel a snap or hear a click. But if the socket is now secure and holds the tailgate up after pulling down on the tailgate multiple times, then you're good to go.
5. You win.
Try the Zen technique and let us know how it goes.
Be well,
Douglas
3. Once
Because the pin sometimes likes to slip out of the pin boss you might have to clamp the two together with large pliers, or vice grips. Don't kill it. Just keep the tool from slipping out.
2. Now, gently slide the end of theIt also tells you how deep the tool shoul
1
Member
Scott,
I agree the process is unusually difficult. But quite do-able. This operation like most all operations on the BMW is not about luck or strength. It's 95% technique. So, calmly and gently try these steps.
To get the big strut installed:
1. Install the pin through the strut, and through the pin boss. The pin boss is the little hole in tailgate arm. With the strut installed it prevents the end of the strut from going too DEEP into the cavity, or not deep enough. Assuming of course your tailgate is fully open. When you install it make SURE the ball head is facing DOWN. So that takes care of one variable: the DEPTH of the strut head.
2. Gently place the collar of the strut tool around the neck of the strut. You're not going to be able to hardly see anything in there, so I don't recommend trying. You're going to do this all by touch and by VISUALIZING the the ball-connector and the strut socket. One good clue that your tool collar is properly placed is that the little metal pin that sticks out the side of the tool will line up at or very close in proximity to the pin boss, where the strut pin and the little C clamp is located. That takes care of variable number two: holding on to the strut neck at the proper location.
Now you are not going to force anything. You're not going to swing the strut back and forth wildly. Instead you will:
3. Calmly and slowly swing the neck of the strut back and forth in a little arc until you have high confidence that you have placed the ball socket on the ball head like a little hat on a crown. You HAVE to BE SURE. If you're not sure, calmly and gently swing the strut back and forth until you're sure. It's also possible you may have to raise the tailgate slightly to get the ball-socket at the proper depth in the cavity--but you should not have to HYPER-EXTEND the tailgate.
4. Now that you're sure you have precariously placed the strut socket on the crown of the ball, you are going to GENTLY and with CONTROL push STRAIGHT DOWN ON THE SOCKET. This is done by raising the tool arm UP, preventing the tool from TWISTING. Not necessarily so easy. You should feel a snap or hear a click. If you do this very slowly it is possible you will not feel a snap or hear a click. But if the socket is now secure and holds the tailgate up after pulling down on the tailgate multiple times, then you're good to go.
5. You win.
Try the Zen technique and let us know how it goes.
Be well,
Douglas
Member
Douglas, thanks for the tips! I finally got the job don. Zen definitely helped. Unfortunately, I was not able to setup the video camera for this, due to the amount of space I had. Ill add some tips to the above for those who
are doing this for the first time:
1. after taking off the plastic hinge covers, I gave the pin a good squirt of WD-40. I had a hell of a time taking off the clip, so after speaking with noodlesandsam on the phone, i took two small micro screw drivers, and pushed
on the open ends, and it popped off. I kept my telescoping magnet handy to retrieve them.
2. I found the pin a bitch to get out. a chisel, or flathead screwdriver and hammer comes in very handy. tap the small end of the pin until it starts to come out. once it got far enough out, I used a pair of pliers to pull it
out the rest of the way. It helps to extend the tailgate all the way up.
3. I removed the big strut first. gotta pull the wires out of the way and slide the tool in there. Kudos to those who used a prybar. definitely use some cardboard or something on the metal trim. I had the wrong leverage point
and bent mine slightly. Slide the tool in there, get the pin in and pop it up. When it comes off it will lay flat in the channel. extending the tailgate all the up, will help clear the hinge and you can pull it out.
4. For the small strut, same procedure with removing the clip. once the clip is off, just pop the end off, insert it in the bmw tool and pop it off.
5. As described above, this is all about feel. slide the strut in and feel around gently, when you feel it catch, push down, and you will hear it snap in place. put the end on, replace the clip.
6. After installing the window strut, I used some zipties to tie the cables out of the way, which made it much easier to put the big strut in.
7. See above description for the big ones. I found i did have to hyper extend the tailgate to get the pin back in, some cars may be different.
8. DEFINITELY FIND A WAY TO KEEP THE TAILGATE RAISED UP! Im not sure what I would have done without using my video gear for the help.
I started this process sunday am. Finished it this am. I stopped after 2.5hrs yesterday to go to the pool. After I had time to think about it, it went much faster. I could do the whole job in an hour next time.
Last edited by scott99540it; 08-26-2013 at 11:16 AM.
Member
I'm complete with tools. Is someone else in line??
 Posting Permissions


 Reply With Quote


Bookmarks