
 Arktissibler-Metallic
Agree - always grease the threads... Same with strut spring compressor screws - not only easier, but super dangerous to not grease them!
Copy - will refrain from impact wrench - Thanks
Will post up my new half shaft puller tool next week... need to finish a little grinding on my collar nut and take some final pics.
Last edited by kojohns; 04-26-2013 at 04:41 PM.
Member
Back from six days on the road.... but I'm surprised by this, actually quite surprised. What were you using for all-thread? Using a coupling nut as the moving nut? What type of lube on the all-thread? Admittedly I have only four bushings worth of data, but with 7/16th NF soft steel rod from Orchard Supply Hardware + a coupling nut as the moving nut + tons of CRC spray on white lith grease, it took maybe 15ftlb worth of torque on the nut to remove the old ones (using Kornknarr's method)... and after the fact there was so little damage/wear on the rod that the coupling nut still runs freely from end to end (can't say the same about the 1/2 NF rod used on the RSFBs)?? Is it your impression that the moving nut simply welded to the rod causing the rod to shear? Or do you think there was really that much tensile load to break the rod, ie, the bushings were really that tightly in there?? Might be some learning to be had here... gregOriginally Posted by kojohns

Arktissibler-Metallic
It was the last piece of 7/16th rod left at the hardware store I went to and it had damaged threads to begin with. With grease, attempted to straighten the thread while extracting a bushing... regular nut... Sheared at the point of damaged thread. Chose to just buy the $30 tool from AKG Motorsports and still needed a piece of black pipe longer than what was supplied by AKG in order to fully extract the bushing.
Have been busy, so haven't finished my new axle pull-through-bearing tool... A bit more grinding to go, but will be out of town until next Monday :-(
Ordered the Harbor Freight bearing tool for $60 off Craigslist... So should be set
Member
What diameter coupling nut did you decide to go with? 1"??
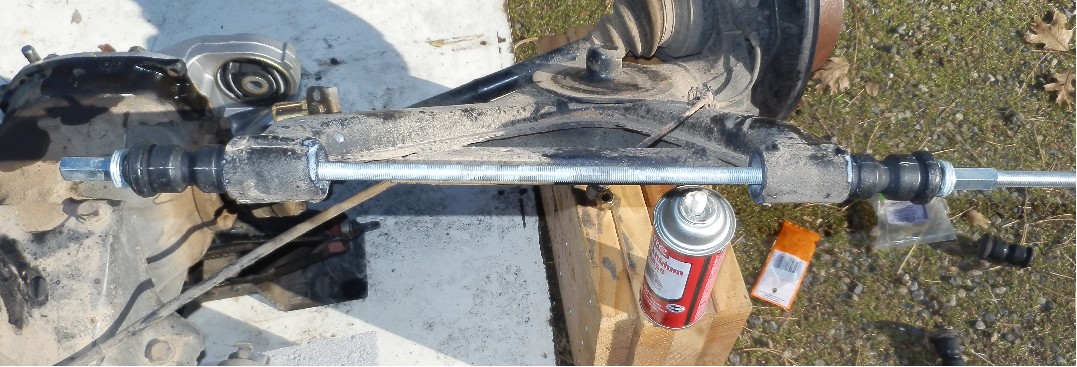
This was my pushing the old RTABs out, and pulling the new ones in using the Kornknarr method - very clever on his part.
two RTABs being pushed out - one against the other:
two RTABs being pulled back in - again, one against the other:
One of the secrets of his method is, in both pushing and pulling, is there is a stack of four or five washers btwn the coupling nuts and the ends of the bushings, with LOTS of lube btwn then, so that the nuts can turn freely, and not be pinned by the rubber of the bushings. Very much my hat's off to him for his cleverness and his sharing... and as I said in my previous post - with all the lube (plus all that's on the all-thread), there was at most 15 ft/lb of torque required to move them either way... bloody clever these Swedes. ;-)
Last edited by gmushial; 05-02-2013 at 12:18 AM.
Arktissibler-Metallic
Oh - I see... Completely different method that I used. Didn't use a coupling nut at all, used a regular nut
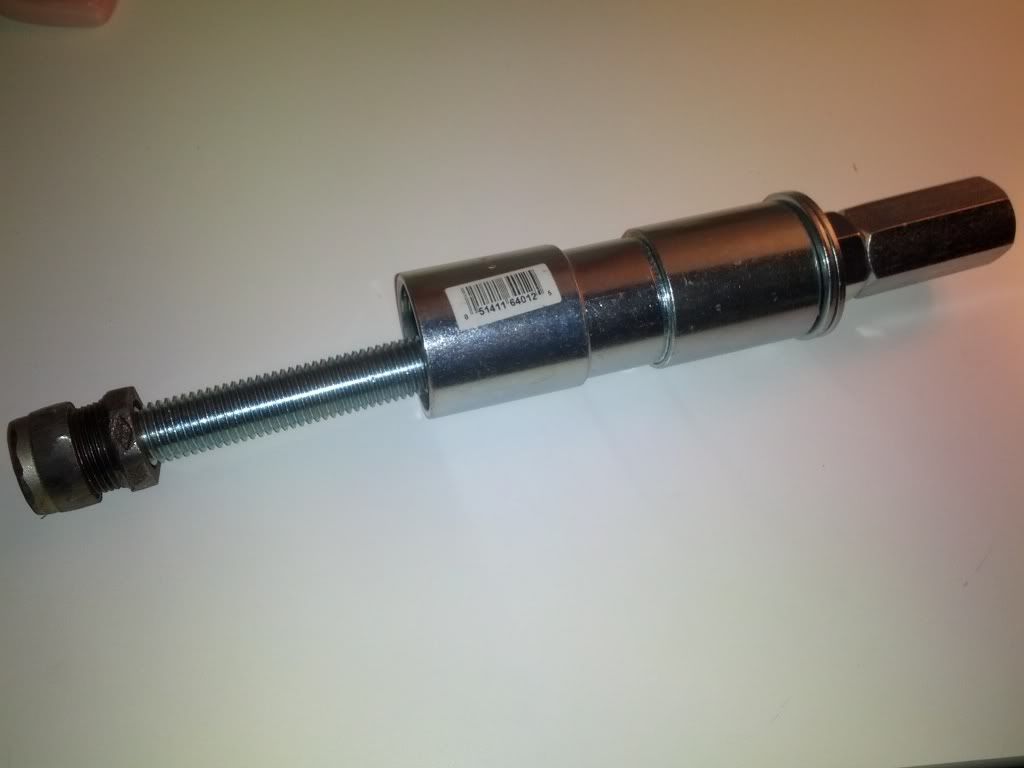
Mine was a clone of this tool which works on one bushing at a time: http://www.akgmotorsport.com/catalog/catalog.php?item=6
RTAB Removal Instructions: http://www.akgmotorsport.com/gallery/?level=album&id=8
RTAB Install Instructions: http://www.akgmotorsport.com/gallery/?level=album&id=9
Last edited by kojohns; 05-02-2013 at 09:59 AM.
Member
Having fought with the receiver cup method on too many bushing, and seeing Kornknarr's posting over the winter, I had to give it a try. Also, there's a necessary goodness in his method: either one has to have a stack of 20 to 30 washers pushing the old bushings out, or one has to use coupling nuts so as to be able to reach something that one can put a wrench on and turn... but the virtue of this (using coupling nuts) is that the load is spread over a large number of threads really reducing the danger of damaging either the all-thread or the nuts... as I said before: bloody clever these Swedes. :-) Though just a caveat: one can only safely use this method on trailing arms with the cross brace, otherwise there might be a danger of bending them... though if one knew a priori that it was going to take so little force to extract and reinsert, then maybe even that caveat is unnecessary... but it sounds like your bushings were in there pretty tight - but then again, with the ///M arms, they're so robust, I don't think it's possible to bend them (at least doing this surgery, this way).
W/re turning a coupling nut into an axle puller, I: chucked up the nut in a lathe and drilled out the old threads with the tailstock mounted drill/chuck to approx. half the depth/length of the nut; still having the hex exterior, used them to hold the nut and tap the new 22mm threads (for non-///M); then taking a short piece of 3/4NF all thread cut it off at 1/2" beyond the 3/4" thread depth still left in the nut; center drilled it and inserted it into the nut; then did likewise for the 22mm end (used the threads off a 22mm donor bolt for this); so that I now had a nut with a 1/2" 3/4"NF center drilled nipple on one end, and a 1/2" worth of 22mm nipple on the other end; chucked up the nut again, using the hex faces on one end and with a live center into the center drilling on the other; and then using the lathe as a lathe, reduced the diameter of the nut for at least half its length so as to clear the splines of the hub; then flipped the nut (becoming puller tool) round and reduced the exterior diameter of the other half of the nut. The virtue of having the two nipple threaded into the nut is that as the nut becomes more thin-walled, there is something inside resisting the tool bit's attempt to ovalize the nut as one is turning it. After one is done, one can unthread the nipples and pitch them (or use them to make another axle puller). One step one might do beyond this is: leave the nipples in the new tool, bake it in the oven, and then quench it in oil or water, giving it a surface hardening and a better internal grain structure, ie, making a stronger tool [leaving the nipples in the tool while baking and quenching hopefully will keep the tool from changing dimensions in the process, especially when quenching]. ... one virtue of this order of steps, means that instead of trying to making the interior coaxial with the exterior, one makes the exterior coaxial with the interior (which is much easier to do). One other change one might think of is: to instead of tapping the new 22mm threads, one might turn then, given that one has lots of room to work - and even more so with your 27mm case - and cut the threads a bit undersized so as to be really snug on the axle end vs the standard bolt/nut type fix (a little loose for my taste) - maybe cut the threads 0.004 undersize so one has a near interference fit, allowing more contact/working surface btwn the tool and the axle threads - making for a stronger setup.
Last edited by gmushial; 05-02-2013 at 12:10 PM.
Arktissibler-Metallic
So... Axle nuts were actually easily broken free with an electric impact wrench with the arms/axles off the floor...
BUT, any tips for breaking away the axle and hub splines? The super cheap 3-jaw puller from HF was ruined very quickly... Super soft metal destroyed it's own threads. Just need a better puller?
The axle metal is fairly soft as well... Not wanting to hammer on it unless possibly with large center punch?
Member
Some axles__not many__come out real easy, like you could tap them out with a small rawhide mallet, but others__MOST__require a fair amount of force. I suspect that has a lot to do with how robust BMW had these tools made...
Often, I just crank down on the tool until I know if I go any further, I'll break something, then walk away. Could be minutes later, and I'll hear a loud CRACK and the bond is broken. After which, it only requires a LOT of force to continue walking it out of the joint.
After wire-brushing the splines on both hubs and axles, and with some light oil, they go back together a little easier, but some are still harder than others.
If I have both axles out of the car, I always return them to their opposite sides, thereby extending the useful life of the CV-joints.
Arktissibler-Metallic
Thanks, do you happen to have a picture of the end of the screw that makes contact with the the end of the axle? Conical / flat / etc
Guessing the HF puller was good for maybe 1-2 ton of force... I began laughing at it when it was obvious the greased screw was beginning to bind in the yoke from thread deformation :-). The screw was chromed... So guessing nothing more than mild steel.
Will return and get my $10 back and go find something more suitable.
Member
Assuming you're trying to preserve the half-shafts, then either the bimmer tool, or renting an OTC 7394 or 6574? The OTC pullers use a 1" hardened drive screw with a flat face other than a very small centering tit. [I think OTC claims a minimum of 20 tons of pressing force, ie, well beyond the HF tool.]
Last edited by gmushial; 05-09-2013 at 06:41 PM.
Member
The BMW tool has a hardened (round) ball swaged into the end of the screw__pretty good solution, actually.
Member
And the half-shaft has a matching concavity on the end? [I think I remember such from some of your other postings.] ... I suspect having the ball reduces the induced friction of trying to turn the drive screw [the OTC with its flat force surface requires a hint of grease to keep the two from binding under heavy loading.]
Member
Close...

Member
BMW CCA Member
when reassembling how difficult is it getting the axle and hub back together? I read in some places that they should go together by hand and require no force other than maybe a gentle tap?
If this is not the case any tips for someone without a BMW special tool. I have 2 new hubs which I'll be putting in today and axle should be here in a couple hours.
Arktissibler-Metallic
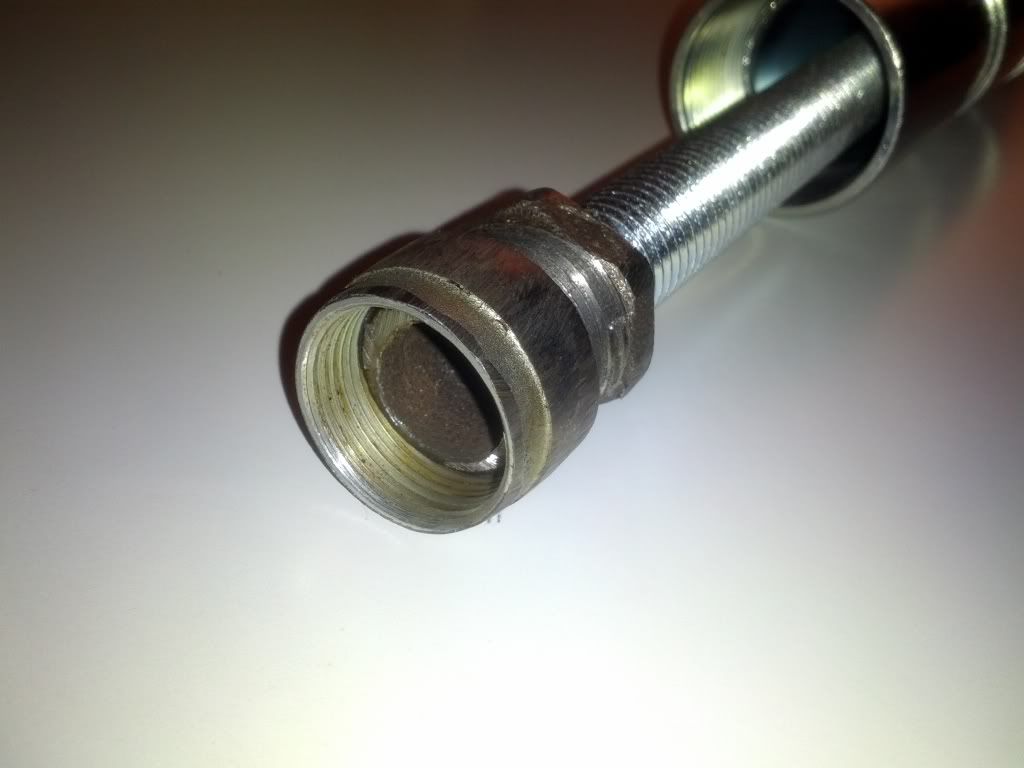
There is a special BMW tool for this... RF has posted pics of it before somwhere... I am making a clone of it that uses a hub nut with the entire exterior of the nut ground down to allow it to thread onto the axle and pull the axle into the hub splines.
Have seen several homemade tool threads with similar designs. The key is to not er the axle in as it will ruin the new bearing... Or at minimum... Shorten its life
Member
BMW CCA Member
Or in my case shorten the axles life...rather dramaticallyReplacement arriving in a few hours.
So the notion that with a brand new wheel hub and a good axle that they should go together with minimal force is not a correct assumption?
Member
Rather strangely, in that I'd have expected tolerances to be pretty tight on these parts, but the difficulty to remove and reinstall seems to be all over the place - from what Dr Forbes describes above, to ones that slide out with a gentle whack from a rubber mallet and easily pulling back through with the tool Kojohns is building. Go figure.
Arktissibler-Metallic
I believe the splined end (or the hub) has a taper to it as well... When I look very closely at the assembled splines, it appears that the axle's splines have been slightly deformed at the end from being pulled into the hub creating a 'pressed' fitment as well as splined fitment. I'll know more when I get these apart, maybe next week.
Here are a couple of pics of the tool I'm making that clones the BMW tool for pulling the axle into the hub... still have more grinding to do to remove thickness of the modified hub nut, I don't think it will quite fit through the splined hub yet:
Last edited by kojohns; 05-10-2013 at 11:26 AM.
Member
BMW CCA Member
Nice!
I was doing some musing on creating a tool like that, I'd be interested in how far you have to grind it since looking at the hub I could see at most 30mm of clearance and on an M27 bolt that means the thickness < 3mm (if I got that right?).
Whats your shopping list / rough cost so far?
Gareth
Member
You already have the new half-shafts, correct? Or did you decide to go with the old ones? What I was going to say, if you're going with new ones, how about measuring them and posting those numbers: spline ID, spline OD and possible taper.
W/re the above pics - what is it you've got on the axle grabbling end? A 27mm heavy nut? But how have you done the "conversion" from metric threads to SAE? Almost looks like you have a 27mm bolt threaded into the back end, and then you drilled and tapped it?? Looks interesting.
Member
BMW CCA Member
Also what hub nut are you using/starting with there? Doesn't look like the stock crush collar one (even after grinding).
- - - Updated - - -
Not new, I've got one from here (that will arrive shortly)... http://forums.bimmerforums.com/forum...reshly-rebuilt
One is currently still in the car and the other is currently with Cardone.
As soon as the other one arrives I'll do a test fit with the new hub and measure it up.
- - - Updated - - -
Slightly off-topic but I'm also going to be sizing these up for a fit to see if they can be misappropriated on an MZ3 axle
OuterCVHousing.jpg
Arktissibler-Metallic
Yes - you are correct on tolerances/clearances... you must grind almost all of it away. I really need a bench grinder to do this right... to get it nice and even all the way around... hand held angle grinder is a little tricky.
Here's the parts list currently for a "Z3-M" Half Shaft Tool... "Non-M Z3" or other cars would be different due to different Axle nut size:
(1x) Half Shaft Axle / Hub Collar Nut (BMW 33411133785) = $4.66
(1x) 3/4" to 1/2" Pipe Fitting (Plumbing Dept) = $3.65
(1x) 12" length of 3/4" Coarse SAE20 All-Thread (Hardware Dept) = $3.75
(1x) 3/4" SAE20 Rod Coupling Nut (Hardware Dept) = $1.78
(1x) 3/4" Nut (Hardware Dept) = $0.25
(2x) 3/4" Cut Washer (Hardware Dept) = $0.40 / each = $0.80
(2x) 1-1/4" x 3" Rigid Conduit Nipple (Electrical Dept) = $3.08 / each = $6.16
(1x) 1-1/4" Rigid Conduit Coupling (Electrical Dept) = $3.50
(1x) JB-Weld Epoxy (or similar) = $4.00
Total = ~$30
The 'receiver cup' assembly could be cheaper as well with a piece of black pipe coupling, I just liked these pieces with a nice smooth flat surface on each end... the three pieces that make that up are $10. Haven't added consumable cost of grinding wheel since I had that already... nor your own time at $Priceless$/Hour
- - - Updated - - -
Definitely different... check out Post #38 to see what the MZ3 axle nut looks like...
Or this: http://www.ecstuning.com/Search/33411133785/
No tapping, all wrong threads... but they work well enough for this purpose and have roughly 3 threads securely engaged in each section. Surprisingly, each section remains quite straight along the axis of the all thread. Once done grinding, will JB Weld it all together with the engaged threads so it doesn't work loose. You don't need this tool to pull the entire splined axle through and overcome the tapered fitment... just enough to get a regular axle nut engaged on the axle to pull it the rest of the way through. This configuration is based on another forum thread with a similar home built tool... This also shows the actual BMW tool that Randy uses:
http://forums.bimmerforums.com/forum...The-Hub-My-Way
Last edited by kojohns; 05-10-2013 at 12:34 PM.
Member
I'll look for something closer...
... hopeful that in the future, searches/searchERS will pull up this thread.
Okay, the definitive pictures of the tool to install the ///M axles (Z3 versions are different size(s) ):


As was stated previously in this thread; this one just pulled in by hand__1 in 1,000,000!


- - - Updated - - -
I must've missed it...:
Arktissibler-Metallic
Thanks for the measurements Randy... <=30mm outer diameter of the puller is what I'm shooting for to clear the splines of the hub... Looks like I only have to remove another 1mm all the way around on my hub/axle/collar nut to be complete. The untouched thin end of the hub/axle/collar nut measures ~29.9mm already :-)
Next week I'll search for someone to lone/rent me a better puller to separate the hub/axle splines. Will also soak in PB Blaster and let sit under pressure as you recommended. Maybe some tapping around the hub with a 3lb mallet will break the bond as well.
- - - Updated - - -
Hah... after this video... 'H-E-A-V-Y D-U-T-Y' seems like the right tool for me ;-)
http://www.youtube.com/watch?v=VFi3PtBX3O4
- - - Updated - - -
Well - have chosen to go with the OTC 7394 from Amazon for $114 Shipped... I saved so much with the other tools... felt it was important to get something that won't possibly fly apart on me for this job :-) Plus it will resale easily if I need/want to after the job.
Last edited by kojohns; 05-10-2013 at 05:12 PM.
Member
Just a heads up: you can get the OTC on eBay for $30 less... likewise, if you don't want to put that type of money out: at least around here, one can rent one for $10 for two days at several of the auto parts stores.
 Posting Permissions


 Reply With Quote
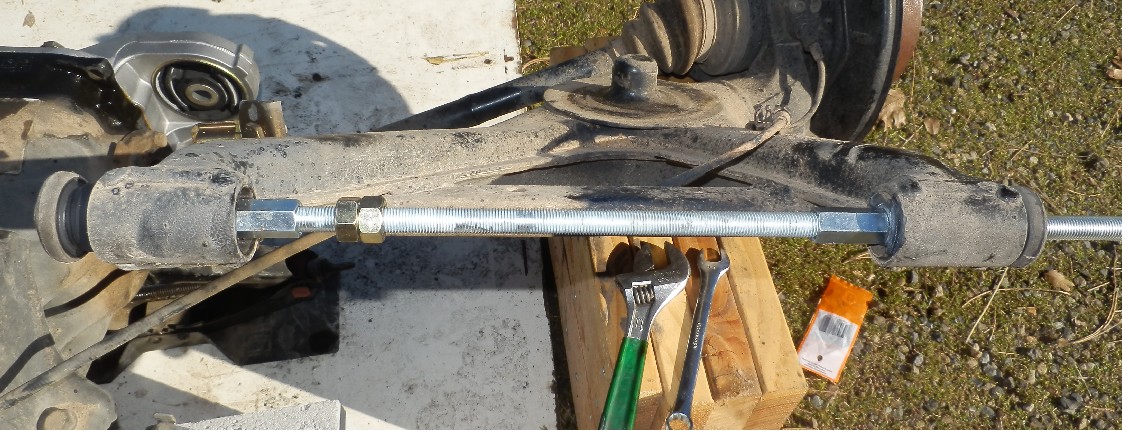


Bookmarks