

 Member
Alrighty, time to get this build log started.
A word of warning... I tend to get wordy and post lots of pics. Sorry, or you're welcome, you choose.
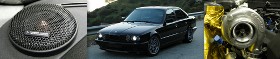
The car is my DD that I've owned for for 10 years now, a 2000 BMW 540i 6-speed sedan in titanium silver with black interior. I love the silver, I haven't washed the car since last fall, yet it still looks sort of clean, even though it's actually filthy, see below...
The car:
Fun with Photoshop...
The headunit, a Panny Bottlehead (CQ-TX5500W):
The above replaced a Pioneer touchscreen unit (AVH-3400BT) that I never used for anything besides an iPod/iPhone interface, that was slow, so I ditched it. The Panny fit just fine in the double din bezel I was using, and looks/sounds much better...absolutely loving the VU meters...
Amps, speakers, processor:
Zapco 150.2 (need to purchase) - right side mids and highs
Zapco 150.2 (need to purchase) - left side mids and highs
Zapco 400.2 (need to purchase) OR Soundstream Ref4.760 (own) - mid bass
Soundstream Ref1.1000 - subs
Zapco DSP-Z8
Hybrid Audio 3-way front:
L1v2s
L3SEs
L8v1s
Acoustic Elegance IB15au's (I ordered these first in case they took a while to get, but they really didn't, and arrived exactly when John said they would!)
Last summer I decided to "freshen up" my motor since it hit 115k miles, and I plan to keep this car a long time. So, I replaced the intake manifold (w/ an M60 manifold) and gaskets, VCGs (and powder coated the VGs), upper/lower timing chain gaskets, timing chains, chain guilds and tensioner, oil separator (why I started all this), CCV and related, upper and lower oil pan gaskets, spark plugs (iridiums), fuel filter, every o-ring I could find... the complete front suspension (still need to do the rear), Koni's all around, rear differential (w/ an M5 3.15 LSD) and clutch, resurfaced my lightweight flywheel, etc...
Runs awesome. Saved, I don't know, $6-7k in labor by doing everything myself. Here's a pic as I was re-assembling... oh so fresh and clean
A couple years ago I took the car to an audio place and had a mediocre system installed that sounded not better than the stock system, with a sub added. Polk db 5 1/4" 2-ways in stock positions w/ a Kenwood powered sub (KSC-SW10, a 5x7 driver w/ a 5x7 passive radiator) under the glovebox. Oddly enough, this set up, despite the small drivers and no processing, gives me a good amount of front impact/attack, hit me in the chest type of feeling that a thread on DIYMA goes on and on about. Problem here is the otherwise mediocre sound and lack of real midbass. Amp was a JL XD700/5 for the Polk mids and highs.
Ground loop noise got to me and I started tearing into the system. Saw how screwy their wiring job was, and re-did everything. Exactly what I didn't want to do. Get back into OCD car audio...: I discovered one of the channels on the JL amp was the source of the noise, and replaced it with a Soundstream Ref4.760... much, much quieter and more power.
This is where I'm starting from.
Install will include door build outs for the L8s, A-pillar fabrication for the L3SEs (glassing), grinding the flanges off the L1v2s to get them in the oem positions, and building an baffle for the AE subs. My car doesn't have the fold-down seats option, so that should be easier...
This will be my first car audio install attempt since my old-school days (mid/late 80's) of RF and Alpine back in SoCal.
First attempt at using a router, and first attempt at fiber-glassing, so we'll see... :blush:
...and yes, this build will be on DIYMA as well, and honestly, will likely be updated over there more often, so HERE is where it's located...
BTW, I will not be treading new ground here with this install, since I will be going by e39 installs done previously by Benny Z, Timmay77, and others... Thanks guys!
Last edited by EditTim; 03-27-2013 at 02:22 AM.
BMWCCA #164901
Current Rides:
'12 X5 xDrvive35i
'07 Aprilia Tuono Factory
Past rides:
'00 540i 6spd,'88 750iL,'88 735i,'79 320i,'and 78 Suzuki GS750
mas (4ohm) member #3
nice! subscribed.
- - - Updated - - -
*also, you may want to ask scott about the oem L1. i don't know current state, but i know he had been working on a raw L1 without mounting flange for oem placement use.
Member
Thanks Ben! It is your old e39 install, rogan's too, that provides 80% of the plan I'm going to follow, especially the L8 door baffles. Which reminds me, how did you fasten the finished door baffle to the inner door skin, besides the 3 bolt holes from the oem plastic baffle/enclosure. I know rogan used some wooden blocks to kind of sandwich the lower door skin along the lower edge, but how did you fasten the bottom? I do have some ideas, but I'm curious how you went about this.Originally Posted by Benny Z

I do remember you mentioning the raw L1s Scott was working on for oem applications, but I already picked up some L1v2s on the cheap to experiment with... with L1v1s on the back up in case things go awry. It's the first thing I'm tackling in this install, so we'll see...
- - - Updated - - -
Alrighty, here we have an L1v2, final prototype before the production run. Note the lack of a plastic terminal cup. These were sourced from Team Hybrid member Dave Brooks on the cheap to see if they could be squeezed into the oem sails.
I know the L1v1s will fit after trimming (barely), so I figured I'd give it a shot, and if I screw up the drivers, no biggie since I have a pair of L1v1s on back up.
The L1v1s have plastic flange, so it's easy to trim those, the L1v2's flange is aluminum:
These terminal posts are just too long... so they have to go, I'll solder the speaker leads to what's left after cutting them down.
After first round of grinding, compared to the L1v1:
The grill will likely have to go:
All cut/trimmed and ready for the initial fitment:
After soldering on the speaker leads and checking the resistance to make sure I didn't screw them up, I check aiming and fitment.
Looking good, but I need to shave off more flange...
After more grinding, and fastened to a bracket:
IT FITS!!!
I failed to take a final pic before buttoning it up (for now), but I did end up grinding off the bottom part of the flange as well. The only part of the flange that remains is the top that has a bolt hole for fastening.
The driver's side L1v2 is directly on-axis pointed at my left ear.
The passenger's side L1v2 point's at my right ear. It's in there. You really can't tell it isn't oem, at least until the pillar build out and the L8s replace those anemic 5 1/4" Polks...There's nothing where the oem mid was (next to the A/C vent)
Yes, this is going to be a 1 seat car...
- - - Updated - - -
Sub baffle time!
I picked up a 4'x8' sheet of 3/4" birch plywood for most of the baffle from Home Depot. They only had one piece in stock, and a corner was f'd up, so they took $10 off (yay) and cut it into 4 pieces for me, $35. I'm using a layer of 3/4" MDF too that the subs are actually going to be mounted to. A total of 5 layers of 3/4" birch/MDF.
After the layers were initial cut to size, with subs on top for general placement:
Time to break out the router and Jasper circle jig. I've owned this router for years, but only used it once last year briefly.
OK, circles are cut!
The plan for the layers:
1 - a piece of birch with the ski-pass cut out. Goes against the seat back to give the rest of the baffle something flat to bolt to.
2 - a piece of birch that surrounds the subs and acts as a spacer so the cones' suspension have room to move.
3 - the piece of MDF, routed a bit to counter-sink the subs. Again, to make room for the cones' suspension.
4 - goes behind the subs to add mass and stiffness.
5 - same as layer 4.
Now it's time to round the edges. Having a router is quite nice!
I went ahead and painted the MDF piece black to help with moisture.
Now I've got to cut out the ski-pass. My car didn't come with this option either, lol...
Last edited by EditTim; 03-27-2013 at 03:46 PM.
BMWCCA #164901
Current Rides:
'12 X5 xDrvive35i
'07 Aprilia Tuono Factory
Past rides:
'00 540i 6spd,'88 750iL,'88 735i,'79 320i,'and 78 Suzuki GS750
MIA
TRM Turbo, Hybrid Audio Technologies stereo, S50 Cams, list goes on and on and on...
Member
Thanks Darren!
I actually couldn't update this thread (w/ more pics) because Bimmerforums will still auto-merge your posts (or whatever they call it now, "update" I guess
Anyhoo, back to making my own ski-pass, lol...
So, time to break out the reciprocating saw, measure twice, cut once, lol...
and done!
Now I'm checking fitment of the first layer of the baffle, with edge molding sourced from McMaster-Carr:
Right on, things coming along according to plan so far...
Here's the first 2 pieces of the baffle, with T-nuts installed, and how they'll fit together. The subs will be firing into this...
...edges painted black, and check for fitment...
I've got some butyl rope (and CCF) from Don@ Sound Deadener Showdown that will fill the gaps and make for a nice seal.
Some CDL for resonance and to fill some holes in the parcel tray, and YES, I'm keeping my full-sized spare. I've needed it way too many times here in Atlanta to lose it.
Some Damplifier to cover to whole area under the parcel shelf. Note the large 3/8" bolts that will bolt everything to the sheet metal behind the seats. There's three across the top (shown), and two across the bottom (not shown). This is in addition to the 12 fasteners around the ski-pass and 2 more that only bolts layer 1 to the seat back. The first two layers are now glued and screwed together.
There are gaps between the baffle and the seat back metal, so I used a caliper to check the thickness of the gaps, and made spacers...
I hate MDF. A couple of the MDF spacers separated and had to be re-glued. The glued bond between the spacers and the baffle was stronger than the bonds holding together the particles of the MDF itself. Nice. Never again...
Now it's time to carpet the rest of the baffle. I used Flexform Medium Graphite to try to match the rest of the trunk carpet, which is NOT a salt & pepper varying color like most trunk liners. It's a solid grey, no lights and darks. This unit will then bolt to the first two pieces with the (5) 3/8" bolts and T-nuts mounted to layer 5.
Sophie is like, "Oh come on dad, hurry the hell up on this project, we've got some walking to do!"
"Sorry Sophie, this project has barely started..."
...and installed. Man, this thing is SOLID!
The gap at the top will not be seen. All of the amps (besides the sub amp) are being mounted to an amp rack installed under the parcel tray (not fabricated yet), blocking the view of said gap. You'd have to bend way down to see it anyway.
Now it's time to deal with mounting the sub amp...
Initially I was planning on using Zapco Z-2KD for sub duty, but it's a touch too long for the location I want to put it.
The Soundstream Ref1.1000 is a great, class G amp that will give my AE subs plenty of power and headroom. The Ref4.760 I currenty have has been great. No noise, super clean, and great sounding, so I figured I couldn't go wrong with the Ref1.1000, and coming in at just under 19" long, it BARELY fits, once I take out the stock amp and brackets.
By BARELY, I mean it will only go in heatsink first. So, I ditched the rear cover and replaced it with plexiglass, with a gap all around to provide proper ventilation.
Now I have to rig up a bracket or two to mount this thing...
The stock amp and brackets... out with the old:
...and in with the new...
Well, this brings the build log to current status. The rest of the progress will be in real time (read: slow).
I should have the amp brackets done by the weekend, and then I'll get started on the pillar build outs. Breaking new ground for me for sure...
Thanks for watching!
BMWCCA #164901
Current Rides:
'12 X5 xDrvive35i
'07 Aprilia Tuono Factory
Past rides:
'00 540i 6spd,'88 750iL,'88 735i,'79 320i,'and 78 Suzuki GS750
MIA
Page break
TRM Turbo, Hybrid Audio Technologies stereo, S50 Cams, list goes on and on and on...
Member
Ah, thanks man!
Question for ya though. What are your thoughts on the stock speaker wires for higher powered systems like yours, and (soon to be) mine?
I'll be running Knu's 10g twisted wire for the subs, but for the front components I'm torn. They appear pretty good for oem, twisted pairs and an ok guage size... alright for the front stage? Or maybe use oem for mids and highs from the Z-150.2's, while going to say, Knu's 12g or 16g for the L8s? Not sure how easy it will be to squeeze that wire through the door's wiring jacket though. What do you recommend?
Last edited by EditTim; 03-29-2013 at 02:18 PM.
BMWCCA #164901
Current Rides:
'12 X5 xDrvive35i
'07 Aprilia Tuono Factory
Past rides:
'00 540i 6spd,'88 750iL,'88 735i,'79 320i,'and 78 Suzuki GS750
mas (4ohm) member #3
i've always used the oem twisted pair speaker wiring. it's something like 17 guage, good stuff.
Member
wow bb
KEVIN
BMW CCA # 416146
Current 2001 525i-5 / 234,000 Miles
///M Weighted Shift knob.
CD43 with AUX retrofit + Bluebus
Auto Dimming Mirror upgrade
H&R Sport / Koni STR.T
OEM Xenon HID Retrofit
The Ex- 2000 540i-6 / 82,xxx miles to 186,xxx miles
CDV Free, 545i Shifter and ///M Weighted Shift knob.
Member of DSC Module Failure Club $$
Member
I'll be tearing into the door plugs here soon and let you know how much room is in there. OEM wire seems a little small for the L8s to me. Might use them for my mids/highs, depending on how much room is in the plug.
Member
Thanks Josh, I'd appreciate that. Although it's good to know that the oem wiring worked just fine in Benny's install with the L8s, so I am leaning toward passing on replacing the oem stuff.
I did run across this which further supports the use of the oem wiring...
source: http://www.roger-russell.com/wire/wire.htm#wiretable

BMWCCA #164901
Current Rides:
'12 X5 xDrvive35i
'07 Aprilia Tuono Factory
Past rides:
'00 540i 6spd,'88 750iL,'88 735i,'79 320i,'and 78 Suzuki GS750
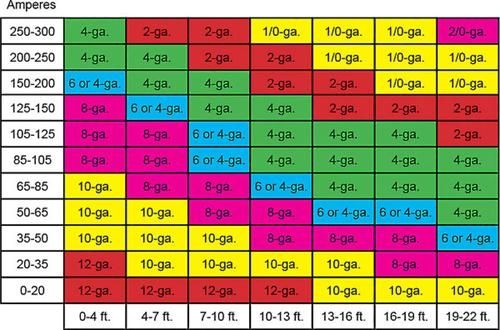
Member
I'm going buy this
And this
http://www.bcae1.com/fuses.htm
Member
I'll give that a read. Where did that chart come from?
BTW, my chart came from Roger Russell, formerly Director of Acoustic Research at McIntosh Laboratory, Inc. and originator of McIntosh Loudspeakers. He probably knows what he's talking about.
Long, but a good read... http://www.roger-russell.com/wire/wire.htm#wiretable
- - - Updated - - -
...from the same Basic Car Audio Electronics site, on their "wiring" page (pg 16), the chart you posted is for power wire, not speaker wire:

Last edited by EditTim; 03-29-2013 at 06:31 PM.
BMWCCA #164901
Current Rides:
'12 X5 xDrvive35i
'07 Aprilia Tuono Factory
Past rides:
'00 540i 6spd,'88 750iL,'88 735i,'79 320i,'and 78 Suzuki GS750
Member
I'm not trying to discredit your find, just sharing my sources.
The chart I found on diyma in a couple different wire/fuse threads. Obviously the OEM wires are tied and true, I want to run bigger just for peace of mind.
Member
...and here is the chart filled out for the L8s powered by the 400.2 using 16g speaker wire...
- - - Updated - - -
Oh, I know. I'm just trying to get to the truth of the matter.
Power wire vs. Speaker wire (in application) = Apples vs. Oranges
I'm using 0/1 for power to distro blocks, then 4g for the short runs to the amps. Two 4g runs for the sub amp.
Speaker wire is what I'm focusing on here...
BMWCCA #164901
Current Rides:
'12 X5 xDrvive35i
'07 Aprilia Tuono Factory
Past rides:
'00 540i 6spd,'88 750iL,'88 735i,'79 320i,'and 78 Suzuki GS750
Member
I honestly haven't looked at any other page on that site, so that's good to know.
Member
Both Benny Z and I have run stupid power through the factory wiring. Don't both replacing it, it's perfectly good.
I had the basic clamp system on the bottom of my door panel. It worked very well. Essentially it's screwing 2 pieces of wood together and sandwiching the door metal at the same time. If I did it again I'd use the same clamp system but extend it as far along the door frame as possible.
My concern with your install is your subwoofer mounting. With a blank covering 3/4 of each cone I'd expect issues with pressure differentials across the cone. I think you either need to use just 1 sub, or deeped the enclosure to reduce pressure differences.
Mutual Admiration SocietyFounding member
Member
Hey rogan, I appreciate your chiming in.
Yeah, I think I'll do an extended clamp system as you mention. Thanks for that!
I hadn't thought about pressure differences across the cone area regarding the subs, I was more concerned with cone suspension. I guess that's something I just have to find out once I get power to them. I've had offers from people who know what they're doing to tune the car once I'm done with the initial install, so if it's a problem, I'll find out then. If need be, I can always add another layer or two of birch to give them more room to breathe without too much problem at all. Thanks again for mentioning this as a possible issue.
BMWCCA #164901
Current Rides:
'12 X5 xDrvive35i
'07 Aprilia Tuono Factory
Past rides:
'00 540i 6spd,'88 750iL,'88 735i,'79 320i,'and 78 Suzuki GS750
Member
Flick some pics to AE customer support. Hopefully you'd get a pretty decent answer back from them. Save you shelling out for recone kits if it is a problem
Mutual Admiration SocietyFounding member
MIA
The BMW oem wiring is good. I wouldn't really bother with running all new wire if you don't have to. That said, if I had my choice I'd run 12 or 14 gauge for the L8s. But you'll be fine with the oem stuff.
TRM Turbo, Hybrid Audio Technologies stereo, S50 Cams, list goes on and on and on...
Member
I may do just that, thanks for the suggestion.
FWIW, this is a huge learning experience for me, and I tend to jump in with both feet.
My gut tells me it should be fine. There's plenty of cone area with 2 15's so they shouldn't be moving too much. I read somewhere that a guy with 2 IB15's (BuickGN on diyma, iirc) looked back at the subs when he was playing music at a decent level (95-100dBs), and saw that the subs were barely moving.
That said, I'm a newbie and understand I may have to redo everything, wouldn't be the first time, lol.
Last summer I re-installed my transmission after clutch work, only to realize I left out the throw-out bearing. Oops. Pulled it out, installed the bearing, and re-installed. This time I managed to pinch an oxygen sensor wire, and it was so trapped, the entire tranny had to come out AGAIN. The third time I re-installed it, it gave me all sorts of grief, but finally slid in properly. I was determined to finish it up, and ended up working straight through the night to do so.
Redoing work isn't my favorite thing in the world, but I'm no stranger to it...
I'm going to do exactly that. Use oem wiring for the mid & highs and 14g or 12g (if it fits) for the L8s. A chart I was using mentioned the 300 circular mils per amp guideline and for the L8s, oem wiring is undersized. 16g is fine up 298 watts (4 ohm, 5' length), and 14g for 300-400 watts. I realize the L8s will never actually see 300-400 watts, so I might go with 16g... we'll see what fits.
- - - Updated - - -
Time for some HAT porn!
Of course, we've already seen the (hacked-up) L1v2s...
So here are the L3SEs:
...and the L8v1s that have never seen power. A big thanks to Dave Brooks, one hell of a nice guy, for the deal on these drivers...
...the DSP-Z8 processor...
10g speaker wire for the subs, and RCA's from KnuKonceptz...
...and the sub amp, the SSRef1.1000. We've seen the guts, here's the rest...
(2) 4g power/ground inputs:
Still need to purchase the (2) z-150.2's, a Z8-R remote for the DSP, a XS 4900D Battery, and more wire, fuses, and dblocks from Knu.
BMWCCA #164901
Current Rides:
'12 X5 xDrvive35i
'07 Aprilia Tuono Factory
Past rides:
'00 540i 6spd,'88 750iL,'88 735i,'79 320i,'and 78 Suzuki GS750
Member
Alrighty, here's the (quick) response from John over at Acoustic Elegance:
Hi Tim,
That will put some additional resistance on the woofers. What you are really doing is making a 4th order bandpass cabinet where the trunk is the sealed enclosure, the space in front is the front chamber, and the pass through is functioning as the port. This will happen to some extent no matter how much space you have there. Getting it closer will add some additional resistance to the woofers and lower output. It shouldn't really hurt anything but moving it back 2-3" should help get a little more output. You would really have to measure the frequency response though to see what the pass through is doing and how it is functioning as a port.
Best regards,
John
I just got this, so I haven't fully processed this yet, but I do find this very interesting.
I've got plenty of power going to the subs, output really isn't a concern for me, but still.
Opinions? Two cents anyone?
BMWCCA #164901
Current Rides:
'12 X5 xDrvive35i
'07 Aprilia Tuono Factory
Past rides:
'00 540i 6spd,'88 750iL,'88 735i,'79 320i,'and 78 Suzuki GS750
Member
If he reckons it's not going to hurt the subs then go for it as built. My concern was for the subs welfare rather than tuning.
Give it a lash and if it's a problem then go back and rebuild the baffle. Might pay to make a duplicate front baffle (just the front piece) now so if you do decide to redo it you can build away at your leisure and then pop the baffle out and replace all in one hit
Mutual Admiration SocietyFounding member
Member
I'm concerned about both. I will be using the PEQ (on the dsp-z8), so there's that, but still. I could open up the hole to the diagonal support areas on the sheet metal without too much trouble... here's a mock up of where the subs are relative to the sheet metal. The ski-pass area would still be completely open, while the diagonals to the ski-pass hole would be seat foam...

BMWCCA #164901
Current Rides:
'12 X5 xDrvive35i
'07 Aprilia Tuono Factory
Past rides:
'00 540i 6spd,'88 750iL,'88 735i,'79 320i,'and 78 Suzuki GS750
Member
I'm trying to get my cut-out nice and clean like you have it. I made a cut-out awhile ago for my speaker and have not cleaned it up yet. Your system looks so nice btw, super clean, every detail!
I was looking on their website and could not decide what trim would be best. If you don't mind, which one did you order? I would appreciate it.
Last edited by E39 Sean 540ia; 04-02-2013 at 05:51 PM.
 Posting Permissions


 Reply With Quote


Bookmarks