
 Member
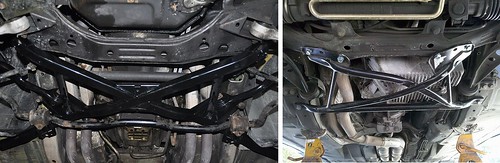
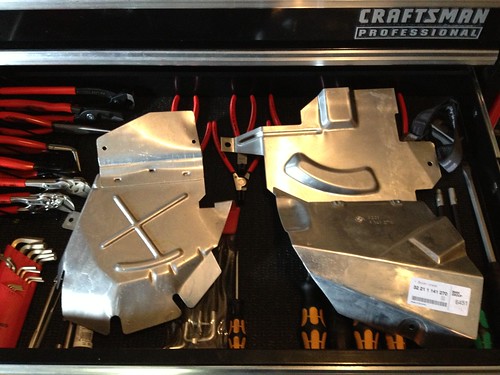
Preface/History: I did this work while my vehicle was on four jack stands and the wheels and brakes were off, that shouldn't affect this DIY but keep that in mind. Also this is a good time to refresh the upper control arms and the swaybar bushings and hardware since you will be unbolting them. The x-brace was added to later E31 models IMO most likely due to chassis flex which could be the result of the lack of a B-pillar which was a defining design feature of the "pillar less coupe". The E31 X brace is extremely similar to the later E36 x-brace but of much more substantial construction and incorporating two additional mounting points on the trailing portion of the x "arms", see below pics of the E31 (left) and E36 (right) braces.
850CSI_VS_E36_Xbrace by 93FIM5, on Flickr
Safety Disclaimer: You're on your own! This is my documentation of how I installed this part. I take no liability for anything you do wrong or if this causes issues on your vehicle or if you get injured during or after the install due to the x-brace.
Tools and Materials:
- Hacksaw or Dremel Tool with cutoff wheels
- Files
- Masking tape
- Safety glasses
- Wurth Zinc Rich Weld Thru Primer (Or whatever you wish I prefer this one)
- Wurth Matte Black Spray Paint (Again or whatever you want)
- Wurth Cavity Protection Spray (I'm not going deeper on this one)
- Loctite 246
- 22mm Socket
- 17mm Socket
- 15mm Socket
- 10mm Socket
- 22mm Wrench
- 17mm Wrench
- 15mm Wrench
- 10X1.5mm tap or thread chaser
- 14X1.5mm tap or thread chaser
- Tap handle
- Torque wrench
- Ratchets
Part Numbers and Quantities:
- 1X 31111140614 X-Brace
- 2X 31111140576 Adapters
- 6X 33331132413 Hex bolt M10X20
- 4X 07119914851 Hex bolt M14X1.5X90
- 4X 33311125916 Washer
- 2X 31111130687 Reduced shaft bolt M10X150
- 2X 07119904198 Washer
- 1X 32211137537 Heat shield front
- 1X 32211141270 Heat shield rear
- 2X 07119915017 Hex bolt with washer M6X12
- 2X 52201975880 Blind rivet nut
- 2X 07119903844 Hex bolt with washer M6X16
- 1X 07129901668 Body nut ST6
- 1X 07119916967 Hex head screw ST6
X-Brace Modification:
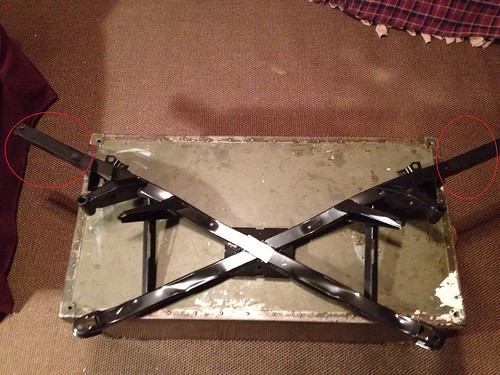
This modification is due to the fact that the E34 doesn't have the "arm" mounting points on the chassis that the later E31's do but the brace still adds rigidity in the same manner as the E36 x-brace. The next picture shows what portion of the brace we are removing.
Xbrace_Mod_Ideas by 93FIM5, on Flickr
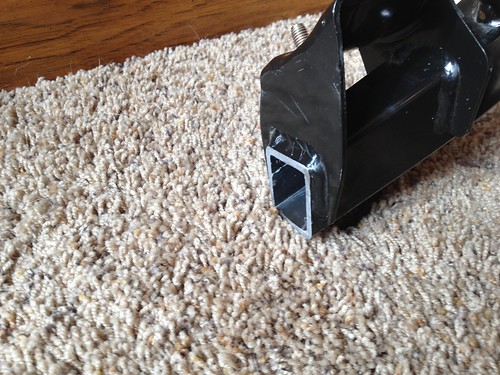
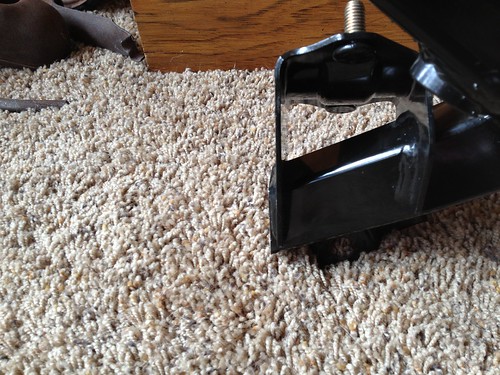
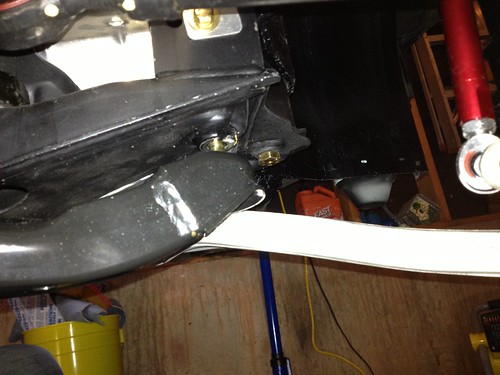
I chose to cut the arms off .25" from the plate that creates the mounting portion for the swaybar, this spacing avoids cutting into the weld of the mount point. I marked my line using masking tape so that I could create a parallel cut with the swaybar mounting bracket, then using a Dremel tool (Put on your safety glasses!!) with a cutoff wheel lightly scored the area for my cut. Here is the finished cut.
X_UpClose_1 by 93FIM5, on Flickr
X_UpClose_2 by 93FIM5, on Flickr
You next want to file any sharp corners and burs off the cut. To finish the modification clean off any cutting grit and metal shavings and remove any oils on the part prior to painting, I chose to use Wurth products with two coats of Zinc primer followed by two coats of black paint. Here is the x-brace with the modifications finished.
Xbrace_Trimmed_No_Paint by 93FIM5, on Flickr
Disassembly:
First off on flat stable ground properly chock the rear wheels and apply the emergency brake. Lift the front of the vehicle so that you are able to place jack stands under the car at the factory jacking positions. I personally use the boxed sections of the uni-body to lift at but my jack has a wide rubber pad that helps to spread the load and not damage the under body coating; use your own judgement and be careful!!! Once the vehicle is safely on jack stands be sure to check the rear chock placement again and double check to make sure the vehicle is stable.
Remove the under engine plastic cladding and the air guide to the transmission.
Locate the front swaybar and proceed to unbolt its end links and chassis mounting points. (My bar was already off since Ive been working on a new mount and bushing setup.) Set the sway bar aside.
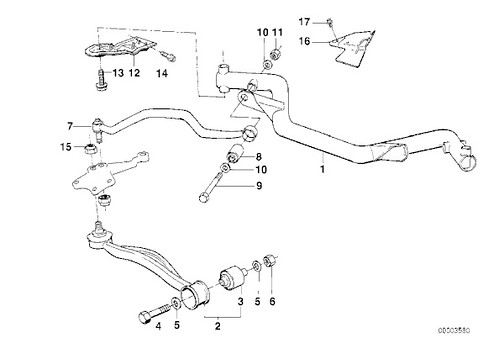
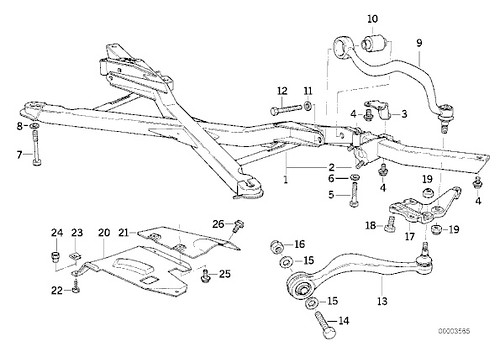
You next want to unbolt the upper control arm #7 from the cross tube which is bolt #9 and nut #11 in the below drawing, these should require a 22mm socket and wrench.
X_DIY_Cross by 93FIM5, on Flickr
After unbolting the control arm suspend it with wire or zip ties from the spring coil, try and keep it at the installed height this helps when installing the x-brace. You next unbolt the cross tube by removing #14 on both drivers and passenger sides, should be 4X bolts in total see above drawing. Finally remove #13 on driver and passenger sides , this will drop the cross tube.
With the cross tube dropped the next parts to remove are the two front subframe bolts #3 in the below drawing, I believe these were 17mm but I need to double check.
X_DIY_Front_Subframe by 93FIM5, on Flickr
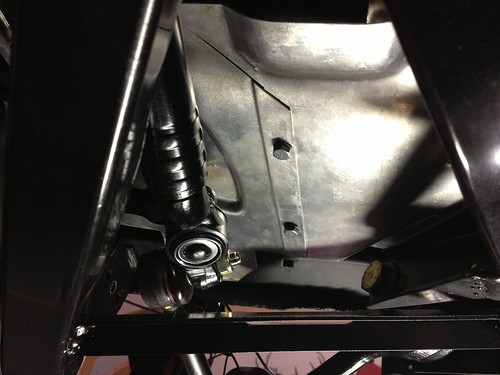
Now is a good time to clean up the rear mounting points of dirt and grime as well as the pads where the front subframe bolts came out of. Once things are cleaned up chase the chassis mount threads for the M10 and M14 bolts to clean out any rust or previous Loctite.
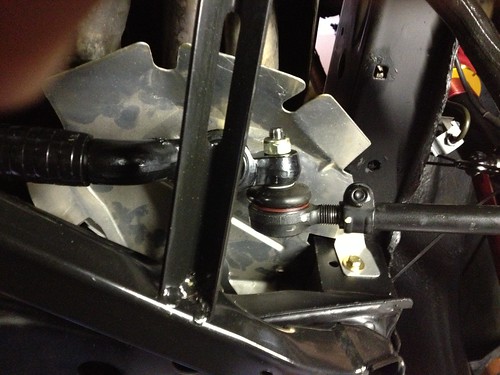
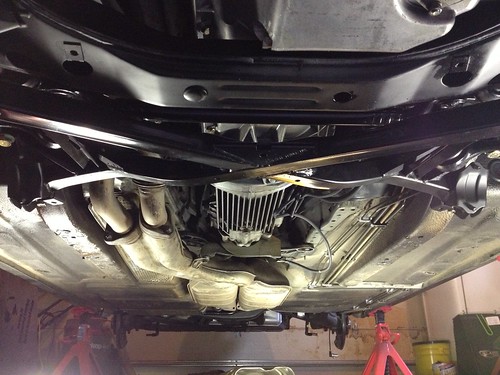
The last thing to do before assembly is to remove the old heat shields since they will not work with the x-brace, instead you will be using a slightly modified 850csi part.
X_Brace_Shield_2 by 93FIM5, on Flickr
Remove this heat shield, it is held in place by the bolt attached to the subframe directly ahead of the tie rod in the above picture and one bolt that threads into the top of the subframe you will need a 10mm socket and ratchet. Its easiest to remove the heat shield by pulling it out from in front of the subframe.
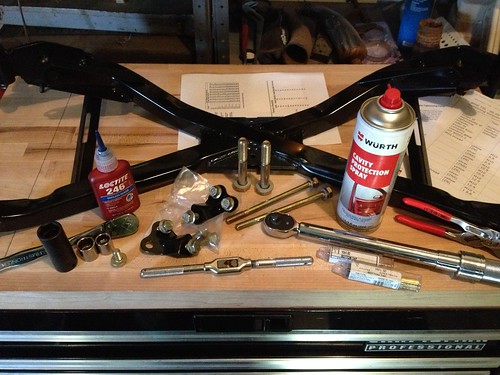
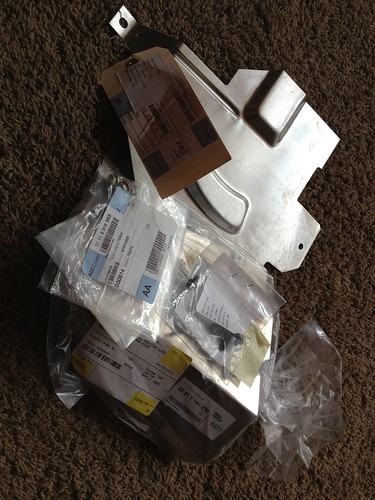
Assembly:
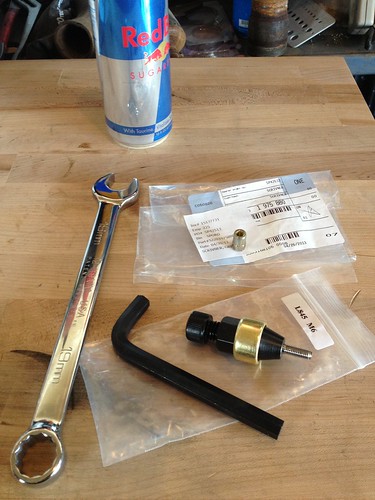
X_Install_Supplies by 93FIM5, on Flickr
So with all your tools and parts out and ready to go the first parts to be installed are the two adapters (Y shaped black brackets in the above pic, PN 31111140576 2X with bolts PN 33331132413 4X).
I sprayed a small amount of Wurth cavity protection spray on a rag and wiped the face of adapters as well as the chassis to help with rust protection. Adapter mounting point.
X_Adapter_Point by 93FIM5, on Flickr
This set of work was done on my back and lifting the x-brace into position off my chest, with all of the hardware easily at hand; if you have someone to help now is a good time. Apply Loctite 246 to bolts PN 33331132413 4X and use them to fasten the adapter finger tight but still allowing play in the bracket. Next using bolts 07119914851 2X (The big ones) mount the x-brace in position but not torqued down, you are making sure the Y adapter brackets are aligned with the x-brace mounting holes. Finally thread the two front subframe bolts through the x-brace and front subframe and into the chassis to ensure alignment. If everything aligns well drop the x-brace on to your chest being sure not to move the adapters and torque the adapter bolts to 47NM (This value was based off BMW TIS info, if someone has a better reference Id like that) using a 15mm socket and your torque wrench.
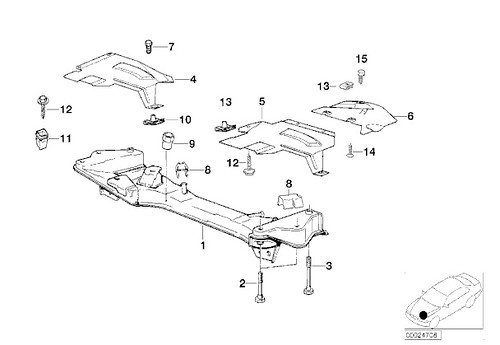
With the adapters torqued to spec now comes the easy part. Apply cavity protection spray to the x-brace and chassis mounting points and apply Loctite 246 to bolts 33331132413 Hex bolt M10X20, 07119914851 Hex bolt M14X1.5X90, and 31111130687 Reduced shaft bolt M10X150. Next press the x-brace in place and install bolts 07119914851 finger tight and ensuring everything is properly aligned, bolt #5 in the below drawing.
X_DIY_Drawing by 93FIM5, on Flickr
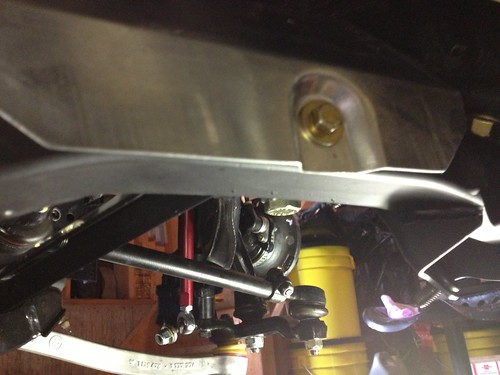
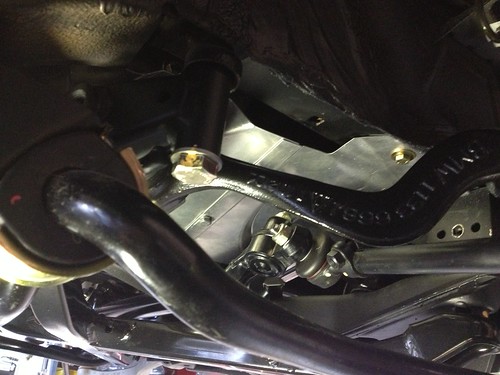
With the x-brace being held by the two M14 bolts (#5 in above drawing) install the two remaining M10X20 Bolts (#4 in above drawing) thru the x-brace and into the adapters. You should have something that looks like the below pics now for the larger M14 bolts and the smaller M10 bolts.
X_Installed_Drivers_Side by 93FIM5, on Flickr
X_Loose_2 by 93FIM5, on Flickr
The next step is to install the longer reduced shaft bolts (#7 in below drawing PN:31111130687 Reduced shaft bolt M10X150) thru the x-brace and front subframe, make sure you applied Loctite and torque to 47NM.
X_DIY_Drawing by 93FIM5, on Flickr
X_Loose_1 by 93FIM5, on Flickr
Finally torque the adapter to x-brace bolts M10X20 Bolts (#4 in above drawing) to 47NM and the two M14 bolts (#5 in above drawing) to 127NM.
The last thing to install is the new heat shield setup from the 850csi. Below is a comparison between the new shields and the old shield (I forgot to include a picture with the upper control arm shield which is the reason behind using these since it no longer fits).
X_Brace_Shield_4 by 93FIM5, on Flickr
X_Brace_Shield_1 by 93FIM5, on Flickr
Start by mounting the rear heat shield (PN 32211141270) to the x-brace with the M6X16 bolt (PN 07119903844).
X_Brace_Shield_RA by 93FIM5, on Flickr
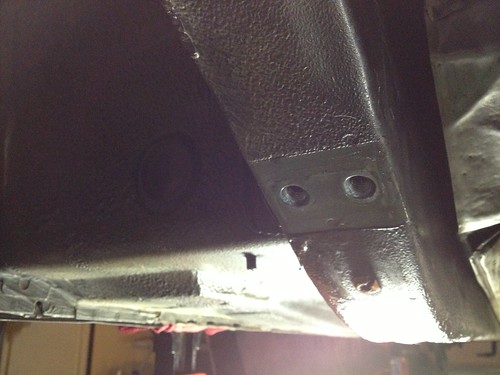
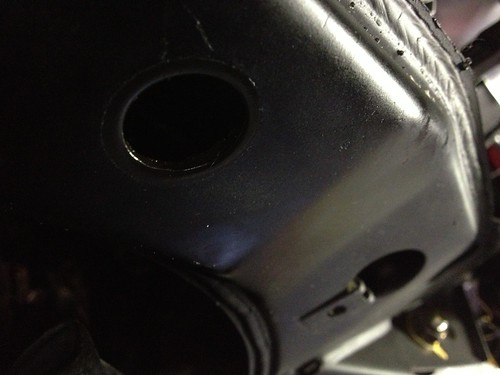
Next remove the plastic plug that is on the passenger side of the lowest point of the subframe, see below pic circled in red.
X_Plug by 93FIM5, on Flickr
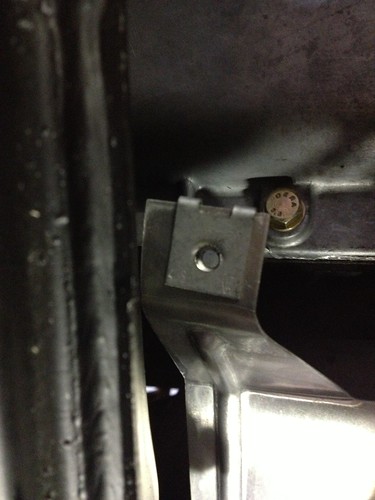
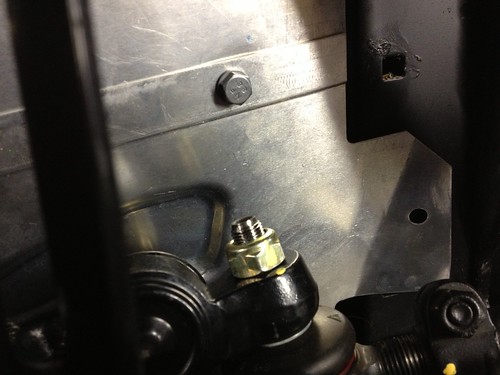
With the plug removed now take the forward heat shield (PN 32211137537) and attach the body nut (PN 07129901668) to the leg of the shield like you see in the below pic.
X_Brace_Shield_BN by 93FIM5, on Flickr
Next using the self tapping screw (PN 07119916967) and going through the hole that you just gained access to by removing the plug attach the front heat shield to the subframe.
X_Brace_Shield_Hole by 93FIM5, on Flickr
(It appears that its possible to install a rivet nut in the subframe replicating the OEM setup but I believe the subframe would have to be dropped to do this, thus the body nut use above.)
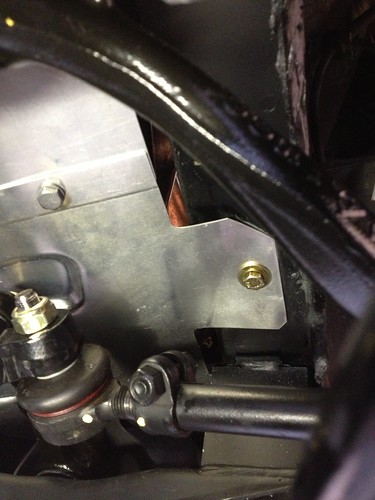
Once the front and rear heat shields are loosely in place attach the front heat shield to the rear shield using two M6X12 bolts (PN 07119915017), should look like the following.
X_Brace_Shield_Mid by 93FIM5, on Flickr
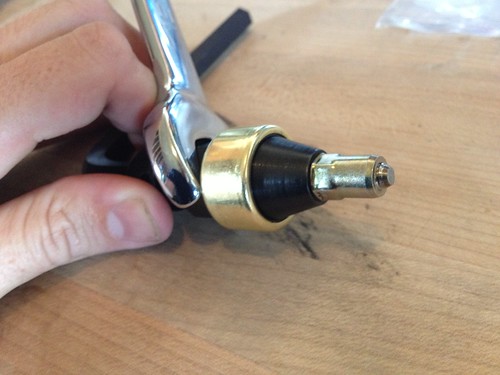
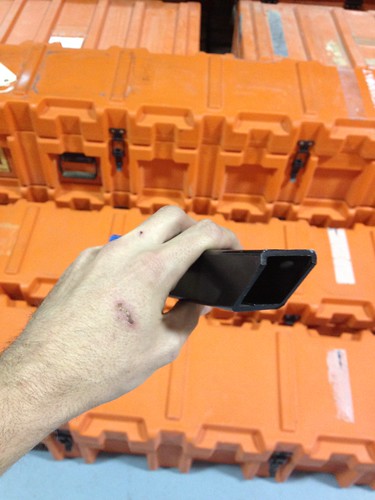
Last you need to install the blind rivet nut (PN 52201975880) into the chassis in the hexagonal hole in the passenger rail which requires a special tool from Atlas, L845-M6.
Rivet_Nut_X_2 by 93FIM5, on Flickr
Here is the insert on the tool ready to be inserted in the hole on the frame rail.
Rivet_Nut_X_1 by 93FIM5, on Flickr
After you install the rivet nut secure the heat shield with a M6X16 bolt (PN 07119903844). Here is a pic showing the location of the hole on the front shield that needs to be bolted to the chassis via the blind rivet nut.
X_Brace_Shield_SA by 93FIM5, on Flickr
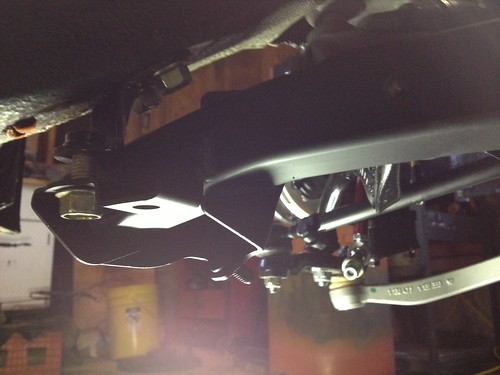
You will need to man handle the shield in place a little but it lines up and makes a tight fit.
X_Heat_2 by 93FIM5, on Flickr
X_Heat_1 by 93FIM5, on Flickr
You now have an x-brace with proper heat shields. The tool to do this can be bought here http://www.enfasco.com/atlas-fasteners.php or I am happy to rent mine out for $10 plus return shipping.
X_Installed_Front by 93FIM5, on Flickr
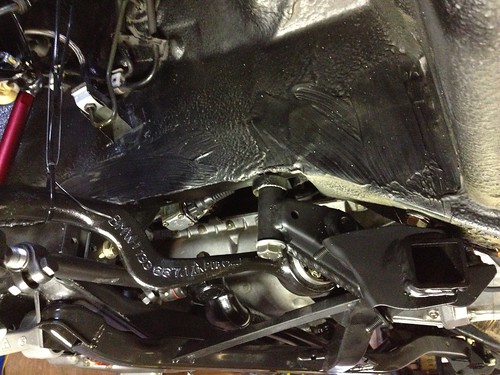
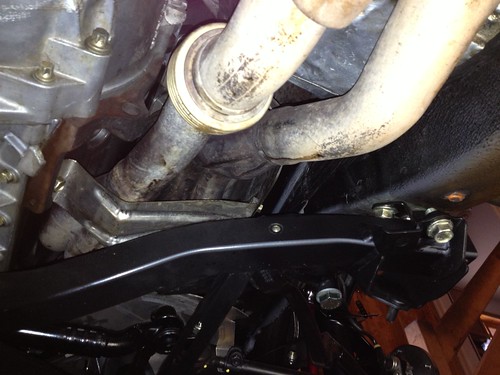
Finish the install by reinstalling your upper control arms remembering to tighten under load if you have bushings and reinstall your swaybar and front engine cover. Also the x-brace actually opens up room for down pipes for those who care, see below pic.
X_Downpipe_Clearance by 93FIM5, on Flickr
References:
www.bmwtechinfo.com/repair/main/941en/index.htm
Last edited by 93FIM5; 07-27-2013 at 08:57 PM.
"You may all go to Hell, and I will go to Texas."
Davy Crockett
www.Angry-Ass.com
My Build Thread Part 1, Part 2
DIY E31 X-Brace Mod and Install
DIY Rear Seat Backrest Modification for E32 Armrest
License Revoked
This rules. Thanks for going through all the effort.
Old School Punk
Wow!
This probably the most ground breaking and beneficial mod for the e34 in a few years.
Nice work!!
Member
No problem, I'm hoping to tweak it a bit more especially with regards to the heat shield and the under body panel for the transmission.
"You may all go to Hell, and I will go to Texas."
Davy Crockett
www.Angry-Ass.com
My Build Thread Part 1, Part 2
DIY E31 X-Brace Mod and Install
DIY Rear Seat Backrest Modification for E32 Armrest
Member
Awesome!
Impractical
Moderator
If you're planning on tweaking it, let me know when you think it's done and I'll move it to the DIY subforum. Great work!Originally Posted by 93FIM5

Current: '94 MX-6 V6/5 '72 240Z '10 Mazda5
Past: '02 330i/5 '85 RX-7 GSL-SE '95 540i/6 '95 525i/5 '86 635CSi/5 '88 JZA70 '86 4K quattro '85 RX-7 S
Wish list: Type 44 Manta Pre-'85 CGT 405 Mi16 SVX W123 Coupe
Nur die spitze. . .
Nice. Just two questions, does the plastic under tray piece fit sorry this is answered around the X-brace and what color chalk do we use on the rear wheels?
Last edited by CO535i; 03-25-2013 at 04:34 PM.
Truth suffers from too much analysis.
Member
BAHAHAHAHA will fix. Thanks for the seeing my oversite!
- - - Updated - - -
Thanks sure will!
"You may all go to Hell, and I will go to Texas."
Davy Crockett
www.Angry-Ass.com
My Build Thread Part 1, Part 2
DIY E31 X-Brace Mod and Install
DIY Rear Seat Backrest Modification for E32 Armrest
banjo_84us@yahoo.com
No absurd claims of how much better the car handles? This DIY is incomplete.
Member
Unfortunately I wont be able to do a back to back since Ive changed way to much since before the brace was installed, in fact I'm sure my car will handle worse the first time I drive it. Gonna take a lot of work to get mine setup correctly. . . I just ordered in the 850csi heat shield and aero pieces so I should have some answers next week.
"You may all go to Hell, and I will go to Texas."
Davy Crockett
www.Angry-Ass.com
My Build Thread Part 1, Part 2
DIY E31 X-Brace Mod and Install
DIY Rear Seat Backrest Modification for E32 Armrest
Member
I've been looking into this same mod....thank you very much for the awesome write-up.
License Revoked
Greg, do you have a guess as to how much the X-brace weighs?
Member
I have better than a guess, I weighed the x-brace before and after the mods along with the stock cross brace.
X-brace: 22.0lbs
X-brace Modified: 19.0lbs
E34 Cross brace w/ support plates: 9.0lbs
So this mod adds 10lbs to the lowest part of the chassis and its still behind the front axle, was a worthwhile trade off for me.
Last edited by 93FIM5; 03-25-2013 at 06:52 PM.
"You may all go to Hell, and I will go to Texas."
Davy Crockett
www.Angry-Ass.com
My Build Thread Part 1, Part 2
DIY E31 X-Brace Mod and Install
DIY Rear Seat Backrest Modification for E32 Armrest
Member
very good diy install and nice photos , looking forward to install mine when it arrives from germany , hope the e31 heat shield and the other bits and pieces works and fits to.
good work with the m5 too .
Member
This thread is fantastic!!
What did the brace and associated items cost from the stealers?
Avus E34 525i Sport with Stroked M50B30TUHybrid, Lysholm AX1600 Supercharger and a nut at the wheel...
Member
Great work! Adding this to my wishlist!
-Eric
2 E34s. 1 E36. 3 Mx-6, 2 626, 06 Trailblazer SS, '73 Vette, 5VZ 4runner, and one insanely screwed up property tax bill each year.
Member
Thanks guys glad I could contribute!
"You may all go to Hell, and I will go to Texas."
Davy Crockett
www.Angry-Ass.com
My Build Thread Part 1, Part 2
DIY E31 X-Brace Mod and Install
DIY Rear Seat Backrest Modification for E32 Armrest
coolant level
Damn, I wish I thought of this when I had my e31 parts car.
banjo_84us@yahoo.com
$357 for just the brace from ecstuning
It's only on later models, 4/92 and up.
Member
Your looking at around $380 for the hardware and brace plus whatever shipping costs, which isn't bad when you consider what say a good strut brace runs.
"You may all go to Hell, and I will go to Texas."
Davy Crockett
www.Angry-Ass.com
My Build Thread Part 1, Part 2
DIY E31 X-Brace Mod and Install
DIY Rear Seat Backrest Modification for E32 Armrest
BMW CCA Member
Punching all of the part #'s & quantities into thebmwpartstore.com I get just under $354 for all of the parts. Not sure what shipping something that large is going to cost.
It's something I'm thinking about. But I don't have a welder or the welding skills to close up the tubes after they get cut off. So that complicates things somewhat for me. Really wish I knew how to weld anything. Maybe someday I'll figure that out...
Cosmos Black/Black 1995 540iA M-Sport
BMW Individual Exclusive Edition, 1 of 65 total, 9/25/95 Build
OEM additions include Euro trim, passenger seat mounted first aid kit, tool kit warning triangle, clears all around, black chrome exhaust tips, spare tire well gas can, and rear armrest fridge.
Waiting for install is an adjustable lumbar support, & drivers side glove box...
Member
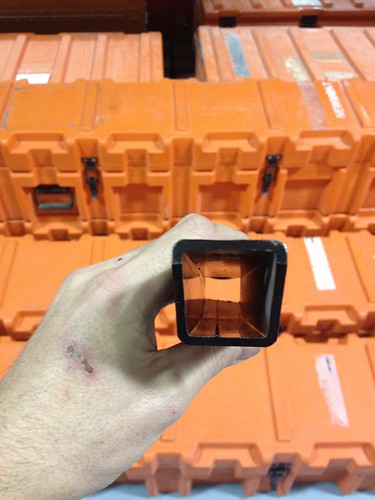
I didn't weld up the tubes, as the brace comes the two arms you are cutting off aren't sealed in any way just a piece of square tubing. I simply primered, painted, and coated with cavity wax.
"You may all go to Hell, and I will go to Texas."
Davy Crockett
www.Angry-Ass.com
My Build Thread Part 1, Part 2
DIY E31 X-Brace Mod and Install
DIY Rear Seat Backrest Modification for E32 Armrest
BMW CCA Member
I know you didn't weld them closed. But they weren't closed from the factory? Hard to tell from the pics but I was thinking that the tube was closed up in some manner and when you cut them shorter to work that it would no longer be closed...
Cosmos Black/Black 1995 540iA M-Sport
BMW Individual Exclusive Edition, 1 of 65 total, 9/25/95 Build
OEM additions include Euro trim, passenger seat mounted first aid kit, tool kit warning triangle, clears all around, black chrome exhaust tips, spare tire well gas can, and rear armrest fridge.
Waiting for install is an adjustable lumbar support, & drivers side glove box...
Member
"You may all go to Hell, and I will go to Texas."
Davy Crockett
www.Angry-Ass.com
My Build Thread Part 1, Part 2
DIY E31 X-Brace Mod and Install
DIY Rear Seat Backrest Modification for E32 Armrest
Member
Sweet interchange!
 Posting Permissions


Bookmarks