Moderator - please review and post to the DIY section if it's ok. I hope I didn't break etiquette by referring to DIYs on the e90POST website.
All - DIYs are for self-help and not intended as professional instruction. PLEASE if you see anything amiss here let me know and I'll update the DIY. In some cases I took the photos after-the-fact so things may seem out-of-step (for example, in step 2 you drain oil and remove filter, and in step 5 you remove the air intake duct - the photo for step 5 shows the filter cap still on).
There is a great DIY for this procedure on the N52 engine at
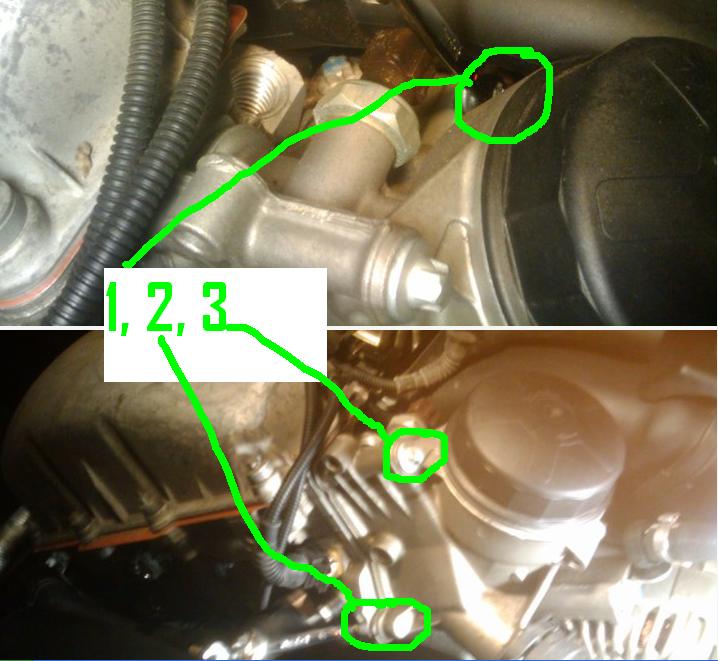
http://www.e90post.com/forums/showthread.php?t=476419. However the process is a piece of cake on the N52 - not so lucky on the N54. I swiped this photo (posted on the e90POST forum by allmotor22) from that DIY to show the general location of the three Oil Filter Housing (OFH) bolts. It's the #1 bolt that causes all the problems because it's completely under the intake manifold on the N54.
This DIY is for an e90, 2007 automatic 335i without sport package. Your results may vary, based on options. For example, your OFH may have an oil cooler attached, and you may have an intercooler that might require a different DIY for the coolant flush. If you have the oil cooler I believe you can leave it untouched for this DIY, but I'm not 100% sure.
Many e90 cars have three common problems at around 100k miles:
- failed oil filter housing gasket
- bad water pump
- bad thermostat
I wonder how many people (like me) got the call from the service department to tell them that all three needed to be done (at a cost of over $2k). Maybe because the three problems are related? Little hardened bits of rubber from the OFH gasket circulate throughout the cooling system and eventually foul the water pump and thermostat. At least that's my theory. I know that I found lots of black rubber bits in my coolant when I replaced the water pump/thermo.
On one DIY the poster used blue tape (like painter's tape) to tape up anything that needed to get reattached - good advice since I woke up in the middle of the night realizing I'd missed step 38.
Parts:
- Oil Filter Housing (OFH) gasket part#11427537293
- Oil filter kit part#11427566327
- Gallon of BMW antifreeze part#11141467704
- 7 quarts of BMW oil part#11510017866
- You may want a new set of air intake manifold gaskets part#11617547242
- You may want to replace the air filter element since you'll have it out anyway part#13717556961
Tools:
8mm nut driver to remove the splash guard
3/8 drive metric socket set with 5-6" extension
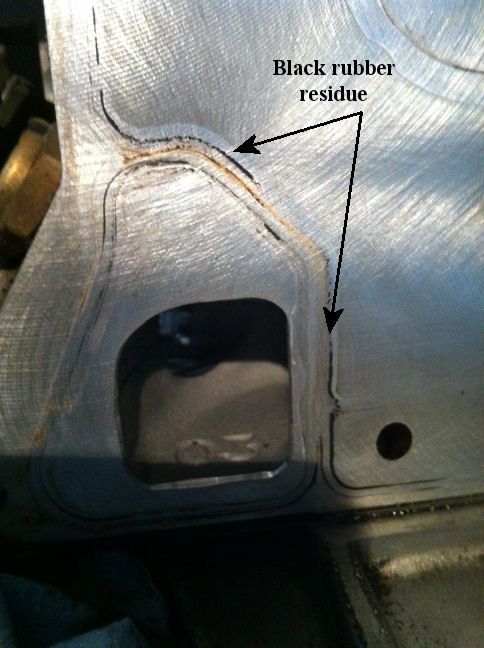
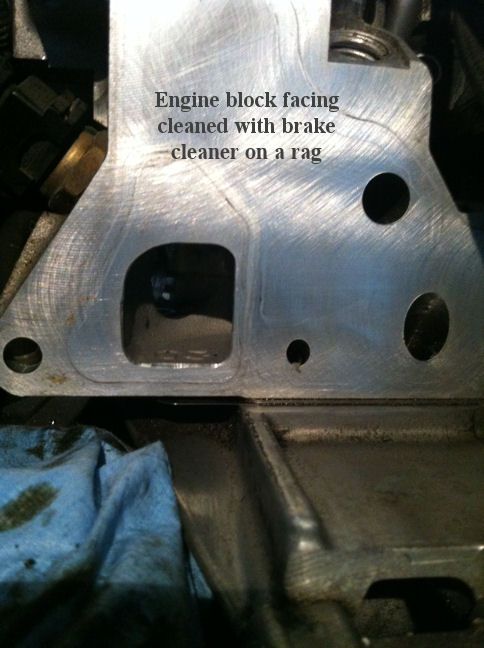
1/4 drive metric socket set with 6"extension
1/2 drive 17mm socket and ratchet (to remove oil drain plug - 3/8 will do in a pinch)
Torque wrenches for the above socket sets (if you have them)
Stubby flathead screwdriver
Regular flathead screwdriver
Awl or pick
Magnetic extension pick-up tool (if possible get the kind that has the side-protector sleeve that keeps it from being attacted to everything but what you're after)
Extensible mirror (you may need this just to see what you're doing in the aft part of the manifold, or to extract something you dropped, but it's not necessary)
3/16 allen wrench
T20 torx nut driver
Oil filter strap wrench
Oil and coolant catch pans
Funnel (with a filter screen if you're saving your coolant)
Lots of rags
Nitrile gloves
Steps:
1. Disconnect the battery - look for a battery DIY. Why you ask? Probably always a good idea, but there is an unprotected positive battery connection directly below the next-to-last aft nut on the intake manifold - believe it goes to the starter? If you drop a socket extension down there (like I did) you will quickly see that it is live. Not good. I still have my fingers crossed that I didn't screw up anything electrical.
2. Drain oil and remove filter. See oil change DIY -
http://www.e90post.com/forums/showth...t=4768&page=16. This involves jacking or ramping car and removing the splashguard. I know it's possible to change the oil without jacking/removing the splashguard, but you'll need to remove the splashguard for the next step anyway (draining coolant), and it's necessary to jack/ramp to get the splashguard out. Also, once you drop the splashguard you will see very quickly that it needs lots of clean-up. (your bad gasket leaked lots of oil - where do you think it all went?)
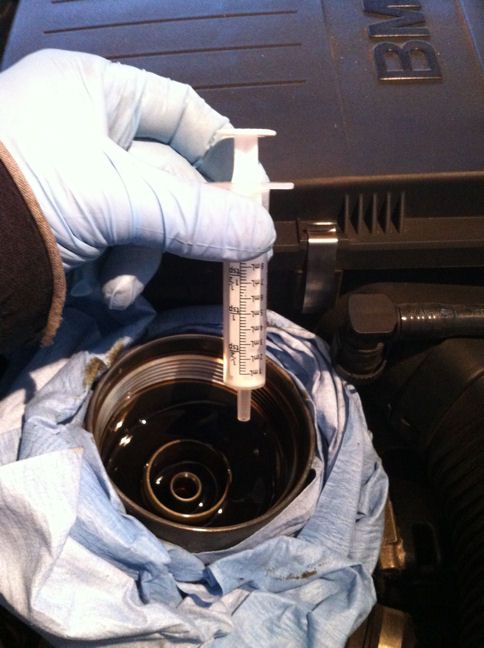
3. Remove the excess oil puddled in the bottom of the OFH. A simple medicine (not medical) syringe works nicely to remove oil left in bottom of filter housing. Otherwise just use rags. When done stuff a clean rag into the main OFH body to prevent any bits from getting in there.
4. If not replacing water-pump/thermostat at the same time, drain several quarts of coolant (see partial coolant flush DIY
http://www.e90post.com/forums/showthread.php?t=551742). The OFH has a coolant hose attached (coolant runs through the unit) and you don't want to release all that coolant onto your alternator and engine when you remove the hose/OFH. Save the coolant if you want for reinstall later, but I recommend filtering it if you do.
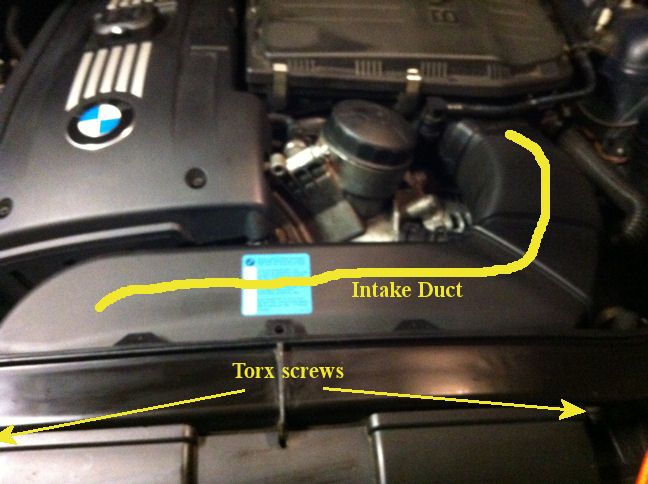
5. Remove front intake duct using a T20 torx on the two screws. The intake duct attaches to the air filter housing with two small tabs (one on each side) that can be easily pried loose by hand or with a screwdriver.
6. Pop the 5 spring clips on top of the air filter housing, lift the cover off and remove the air filter element.
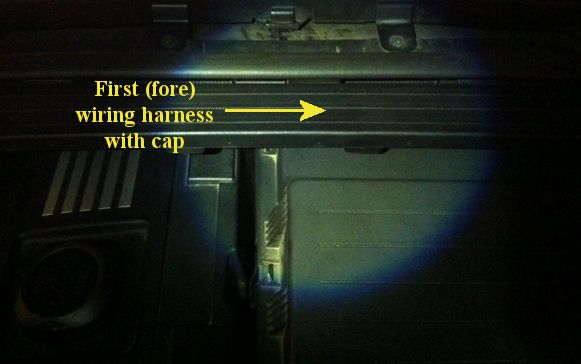
7. Release the first (fore) vacuum/wiring harnesses on the windshield wiper sill to gain a little more clearance. This may not be necessary but it gives you some more clearance. Lift cover off by prying the four clips along the front, then use the awl to depress the small tab on each of three retaining clips in the rear and slide unit forward and off the rails.
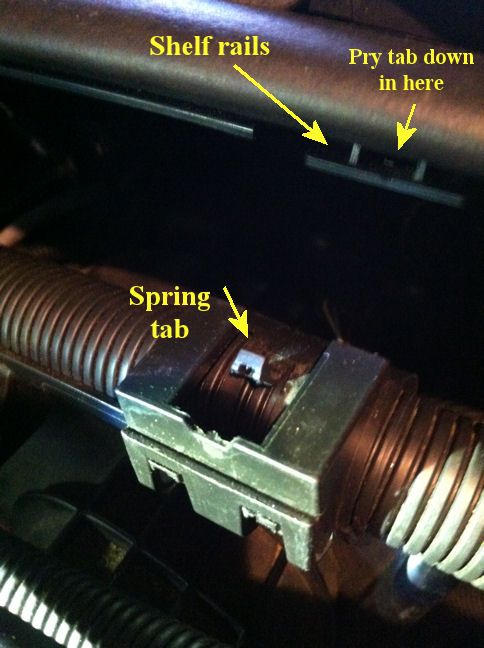
8. Release the second (aft) wiring harness. This may not be necessary but it gives you some more clearance. Use the awl to depress the small tab on each of three retaining clips and slide the unit forward and off the rails.
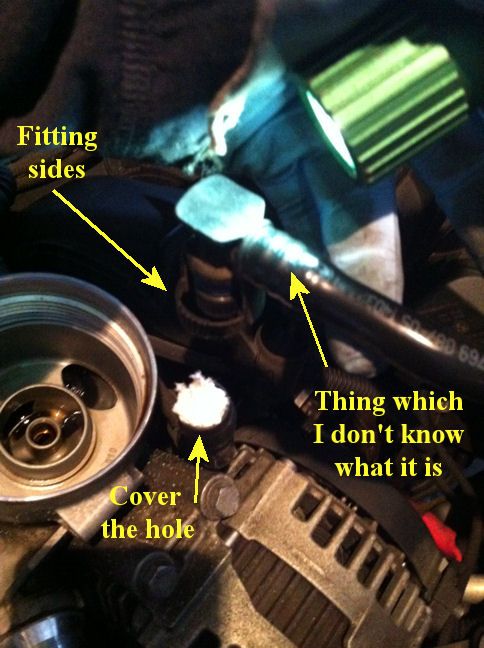
9. Disengage whatever this is (sorry, not sure what it is) by depressing the sides of the fitting and lifing up - plug the hole with cloth or cover with tape.
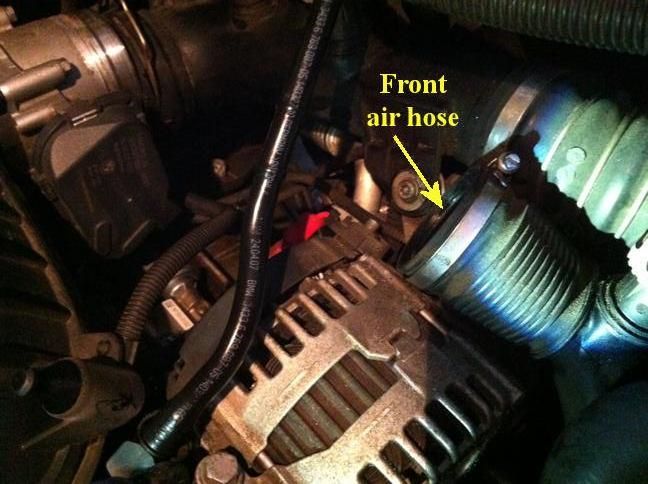
10. Remove front air hose from air filter housing by loosening clamp with a screwdriver and sliding hose off.
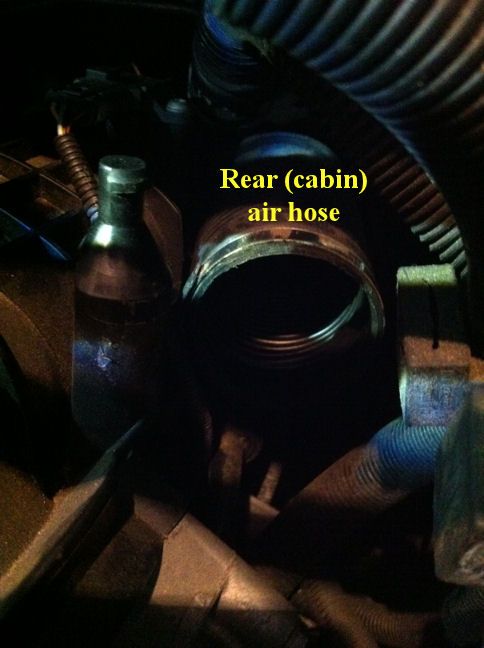
11. Remove the rear (aft, cabin) air hose from air filter housing by using a stubby screwdriver to loosen clamp and then slide hose off.
12. Each of the vacuum/wire harness lines from steps 7 and 8 are clipped to the side of the air filter housing on the driver's side. Disengage by simply pulling each of the three rubberized clips up.
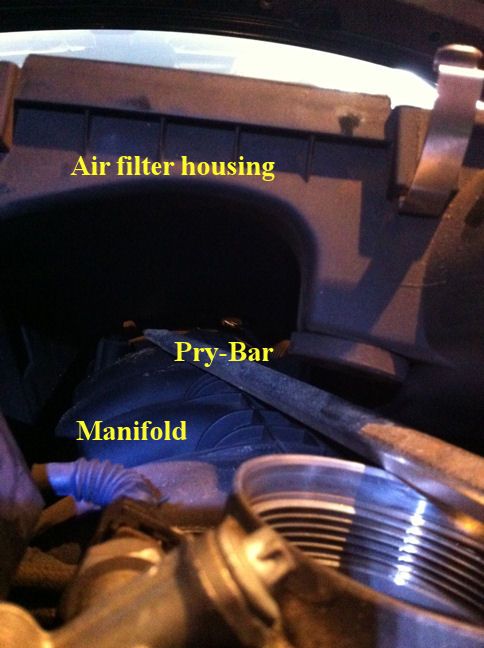
13. The air filter housing is ready to come out. It is held in with three rubberized grommets fitted over plastic posts on the intake manifold - one fore and two aft. Pop the forward one by grasping the air filter housing firmly and wiggling it back and forth while pulling up. Same with the aft-right. For the aft-left, you will need to slide a pry bar underneath and pry it up. Pull the air filter housing out.
14. Remove the electrical connector and the coolant hose from the OFH. (Note that metal clips on HOSES are pried up, but metal clips on ELECTRICAL CONNECTORS are pushed in) Pry up the metal clip on the hose until it stops, then work the hose off the OFH. Push the clip in on the electrical connector and pull the connector off the OFH.
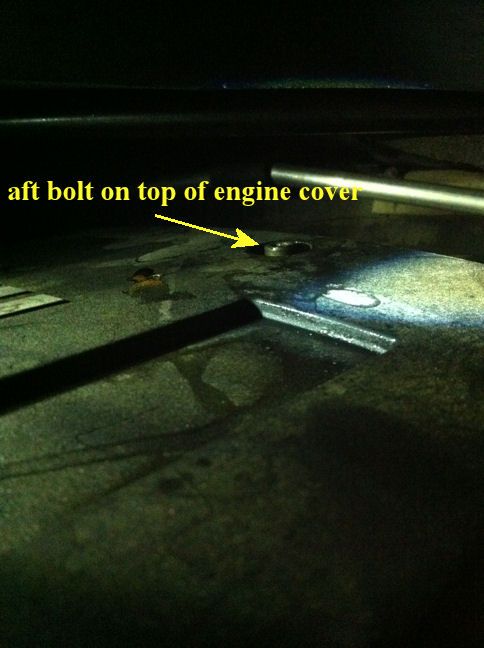
15a. Remove the engine cover to gain a little clearance for the two aft manifold nuts. This may not be necessary but it's a fairly easy step and it did seem to help. The cover is held on with four 3/16 allen bolts, two fore and two aft - one aft bolt is on the left (passenger) side of the cover and the other aft bolt is on the top of the cover. The aft one on the top of the cover is in a very tight space, so patience is needed to work it out with an allen wrench. I used an allen wrench to break it, and once it was loose I used an allen bit to finish the removal by hand, but it was very tight. The magnetic pick-up tool is useful for extracting the bolt once it's loose. Remove the two fore bolts.
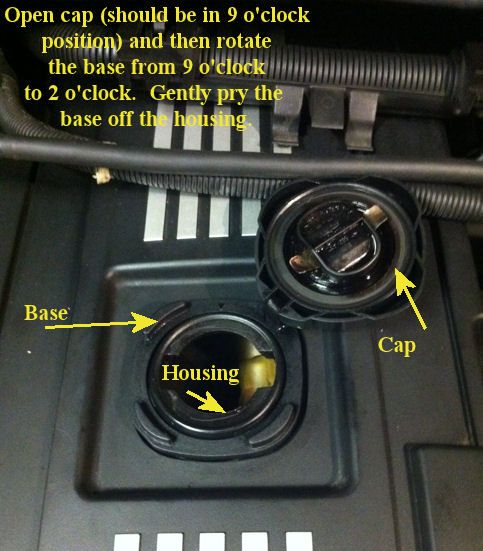
15b. Before pulling the engine cover off remove the oil filler cover. Do this by opening the cover as usual (1/2 turn counter-clockwise and flip open), and then with the lid flipped open turn the entire unit (cover and base) clockwise about 1/3 turn until it releases. With the oil-filler cover off, ease the engine cover out.
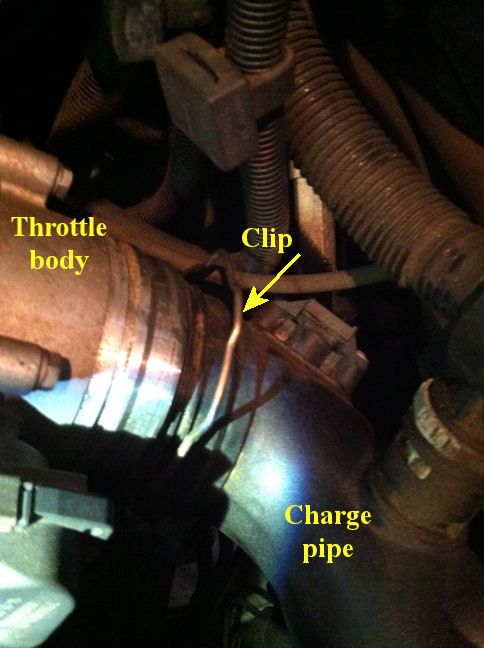
16. Release the charge pipe from the throttle body by popping the metal clip up and working the pipe loose. Do not remove the metal clip - just pop it up until it stops. This step may be unnessecary if you are not fully removing the manifold, but it gives you more room to wiggle the manifold loose.
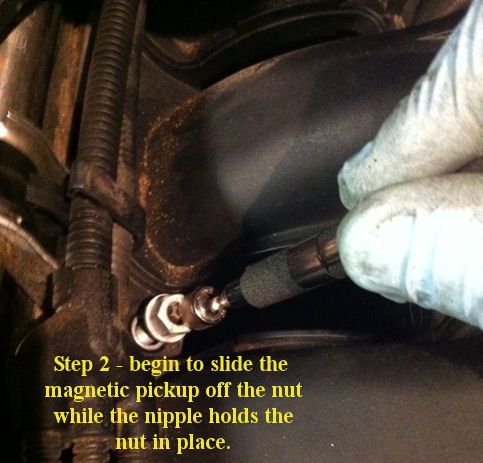
17. Remove air intake manifold. This part seemed scary to me (noob), but it has to come out in order to gain access/clearance for that infamous first bolt on the oil filter housing. The manifold is held on with one bolt (fore) and six nuts (one fore, one between each of the 5 manifold outlets, and one aft). Working from the front of the car back, the nuts are staggered - low, high, low, high, low, high. Remove the fore manfold bolt and the first 4 nuts - these are easy. The two aft nuts are not visible and you'll have to get them out with a short (~5") extension. Once you break them (they shouldn't be very tight), work them off by hand with just the extension/socket. BE CAREFUL not to drop the nuts down in the engine bay! I worked them by hand with the socket extension to nearly-off, then used my hands to work them loose the rest of the way. Fortunately the bolt pins have a nipple on the top so the nut stays on even after it's completely loose Once loose I used the magnetic extension to extract them.
18. Make sure there is no debris on top of the manifold (blow it off with compressed air if you've got it), then pull the manifold up and loose. I did not remove it completely - just enough to make sure I had sufficient clearance for that first OFH bolt. CAUTION: I recommend pulling the intake all the way out for inspection - in the very least check the gaskets and make sure they are properly aligned. Some people like to replace the gaskets, others have said they've had the manifold off numerous times without replacing the gaskets. Obviously I elected to NOT replace the gaskets since I never fully removed the manifold. One more thing to keep me awake at night. If you do pull the manifold always plug or cover engine openings until you're ready to reassemble, and then make sure to remove your plugs/coverings. But if you're like me and leave the manifold on, you may need to wedge a screwdriver handle or something between the manifold and the oil filter housing to get it to stay out of the way.
19. There are two small wiring harnesses running between the manifold and the first bolt on the oil filter housing. These wires may interfere with your attempt to access that bolt, so I moved them by popping the small connecting clip off the manifold and moving the wires out of the way in order to gain direct and unobstructed access to that first bolt.
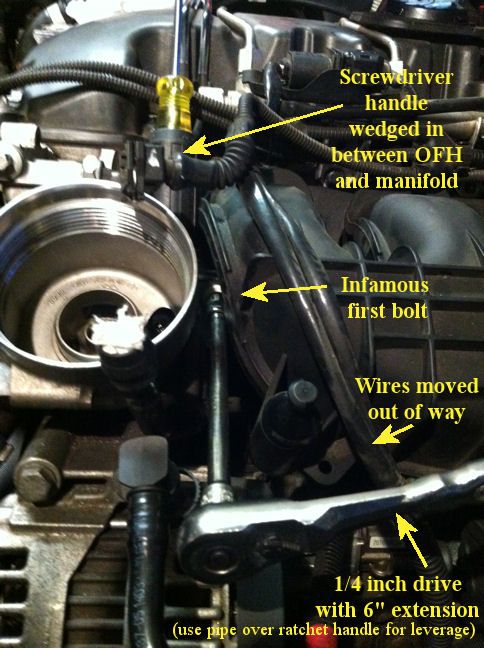
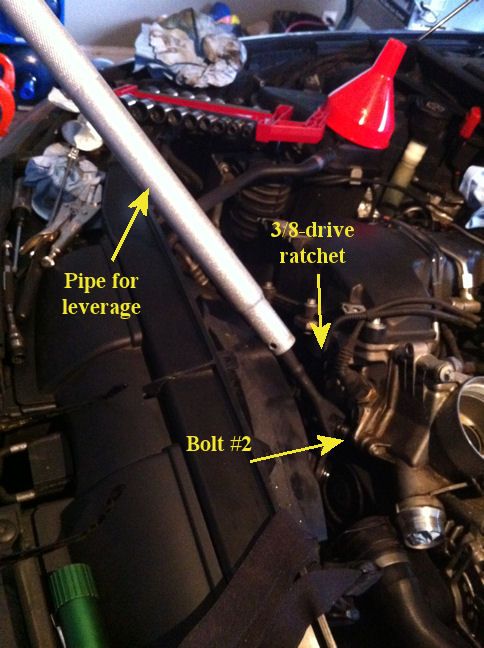
20a. Once you have moved the manifold sufficiently and moved those wires out of the way you will have direct access to the first oil filter housing bolt. I found that a 1/4 drive ratchet with a 6" extension and an 8mm socket worked great for that first bolt. It's nice if you have the torx bit, but a regular 6-point socket works as well. I used a metal pipe to gain some leverage and the bolt broke easily. Next remove the number three (top) bolt. At this point I marked the top bolt just to avoid any confusion later, although it would be pretty difficult to get the three bolts (all different sizes) mixed up. I actually found the number two (bottom, shortest) bolt to be the most difficult to break. It appears readily accessible, but the space is tight because of the coolant hose right beneath it. One caution - the wimpy 8mm heads on these bolts will strip easily. The (small) 8mm flex ratcheting box-end wrench I have is perfect for this job, but it just felt as though either the bolt head was going to strip or the delicate wrench was going to break. I decided to move the coolant hose by removing the two 10mm bolts that attach the coolant hose coupling to the block. The hose has a sealing o-ring so it takes a little wiggling and a gentle pry on the hose flange with a screwdriver to pop the hose out of its fitting.

20b. With this hose out of the way I had all the clearance I needed to put a beefier 3/8 drive 8mm socket on the last OFH bolt. I used a pipe for leverage just to eliminate any doubt, and the bolt broke easily. Just make sure you hold the socket tight on the bolt with one hand while ratcheting/leveraging with the other so as not to slip and strip the bolt head. With all three bolts removed, pop the OFH off the engine block and set it aside for cleaning.
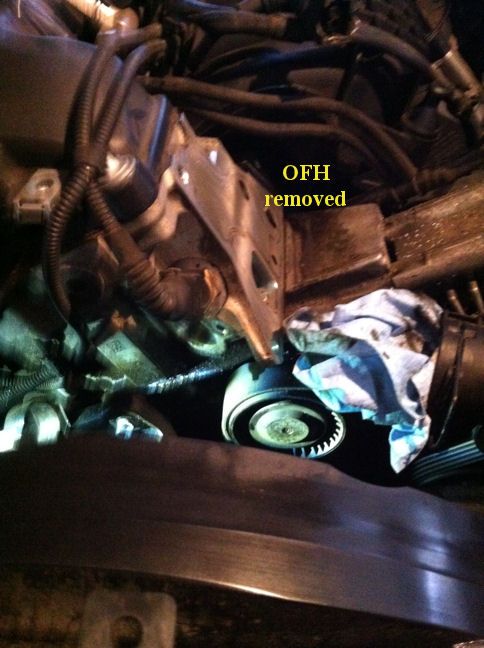
21. Clean the block. You will notice some black rubber residue from the old gasket on the engine block. Clean the block with a soft cloth and some brake cleaning fluid. I did not want to spray directly into the engine bay so I sprayed the fluid onto the cloth and used some elbow grease to completely clean the block.
22. Remove the old gasket from the OFH - use an awl (careful not to scratch the OFH) to get it started and it should just pull right out. Clean things up generally and put the new gasket on. Once I had the gasket in I applied a VERY SLIGHT coating of oil to it - not sure if this is proper or not.
You are now ready to begin putting it all back together.....
23. Reinstall the OFH. Keep that clean rag stuffed into the main OFH body to prevent any bits from getting in there. Snug the three bolts and then tighten in a rotating pattern - first one, then the next, then the next - 1/4 turn at a time until tight. Tighten to 22nm if you have a torque wrench, otherwise tighten until the bolts stop, and not further.
24. Reattach the front coolant hose to engine block. It is surprisingly difficult to get the two bolts threaded. Be patient. I inserted the bolts into the hose flange and got them threaded into the block BEFORE seating the hose into the housing. I then seated the hose, tightened the bolts snug and then torqued in an alternating pattern until they stopped.
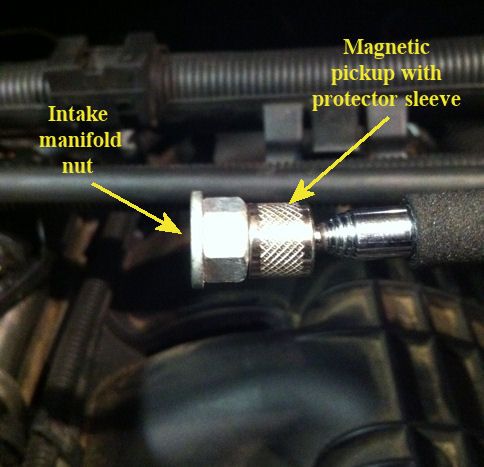
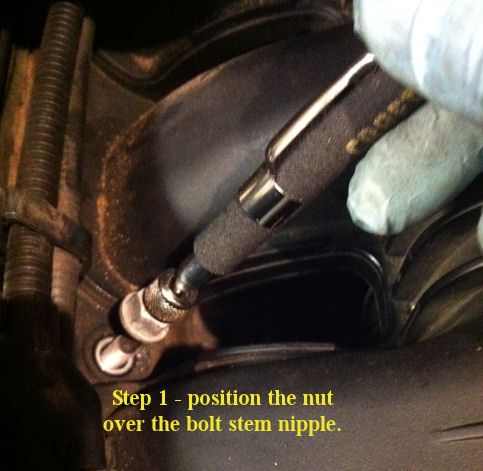
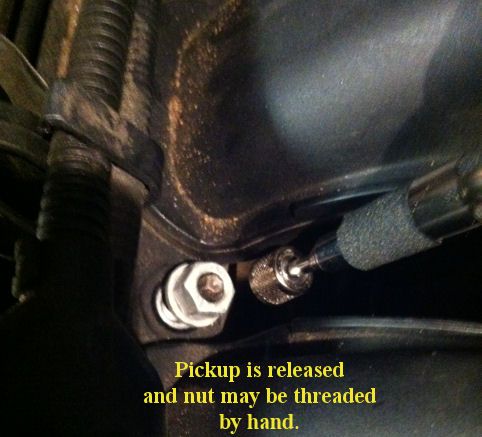
25a. Reattach the manifold to the head. The fore bolt and first 4 nuts are easy - get them started and hand-tightened. The high bolt stems are easy to get the nut started. The low ones are difficult to reach with your fingers to get the nut started. A magnetic extension on your ratchet would do the trick nicely, but I didn't have one. I used the magnetic extension pickup-rod to get the nut into place, then slid the rod off - the bolt stems have nipples at the top that will hold the nut on the stem while you slide the magnetic pick-up off. Once I had the nut on the stem, I started them by hand and then used a ratchet extension with an 11mm socket (I think it's 11mm) to hand-tighten.
(note that in the following pictures I demonstrate the concept on one of the high bolt stems, but the technique is only necessary for the low bolt stems)
25b. The last nut is the easier of the two aft nuts. You can actually see the bolt stem since it's a high one. I got that one started with my fingers. The next-to-last one is trouble. You can't see it since it's a low one. You can feel the bolt stem, but you can't fit two sets of fingers down in there to guide the nut onto the stem. And I didn't feel confident enough to hold the nut between two fingers to try and find the stem and get it started (you will see that dropping the nut is trouble). I actually did drop the nut and was lucky enough to be able to see it and extract it with a magnetic pick-up. I also dropped a ratchet extension with socket down there when the extension slipped off the ratchet. A word of caution: make sure your ratchet holds the extension tight - try to pull it off and if it slips right off with no resistance I recommend investing in another ratchet or extension (whichever is the problem). I got the nut onto the stem using the magnetic pick-up trick, and then hand-tightened with an extension and socket. Using the magnetic pickup allows you to use your other hand to feel it onto the bolt stem - otherwise a mirror will help.
With all nuts (and one bolt) hand-tightened, begin torqueing down evenly across all bolts - that is, tighten one bolt 1/4 turn, then the next, and next, and so on, and then start all over again. Do this until the nuts (and one bolt) are very snug - do not overtighten. You will recall that when you loosened the nuts to remove the manifold they were not very tight and therefore easy to loosen. Keep that in mind.
26. Reinstall the charge pipe to the throttle body - wiggle it onto the throttle body until snug and then push the clip into the locking position. Test to make sure it's tight and won't come off.
27. Attach the electrical connector to the OFH - push until it clicks and test that it won't come off.
28. Attach the small wire harness from step 19 back to the air intake manifold by reinserting the nipple into the hole in the manifold from underneath.
29. Reinstall the engine cover. Strangely, this was the most difficult step for me. After getting the cover into position, check all the way around that nothing is pinched - wires, vacuum hoses or even that insulation on the underside of the cover (it is likely loose and may protrude once you get the cover in position). The aft allen bolt is a bugger to get started. I finally got it to work by installing the front two allen bolts first (but not tightening them completely). This seemed to get things sufficiently aligned to get that back bolt started properly. I then used the allen wrench to finish it up - but it took patience.
30. Reinstall the oil fill cap by reversing step 15b.
31. Reinstall the OFH coolant hose. This style hose is keyed - there is a slot at the top, right where the clip lifts up. That slot aligns with the tab on the OFH receptacle. Push it in tight and then push the clip down into position. Test it to make sure the hose won't pull out.
32. Put the air filter housing into place - work it in underneath those wiring harnesses so that the three rubber grommets align with the posts on the manifold - but don't push them into locking position yet.
33. Reattach the after (cabin) air hose at the back of the housing. Space is tight and you'll have to wiggle it snug. Use your stubby screw driver to tighten the clamp.
34. Double check that the rubber grommets on the housing are still aligned with the posts on the manifold and push down on the the air filter housing to lock it into place.
35. Reattach the forward air hose to the front of the air intake housing - push it in snug and tighten the clamp.
36. Reattach the aft wiring harness into the wiper sill by aligning the three slide tabs and pushing in until it clicks.
37. Reattach the fore wiring harness conduit into the wiper sill. IMPORTANT - insert the wiring harness and vacuum line into the bottom tray of the conduit FIRST. Then attach the bottom tray by aligning the three sliding tabs and pushing in until it clicks. Attach the conduit tray top.
38. Reattach the three wiring harness rubber clips to the side of the air filter housing.
39. Reinstall the air filter and install the filter housing top. Note that the top has three sets of tabs on the back that must align with (and go into) the three sets of holes in the back of the air filter housing. Press all five spring clips back up into locking position.
40. Reinstall the front intake duct.
41. Make sure the oil plug is put back in with the new crush washer (make sure you took the old one off and can account for it) and torqued to spec (25nm - see oil change DIY). Add 6 quarts of oil - pour ~half the sixth quart into the filter housing. Replace the two o-rings on the filter cover and lightly oil them.
42. Put the filter into the cap, install the cap and tighten to 25nm (or snug with a filter wrench).
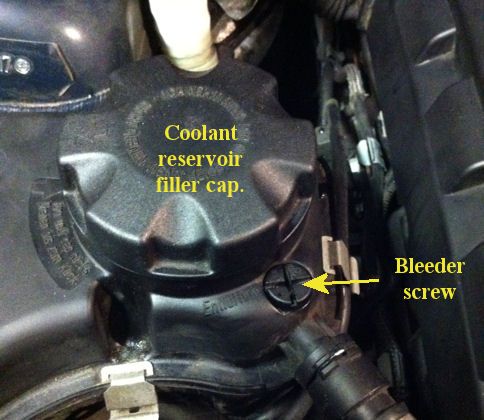
43. If you are discarding your old coolant, mix the fresh BMW coolant 50/50 with distilled water. Remove the coolant reservior cap and bleed screw. Pour your coolant mixture in until it appears that it will begin to come out of the bleed hole. Replace bleed screw and reservoir cap.
44. Reconnect the battery.
45. Follow these instructions to vent the coolant system (some people recommend attaching a battery charger, but your car battery should be able to handle 12 minutes with the headlamps on):
- Insert key in the dash
- With foot OFF the brake (don't want to start the car), push the start button (headlamps and interior systems come on).
- Turn both temp dials as high as they will go (84 degrees) and put the fan on the lowest setting.
- Push the accelerator pedal in for ten seconds then let go - you will hear the water pump cycle on. Then let it go.
- Check the time or set a timer for 12 minutes. In this time period you will hear the water pump cycle on and off and coolant gurgling at the reservoir.
- After 12 minutes turn the car off, remove the reservoir cap and check the fluid - it should be slightly below where you started.
- Repeat.
46. Start the car and keep your eye on the temp gauge. If it begins to climb turn the engine off immediately - something didn't work with your fill/bleed/vent process. Try it again.
47. Check the oil level (click the left-hand stalk programming thumb-button upward until the dash indicator says "Oil", then press the outer stalk button in. The system may take a minute or two to register the oil level. Depending on how much of your oil you drained earlier, you may need to crack that 7th quart and top it off. It should NOT take the full 7th quart (unless you somehow drained every single drop), but it may take half.
48. With the engine running crawl underneath to check for leaks.
49. Turn off the engine and replace the splashguard.
50. If you want to reset your oil interval in the computer, check out this DIY:
http://www.e90post.com/forums/showth...=360706&page=2 (there are other DIYs on this topic - look around). I didn't reset mine because I'd recently had the oil changed at the dealer.
51. Find some creative way to spend that $1000 you just saved!

 we're gonna die out here
(more pictures here)

Originally Posted by mystreba

 Posting Permissions


 Reply With Quote
Bookmarks