
 AbeLincoln
BMW CCA Member
AbeLincoln
BMW CCA Member
I've never had a car fully resprayed because I feel as though the original paint can never be matched as far as quality goes. Sure, there are great shops out there who will give you a 9.99/10 paint job for an arm and a leg but they will never meet factory fresh paint, especially since lead based paints were discontinued after '99-01. Though, to answer your question, if you are up for taking it apart yourself and going through with perfect prep work then go for itOriginally Posted by vanne

It will save you a lot of money!
///
Member
I'm not sure about the durability, but the aesthetic quality of this factory paint job leaves a lot to be desired. It can be improved on for sure (orange peel mostly).
That being said, I've settled on not spraying the whole car. I was milling it over with a buddy and he mentioned that it makes more sense to wait until the factory clear coat starts to have real issues in another 5-10 years or so before doing anything drastic. I tend to agree all things considered.
Member
I've placed the order for parts.

Last edited by BenFenner; 01-09-2013 at 11:57 AM.
Member
Parts came and everything looks good. For those who were wondering (like I was) the gills don't come painted body color (which should be obvious since there is no color choice when ordering).
I've gotten a bunch of quotes from body shops and have settled on one highly recommended by some folks who commission body work for where I work. He's willing to work with me and allow me to do some of the labor (undress the hood) myself which will hopefully avoid any minor breakage of ancillary stuff. He's also not gouging the crap out of me like some of the other places.
It is possible that the car won't look perfect when it is done because of lack of blending and whatnot (although I'm told a metallic black is very forgiving in that regard), but the price is right and the whole car needs to be redone at some point anyway which I will save for when the original clear coat starts to have issues in another 5 - 10 years.
Pics of new parts soon.
Last edited by BenFenner; 01-09-2013 at 01:26 PM.
Member
Well, I have the car back. There is good and bad news. I'm a bit upset about the results right now so I'm going to wait until tomorrow so I can post with a cooler head. There will be pics.
First things first though. The side gill was not masked off properly, and the entire piece was painted, including the honeycomb looking bit that is supposed to be left raw. How in the hell am I supposed to go about removing the paint from that section? When asked about it, the body man offered no solution, resolution, consolation, or suggestion.
Last edited by BenFenner; 01-29-2013 at 12:32 AM.
License Revoked
In for pictures.
Ralph
Well, you did say you were going with the cheaper option and that not perfect was ok with you. Two solutions: buy a new side gill, or paint the other one to match. Pics of it parked in the sun for best eval.
Member
While I wait to upload pics (it takes me some time to organize and upload them, and I'm a bit behind) I'll go over the work that was done.
The good news is that the hood shape came out well. That's the meat of it, so I keep telling myself not to be too upset about it. The fender mounting points needed work and that seems to have gone well. The paint match from what I could tell in the dusk was good. The hood, fender, indicator, and rocker panel show no sign of the physical damage.
The paint has medium orange peel, which may be more visible than the OEM peel simply due to the freshness, clearness, and cleanliness of the new paint. Nothing too bad, and if I want I can always wet sand, or have someone else do that. It would have been nice to at least have it suggested as an option. I'll have to see it in better light to make up my mind about it.
The rear fender dent has been removed and touched up. The shape is good, but for some crazy reason he felt it acceptable for it to leave his shop with some pin-holes in the paint. When I pointed that out to him, he offered up an excuse that there was a good bit of rock and road damage there. (Yah, that's why I had you "fix" it.)
This area is covered by the spat so I'm trying to let this one slide.
If that were my shop, I'd never let that out the door.
The side gill is the main issue. Not only did the inner section get painted, but the gill itself is set far out from the hood on the leading edge. It does not sit the way it should. And the chrome piece isn't installed properly. It sticks out from the grill piece a good bit as if he couldn't get it to seat properly.
I'm pretty sure I'll be massaging the fit of the gill, and the chrome bit, and figuring something about the damn painted section that should have been left raw. If there's a way to strip the paint just in that one section without causing damage to the other paint or the plastic I'm all ears.
Otherwise I guess I may have to tape them both off and paint them both a non-glossy black. I was quite explicit about my instructions to call me if he had any questions. He said he wasn't sure about painting that part or not, so he looked at the original and determined it was painted (WTF?!).
I regret taking the job to this shop, and have learned my lesson. I should have gone with my second choice.
Last edited by BenFenner; 01-29-2013 at 08:48 AM.
Member
Pics are coming, I promise.
I did some work on the side gill. The chrome bit came from the factory in the wrong shape (pinched in) so I'm not surprised it didn't seat properly. I used a heat gun to carefully heat the piece and stretch it out (like stuffing a cutlet, for the visual) and got that bit mounted properly. I then attacked the hood mounting points for the side gill, and massaged the gill itself a little to get the thing to sit properly in the hood. I'm happy enough with how that is now.
Doing this work I found more flaws in the job.
I found a ton of inclusions in the paint, the worse of which is clearly a piece of a leaf between the color and clear coat.
There are also some sizable clear coat drips on the leading edge of the hood. As well as runs around the right grill opening (will be hidden by the kidney grill) and in front of the BMW roundel (will be visible).
Again, pics of all this soon I promise.
For my own reference here are additional parts I'm going to buy:
51138412949 - Driver's side kidney grill
51138412950 - Passenger's side kidney grill
51141807495 - Hood roundel grommets
61131378908 - Plastic bracket to hold the spray nozzle heater electrical connection
Plus unrelated oil change parts:
11427833769 - Oil filter + oil filter housing o-rings and washers
07119963151 - Drain plug gasket (not required, included in above kit)
Last edited by BenFenner; 02-07-2013 at 02:49 PM.
Member
Facebook album permalink (in case the images don't show up in the future).
Well, I promised pictures and I'm finally here to deliver. These are pictures of the original damage from over 9 months ago. There will be additional pictures that I will post soon of the new parts, repair work, and results.
Recall, I backed into a drainage tube (painted brown) in a parking lot while leaving my parking space with the wheel at full lock. =/
I parked for work on a Saturday (not normal for me) in a parking structure that I'm not familiar with. On Sunday I had to go back to work, so I parked in the exact same spot in the exact same way so I could take pictures and prevent some sort of bad luck demon from creeping into my brain. This is where I'd parked. Next to the pillar (with brown drainage tube) to make sure I had room to both sides of the car. As I walked to the car, I reminded myself of the pole mentally. When I got in the car and started backing up, there were some pedestrians I had to wait for. In that time of waiting, I decided a reverse "U" would give me a good line on the exit, so I turned the wheel full-lock to the right. After the pedestrians cleared, I gave it some pedal and crunched into the drainage tube.
This is the following day when I took pictures.
I took some detailed pictures of the side gill, as I was considering trading them for non-M units at one point after the incident.

Member
Facebook album permalink.
Bear with me while I post more pictures. These are a few more of the damage. Next will be pics of the repair parts and the dressing down of the hood for repair.

Member
Facebook album permalink.
Here are the new parts I ordered from www.eBMWParts.com (no longer accepting on-line orders) for the body repair shop. I was able to save a good bit of money by ordering myself. All of the body shops charge MSRP for parts. I picked up a new M side gill, new turn signal, and new side body panel. (I will eventually order new front kidney grills as well in a later update.)
(I am unaware at this time, but this OEM trim piece was malformed from the factory and the body shop guy won't install it correctly. I will have to work it myself afterward. The body shop guy thought it was aftermarket because of how poorly it fit.)
(I should have realized here that the piece wasn't manufactured correctly. The plastic "chrome" piece is pinched, and won't sit properly in the corresponding piece.)
Next up will be pics of dressing down the hood for body work.
Last edited by BenFenner; 10-06-2013 at 08:15 PM.
Member
Facebook album permalink.
Here are the pictures of the hood tear-down. I will find the front kidney grills already a bit broken, and I will break them a bit more removing them so I will end up ordering new ones. I will also order new front roundel grommets and other small, brittle, plastic trim pieces that I manage to break while removing the under-hood fabric cover.
Next the car will be headed to the "body shop". I do use that term loosely. And if you've read the previous posts above, you'll know why. =/
More pics to come.
Member
Facebook album permalink.
Tach reading when dropping off the car.
Tach reading after picking up the car.
Doing a poor job of showing the moderate and expected orange peel on the hood.
Better pics further down.
Showing the extremely poor fitment of the chrome trim piece on the gill.
Showing the poor (too tight) gap up top between the gill and the hood.
Showing how far the gill protrudes from the hood.
It is sitting much too proud.
This is the undamaged side for comparison.
Notice the uniform panel gap all around.
Next up are the pin-holes in the paint.
I think this is on the trailing edge of the front wheel well somewhere. I forget where.
But anywhere there was body filler applied, there seems to be these pin-holes in the paint.
The side skirt up front by the wheel well got bent slightly, so it needed a little work.
Here are the pin-holes on that leading edge.
Here is a general side shot.
The most obvious issue being the panel gap above the gill.
Here is a close-up of the gill, showing how he painted the inside where it should have been left raw.
Mind you, I pointed out most of these issues to him when I picked up the car and he didn't seem to care or offer any remedy.
Showing the correct side for comparison.
Here is a general shot of the good side. Notice the even panel gap around the gill.
When I bought the car, you might recall there was a pretty good dent in the rear fender where the stone guards cover up.
While I was getting body work done, I thought I'd at least try to get the car returned to me better than it was
before so I had him fix the dent and just paint a patch over it so the stone guard could still cover it up.
Looking closer, it is obvious that some filler was used.
Guess how I know?
These issues don't really bother me much since it was never going to look right
without major work anyway, but you'd think one would have more pride in their work.
Now we are moving on to the drips and runs.
This is a run in the clear coat on the top-left of the left kidney grill opening.
The grill trim thankfully covers this mistake.
This is the leading edge of the hood, right above the driver's side headlight.
This is getting a bit silly now.
Here is the clear coat running below the hood roundel.
And here is one of the worst issues.
This is a leaf particle under the clear coat on the hood near the passenger's side head light.
Seriously?
Here are the better pics I promised showing the moderate orange peel.
At the time the issues were obviously unsettling. The paint issues I could not deal with right away,
but I figured I'd at least fit the fitment issues with the side gill. After that I would re-asses the situation and plan a course for the future.
The next pictures will show the repair work. I promise I am almost done with this update, and apologize for the amount and size of the pictures.
I'm doing this for my own records as well.
Yeah, that just happened.
What shoddy work. How ridiculous. Did they charge you to do the work right - including full repair (not filler), prep work, paint, and post-paint - then cut every possible corner and sit on the profit?
Last edited by BMWBergy; 10-20-2013 at 07:23 PM.
DIY/Project Links:_TC Kline D/A & Suspension Refresh_|_Oil/Engine Cooling Options / Install_|_
Dinan/Fikse FM-5 Build_|_Stereo Install_|_HID Retrofit_|_
Member
I paid $1,300 for the body work. I should have gone with my 2nd choice, which was a $2,200 quote, for identical work from a reputable shop with a customer-leaves-happy policy. The 3rd choice was a ~$3,300 quote, for a bit more work and parts (included blending the door) and required I get my body parts through them at MSRP.
Last edited by BenFenner; 10-21-2013 at 10:04 PM.
Member
Facebook album permalink.
Here are the final pictures for this saga. It will continue I'm sure (in my build thread) as I get more mistakes fixed way down the road but this is it for now.
The first thing to address was the chrome bit on the gill not seating correctly. This is when I finally realized the part I'd bought was molded incorrectly. I had to spread the chrome bit apart to get it to sit flush. This was accomplished with a heat gun and some pliers to spread it open from behind. I used the original piece to see how it comes apart and see exactly what was wrong.
Results! (Before picture.)
To address the mounting of the gill, a few of the mounting holes needed to be moved in, out, or down. I used this bolt as a drift. It has a flared section on the end I could use to pull with if I needed. I also did some pounding with wood between the hammer and the body.
This picture is me moving the hole down some. Imagine me hitting the bolt in the middle from above with a hammer. Inevitably a little bit of paint damage was done right at and around the holes. I touched that up with a glossy black paint pen to prevent rusting.
Not only that, but there are rubber spacers mounted to the hood that are designed to align the top panel gap properly for the gill. These were destroyed. I ended up stacking some double-sided tape to replace them. This worked out well and had stood the test of a full summer now.
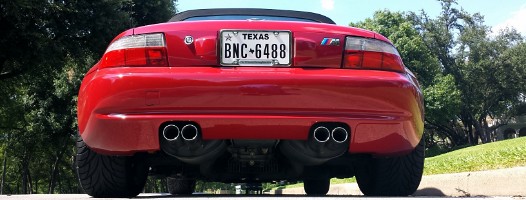
Rear bumper almost in good condition.
Front bumper torn to bits an not functional.
Results! (Before picture.)
Not perfect, but MUCH better.
Panel gaps are looking much better now.
The rest of the issues will get attention as I see fit. For now it takes a trained eye to pick out the issues so I'll get to them as I can.
That's my story, and I'm stickin' to it.
Last edited by BenFenner; 10-30-2013 at 07:17 PM.
Member
Sorry to hear about your misfortune. It's a reminder to us all that "you get what you pay for" is especially true in fields that require lots of labor.
On a happier note, I'm very jealous of your rash-free roadstars. Have they been refinished?
Cyrus Mistry
Member
The images of the wheels are very misleading. They are clean, but they have low-to-moderate rash on all of them. Here's probably the worst one.
https://sphotos-a.xx.fbcdn.net/hphot...10056575_o.jpg
Member
That still looks remarkable good for a car with your mileage. I have only 57k on my roadster and sadly the rash is much, much worse.
Cyrus Mistry
Member
I like the inner section of the gill being painted. Was never fond of that flat black, looks dirty.
98 M Roady / 13 328i xDrive
Member
If they were both painted in the inside it would be less of an issue. They are mismatched right now which is not cool. I prefer to hide the fact that they are fake vents, so flat black is my preference.
Member
Why not tape them off and spray them black yourself?
Member
They are supposed to be raw plastic, not painted.
However, taping them off and spraying them flat is something I'd thought about. The main issue with that, and I know I'm getting very anal here, is that the dimples on one gill will be filled with paint much more on one side than the other which change their appearance a good bit. The painted side has a thick layer of paint I'd like to strip back down to the plastic before doing anything to either of them. And I have no idea how I'd do that without compromising the rest of the piece.
I could always paint the other side up to match with a bunch of coats, then hit them both with flat black... Kind of obnoxious, but maybe an option.
I'm thinking at the end of the day, eventually, I'll just get two new gills and have a body shop paint them properly. Possibly after buying a new hood... So I'm not going to spend a lot of time on it now when I'll maybe get it fixed properly later on. I have sure learned my lesson though. =/
Member
Wow thats really awful work. I had my whole Z painted after the Colorado incident earlier this year, and the worst part was a misaligned hood that they fixed ASAP and a little bit of clearcoat drip at the edge of a door that was promptly taken care of. I also had the Topaz Z's hood (A section of it) sprayed and blended and it came out excellent. At least you are taking care of it in your own way.
2001 Z3 3.0i -Oxford Green/Sandbeige
2016 428xi -Estoril Blue II/Black
2018 430iC- Estoril Blue II/Black
2018 330it - Melbourne Red/Venetian Beige/Black
 Posting Permissions


 Reply With Quote


Bookmarks