
 Member
Parts used:

Radiator ( Autohaus )
BEHR 17111436060 ~130$
Hoses and rest of staff ( ECSTuning )
Radiator Hose - Lower 11531705224 ~30$
Radiator Hose – Upper 11531705223 ~33$
Expansion Tank Hose 11531438632 ~30$
Expansion Tank Hose 11531438633 ~23$
Coolant Hose 11531438634 ~26$
Coolant Expansion Tank 17111436381 ~70$
Expansion Tank Cap 17111742231 ~15$
Expansion Tank Cap Seal 17111723580 ~5$
O-Ring 13621743299 ~1$
Coolant Bleeder Screw 17111712788 ~3$
Radiator Mount Support (4) 17111712911 ~5$
BMW Blue Coolant ~20$
Total ~400$
I would also replace T-T, W-P, belts and tensions with this DIY but I already did so I will skip this part.
Working under car
Raise front of car and place on jack stands (follow appropriate procedure; chock both sides of both rear wheels).
Remove large engine compartment shield underneath front of car.
Remove drain plug radiator and drain coolant.

Be sure to use some large empty plastic box underneath the car and close to the engine.
Coolant will spray all around!

Try to cover the entire space under engine.
Coolant will leak from all directions when you will remove radiator and hoses.
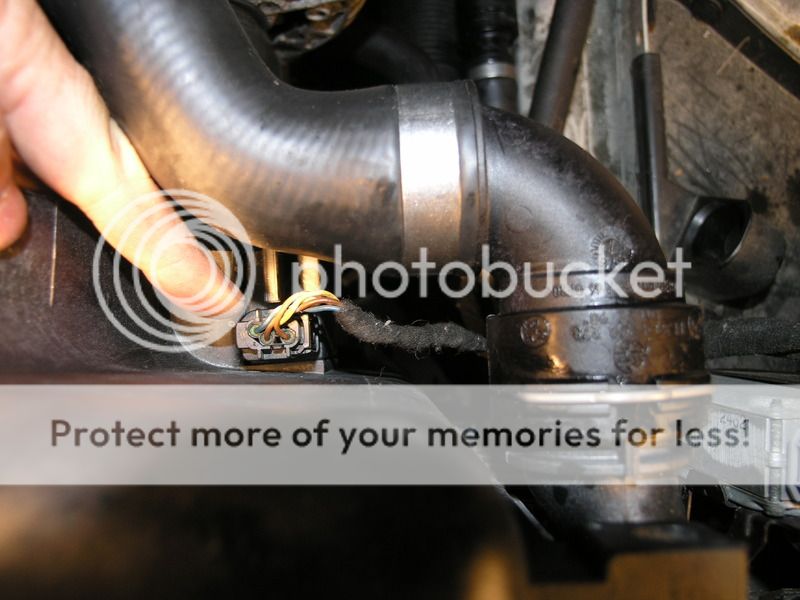
Disconnect auxiliary water pump electrical connector at bottom corner.
Disconnect coolant hoses from fan shroud bottom.
Note how it was installed on the fan shroud for reinstallation.

Lift 2 metal brackets from every hose and pry out hoses from the auxiliary water pump.
Working from the top of car :
Remove 8mm screw which holds right radiator bracket.
Remove right brackets and 2 rubber mounts, 1 from radiator and 1 from the body.

Remove left 8mm screw.
Remove left brackets and 2 rubber mounts, 1 from radiator and 1 from the body.

Remove rubber seal between fan shroud top and car body.
Remember seal orientation for reinstallation.
Remove right upper water hose.
Lift metal bracket and pry upper side out.
Lift metal bracket and pry low side out.

Remove sensor from fan shroud right side.
Remove rivet at right side of top corner of fan shroud.
Pry out rivet center pin with base.

Remove rivet at left side of top corner of fan shroud.
Pry out rivet center pin with base.
Remove plastic clip at expansion tank bleed screw.
Press in at both sides and lift it out.

Lift fan shroud up and to rear.
Unscrew overflow hose clamp at radiator right top.
Pry hose off radiator overflow neck.

Plug overflow hose. This will not allow coolant to escape.
Remove fan with fan clutch from water pump shaft.
Use 32 combo wrench with BMW water pump holder tool.
Note direction of removal is clockwise.
Last edited by champaign777; 12-14-2013 at 07:58 PM.
Member

Lift out fan with fan clutch from the top.

Disconnect expansion tank from fan shroud.
Lift out fan shroud.

Place expansion tank at high location in engine bay and hold it.
Allow all coolant to drain out ( ~5-10 min ).

Under cabin filter housing from the right side of alternator there is a second side of Expansion Tank Hose.
Lift metal bracket and pry upper side out ( restricted access but nothing complicated ).

Remove expansion tank and 3 attached hoses.
Reuse overflow hose. Keep other two hoses with expansion tank as spares.

This is what you will see probably .
Now it’s a good time to replace T-T, W-P, belts and tensioners!
I already did so I will skip this part.
Lift metal bracket and pry upper side of low radiator hose out.
Disconnect Coolant Temperature Sensor.
Lift metal bracket and pry low side of lower radiator hose out.
Remove low radiator hose.
Reuse Coolant Temperature Sensor.
Remove Radiator ( took me 5min ).
2 radiator mounts hold Radiator from left and from right sides ( down location ).
Left side is easy to remove, right side need to play up / down a bit more between transmissions metal pipes.

Pull left side to the engine.
Pull right side to the engine.
Pull both sides up to the top, side by side.
Use up down / up down techniques all time.

Clean all around transmission radiator / pipes.
A lot of crap will come out.

Remove cabin filter housing and put it on the top of engine.
Do not disconnect vacuum hoses!
Now a bit difficult part (~10 min ).
Lift metal bracket and pry upper side of low Coolant Hose ( from auxiliary pump to engine ).
Disconnect 10mm bolt holding this hose in the middle and remove hose ( restricted access ) .
Reuse connector.
Last edited by champaign777; 08-19-2012 at 10:37 AM.
Member
Installation:
Remove 2 plastics which hold fan shroud and reinstall them in the end.

Install radiator.
Use the same technique similar to removal.
Check that both sides are installed correctly and 2 radiator mounts are in place.
Re-install all plastic holders from the old hoses.

Use new o-ring for aux fan switch.

Re-install fan shroud with fan (just 32mm combo wrench), counter clockwise.

Re-install overflow hose to the new Expansion Tank.

Cut overflow hose 5-10mm and use new pipe hose clamps to secure it ( on both sides ).

Install new Expansion Tank Hose from the left side.


Install Expansion Tank with overflow hose inside fan shroud.

Attach the Expansion Tank Hose.
Attaching hoses will require some effort to secure them all the way.
Do NOT raise the clip before pushing them on , just push it till you get this “click”.

Now it’s the time to install radiator plastic if you still didn’t crack them yet .

Attach auxiliary pump to 2 hoses.
Install auxiliary water pump at bottom left side (Insert into shroud clip).

Install auxiliary water pump electrical connector.
Install coolant hoses on fan shroud at bottom side.
Double check your coolant plug is not open if you don’t want to see all coolant on your floor.

Attach Radiator Hose - Lower and don’t forget about electrical connector to Coolant switch ( left side down ).
Attach Radiator Hose – Upper and dont forget about electrical AUC (smell) sensor.

Install Expansion Tank Cap Seal, Coolant Bleeder Screw and Expansion Tank Cap.
Install rivet at each top corner of fan shroud.

Install 4 new Radiator Mount Support on left and right sides.
Install left – right brackets holding radiator to the car frame.

Install rubber seal between fan shroud top and car frame.
Install cabin filter housing.
Top off with BMW coolant mixed with distill water (50/50) and follow TIS procedure for M54 engine bleeding.
http://tis.spaghetticoder.org/s/view.pl?1/01/34/82
Enjoy you UDM , the best 5 series ever !!!

Last edited by champaign777; 08-18-2012 at 09:38 PM.
BMWCCA 484984
Nice job and thanks for doing the DIY. I've merged your posts into a single thread and will leave the thread in the main section for comments. I'll tow it to E39 DIY later.
Major Lazer
Awesome work as usual Igor
2003 M5 LSx l 6 Spd Manual l 4.10 LSD
Build Thread
The chassis must always be regarded as a means to an end and never as an end itself
Member
Nice job again!
BMWCCA 484984
Igor,
You had the fan removal listed as right to left (couterclockwise), so I changed it to clockwise for you and did some light editing as per your request. Let me know if you need anything else.
Member
Great job...!
No new water pump....?
Thanks!
Jason
Looking for an E39 belly pan , passenger front inner fender liner
BMWCCA 484984
Originally Posted by Jason5driver


Member
Cooling over haul is overrated!
BTW, every time someone mentions "cooling over haul" Cn90 will get a small royalty.
Member
thanks James
I think we can add 525i guys as well ,they have the same cooling overhaul as 530i
I know Robert I will come back to this in 3-4 years so i did it for my memory to remember next time
Very straightforward job , can't be compared to your "Cooling System Overhaul My Way" ahh
Jason its just to remove 4 bolts ... you dont even need your mechanic
Cam don't want to get M54 so we must to survey somehow !
Last edited by champaign777; 08-18-2012 at 11:21 PM. Reason: Automerged Doublepost
Member
Sam don't want to get M54 so we must to survey somehow !
Who is Sam? Should I know him?
BTW, Good job comrade!
Member
my mistake Alex
Cam ( CNN )
Last edited by champaign777; 08-18-2012 at 11:21 PM.
Member
Haha Alex,
I am still dirt poor, no royalty even though my DIYs were used over 100,000 times.
Anyway, fantastic job champaign!
For those reading this thread, I just want them to be aware that:
1996-1998 6-cylinder engine: slightly different setup
http://www.bimmerboard.com/forums/posts/199986/
1999-2003 6-cylinder engine: use this DIY by champaign777.
-------
Now I need to add my 2 cents:
1. Apply a a bit of antiseize on the Fan Clutch nut, it will make it much easier next time you need to remove the Fan Clutch.
2. If you have trouble installing Fan Clutch due to tight space, use this "Poultry Cord" Trick. This will make the installation painless:
http://www.bimmerfest.com/forums/sho...d.php?t=240143
3. Personally I think BMW TIS procedure made coolant bleeding too complicated.
1996-98: With engine cold: fill reservoir all the way to the brim, it will flow out the bleeder on the tstat housing. Then bleed the bleeder @ reservoir. It took me a long time to discover the trick of "filling to the brim" of the reservoir. If you fill to "KALT", it is not enough to push coolant out of the bleeder on the tstat housing.
1999-2003: models with Aux Water Pump. Same as above, except you turn the heat on to move the coolant inside the Aux WP circuit.
Then prepare some 50-50 coolant and carry it in the trunk (just in case you have to fill it), go for a test drive around your blocks (heater on), not too far from home, just drive around. Then bring the car back and check coolant level once the engine cools down.
You will find that by filling to the brim, the level will settle down very nice at "KALT".
Also, check coolant level everyday for about 1 week.
Member
Nice DIY with pictures. It should boost confident for many others to tackle this job.

2000 Dinan S1 //M5 (my DD) --------------- 06 DINAN E53 4.8iS (wife's) -------------- 90 Straman Z32TT (my pride & joy)
Gone, but not forgotten: 01 E39 M5, 01 E53 3.0i, 01 525i Sport, 03 DINAN 540i MSport and 91 Z32 TwinTurbo
Old School
Thanks for the great DIY. Superb pictures. Should be good for the M52TU also.
Much modified VF Supercharger Kit tuned by Tuning Tech FS, M5 front sports seats, CVV to catch can conversion, Boost Gauge, Schmiedmann header to rear muffler high flow exhaust, Header Ceramic coated inside & out, Exhaust heat wrapped from flanges after header to before CATs, Kicker sub with dedicated 200 watt amp, CCFL angel eyes, CF facelift kidney grills, Quaife LS diff ,Super duty cooling kit, Electric fan controlled by temperature adjustable 2 speed controller (JimLev design)
John
Member
more 2 cents:
1) M52 and M54 bleeding is different
For M54 do NOT leave any Coolant Bleeder Screw open ( there are 2 )
Auxiliary water pump will generates a considerable flow and you will get a geyser 1-2 feet high on the upper rad hose near the thermostat !!
Ask me how i know from my first cooling overhaul
2) BMW uses some lithium grease to lubricate connections between hoses , i used just coolant
Last edited by champaign777; 08-19-2012 at 10:54 AM.
Member
+1 for the geyser lol good times
96 318is Sport --sold
96 528ia Premium Comfort seats --sold
98 528ia euro sport pack BR41880-- sold
01 530ia Premium CE52247
02 540ia Individual GG91507
Old School
The M52TU has the same bleeder screw layout as the M54. I have always bled the cooling system using the Aux water pump but just 'cracked' the bleeder screws. I can visualize your geyser if the bleeder screw(s) were removed.
I totally agree with you about using coolant as lube at connectors
Much modified VF Supercharger Kit tuned by Tuning Tech FS, M5 front sports seats, CVV to catch can conversion, Boost Gauge, Schmiedmann header to rear muffler high flow exhaust, Header Ceramic coated inside & out, Exhaust heat wrapped from flanges after header to before CATs, Kicker sub with dedicated 200 watt amp, CCFL angel eyes, CF facelift kidney grills, Quaife LS diff ,Super duty cooling kit, Electric fan controlled by temperature adjustable 2 speed controller (JimLev design)
John
Member
one more 0.02
this car has low claster , for M54 with high cluster there is one more electrical connector
on the bottom of Expansion Tank

Member
?
What are you talking about..?
Looking for an E39 belly pan , passenger front inner fender liner
Member
I miss bimmerfimer Jason ! It was a Joke LOL
http://forums.bimmerforums.com/forum...&postcount=265
Last edited by champaign777; 08-19-2012 at 02:29 PM.
Member
I was wandering what is the coolant engine temperature test #7 on your 530i ( low cluster )
[ame]http://www.youtube.com/watch?v=260cWJBy_WM[/ame]
My keeps around 95C ( 94-96 ) with outside temperature around 0C (31F) ... normal ?
Last edited by champaign777; 02-24-2013 at 08:59 PM.
Member
My second M54 coolant temperature keeps 92-93C ( high cluster )
[ame]http://www.youtube.com/watch?v=cXrWrkEqClU[/ame]
[ame]http://www.youtube.com/watch?v=IHpX2sBm_o8[/ame]
mmm the first car 95C is looks like more heavy on gas than the second car 93C , how it can be related ...
*** UPDATE ***
I found why one of my E39 was heavy on gas , - Parking Brakes too close to rotors , Parking Brake adjustment fixed it
Last edited by champaign777; 08-01-2013 at 11:26 PM.
Member
NICE!
In your first post you mention it's a good time to replace the T-T?
What is this acronym for??
 Posting Permissions


 Reply With Quote


Bookmarks