
 Member

I always find this to be a pain in the ass to wrestle with,
and it never seems to be the same way twice,
so I want to get this straight once and for all.
I'm sure this is trivial once you've done it a dozen times (since it's part of almost every DIY under the hood), but for beginners, it's a royal pain.
It took me 30 mins+ and 10 tries to finally get these pieces back together.
Since this is an airtight system of linkages, there is very little play.
It is very frustrating to know everything is "half disconnected" yet nothing comes apart without forcing it a little.
(Plus, I try never use enough force in fear of tearing or breaking something)
1) First, what wire is supposed to be clipped into the red circle?
2) Do you remove the MAF before trying to seperate the airbox from the resonator box? If so, what is the ideal point/order of disassembly? Do you take it apart at the yellow or purple circle? Sometimes, it's so jammed together, it feels like nothing's going to give, and I'm going to break/rip something. Yes, the MAF can be a hassle to remove.
3) The 2 screws holding the airbox to the resonator box (underneath the MAF & intake boot #1) always seem to be hard to get to, namely the one underneath. (This is when my back starts to hurt!) What's the right order of doing things? I loosen the air box, and lift it out partially. There is only so much play, b/c the screw to the resonator box still needs to be removed. I take out the top/side one. Then the last thing remaining is the one underneath. It always feels awkward to be yanking up all this plastic, in order to get at the bolt underneath.
Today, I was not even able to get the underneath screw back in. You can barely see it. If you yank the airbox up high enough to see, the 2 parts do not even connect. So, I left it off. The other side screw seems to hold it in place well enough. (...ugh, I know)
4) Hardest part: Do you reassemble in reverse order? Is this the correct order?
a) Try to screw in the underneath screw in first? (connect airbox to resonator box)
b) Then screw in the side one?
c) Then slide the airbox fully into place, and secure?
Thanks for the help.
I'd really like to move past this continual obstacle!
Last edited by OnTheFence; 01-29-2012 at 09:16 PM.
E39 DIYs done: Wipers, O2 sensors , MAF , Upper/Lower Intake Boots , FSU , ABS module fix , Power Steering Reservoir , Changed Rear Differential Oil , DISA , SAP, Vacuum lines , Radar Detector Hardwire , Fuel Filter , LED Angel Eyes , Headlight Adjusters--> [1],[2], [3] , Headlight Polishing, Punted: Fan Clutch/Tensioner/Pulleys , Oil cap O-rings , Window regulator ,Crumbling Cowl
Member
The best I can say is that day two, most things are easier and make more sense.
Especially if you are over thing it.
GL
First 100 post questions, Second 100 posts question, then maybe some input in the E39 community.
Member
I take it apart where the intake boot coming from the MAF meets the second intake boot that goes to the throttle body. Much quicker, and saves you from having the fiddle with the resonator box.
Member
I go food shopping at COSTCO.
Stock up a week's worth of food and supplies.
I watch JAWS, The Thing (1981) and Casino Royale (all in BluRay).
Then I dig into removing my e39 Air Intake Box.
I know I don't live in Alaska, but I take Air Intake Box removal seriously.
v
v
v
v
v
v
v
v
v
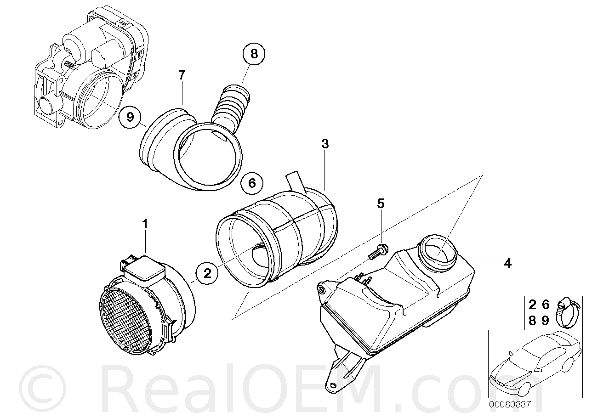
Squire, the b*tch in the whole thing is part # 4 in the diagram above.
There is a very easy way to DELETE part # 4 (by purchasing an alternative BMW intake which DOES NOT have a lower mouth to connect to # 4).
You literally remove # 4 from the car.
You intall the rubber intake boot in 2 minutes.
I will post the part number you need to order.
Give me two minutes.
EDIT: OTF, purchase # 3 here:
http://www.realoem.com/bmw/showparts...05&hg=13&fg=15
Then install it...and remove/delete # 4 from the diagram you posted.
This will make your life 1M times easier when you have to do work on the port (left) side of your engine...you will be able to remove your intake boot in seconds.
Last edited by bimmerfiver; 01-29-2012 at 10:28 PM.
"I'd smash that (Jennifer Connelly) like a failed coup in sub-Saharan Africa."
~Macktheknife in my epic Jennifer Connelly OT Thread
Member
Me too.Originally Posted by Julian

1. Remove the F connector.
2. Loosen the clamp that fixes the upper intake boot the the lower intake boot and disconnect the upper intake boot at that end.
3. Remove the MAF electrical connector.
4. Remove the bolt that secures the air box.
5. Remove the air box, MAF and upper intake boot as an assembly.
Steve
2001 530i/5 S+P CDV delete/Akebono ceramic pads/M5 SSK/RedLine MTL/M5 rear sway bar
BMWCCA Member #337964
Member
Thanks, you can learn a great tip even from the dumbest threads !
Nice, so Julian/Steve just leave the entire thing assembled:
Air box + MAF + Upper/#1 Intake Boot.
And you disconnect at the first of the 2 parallel hose clamps at that middle plastic connector piece....
I'll try it next time!
5er, what's the point of the resonator box?
Is this a common E39 delete?
Last edited by OnTheFence; 01-29-2012 at 11:14 PM.
E39 DIYs done: Wipers, O2 sensors , MAF , Upper/Lower Intake Boots , FSU , ABS module fix , Power Steering Reservoir , Changed Rear Differential Oil , DISA , SAP, Vacuum lines , Radar Detector Hardwire , Fuel Filter , LED Angel Eyes , Headlight Adjusters--> [1],[2], [3] , Headlight Polishing, Punted: Fan Clutch/Tensioner/Pulleys , Oil cap O-rings , Window regulator ,Crumbling Cowl
Member
i never remove MAF
just disconnect 2 boots , remove #4 and MAF electrical connector and take the whole plastic part out and lift it up
10 min
Last edited by champaign777; 02-22-2012 at 06:07 PM.
Member
The F connector is the fitting that attaches two vacuum hoses to the port in the upper intake boot. Check this link.
Also, I forgot to mention there is a hose clamp that secures the intake to a flexible hose that goes through the fender.
Last edited by Steve530; 01-29-2012 at 11:20 PM.
Steve
2001 530i/5 S+P CDV delete/Akebono ceramic pads/M5 SSK/RedLine MTL/M5 rear sway bar
BMWCCA Member #337964
Member
OTF, this procudure is about as difficult as "installing" OEM floormats or wiper arms.
It is a common delete and...what's the point of # 4, the resonator box? It's to quiet-down intake. You can search the Forum, it's commonspeak.
Remove/install intake box as you deem fit.
It's quite easy.
How often will you have to do it, right?
It's rare.
So leave it be and turn the page.
Next project.
Be happy...you were able to install the new intake tubing from the MAF to the Throttle Body. It's all good. Next project!
"I'd smash that (Jennifer Connelly) like a failed coup in sub-Saharan Africa."
~Macktheknife in my epic Jennifer Connelly OT Thread
Member
5er,
I didn't think it's difficult, but I just spent $30 replacing the upper/outer boot (that wasn't even bad), so it seems silly to turn around and toss the brand new boot for another one.
I will just try the other method of leaving the Airbox/resonator/MAF/upper boot chain intact, and removing from the 2 intake boot's connector piece. If that works easily, I'll just do that going forward.
Thanks for the intake boot DIY, 5er. I'm glad I did it.
E39 DIYs done: Wipers, O2 sensors , MAF , Upper/Lower Intake Boots , FSU , ABS module fix , Power Steering Reservoir , Changed Rear Differential Oil , DISA , SAP, Vacuum lines , Radar Detector Hardwire , Fuel Filter , LED Angel Eyes , Headlight Adjusters--> [1],[2], [3] , Headlight Polishing, Punted: Fan Clutch/Tensioner/Pulleys , Oil cap O-rings , Window regulator ,Crumbling Cowl
Member
Today, I finally tried the method where I remove airbox/resonator/upper boot all in 1 shot. Coming off, it sorta worked. However, it was impossible to put back on this way. I have no idea how you can reattach where the 2 boots meet while the airbox is seated. Impossible. I think part of the issue is that the upper boot is hitting the lower boot at a weird angle. It just would not seat all the way around.
So, I had to resort to detaching the resonator box AND loosening the hose clamp attaching the MAF to upper boot. This finally gave some rotational leeway which THEN allowed me to connect the 2 boots. This is a great tip, otherwise, the 2 boots just can't meet. For now, my resonator box has both attaching bolts removed.
No clue how you guys manage attaching this while it's all 1 unit (airbox/resonator/upper boot). It would have to hit the lower boot at the perfect angle. As you can see in the pic, mine was not this way without loosening the MAF & resonator box.

Last edited by OnTheFence; 02-22-2012 at 06:58 PM.
E39 DIYs done: Wipers, O2 sensors , MAF , Upper/Lower Intake Boots , FSU , ABS module fix , Power Steering Reservoir , Changed Rear Differential Oil , DISA , SAP, Vacuum lines , Radar Detector Hardwire , Fuel Filter , LED Angel Eyes , Headlight Adjusters--> [1],[2], [3] , Headlight Polishing, Punted: Fan Clutch/Tensioner/Pulleys , Oil cap O-rings , Window regulator ,Crumbling Cowl
Member
Comrade ,this is not a nightmare
Everything is difficult for the first time but when you do it 10 times it is really easy
We sure you can do it , the force will be with you
Last edited by champaign777; 02-22-2012 at 06:16 PM.
Member
I got rid of #4, because i take it apart so much.
I used a 1 1/2 pvc plug and a clamp to cover to hole. I
ts been 2 months and i can report that my car has a better sound now
and no problems at all =].
NEVER argue with an idiot, as he will make you stoop to his level of idiocy.
Member
How does it sound differently?
E39 DIYs done: Wipers, O2 sensors , MAF , Upper/Lower Intake Boots , FSU , ABS module fix , Power Steering Reservoir , Changed Rear Differential Oil , DISA , SAP, Vacuum lines , Radar Detector Hardwire , Fuel Filter , LED Angel Eyes , Headlight Adjusters--> [1],[2], [3] , Headlight Polishing, Punted: Fan Clutch/Tensioner/Pulleys , Oil cap O-rings , Window regulator ,Crumbling Cowl
BMWCCA 484984
He's talking about an Intake Silencer Delete.
Member
By the way, it took me about 20 minutes to remove the F-boot from the intake boot.
It was in there VERY tight.
I almost gave up on doing the DISA swap b/c of this roadblock.
I had to resort to digging in with a flathead screwdriver to finally get it to give way.
Does anyone ever grease this part before putting it back in?
If so, what kind of grease should I get?
I think I saw some "mayo" on this the last time I remove it, but now it's perfectly dry.
I put a few drops of motor oil on it before putting it back.
I'm going to get a few extras for $2/ea b/c I can easily see breaking this when trying to remove it.
Can anyone verify the part number? Where is it under realOEM?
This doesn't look right.
http://www.realoem.com/bmw/showparts...11&fg=45&hl=16
Last edited by OnTheFence; 02-22-2012 at 07:58 PM.
E39 DIYs done: Wipers, O2 sensors , MAF , Upper/Lower Intake Boots , FSU , ABS module fix , Power Steering Reservoir , Changed Rear Differential Oil , DISA , SAP, Vacuum lines , Radar Detector Hardwire , Fuel Filter , LED Angel Eyes , Headlight Adjusters--> [1],[2], [3] , Headlight Polishing, Punted: Fan Clutch/Tensioner/Pulleys , Oil cap O-rings , Window regulator ,Crumbling Cowl
Member
Yea, the diagram is wrong. 13 32 7 503 677 is the correct number.
And grease the F connector. It helps a little.
Last edited by Steve530; 02-22-2012 at 08:21 PM.
Steve
2001 530i/5 S+P CDV delete/Akebono ceramic pads/M5 SSK/RedLine MTL/M5 rear sway bar
BMWCCA Member #337964
Member
Part of me says, drive up and help this OnTheFence dude. I will ask him him, "What do you need done to your e39?" Then I will immediately duct tape him to his mailbox, do all the work on his car and leave a pair of scissors in the mailbox as I race outta there.
"I'd smash that (Jennifer Connelly) like a failed coup in sub-Saharan Africa."
~Macktheknife in my epic Jennifer Connelly OT Thread
Member
Ha.... Yes, it must be painful to read my posts....
Actually, 5er, I think most of my prev. maint work is done.
So, our quality time may be coming to a close... (until the real problems start, that is)

Previous owner
Valve Cover Gasket (88k)
Cooling System (90k)
Windshield Washer Pump (97k)
CPS (97k)
Battery (104k)
4 new Brakes/Rotors (105k)
CCV (108k)
Spark Plugs (109k)
Alternator (118k)
Oil Filter Housing Gasket (118k)
New Fan belts (118k)
Stuff I've done myself in 2 months (at 120k)
After not popping the hood of a car in 23 years, and owning no tools
2 Cabin Filters / Air Filter
O2 sensors
Mass air flow sensor (MAF)
FSU (AC/fan blower sensor)
Remanufactured ABS module
Cig. lighter fuse
New Wipers
Treat Rubber Weatherstripping Seals
TriFlow (Lube doors handles/locks)
Replace Both Intake Boots
Replace Power Steering Reservoir (and flush steering fluid)
Change Differential Fluid
Replace DISA
Replace SAP Valve
Replace 2 vacuum lines (SAP valve .& MAF/intake boot to fuel filter)
All I have left is:
Elusive fuel filter
Headlight Adjusters
I am going to have a shop change the tranny fluid for about $300
Crash the car into a brick wall while checking my cell phone.
Last edited by OnTheFence; 02-22-2012 at 10:34 PM.
E39 DIYs done: Wipers, O2 sensors , MAF , Upper/Lower Intake Boots , FSU , ABS module fix , Power Steering Reservoir , Changed Rear Differential Oil , DISA , SAP, Vacuum lines , Radar Detector Hardwire , Fuel Filter , LED Angel Eyes , Headlight Adjusters--> [1],[2], [3] , Headlight Polishing, Punted: Fan Clutch/Tensioner/Pulleys , Oil cap O-rings , Window regulator ,Crumbling Cowl
Member
Oh you wait my friend. Wait until you dig into your suspension, control arms, tie-rods and wheel bearings. You'll want me on that wall and need me on that wall as you talk about torque specs at your cocktail parties. Poor Demi Moore.
"I'd smash that (Jennifer Connelly) like a failed coup in sub-Saharan Africa."
~Macktheknife in my epic Jennifer Connelly OT Thread
Member
again dude
the only time you need to remove your F-boot from the intake boot is the time when you want to replace the intake boot
Member
Nah, that will all be farmed out to a pro. Out of my league. I have reached the end of the line. It's been a wonderful 2 months. I think I could try a brake job or something. Fan clutch? Fuel pump? Time will tell. I'm glad I came even this far. All thanks to this forum.
Really? I've had to remove the F-boot any time I've neeed to remove the intake hoses. How do you clean/replace the throttle body without removing the F-boot? Alternator? PS reservoir? DISA? Idle Control Valve? How do you do it? By removing the 2 hoses themselves? If so, I've never heard of anything saying they prefer that method.
Last edited by OnTheFence; 02-22-2012 at 09:32 PM. Reason: Automerged Doublepost
E39 DIYs done: Wipers, O2 sensors , MAF , Upper/Lower Intake Boots , FSU , ABS module fix , Power Steering Reservoir , Changed Rear Differential Oil , DISA , SAP, Vacuum lines , Radar Detector Hardwire , Fuel Filter , LED Angel Eyes , Headlight Adjusters--> [1],[2], [3] , Headlight Polishing, Punted: Fan Clutch/Tensioner/Pulleys , Oil cap O-rings , Window regulator ,Crumbling Cowl
Member
hoses are connected to the F-boot and F-boot is connected to the big intake boot and still you canReally? I've had to remove the F-boot any time I've neeed to remove the intake hoses. How do you clean/replace the throttle body without removing the F-boot? Alternator? PS reservoir? DISA? Idle Control Valve? How do you do it? By removing the 2 hoses themselves? If so, I've never heard of anything saying they prefer that method.
clean/replace the throttle body , Alternator , PS reservoir , DISA , Idle Control Valve and more
no need to remove this F-boot , just turn intake boot up and put it on the top of engine
telling you the only time you need to disconnect this F-boot is the time you want to replace the intake boot
GL
Last edited by champaign777; 02-22-2012 at 11:05 PM.
Member
Maybe this is different for a 540i, but for a 530i, the smaller vacuum hose doesn't reach that far.
Also, the method being discussed above entails keeping the entire thing as 1 unit (airbox/resonator/MAF/upper intake)
Do you really want to work with that giant mess sitting atop your engine?? I use that space to put down my tools!

Last edited by OnTheFence; 02-22-2012 at 11:55 PM.
E39 DIYs done: Wipers, O2 sensors , MAF , Upper/Lower Intake Boots , FSU , ABS module fix , Power Steering Reservoir , Changed Rear Differential Oil , DISA , SAP, Vacuum lines , Radar Detector Hardwire , Fuel Filter , LED Angel Eyes , Headlight Adjusters--> [1],[2], [3] , Headlight Polishing, Punted: Fan Clutch/Tensioner/Pulleys , Oil cap O-rings , Window regulator ,Crumbling Cowl
Member
dude
i have 3 M54 like your and i did it 10 times including my last 2003 530i Silver
just try it and ask for my paypal ( 10$ donation is highly appreciated taking in consideration the headache of removing and cracking your F-boot )
Last edited by champaign777; 02-23-2012 at 12:10 AM.
 Posting Permissions


 Reply With Quote


Bookmarks