
 Member
Well today I got started on my IE subframe bushings, and I didnt get too far due to a broken off subframe bushing stud. I was giving it a good turn with a breaker bar, but in the wrong direction.
Fortunately a new stud is rather cheap to get, but I dont know exactly what size the topmost hex part is, where you tighten it with a wrench... it looks like 25mm can anyone confirm?
Also, my IE bushings came with two large brass-colored washers. Do those go on top between the studs and the body?
Member
The washers are not required...but if you want to use them they go on the bottom.
You will notice the bushing has a section removed at one end to accommodate the HEX on the stud, therefore the washer goes on the other end.
Member
Thanks for the info SunzOut.
I feel like such an idiot for breaking that stud. Honestly, I've been wrenching on cars for many years... I just had an off day I guess.
License Revoked
Just got mine in the mail from IE a few days ago. I'll be attempting the install in a few weeks...Fairly straight forward job for a back yard mechanic?
I'll be doing some searches on here for sure...
Member
You guys realized you need a tool to remove the bushing from the subframe.
Dan "PbFut" Rose
Member
Subframe stud requires a 27mm socket that is at least 5" deep inside length.
Torque spec is critical here.
Last edited by Monolith; 12-19-2010 at 08:59 PM.
Member
Was your stud bent or damaged? I do not recall having to remove the mounting stud when I changed my bushings; the subframe just slid off them
Last edited by KBH22102; 12-19-2010 at 08:51 PM.
Kelvin
Member
I'm using this method/tool: http://forums.bimmerforums.com/forum....php?t=1389953Originally Posted by PbFut

Thanks, thats the exact info I need.
First one came off easy with the impact gun. The second one I snapped in half turning it the wrong way... and I hadn't even had my first beer yet.
Member
There's picture of what you might use in this thread.
Member
I've used the two-jammed-nuts method before for studs that were too long, and it works great. Thanks for the reminder.
Member
Be sure you have a backup. Gonna be a long day.
Dan "PbFut" Rose
Member
how many miles on the vehicle(s) when you start to replace the subframe bushings ?? what are the symptoms ? clunking noise ? bottom out like dead shocks ?etc ??
Member
Honestly my stockers are perfect, especially considering their age. But I'm an autocrosser and a track-day guy, and I know I need to do these (and a few other things) before I get out there and flog it. It's an ounce of prevention thing.
Last edited by Silberwald; 12-20-2010 at 09:38 PM.
Member
so Siberwald
what are you replacing in the rear ? rubber bushing ? etc
Member
Rear subframe bushings. In a nutshell, stiffening these up will reduce play and help prevent subframe tearout issues on a hard-driven z3/ti/e30.
Supporting Vendor
long day(z)
Member
Silberwald
Thanks for the explanantion on this subject but I think the real problem back in the early production days of the Z3 was that the metal being welded etc, the tolerances started to increase that possibly caused welding problems ( bad welded joints ). So if someone in production didn't adhere to the specs this could have caused problems in the vehicles down the road.
Of course " beating " the car puts more stresses on the vehicle ie. the subframe issues.
my 2 cents Sir ! Have fun driving ALL year round while mine is snoozing in the garage.
Member
From what I've read here and a few other places, the issue stems from the subframe connecting in three places like a wide triangle. Motion and play from the two side bushings puts pivot and pull on the the middle-most point - the single differential ear. With the poly bushings you make a small sacrifice of increased NVH in exchange for less play/strain on that middle pickup point.
RaninKonig....
i daily my car, but I also drive very spiritedly quite often. what material would you recomend i get in the subfram bushings for my habits? I wouldnt really care about a little extra noise but i dont want every bump to be an earful.
Member
BMW CCA Member
Shore 80A subframe bushings are stiffer then stock. 75D bushings are stiffer than 80As, nearly like solid metal bushings. 75ds are really for full race cars.
(so says the US Constitution. lol)
Last edited by osborni; 12-21-2010 at 01:49 PM.
- Ian
2000 M Coupe, stripped and DE prepped
46mm wheel bearing socket for rent - $30 deposit + $10 fee. PM for details.
Member
I'm not sure what the exact Durometer of the Ireland Engineering bushings are, though they are certainly stiffer than stock, and not a full-on race bushing. I chose them based on lots of testimonials here and their competitive Black Friday price.
Member
Silberwald
Thanks again for the explanation, I'll keep an eye for "issues" underneath !
Last edited by io14; 12-21-2010 at 02:11 PM. Reason: spelling
Member
Reporting back in with good news. The DIY tool for pulling bushings works!
Today I finally got time to get back to work on this. I miss driving my Z3 coupe so dearly...how quickly I've fallen in love with this car.
So here are some notes for anyone who is doing this down the road:
1.) I did not need to decouple the drive shaft or anything on the diff other that the main diff bushing bolt. I left the brakes in place too, but I was careful not to let the subframe or control arms droop enough to stress the rubber brake hoses. I DID pull the shock bolts, the sway bar bolts, driveshaft heat-shield, exhuast and spare.
2.) removing the exhaust and spare seems like a hassle, but it makes everything much easier to do...I'd say its mandatory
3.) Pry bars are your friend. Have a short one and a long one
4.) Lots of HEAT is required to get the bushings out, so get your bushing rig all set to pull then hit the bushing collar with a torch or heat gun until its super hot so that rubber is all mushy. Then start crankin away on your bushing rig.
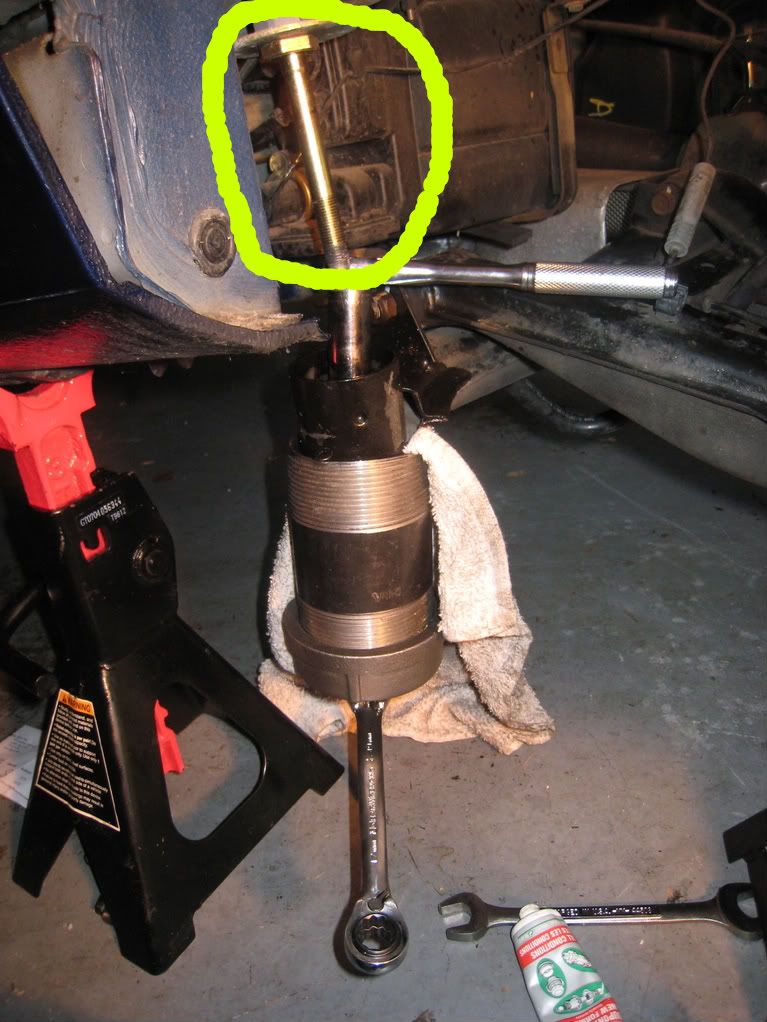
Finally here are some pics of my bushing puller rig. I got all the parts at Harbor Freight for less than $25 (on-sale and coupon prices). It is comprised of a pitman arm puller (get the bigger one) and a 2-arm jaw puller.
Take the screw-drive out of the pitman arm puller and machine it down to serve as a presser on the subframe bushing collar. I use a little Montgomery Ward bench grinder I got for $2.99 at a garage sale for this kind of thing. It doesnt take much more than patience, but you gotta wear some goggles and check it frequently as you go so you dont over-do it.
You use the jaw puller to pull on the metal-filled lip of the bushing. I found that the rounded edges of the claws on the puller can slip off the lip. If you grind them flat and scuffed up, they'll stick.
Positioning of the jaw puller claws is also critical. It takes some juggling to get it all in place. You want to have the claws deeply "flexed" inward and clamping downward slightly when you start, and as close as possible to being exactly straight across from each other at the widest point. As you turn them, they will bite deeper in and the arms will stretch out straight. This will allow them to balance out naturally so both sides have even pressure and angle.
Hopefully tomorrow or the next day I'll get the rest of it back together with the IE poly bushings in palce. My broken stud replacement went easy, as there was plenty of room to get at it with a regular old adjustable wrench, and the bushing was out of the way.
If anyone in the Austin, TX area needs to use these tools or have some help doing theirs, just hit me up.
Now I'm going to have a beer and a merry xmas.
---- Xmas Morning ----
Checking back in after the first-drive with the new IE bushings. I gotta say WOW the difference is substantial!
* NO MORE REAR FLOATY-NESS *
* NO MORE TRAM-LINING *
* At both low and high speeds. *
I guess those stockers were shot after all. I feel much more comfortable and confident in the Z3 now, especially on corners and lumpy or uneven roads. Also the only NVH I get is a little more of the typical clunk noise when I clutch in/out...the rest sounds the same (considering how loud my crap tires are lol)
I HIGHLY recommend this upgrade, but it is NOT a job to do alone if you are a beginner mechanic.
Last edited by Silberwald; 12-25-2010 at 02:05 PM. Reason: Automerged Doublepost
Gort! Klaatu barada nikto
I'm doing this during the long NH winter. Thanks for the post. I already have the tools you listed. Good Job.
2000 Z3 MCoupe, '01 LSB E46 M3, '99 GTI VR6, '06 Audi A4, Andrew '95 Avus M3
Member
Stay warm! and best of luck. Remember: Lots of heat and patient machining (about 1 hour total at the grinder in multiple trips) were more helpful than anything else.
 Posting Permissions


 Reply With Quote


Bookmarks